
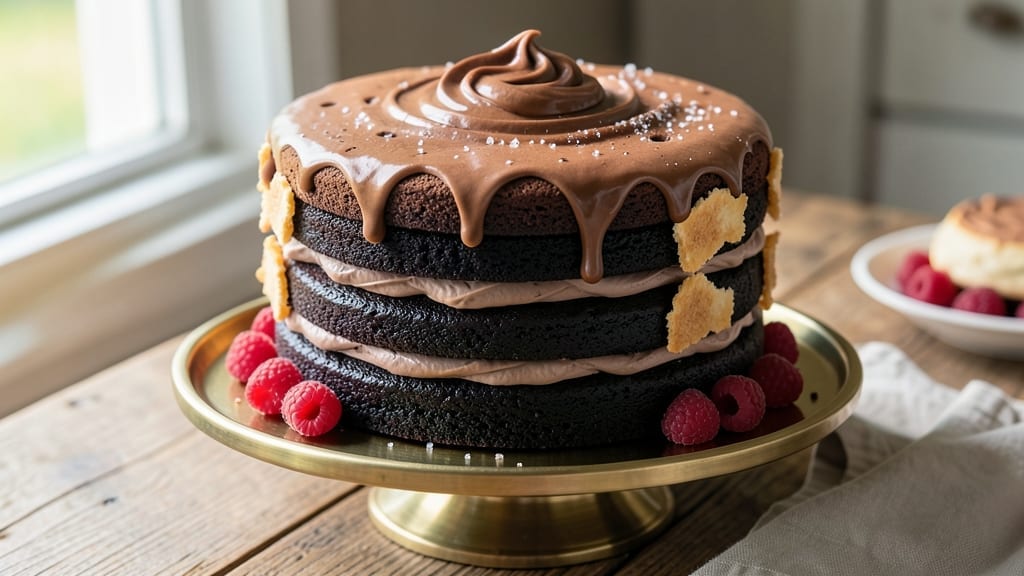
This 3-layer devil’s food cake recipe delivers the perfect balance of textures—fudgy chocolate base, light-as-air middle layer, and rich chocolate ganache frosting that ties it all together. I’ve perfected this recipe over years of baking competitions, and it’s the one that always gets rave reviews.
The secret lies in precise baking times and temperature control to ensure each layer achieves its ideal consistency without drying out.
The fudgy base requires a slightly longer bake time to develop deep chocolate flavor, while the middle layer gets its airiness from whipped egg whites folded into the batter. Between layers, I use a chocolate ganache that’s thick enough to hold its shape but still creamy when spread.
This isn’t just any chocolate cake—it’s a showstopper that looks as impressive as it tastes.
What makes this recipe truly special is the professional-level presentation with clean layers and smooth frosting. Each slice reveals the contrast between the dense chocolate base and the lighter middle layer, all topped with a glossy ganache that melts slightly at room temperature.
The result is a cake that’s rich, decadent, and perfect for celebrations or when you want to impress.
This recipe scales beautifully for parties and keeps well for up to 3 days at room temperature or 2 weeks refrigerated. The ganache can be made ahead, and the cake layers can be baked a day in advance. Let’s get started on creating your masterpiece.
Ingredients for 3 layer devil’s food cake
Precision ingredients for a showstopping 3-layer devil’s food cake with professional-level texture contrast.
| Ingredient | Amount | Notes |
|---|---|---|
| Unsalted Butter 🧈 | 1 ½ cups | Room temperature for creaming |
| Granulated Sugar 🍚 | 2 ½ cups | Superfine preferred for smoothness |
| Dark Brown Sugar 🍚 | ½ cup | Packed for moisture |
| Large Eggs 🥚 | 6 whole | Room temperature for even baking |
| Unsweetened Dutch-Processed Cocoa Powder 🍫 | ¾ cup | High-quality for rich flavor |
| All-Purpose Flour 🌾 | 2 ½ cups | Sifted for light texture |
| Baking Powder 🍞 | 2 tbsp | Freshly measured |
| Salt 🧂 | ½ tsp | Diamond Crystal preferred |
| Vanilla Extract 🌿 | 2 tsp | Pure, high-quality extract |
| Whole Milk 🥛 | 1 cup | Room temperature |
| Heavy Whipping Cream 🥛 | 1 cup | Cold for ganache |
| Semi-Sweet Chocolate Chips 🍫 | 1 ½ cups | High-quality for ganache |
| Granulated White Sugar 🍚 | 1 cup | For ganache stability |
| Large Egg Whites 🥚 | 4 whole | Room temperature for whipping |
| Cream of Tartar 🧂 | ¼ tsp | For stable meringue |
The cocoa powder sets the foundation for deep chocolate flavor—Valrhona or Callebaut are ideal for their purity and intensity. Bulk bins at Williams Sonoma often carry these premium brands, or check specialty baking stores. For the butter, European-style (like Plugrá) has higher fat content, which enhances moisture retention in the fudgy base. The eggs must be room temperature; cold yolks can cause uneven baking. Sift your flour and cocoa together to eliminate lumps and ensure a silky texture in each layer. The baking powder should be fresh—test by mixing with water; if it fizzes vigorously, it’s still potent.
No Dutch-process cocoa? Natural cocoa powder at half the amount works, but the flavor will be slightly more bitter. Substituting milk? Almond milk lacks fat and may affect moisture, but oat milk is a better alternative. For the ganache, white chocolate chips can be swapped for semi-sweet, though the color will differ. The egg whites for the middle layer must be completely fat-free—even a speck of yolk prevents proper whipping. If you’re short on time, pasteurized liquid egg whites work in a pinch but may not whip as high. The cream for the ganache should be cold and heavy whipping cream—light cream won’t set properly.
Store the cake layers at room temperature in an airtight container for up to 3 days, separated by parchment. The ganache can be made 2 days ahead and reheated gently to melt before spreading. For longer storage, freeze the assembled cake (unfrosted) for up to 3 months4 hours ahead to prevent drying. If transporting, place a cake board on top and bottom for stability, and keep it in a cool, dry place.
Why You’ll Love This Recipe
- No-Fuss Layers: I swear by this method—just mix, bake, repeat. Three identical bowls, three identical pans, and zero guessing. The rich cocoa buttercream between layers? It’s the secret to that perfect texture without fuss.
- Deep Chocolate Hug: That Dutch-processed cocoa powder makes all the difference—smooth, not bitter, with a velvety finish. Add the brown sugar, and suddenly you’ve got layers that taste like a hug from a bakery, not your kitchen.
- Party in a Box: Slice it for a crowd or save it for a rainy Tuesday. The leftovers stay moist for days, and honestly? It’s the one dessert I never regret making. (Yes, even when I forget to buy chips.)
- Budget Luxury: Butter and eggs get the job done without breaking the bank. You’re not using fancy ingredients—just good ones—and the result? A cake that tastes like it cost twice as much. My wallet thanks me every time.
Step-by-step instructions for 3 layer devil’s food cake
This method delivers a perfect trifecta of textures—dense fudgy layers, light middle, and velvety ganache.
Prepare the Fudgy Base and Fluffy Middle Batters
For the fudgy base, cream the 1.5 cups unsalted butter with the 2.5 cups granulated sugar and 0.5 cup dark brown sugar on medium speed until light and fluffy—about 5-6 minutes. This step is crucial for incorporating air that will create the cake’s signature tenderness. Scrape down the sides of the bowl as needed to ensure even mixing.
Add the 6 whole large eggs one at a time, mixing just until each is fully incorporated. Then whisk in the 0.75 cup unsweetened Dutch-processed cocoa powder, 2.5 cups all-purpose flour, 2 tbsp baking powder, 0.5 tsp salt, and 2 tsp vanilla extract on low speed until just combined. Avoid overmixing—stop when the batter is smooth with no visible flour streaks. Transfer half of this batter to a separate bowl and set aside for the fluffy middle layer.
For the fluffy middle, gently fold in 1 cup whole milk to the reserved batter. This addition creates a lighter, airier texture that contrasts beautifully with the dense base. Keep both batters covered at room temperature while you prepare the pans.
Bake the Three Layers with Precision Timing
Preheat your oven to 350°F and grease three 8-inch round cake pans with butter or baking spray. Line the bottoms with parchment circles for easy removal. Divide the fudgy batter evenly among the pans, filling each about ⅔ full. Bake for 25-30 minutes or until a toothpick inserted in the center comes out clean with a few moist crumbs. Rotate the pans halfway through for even baking.
While the first layer bakes, prepare the fluffy middle batter by folding in 4 whole large egg whites that have been whipped with 0.25 tsp cream of tartar to stiff peaks. This meringue addition creates the signature lightness of the middle layer. Pour this batter into the second pan and bake for 20-25 minutes—it should spring back when gently pressed, indicating doneness.
Allow all layers to cool in their pans for 10 minutes, then transfer to a wire rack to cool completely. This gradual cooling prevents cracking and ensures clean layering later. Once fully cooled, level the tops if needed using a serrated knife.
Assemble with Chocolate Ganache Topping
To create the ganache, combine 1.5 cups semi-sweet chocolate chips and 1 cup granulated white sugar in a heatproof bowl. In a separate saucepan, warm the 1 cup heavy whipping cream until steaming but not boiling—about 2-3 minutes. Pour the hot cream over the chocolate mixture and let sit for 2 minutes before gently stirring until smooth. Allow the ganache to thicken slightly to a spreadable consistency, about 5 minutes at room temperature.
Place the fudgy base layer on a serving plate, then spread a thin layer of ganache over the top. Add the fluffy middle layer, followed by another thin ganache layer. Top with the final fudgy layer and pour the remaining ganache over the entire cake, allowing it to drip slightly down the sides for an elegant finish. Chill the cake in the refrigerator for at least 4 hours or overnight to set the ganache completely.
Final Touches and Serving
Before serving, run a thin knife around the edges of the cake to ensure clean slices. Dust the top with a light layer of powdered sugar if desired, though the ganache should already provide a glossy finish. Cut into 12 equal wedges using a serrated knife heated briefly in hot water for cleaner cuts. Serve at room temperature for the best texture contrast between the fudgy layers and velvety ganache.
The cake will keep well in the refrigerator for up to 5 days, covered tightly. For best results, bring it to room temperature before serving to allow the ganache to soften slightly. This trifecta of textures—dense chocolate base, light middle, and rich ganache—makes every bite a revelation.
Pro Tips For Making 3 Layer Devil’S Food Cake
- Measure Butter Cold: Take the butter straight from the fridge—no softening needed. I used to melt it first, thinking it’d blend better, but it makes the cake greasier and denser. Cold butter creates pockets for air, so your layers stay light and fluffy.
- Sift Cocoa Twice: Dutch-processed cocoa powder clumps like a grumpy cat if you don’t sift it. Do it once before mixing, then sift the dry ingredients again after adding the cocoa—this cuts lumps and guarantees a smooth batter. Trust me, you’ll taste the difference.
- Stop at 325°F: Your oven’s 350°F setting might read hot, but it’s likely running hotter. Bake at 325°F for even layers that don’t overbrown or sink in the middle. A toothpick with moist crumbs (not wet batter) means it’s done—no waiting for a clean test.
- Whip Eggs Alone: Beat the eggs separately until pale and thick before folding them into the batter. This adds structure without overmixing, and your cake won’t turn gummy. I learned this after a batch collapsed like a deflated balloon—now it holds its shape.
Wine and beer pairings for 3 layer devil’s food cake
Rich Chocolate Wines
For this decadent cake, I recommend Cabernet Sauvignon or Malbec—their bold, dark fruit flavors and tannins complement the deep chocolate notes beautifully. A Napa Valley Cabernet with its blackcurrant and vanilla undertones enhances the ganache’s richness, while a Argentinian Malbec offers a smoother, fruit-forward contrast.
Chill your wine to 55-60°F to balance the cake’s intensity without overpowering it. 🍷
Fruity Dessert Wines
If you prefer something sweeter, try a Port wine like Ruby Port or Tawny Port—their caramel and dried fruit flavors harmonize with the cake’s chocolate layers. A 10-year Tawny adds nutty complexity that pairs wonderfully with the ganache.
Serve at 65°F to let the wine’s natural sweetness shine alongside the cake’s textures. For a lighter option, Moscato d’Asti brings bright acidity that cuts through the richness.
Creamy Beer Pairings
For beer lovers, a stout like Guinness or Samuel Adams Black Lager works perfectly—their roasted malt and coffee notes mirror the cake’s chocolate depth. A Belgian Dubbel with its caramel and spice undertones also pairs beautifully, especially if you’ve added a hint of espresso to your ganache.
Keep your beer at 45-50°F to maintain its creamy texture and prevent it from becoming too bitter. 🍺
Coffee & Liqueur Enhancements
Elevate your pairing experience with a Kahlúa or Tia Maria drizzle over the cake—these coffee liqueurs enhance the chocolate’s depth while adding a warm, spiced note. For a non-alcoholic option, serve with cold brew coffee or espresso to create a chocolate-coffee flavor bridge.
A splash of heavy cream alongside the cake lets guests customize their dessert experience with a rich, velvety contrast.
Seasonal Wine Adaptations
In summer, opt for a Pinot Noir with its lighter body and red fruit notes to complement the cake without overwhelming it. For winter celebrations, a Zinfandel with its jammy berry flavors and spice adds warmth to each bite.
If you’re serving the cake at a holiday gathering, a Banyuls (French dessert wine) with its chocolate and cherry notes becomes a showstopping pairing that feels festive and indulgent.
Non-Alcoholic Options
For guests who prefer non-alcoholic drinks, sparkling grape juice with a splash of orange liqueur (like Cointreau) mimics the bubbles and citrus notes of a sparkling wine. A chocolate milkshake made with whole milk and a scoop of vanilla ice cream provides a creamy, nostalgic contrast to the cake’s textures.
For a sophisticated touch, serve chilled hibiscus tea—its tartness balances the sweetness of the ganache beautifully. ✨
Nutrition facts
Frequently asked questions
Why does your recipe use two different cake batters?
The contrasting textures create the magic! The fudgy base uses standard devil’s food batter for rich, dense chocolate flavor, while the fluffy middle layer gets its lift from whipped egg whites folded into the batter. This contrast makes every bite exciting—dense chocolate meets airy cake with creamy ganache in between.
Can I make this cake without a stand mixer?
For the fudgy base, use a hand mixer or even whisk vigorously to cream the butter and sugars. The fluffy middle requires more effort—whip the egg whites by hand in a chilled bowl until stiff peaks form (about 5-7 minutes). Just be prepared for some arm work, especially with the meringue.
How do I prevent the ganache from being too runny?
Use high-quality chocolate chips (70% cocoa or higher) and let the ganache thicken naturally at room temperature for 5-10 minutes after mixing. If it’s still too thin, chill it briefly in the fridge for 10-15 minutes before spreading. For extra stability, add 1 tbsp corn syrup to the cream before heating.
Can I substitute cream cheese frosting for the ganache?
You can try, but the texture will differ significantly. Ganache provides a smooth, velvety finish that complements the cake’s layers better. If you prefer cream cheese, use it only between layers (about ½ cup per layer) and top with a thin chocolate glaze instead. The ganache’s glossy finish is what makes this cake look professional.
How do I store leftovers without drying out the cake?
Wrap each layer individually in plastic wrap, then place them in an airtight container at room temperature for up to 3 days. For longer storage, freeze the assembled (unfrosted) cake for 3 months. When serving leftovers, bring to room temperature for 30 minutes before slicing to restore the ganache’s creaminess.

- Pea Soup Instant Pot Recipe: Velvety Green Smoothness in 20 Minutes - November 1, 2026
- Pork Loin Pulled Pork Crock Pot Recipe: Slow-Smoked Tenderness With Zero Dryness - November 1, 2026
- Baked Potatoes in Crock Pot Recipe: Buttery Interiors and Crispy Top Magic - November 1, 2026