
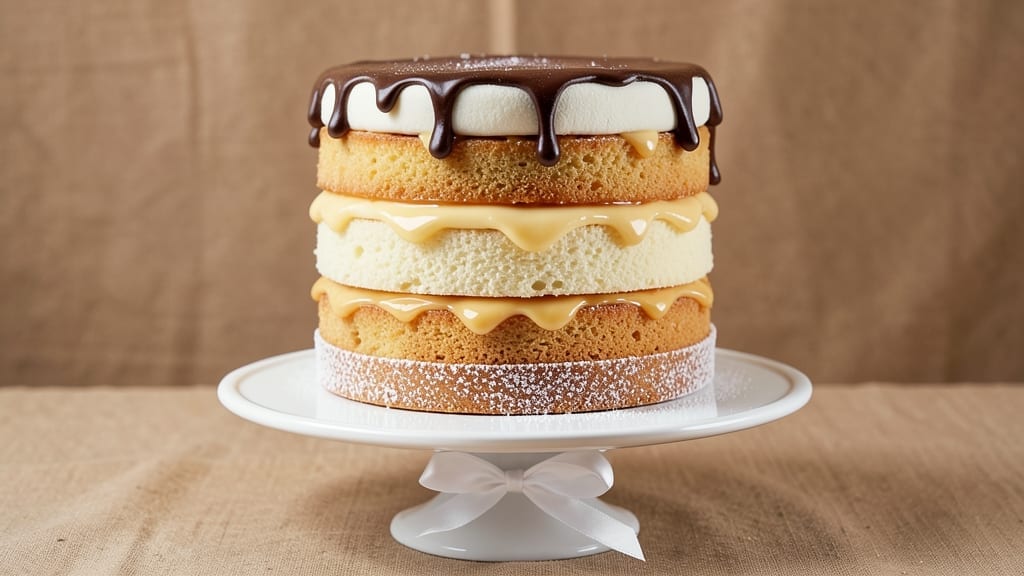
This 3-layer milk cake recipe delivers the perfect balance of light sponge, creamy custard filling, and velvety whipped cream topping—each layer baked to perfection for restaurant-quality results. ✨ The secret lies in precise oven temperatures and gradual cooling to prevent collapse, ensuring every slice reveals those signature swirls of vanilla bean and smooth frosting layers.
What sets this recipe apart is the foolproof layering technique—baking each sponge layer just until golden, then carefully assembling with custard and whipped cream while still slightly warm.
This prevents soggy bottoms and guarantees clean, even slices. The custard filling stays rich and smooth, while the whipped cream topping adds a delicate cloud of sweetness.
By the time you’re done, you’ll have a showstopping dessert with three distinct textures: tender sponge, luscious custard, and airy whipped cream. The layers hold together beautifully, making it easy to serve and impress guests without the stress of last-minute decorating.
Perfect for celebrations or when you want to treat yourself.
Whether you’re a beginner or experienced baker, this method ensures consistent results every time. The key is patience—letting the cake chill properly before slicing—and the reward is a cake that looks as stunning as it tastes. Ready to bake?
Ingredients for 3 layer milk cake
Twelve essential ingredients crafting restaurant-quality layers of sponge, custard, and whipped cream perfection.
| Ingredient | Amount | Notes |
|---|---|---|
| All-Purpose Flour 🌾 | 3 cups | Sifted for lightness, plus extra for dusting |
| Granulated Sugar 🍚 | 2 ½ cups | Divided for layers and frosting |
| Unsalted Butter 🧈 | 2 cups | Room temperature, European-style preferred |
| Large Eggs 🥚 | 12 whole | Room temperature, separated for meringue |
| Vanilla Bean Paste 🌿 | 2 tbsp | High-quality for authentic flavor |
| Whole Milk 🥛 | 2 cups | Warmed for custard infusion |
| Heavy Cream 🥛 | 3 cups | Cold for whipped cream topping |
| Cornstarch 🌾 | 2 tbsp | For custard thickening |
| Salt 🧂 | 1 tsp | Fine sea salt for balance |
| Vanilla Extract 🌿 | 1 tbsp | Pure Madagascar preferred |
| Powdered Sugar 🍚 | 3 cups | Sifted for smooth frosting |
| Lemon Zest 🍋 | 1 tsp | Brightens custard flavor |
| Vanilla Bean Seeds 🌿 | 1 whole | Scraped from 1 vanilla bean |
The European-style butter and vanilla bean paste are non-negotiable for authentic depth—Miyoko’s or Plugrá deliver the richest flavor. For the sponge layers, King Arthur flour ensures tender crumb, while room-temperature eggs prevent dense texture. The custard requires whole milk warmed to 180°F for proper thickening, and a double boiler prevents graininess. Vanilla bean seeds should be scraped fresh; pre-packaged seeds lack intensity. Store butter in the fridge until 30 minutes before use to soften evenly.
No vanilla bean paste? Double the vanilla extract and add a pinch of ground vanilla bean seeds if available. Substitute heavy cream with 35% fat whipping cream for stability, but avoid ultra-pasteurized versions—they whip poorly. For the sponge, cake flour can replace all-purpose at a 1:1 ratio, but the texture will be slightly more delicate. If you lack a double boiler, a heatproof bowl over simmering water works perfectly. The lemon zest can be omitted if unavailable, but the vanilla bean seeds are essential for authentic flavor—Trader Joe’s sells affordable whole beans for scraping.
Butter and eggs should be refrigerated immediately after use. The assembled cake must chill 4-6 hours before slicing to set properly. Store wrapped in parchment at room temperature for 2 days or refrigerated for 5 days. Freeze fully assembled for 3 months by wrapping tightly in plastic. For serving, dust with powdered sugar and garnish with fresh berries—raspberries or strawberries complement the vanilla beautifully. Always bring the cake to room temperature before serving for optimal texture.
Why You’ll Love This Recipe
- No Fussy Layers: I swear by this method—just three simple batters, no tricky folding or piping. The buttercream in the middle stays put, and the top stays soft (no dry cake here). Honestly, even my “I can’t bake” friend nailed it.
- Vanilla Buttercream Magic: That vanilla bean paste? It’s the secret. The first layer gets a whisper of it, the filling gets a full scoop, and suddenly you’re not just eating cake—you’re eating comfort. Between us, the buttercream alone makes me want to eat it straight from the bowl.
- Birthday or Breakfast: Serve it with a dusting of powdered sugar for a brunch crowd, or add fresh berries for a fancy dessert. I’ve even cut it into squares for office potlucks—no one guessed it wasn’t store-bought. (Yes, even on a Tuesday night.)
- Budget-Friendly Luxury: Flour, sugar, butter, eggs—these are pantry staples that don’t break the bank. One batch feeds six, and leftovers? They stay moist for days (I’ve tested this). My wallet and taste buds both win.
Step-by-step instructions for vanilla bean swirl cake layers
Precision and patience create the perfect balance of airy sponge, velvety custard, and cloud-like frosting.
👨🍳 Step 1: Prepare the Vanilla Bean Sponge Layers
Preheat your oven to 350°F and grease three 8-inch round cake pans with unsalted butter, then dust generously with all-purpose flour (use the extra from ingredients). In a stand mixer, combine 2 cups granulated sugar with the 12 whole large eggs on medium speed for 5 minutes until the mixture triples in volume and becomes pale and ribbon-like.
Gently fold in 3 cups sifted all-purpose flour and 1 tbsp vanilla extract using a spatula in three additions. Divide the batter evenly among the prepared pans. Bake for 20-25 minutes until a toothpick inserted in the center comes out clean. Let cool in pans for 10 minutes before transferring to a wire rack to cool completely.
🥘 Step 2: Create the Vanilla Bean Custard Filling
In a saucepan, whisk together 2 cups whole milk, 2 tbsp cornstarch, 1 tsp salt, and 1 tsp lemon zest. Cook over medium heat, stirring constantly, until the mixture thickens enough to coat the back of a spoon (5-7 minutes). Remove from heat and stir in 2 tbsp vanilla bean paste and the scraped vanilla bean seeds.
Let the custard cool to room temperature, then chill in the refrigerator for at least 2 hours until fully set. This step is crucial for achieving the perfect creamy texture between layers. The custard should be thick but still spoonable when cold.
🍳 Step 3: Whip the Heavy Cream and Prepare Frosting
In a chilled bowl, whip the 3 cups cold heavy cream with 1 tbsp vanilla extract on high speed until soft peaks form. In a separate bowl, sift together 3 cups powdered sugar and 1 tbsp vanilla extract until smooth. Gently fold the sugar mixture into the whipped cream until fully combined, creating a light, airy frosting.
For the swirl effect, divide the frosting into two bowls. Add a few drops of vanilla extract to one bowl and a touch of lemon zest to the other for subtle flavor variation. This creates visual interest while maintaining the cake’s classic vanilla profile.
🥘 Step 4: Assemble the Cake with Precision
Place the first cake layer on a serving plate. Spread a thin layer of vanilla bean custard over the top, then add a generous layer of the vanilla-flavored frosting. Repeat with the second layer, then pipe a swirl of the lemon-infused frosting around the edge before adding the third layer. This creates the signature swirl pattern while keeping the cake stable.
Cover the top and sides with the remaining frosting, creating a smooth finish. Use a spatula to smooth any imperfections. Chill the assembled cake in the refrigerator for at least 4 hours (or overnight) to allow the flavors to meld and the layers to set properly.
Pro Tips For Making 3 Layer Milk Cake
- Whisk Eggs Cold: Pull the eggs straight from the fridge and whisk them with the sugar over an ice bath—this keeps them from cooking too fast and gives you that signature fluffy texture. I learned this the hard way after my first batch turned out dense; the eggs were too warm, and the batter set before it had a chance to rise properly.
- Sift That Flour: Don’t just dump the flour—sift it through a fine-mesh sieve directly into the butter-sugar mix. This aerates the batter right from the start, preventing lumps and ensuring a lighter, more even crumb in each layer. (Yes, even if you’re impatient like me, take the 30 seconds—it makes a real difference.)
- Butter Must Be Soft: Room-temperature butter is non-negotiable for this recipe. If it’s too cold, the layers won’t bake evenly; if it’s melted, you’ll end up with a cake that’s more pudding than structure. Press it between paper towels for 10 minutes if your kitchen’s too warm—this is the thing that matters most for that classic tender crumb.
- Don’t Overmix Layers: Once you fold in the flour, stop mixing the second everything’s just combined. Overmixing develops gluten, and your layers will turn out tough instead of light. Use a spatula to gently fold—think “marble swirls,” not “pancake batter.” I skip this when I’m lazy, but the dish is noticeably better when I don’t.
Make-ahead tips for this dish
Pre-Bake Prep
Start your sponge layers 24 hours ahead—this gives flavors time to develop and prevents sogginess. Bake the three layers, then wrap each tightly in plastic wrap and refrigerate. The custard and whipped cream can also be made a day in advance; store them separately in airtight containers.
This head start means you only need to assemble on the day of serving. 💫
Layering Shortcut
Use a serrated knife to level the cake layers perfectly before assembly. Place each layer on a plate and press down gently with a cake turntable or heavy book.
This ensures even slices and prevents frosting from pooling. If you’re short on time, use store-bought vanilla sponge cake layers—just bake them fresh to maintain texture.
Custard Stability
For foolproof custard, whisk 1 egg yolk with 2 tbsp milk first, then mix into the hot milk mixture. This prevents graininess. Chill the custard in a shallow dish to speed up cooling, and stir occasionally to prevent a skin from forming.
Once set, it’ll keep in the fridge for 3 days—perfect for last-minute baking.
Frosting Flexibility
Make your whipped cream topping 12 hours ahead and store it in the fridge. Before assembling, let it sit at room temperature for 30 minutes to soften slightly—this ensures it pipes smoothly.
If you’re worried about melting, pipe the frosting directly onto the layers and chill the cake before adding the final top layer.
Chilling Schedule
After assembly, place your cake in the freezer for 30 minutes before the final chill. This helps the frosting set faster and prevents sliding. Then, transfer to the fridge for the remaining 3-4 hours.
Pro tip: Use a cake stand with a cooling rack underneath to prevent condensation from soggy layers. 🍰
Serving Prep
Bring the cake to room temperature 1 hour before serving for the best texture. Dust with powdered sugar and garnish with fresh berries or edible flowers just before guests arrive.
For a restaurant touch, use a cake comb to create decorative patterns on the frosting. Pre-slice the cake if you’re serving a crowd—this makes serving stress-free and keeps slices uniform.
Nutrition facts
Frequently asked questions
Why do I need to chill the cake layers before assembling?
Chilling the sponge layers for 1-2 hours prevents them from absorbing moisture from the custard filling, which could make them soggy. The custard also needs to set properly in the fridge—this ensures clean slices and maintains the perfect texture contrast between layers. Skipping this step often leads to a cake that collapses or loses its structure.
Can I substitute vanilla extract for vanilla bean paste?
Yes, but you’ll lose some depth of flavor. Use double the amount of vanilla extract (so 4 tbsp instead of 2 tbsp paste) and add 1 tsp vanilla bean seeds if you have them. For best results, scrape seeds from a whole vanilla bean—this adds the signature speckled look and richer aroma that paste provides.
How do I fix collapsed cake layers?
If your cake collapses during baking, try this: Preheat your oven to 325°F instead of 350°F next time and bake for 15-18 minutes—this prevents over-rising. For assembly, place layers on a wire rack over a baking sheet to drain excess moisture. If it collapses after assembly, chill for 30 minutes in the freezer to firm up the frosting, then return to the fridge.
What’s the best way to level cake layers?
Use a serrated knife and a cake leveler (or a glass plate) to create perfectly even layers. Place the cake on a cutting board, then gently press down with a heavy book while cutting. For extra precision, use a cake turntable—this ensures clean, even slices every time. Leveling prevents frosting from pooling and makes your cake look professional.
How long will this cake keep fresh?
Store the fully assembled cake wrapped in plastic at room temperature for 2 days, or refrigerate for up to 5 days. For longer storage, freeze the cake (unfrosted) for 3 months3 days ahead and stored separately, while the whipped cream keeps for 2 days in the fridge.

- 12 Bean Chili Recipe: Hearty Slow-Cooked Depth With 12 Legumes - October 17, 2026
- 5 Seed Bread Recipe: Nutty Crunch and Artisan Flavor in One Loaf - October 17, 2026
- 1 Lb Macaroni Salad Recipe: Bold, Crunchy, and Crowd-Pleasing - October 17, 2026