
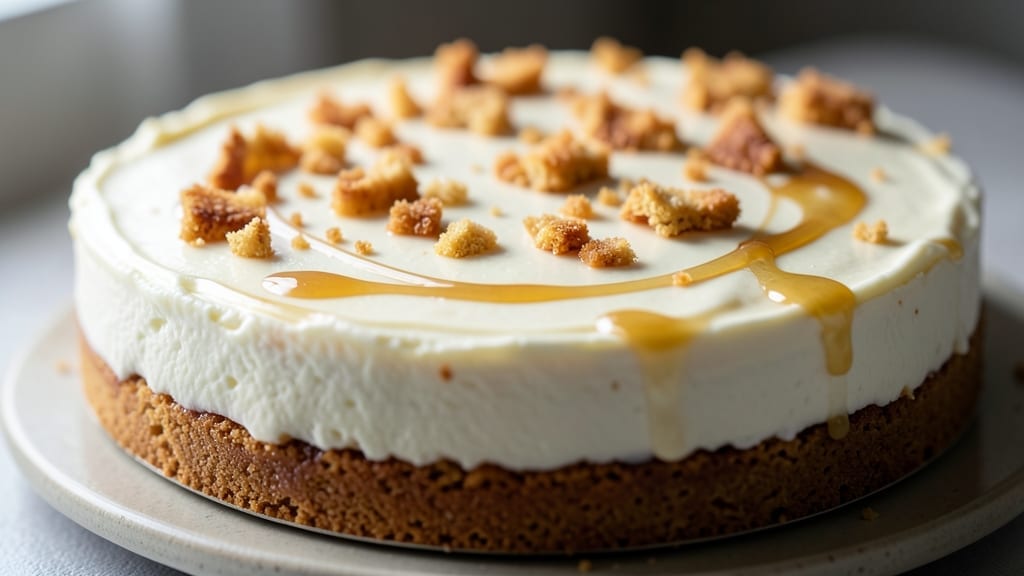
A 1-pound cream cheese cheesecake recipe that delivers a no-bake, silky-smooth center is the perfect solution for those who crave rich, creamy dessert without the hassle of baking.
This recipe combines a buttery graham cracker crust with a velvety cream cheese filling that stays perfectly set at room temperature, making it ideal for special occasions or last-minute gatherings.
The secret lies in precise measurements and chilling time, ensuring a texture that’s both firm enough to slice and tender enough to melt in your mouth.
What sets this recipe apart is its simplicity—just five key ingredients and 30 minutes of prep time, followed by 4 hours of chilling.
The crust is made with graham crackers and melted butter for a sturdy base, while the filling combines cream cheese, sweetened condensed milk, and a touch of vanilla for that classic cheesecake flavor.
No water bath or oven required, so you can enjoy a restaurant-quality dessert without the risk of cracks or overbaking.
By the time you’re ready to serve, you’ll have a smooth, creamy cheesecake with a clean slice and no messy crumbs. The texture is rich and velvety, with a subtle sweetness that balances the buttery crust perfectly.
This recipe is foolproof for beginners but impressive enough for any dessert lover—ideal for holidays, potlucks, or just treating yourself.
Pair it with fresh berries, a drizzle of caramel, or a dusting of powdered sugar for an extra touch of elegance. The best part? It keeps well in the fridge for up to 5 days**, so you can make it ahead and enjoy it whenever the craving strikes.
Let’s get started on creating your perfect no-bake cheesecake.
Ingredients for 1 pound cream cheese cheesecake
Five simple ingredients transform into a restaurant-quality no-bake cheesecake with velvety perfection.
| Ingredient | Amount | Notes |
|---|---|---|
| Full-Fat Cream Cheese 🧀 | 16 oz | Room temperature for blending |
| Sweetened Condensed Milk 🥛 | 14 oz | Standard 14 oz can |
| Pure Vanilla Extract 🌿 | 1 tbsp | High-quality, not imitation |
| Graham Crackers 🍪 | 1 ½ cups | Crushed into fine crumbs |
| Unsalted Butter 🧈 | ½ cup | Melted, cooled slightly |
The cream cheese is non-negotiable here—Philadelphia brand is my go-to, but any full-fat, high-quality block works. Grab the 16 oz tub from the dairy aisle, not the single-serving packs. For the condensed milk, Hershey’s or Eagle Brand are reliable, but check the expiration date—old cans lose sweetness. The graham crackers? Honey Maid or Keebler are standard, but any sturdy graham works. Just crush them finely—no big chunks in the crust. Pro tip: toast the crumbs briefly with the melted butter for extra flavor.
No vanilla extract? Vanilla bean paste works beautifully, or scrape seeds from a pod. Short on butter? Coconut oil melts smoothly, though it has a slight coconut taste. The condensed milk can be swapped for equal parts heavy cream + powdered sugar, but texture might shift slightly. For a richer filling, add 2 tbsp sour cream to the cream cheese mix. The crust can be made ahead and stored in the fridge for 2 days—just press it firmly into the pan before adding filling.
This cheesecake needs 4 hours of chilling for perfect set—no rushing! Cover it loosely with plastic wrap to prevent a skin from forming. Once set, it keeps in the fridge for 5 days (as promised), or freeze portions for 3 months. For serving, run a hot knife through the center to get clean slices. Pair with fresh raspberries or caramel drizzle—trust me, it’s worth the extra minute.
Why You’ll Love This Recipe
- No Mixing Madness: I swear by this—just fold the cream cheese and condensed milk until smooth. No stand mixer, no stress. The graham cracker crust? Crush them, melt the butter, press, and call it done. That’s it. (Yes, even on a Tuesday night.)
- Silky Smooth Magic: The secret’s in the fat. Full-fat cream cheese and condensed milk create this unreal texture—creamy but with just enough structure to hold a spoon. Add a splash of vanilla, and suddenly you’ve got dessert that tastes like a hug from a bakery.
- Party in a Pound: This is my go-to for gatherings because it’s perfectly portioned—one pound means no waste, no leftovers sitting around. Serve slices at book club, potlucks, or even as a “just because” treat. (Pro tip: Top with berries for instant wow factor.)
- Budget-Friendly Luxury: Honestly, this costs next to nothing but tastes like a splurge. Graham crackers, butter, and cream cheese? Pantry staples. The condensed milk cuts sugar costs while keeping it rich. And since it’s small, you’re not committing to a giant cake—just pure, creamy satisfaction.
Step-by-step instructions for no-bake cream cheese cheesecake
This no-bake cheesecake delivers a silky center every time—no oven required!
Melt the Butter and Prepare the Crust
In a small saucepan, melt the 0.5 cup unsalted butter over low heat until completely liquid—watch carefully so it doesn’t brown. While the butter melts, crush the 1.5 cups graham crackers into fine crumbs using a food processor or rolling pin. The crumbs should resemble coarse sand for an even, sturdy crust.
Transfer the crushed graham crackers to a mixing bowl and stir in the melted butter until evenly combined. The mixture will look like wet sand. Press this firmly into the bottom of a 6-inch springform pan, using the back of a spoon to create an even, compact layer. Chill in the refrigerator while you prepare the filling—this prevents crumbling when you add the cheesecake layer.
Blend the Cream Cheese and Condensed Milk
Using an electric mixer on low speed, beat the 16 oz full-fat cream cheese in a large mixing bowl until completely smooth—no lumps should remain. This step is crucial because cold cream cheese blends unevenly. Gradually add the 14 oz sweetened condensed milk while mixing on medium speed. The mixture will thicken slightly as it combines, creating a rich, velvety base.
Here’s the thing—don’t rush this blending process. The cream cheese needs to incorporate fully with the condensed milk to prevent graininess in your final cheesecake. Once fully combined, scrape down the sides of the bowl with a spatula to ensure even mixing. The batter should be thick but pourable, with a smooth, satiny texture.
Fold in Vanilla and Pour Over Crust
Add the 1 tbsp pure vanilla extract to the cream cheese mixture and stir gently with a spatula until fully incorporated. The vanilla enhances the natural sweetness of the condensed milk while adding depth to the flavor profile. Pour this mixture evenly over the chilled graham cracker crust in the springform pan, spreading it out to create an even layer.
Real talk: Don’t overfill the pan—leave about ½ inch of space at the top. This allows for proper chilling and prevents spillage when you remove the springform later. Tap the pan gently on the counter a few times to eliminate any air bubbles that may have formed on the surface. Smooth the top with a spatula for a flawless finish.
Chill Until Firm
Cover the springform pan tightly with plastic wrap and refrigerate for at least 4 hours, or until the cheesecake is completely set. This chilling time is non-negotiable—rushing it results in a runny center that won’t hold its shape. For best results, I recommend chilling overnight, which allows the flavors to meld beautifully and creates that perfect silky texture.
To test doneness, insert a toothpick into the center. If it comes out clean with no wet batter clinging to it, your cheesecake is ready. If not, return it to the refrigerator for another 30-60 minutes. Once set, run a knife around the edge to loosen it from the pan before releasing the springform. Serve chilled with fresh berries or a drizzle of caramel for an elegant touch.
Pro Tips For Making 1 Pound Cream Cheese Cheesecake
- Whip Cream Cheese Slow: I used to blast the mixer at high speed, and half the time, the cheesecake filling ended up grainy. Instead, start on low and gradually increase speed—stop when it’s smooth but still slightly thick. The condensed milk will thin it out later, but this step guarantees a silky texture without lumps.
- Chill Condensed Milk First: Sweetened condensed milk is thick and stubborn. Pop the can in the fridge for 10 minutes before mixing—it blends into the cream cheese like a dream instead of fighting you. (Yes, even if you’re impatient like me.)
- Press Crust Firmly: The graham cracker crust is the foundation, and if it’s loose, the filling will leak everywhere. Use the bottom of a glass to press the crumbs into the pan in even layers—no gaps, no shortcuts. I learned this the hard way when my first attempt crumbled like a sad sandwich.
- Bake Until Edge Pulls: The center will jiggle, but the edges should pull away cleanly from the pan when done. If it’s still wobbly after the full time, tent with foil and bake 5 more minutes—underbaking is the fastest way to a runny disaster. (Your future self will thank you.)
Make-ahead tips for 1 pound cream cheese cheesecake
Crust Prep Ahead
Make the graham cracker crust the night before and store it in an airtight container in the fridge. This saves 15 minutes of prep time the next day. Press the chilled crust into the pan and wrap it tightly with plastic wrap—it’ll stay firm and ready for your filling.
I like to label it with the date so I don’t forget when it was made. 📅
Filling Prep Timeline
Blend the cream cheese and condensed milk filling up to 24 hours ahead of time, then store it in a sealed container in the fridge. When ready to assemble, simply pour it over the crust and chill.
This works especially well for holiday desserts when you’re juggling multiple dishes. Just remember to bring the filling to room temperature before mixing to avoid lumps.
Freezing Fully Assembled
For maximum convenience, assemble the entire cheesecake (crust + filling) and freeze it in the springform pan. Wrap it tightly in plastic wrap and foil to prevent freezer burn. When ready to serve, thaw in the fridge for 6-8 hours—no need to defrost at room temperature.
This is my go-to for parties, as it keeps perfectly for 3 months and still slices cleanly. ❄️
Portion Control
Divide the filling into individual portions before chilling if you know you won’t finish it all. Use 4-ounce ramekins or small springform pans for single servings. Each portion will set beautifully on its own, and you can store them stacked in the fridge for up to 5 days.
This is perfect for meal prep—just grab and serve whenever you crave dessert.
Topping Prep
Prep your toppings the day before to save time. Arrange fresh berries in a shallow dish or measure out caramel drizzle into a squeeze bottle. Store them separately in the fridge until serving.
For a no-fuss option, sprinkle powdered sugar through a fine-mesh sieve just before serving—it adds instant elegance with zero effort. 💫
Make-Ahead Serving
When serving make-ahead cheesecake, let it sit at room temperature for 10-15 minutes before slicing to make it easier to cut. Use a long, sharp knife heated under hot water for clean slices.
I also recommend running a thin spatula around the edges of the pan to loosen any stuck crust before releasing the springform. This ensures perfect presentation every time.
Nutrition facts
Frequently asked questions
Can I use low-fat cream cheese for this recipe?
Not ideal—full-fat cream cheese is essential for that classic, creamy texture. Low-fat versions often create a grainy or crumbly cheesecake because they lack the fat needed to bind properly. If you’re watching fat, try a reduced-fat version, but expect slightly less richness in the final product.
Why does my cheesecake have a grainy texture?
Graininess usually means the cream cheese wasn’t blended smooth enough with the condensed milk. Always beat the cream cheese on low speed until completely lump-free before adding the condensed milk. Also, ensure your cream cheese is at room temperature—cold lumps won’t blend properly.
How do I prevent cracks in the top?
Cracks happen when the cheesecake sets too quickly or isn’t chilled evenly. To avoid this, cover the pan tightly with plastic wrap and let it set at room temperature for 1 hour before refrigerating. This slows the setting process. Also, avoid opening the fridge door frequently while it’s chilling.
Can I make this cheesecake in a different pan size?
Yes, but adjust the crust and filling proportionally. For a 8-inch pan, double the recipe; for a 4-inch pan, halve it. The key is maintaining a 1-inch-thick layer of filling. If using a non-springform pan, grease it well and line with parchment paper for easy removal.
What if I don’t have sweetened condensed milk?
No problem! Mix 1 cup heavy cream + ½ cup powdered sugar as a substitute. Whisk until smooth and use immediately—it won’t thicken like condensed milk, but it’ll work in a pinch. For best results, chill the mixture for 30 minutes before using to mimic the condensed milk’s consistency.

- 12 Bean Chili Recipe: Hearty Slow-Cooked Depth With 12 Legumes - October 17, 2026
- 5 Seed Bread Recipe: Nutty Crunch and Artisan Flavor in One Loaf - October 17, 2026
- 1 Lb Macaroni Salad Recipe: Bold, Crunchy, and Crowd-Pleasing - October 17, 2026