
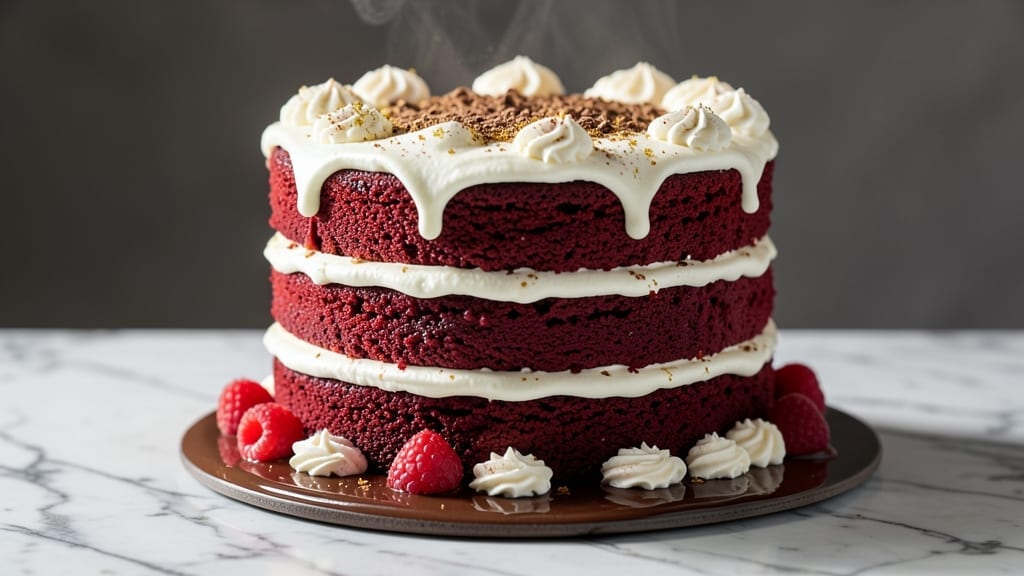
This 3-layer red velvet cake recipe from scratch delivers the perfect balance of deep red layers and velvety cream cheese frosting that’s become a holiday staple. 💛 The secret lies in precise measurements and gentle folding to maintain that signature moisture while achieving rich cocoa depth without bitterness.
After years of baking red velvet cakes, I’ve perfected this method to ensure each layer stays tender and the frosting achieves that signature tangy-sweet flavor.
What sets this recipe apart is the foolproof technique for achieving consistent results every time. We’ll use buttermilk for that signature tang, cocoa powder for depth, and a precise baking time to prevent dryness.
The cream cheese frosting requires just five ingredients but delivers a flavor that’s both rich and balanced—never too sweet or too heavy. This cake is perfect for special occasions, holiday gatherings, or simply treating yourself to a decadent dessert.
The final result is a showstopping cake with perfectly moist layers, a thick layer of creamy frosting, and a presentation that’s as impressive as it is delicious. Each bite delivers the perfect harmony of red velvet flavor and tangy cream cheese frosting.
Whether you’re baking for a celebration or just craving a classic dessert, this recipe will deliver restaurant-quality results with minimal fuss.
Ready to create a cake that rivals your favorite bakery? Let’s get started with the ingredients and step-by-step instructions that will guide you through baking, frosting, and assembling this iconic dessert. The process is simpler than you might think, and the results are absolutely worth the effort.
Ingredients for 3 layer red velvet cake recipe from scratch
These 15 ingredients create the perfect harmony of deep red velvet layers and velvety cream cheese frosting.
| Ingredient | Amount | Notes |
|---|---|---|
| All-Purpose Flour 🌾 | 3 ½ cups | Sifted for light texture |
| Granulated Sugar 🍚 | 2 ½ cups | Superfine preferred for smoothness |
| Cocoa Powder 🍫 | ½ cup | Dutch-processed for rich flavor |
| Buttermilk 🥛 | 1 ½ cups | Fresh, not powdered |
| Vegetable Oil 🫒 | 1 ½ cups | Light neutral oil preferred |
| Large Eggs 🥚 | 4 whole | Room temperature for even mixing |
| White Vinegar 🍶 | 1 tbsp | For tangy depth |
| Baking Soda 🧂 | 1 tsp | Freshly measured |
| Salt 🧂 | ½ tsp | Fine sea salt preferred |
| Red Food Coloring 🎨 | ½ tsp | Gel-based for vibrant color |
| Vanilla Extract 🌸 | 2 tsp | Pure vanilla for aroma |
| Cream Cheese 🧀 | 16 oz | Full-fat, room temperature |
| Powdered Sugar 🍚 | 4 cups | Confectioners' sugar preferred |
| Heavy Cream 🥛 | 1 cup | Cold for whipped stability |
| Butter 🧈 | 1 cup | Unsalted, softened |
The cocoa powder and buttermilk are non-negotiable for that signature red velvet flavor. Dutch-processed cocoa from Ghirardelli gives the richest color and smoothest texture—don’t skimp here. Buttermilk should be fresh (not powdered) for proper tang. King Arthur flour is my go-to for baking, but any all-purpose will work if sifted properly. The red food coloring is where presentation meets flavor—gel-based coloring mixes better than liquid and won’t alter the moisture balance. For the frosting, Philadelphia cream cheese is the gold standard, but any full-fat brand will do if brought to room temperature first.
No buttermilk? Mix 1.5 cups milk + 1.5 tbsp vinegar and let sit for 5 minutes. Running short on vanilla? Vanilla bean paste adds extra depth. The cake layers can be baked a day ahead and stored at room temperature wrapped tightly—parchment paper between layers prevents sticking. For the frosting, if you’re short on powdered sugar, blend regular sugar in a food processor until it reaches a fine powder. The red velvet layers should be slightly underbaked in the center—they’ll firm up as they cool. No food processor for powdered sugar? Sift it through a fine-mesh strainer.
Cake layers keep 3 days at room temperature wrapped in plastic, or 1 week refrigerated. Frosting can be made 2 days ahead and stored in the fridge—just whip it back to fluffiness before assembling. For a showstopper presentation, dust the cake with powdered sugar and garnish with fresh berries. The frosting can be tinted with a drop of red coloring if you want matching layers, but it’s not required. Freeze unfrosted layers for up to 3 months—thaw at room temperature before assembling.
Why You’ll Love This Recipe
- No Fuss Layers: I swear by the buttermilk—it keeps the crumb tender without a single drop of sourness sneaking in. Mixing the cocoa powder into the dry ingredients first? That’s the secret to that perfect velvety texture, not some overworked batter.
- Velvet Magic: The sugar and oil combo makes this cake melt-in-your-mouth rich, but the cocoa powder adds just enough depth to stop it from being too sweet. Honestly, the first time I tasted it, I thought, “Wait, this is better than boxed mix?”—and it is.
- Party Ready: Three layers mean you can stack it for birthdays, slice it for book club, or even serve it as cupcakes. The frosting (if you add it) stays put, so no messy crumbs when you’re cutting—just clean slices every time.
- Budget-Friendly Luxury: All-purpose flour, sugar, and oil are pantry staples, and buttermilk stretches further than you’d think. I’ve made this for 12 people and still had leftovers that lasted a week—no one complained, either.
Step-by-step instructions for 3-Layer red velvet cake
Here’s how to create that iconic deep red velvet texture and velvety cream cheese frosting—every layer perfect!
👨🍳 Step 1: Whisk Dry Ingredients for Perfect Texture
In a large mixing bowl, sift together the 3.5 cups All-Purpose Flour and 0.5 cup Cocoa Powder. I like to use a whisk here to break up any cocoa lumps completely. Add the 2.5 cups Granulated Sugar, 1 tsp Baking Soda, and 0.5 tsp Salt, whisking until everything is uniformly combined. This pre-mixing ensures no dry spots when we add the wet ingredients later.
Real talk: Don’t skip sifting the flour—it prevents dense layers. I press down gently on the mixture with my fingers to make sure there are no air pockets. The cocoa powder should be evenly distributed so your cake turns that perfect deep red color without any streaks.
🍳 Step 2: Combine Wet Ingredients for Maximum Moisture
In a separate large bowl, whisk together the 1.5 cups Buttermilk, 1.5 cups Vegetable Oil, 4 whole Large Eggs, 2 tsp Vanilla Extract, and 1 tbsp White Vinegar until smooth. The vinegar might curdle the buttermilk slightly—that’s normal and actually enhances the cake’s tenderness. Add the 0.5 tsp Red Food Coloring and mix until fully incorporated.
I use room temperature eggs here—they emulsify better with the oil, creating that signature velvety crumb. The oil keeps the cake moist while the vinegar adds subtle tang that balances the sweetness. This is where that deep red color really comes to life—make sure it’s vibrant but not neon.
🥘 Step 3: Gently Fold Wet into Dry for Light Layers
With the mixer on low speed, gradually add the dry ingredients to the wet mixture, mixing just until combined. I use a spatula to scrape down the sides frequently—this prevents overmixing which would make the cake tough. The batter should be thick but pourable, with no flour streaks remaining. Let the batter rest for 15 minutes at room temperature while you prepare your pans.
Don’t skip the rest—it allows the flour to hydrate fully, resulting in that perfect tender crumb. I use three 6-inch round pans here, lined with parchment paper and lightly greased with vegetable oil. The batter should fill each pan about two-thirds full—it will rise significantly.
🔥 Step 4: Bake to Perfect Doneness
Preheat your oven to 350°F. Bake each layer for 25-30 minutes, or until a toothpick inserted in the center comes out clean. I rotate the pans halfway through baking for even heat distribution. The tops should be domed slightly and spring back when pressed gently—this indicates proper doneness.
Here’s the thing—red velvet cake can dry out quickly if overbaked. I pull mine out when the edges are set but the center still has a tiny bit of bounce. Let each layer cool in the pan for 10 minutes, then transfer to a wire rack to cool completely before assembling.
🥘 Step 5: Make Cream Cheese Frosting
In a stand mixer fitted with the paddle attachment, beat the 16 oz Cream Cheese and 1 cup Butter on medium speed until smooth and creamy, about 3-4 minutes. Gradually add the 4 cups Powdered Sugar and mix until fully incorporated. In a separate bowl, whip the 1 cup Heavy Cream to stiff peaks, then gently fold it into the cream cheese mixture.
This is where the magic happens—the frosting should be thick but spreadable. If it’s too stiff, add a splash of heavy cream; if too thin, add a bit more powdered sugar. The frosting should be cool but not cold when you spread it between layers—this helps prevent melting that would make your cake soggy.
🍰 Step 6: Assemble with Precision
Level the tops of each cake layer with a serrated knife if needed. Place the first layer on a cake stand or plate, spread with about 1 cup of frosting, then add the second layer. Repeat with the third layer, then frost the entire cake with the remaining frosting. I use a bench scraper to create clean edges and smooth sides.
For that professional finish, I pipe decorative rosettes around the edges using leftover frosting. Chill the cake in the refrigerator for 1 hour before slicing—this helps the layers set properly and makes for cleaner cuts. Each slice should reveal that perfect deep red velvet texture with creamy frosting oozing out.
Pro Tips For Making 3 Layer Red Velvet Cake Recipe From Scratch
- Sift the Cocoa: I learned this the hard way—lump-free cocoa powder is non-negotiable for that silky texture. Sift it with the flour before mixing, especially if your cocoa powder is on the clumpy side. No sifter? Press it through a fine-mesh strainer while stirring the dry ingredients.
- Whip the Buttermilk: Cold buttermilk + a whisk = fluffier layers. Pour it into a bowl, add an ice cube, and give it 30 seconds of vigorous whisking before mixing it into the batter. The cold fat in the ice cube mimics commercial buttermilk’s tanginess and keeps the crumb tender.
- Rotate the Pans: After 20 minutes in a 350°F (175°C) oven, swap the cake pans front-to-back and top-to-bottom. Red velvet cakes bake unevenly—this evens out the heat and guarantees all layers rise evenly. (Yes, even if you’re impatient like me.)
- Ice the Cake Twice: Skip the rush to frost—let the cake cool completely (1-2 hours) before the first thin layer of cream cheese frosting. Then, after assembling, chill it uncovered for 30 minutes before the final coat. This prevents soggy layers and makes the frosting stick like glue.
Pro cooking tips for this recipe
Batter Consistency
Your red velvet batter should be thick but pourable—like pancake batter consistency. I use a spatula to scrape down the sides of the bowl while mixing to ensure even distribution.
If the batter is too thin, add 1-2 tablespoons more flour; if too thick, mix in 1 teaspoon more buttermilk. The 15-minute rest before baking is critical—it allows the flour to fully hydrate, preventing dense layers. 💛
Color Control
The gel-based red food coloring is your secret weapon for vibrant color without altering moisture. Start with ½ teaspoon and adjust—too much can make the cake taste slightly artificial. I mix the coloring with the buttermilk first to ensure even distribution.
For a deeper hue, add ¼ teaspoon more, but stop before it looks neon. The color will darken slightly as it bakes.
Baking Time Precision
Bake each layer for 25-30 minutes at 350°F until a toothpick comes out clean. I pull mine out when the edges are set but the center still has a tiny bounce—overbaking dries out the cake.
Rotate pans halfway through for even heat distribution. Let layers cool in pans for 10 minutes before transferring to a rack. This prevents cracking when assembling.
Frosting Temperature
The frosting must be cool but not cold when spreading—this prevents melting that makes layers soggy. If your kitchen is warm, chill the frosting bowl in the fridge for 10 minutes before using. For extra stability, whip the heavy cream to stiff peaks before folding it in.
The frosting should hold its shape when piped but still be spreadable—adjust with powdered sugar or heavy cream as needed. ✨
Layer Assembly Tips
Level each cake layer with a serrated knife for even frosting distribution. I spread about 1 cup frosting between layers—don’t overfill, or it’ll spill over. Use a bench scraper to create clean edges when frosting the exterior.
Chill the cake for 1 hour before slicing—this sets the layers and makes for cleaner cuts. For a showstopper, pipe rosettes around the edges with leftover frosting.
Equipment Must-Haves
Invest in a stand mixer with a paddle attachment for smooth frosting—hand mixing can overwork the cream cheese. I use 6-inch round pans for even baking, lined with parchment paper to prevent sticking. A wire rack is essential for cooling layers properly.
For decorating, a piping bag with a star tip creates professional rosettes. Don’t skip the bench scraper—it’s a game-changer for clean frosting edges. 💡
Nutrition facts
Frequently asked questions
Why does red velvet cake have a slightly tangy flavor?
The signature tang comes from the combination of buttermilk and white vinegar in the batter. The vinegar reacts with the baking soda to create lift while adding subtle acidity that balances the sweetness. This classic pairing prevents the cake from tasting overly sweet and gives it that signature depth of flavor.
Can I make this cake in a different size pan?
Yes, but adjust baking times accordingly. For 8-inch pans, bake each layer for 20-25 minutes at 350°F. For 9-inch pans, reduce to 18-22 minutes. The key is to bake until a toothpick comes out clean—red velvet cake can dry out quickly if overbaked. Always rotate pans halfway through for even baking.
What’s the best way to store leftover cake?
Store the fully assembled cake at room temperature for up to 3 days in an airtight container. For longer storage, refrigerate for up to 1 week—bring to room temperature before serving. Individual layers can be refrigerated for 1 week or frozen for 3 months (thaw completely before assembling). The frosting can be made 2 days ahead and stored in the fridge.
How do I fix dry cake layers?
If your layers are dry, the most likely causes are overbaking or not enough moisture in the batter. For future bakes, remove layers when a toothpick comes out with just a few moist crumbs. To salvage dry layers, brush them with simple syrup (equal parts sugar and water, heated until dissolved) before frosting. This adds moisture without altering flavor. Always let layers cool completely before assembling to prevent sogginess.
Can I substitute any ingredients in this recipe?
Some substitutions work well: use sour cream instead of buttermilk (mix 1.5 cups sour cream + 1.5 tbsp milk), or applesauce for half the oil (reduces fat by 25%). For dairy-free, use coconut milk yogurt instead of buttermilk and dairy-free cream cheese. Avoid substituting cocoa powder with chocolate—it changes the texture and flavor completely. Always adjust liquid measurements if substituting with different ingredients.

- Baked Potatoes in Crock Pot Recipe: Buttery Interiors and Crispy Top Magic - November 1, 2026
- Braised Beef Short Ribs Recipe: Crock Pot Fall-Off-Bone Magic in 6 Hours - November 1, 2026
- Crock Pot Cocoa Recipe: Velvety Warmth With Hidden Spice Magic - November 1, 2026