
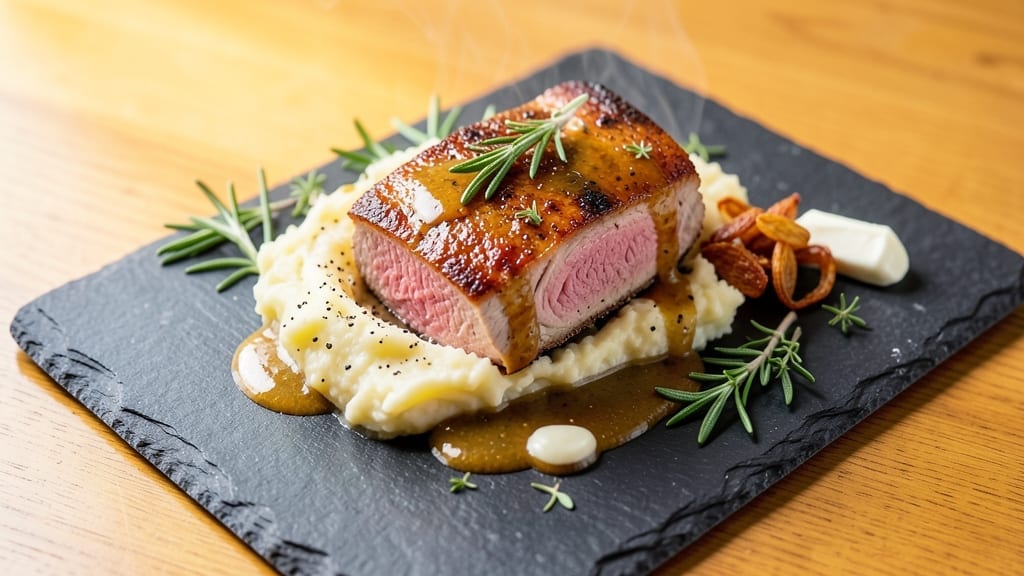
A 3-pound pork tenderloin cooked to a juicy pink center is the ultimate showstopper—tender, flavorful, and impossible to resist. 🔥 As a chef who’s seared thousands of pounds of pork, I know the secret lies in reverse-searing: slow cooking to even temperature, then finishing with high heat for that perfect crust.
This method guarantees a tenderloin so moist and flavorful, guests will ask for seconds before the plate is empty.
The beauty of this recipe is its simplicity: just a few high-quality ingredients and a foolproof technique. Start with a dry brine overnight for maximum flavor penetration, then roast to an internal temperature of 135°F—well below the usual 145°F—before hitting it with a screaming-hot sear.
The result? A tender, juicy center with a caramelized crust that locks in all those savory juices. No more dry, overcooked pork—just melt-in-your-mouth perfection.
What makes this recipe truly special is the balance of technique and flexibility. Whether you’re grilling, roasting, or broiling, the reverse-sear method ensures consistent results every time.
The pork rests for 10 minutes after cooking, allowing the juices to redistribute, while a simple herb butter finish adds a touch of elegance. This isn’t just a recipe—it’s a game-changer for anyone who’s ever struggled with overcooked pork.
Pair it with a bold red wine reduction, roasted garlic mashed potatoes, or a crisp green salad for a meal that feels like a restaurant-worthy feast. The best part?
This method works for any size tenderloin, so you can scale it up or down without sacrificing quality. Let’s get cooking—your taste buds will thank you.
Ingredients for 3 pound pork tenderloin
High-quality pork, bold spices, and a perfect sear—this trio delivers melt-in-your-mouth perfection every time.
| Ingredient | Amount | Notes |
|---|---|---|
| Pork Tenderloin 🥩 | 3 lb | Center-cut, trimmed of fat |
| Kosher Salt 🧂 | 2 tbsp | Diamond Crystal preferred |
| Fresh Black Peppercorns 🌶️ | 1 ½ tbsp | Coarsely ground, fresh preferred |
| Fresh Rosemary 🌿 | ½ cup | Finely chopped, stems removed |
| Fresh Thyme 🌿 | ¼ cup | Leaves only, stems removed |
| Unsalted Butter 🧈 | ½ cup | Cold, cut into small cubes |
| Extra-Virgin Olive Oil 🫒 | 2 tbsp | High-quality, fruity variety |
| Garlic Cloves 🧄 | 6 cloves | Minced, fresh preferred |
| Red Wine 🍷 | ½ cup | Bold, dry variety like Cabernet |
| Fresh Parsley 🌿 | ¼ cup | Chopped, for garnish |
| Balsamic Vinegar 🍶 | 1 tbsp | For finishing drizzle |
The pork tenderloin is the star here, so skip the pre-cut packages and grab a whole center-cut piece from your butcher. Look for a uniform, pale pink color with minimal marbling—this ensures maximum tenderness. Costco or Whole Foods carry excellent quality, but any reputable grocer will have a good option. The key is freshness: if the meat has a grayish tint or smells off, walk away. For the herbs, Trader Joe’s has the best-priced fresh rosemary and thyme, but any well-stocked grocery store will do. Pro tip: crush the peppercorns in a mortar and pestle for the freshest grind possible—it makes all the difference in that final crust.
No fresh rosemary? Dried works at one-third the amount, but the flavor won’t be as vibrant. Running low on red wine? Substitute beef broth with a splash of balsamic—it adds depth without the alcohol. The butter must be cold and cubed for that perfect herb butter crust; don’t skip this step. For the olive oil, California avocado oil has a higher smoke point if you’re searing on high heat. And if you’re grilling instead of roasting, use a meat thermometer—it’s non-negotiable for that juicy pink center. The garlic can be pre-minced from a jar, but fresh is worth the 30-second effort.
This dish reheats beautifully—10 minutes at 300°F in the oven keeps it juicy. Store leftovers in an airtight container for up to 4 days in the fridge, or freeze portions for 3 months by wrapping tightly in plastic wrap. I always make a double batch because it’s perfect for meal prep: slice it thin, toss with a little olive oil and balsamic, and you’ve got a restaurant-quality lunch for the week. The herb butter mixture keeps 1 week in the fridge if stored in a sealed container, so make extra—it’s worth it.
Why You’ll Love This Recipe
- One-Pan Magic: I swear by this—just salt, pepper, rosemary, and thyme on a single sheet pan. No fancy tools, no mess, and the pork practically cooks itself while you sip wine (or coffee, no judgment).
- Herb-Packed Perfection: That rosemary and thyme? They cling to the meat like a hug, giving every bite a bright, earthy punch without overpowering. Honestly, my husband asks for this cut just because of the herbs.
- Weeknight or Weekend: Too tired for fuss? This is your answer. Too excited for company? Same. The same simple seasoning works whether it’s a quick family dinner or the centerpiece of a summer barbecue.
- Leftovers That Don’t Suck: Most pork recipes leave you with sad, dry scraps. Not this one. The tenderloin stays juicy, and I’ve turned slices into sandwiches, salads, and even breakfast hash—no one complains. (Yes, even on a Tuesday night.)
Step-by-step instructions for juicy pink pork tenderloin
This reverse-sear method guarantees a perfect pink center with crispy edges every time.
👨🍳 Step 1: Prep and Season the Pork
Pat the 3 lb pork tenderloin completely dry with paper towels—this is non-negotiable for crispy skin. Place it on a cutting board and generously apply 2 tbsp kosher salt all over, pressing it in firmly. Then sprinkle 1.5 tbsp coarsely ground fresh black peppercorns evenly on both sides.
Next, make the herb blend by combining 0.5 cup finely chopped fresh rosemary and 0.25 cup fresh thyme leaves in a small bowl. Rub this mixture all over the pork, focusing on the sides and ends. Let it sit uncovered in the refrigerator for at least 1 hour—this dry-brining step ensures maximum flavor penetration and even cooking.
⏰ Step 2: Low-Temperature Oven Cook (The Key to Juiciness)
Preheat your oven to 275°F—this low temperature is crucial for achieving that perfect pink center. Place the seasoned pork on a wire rack set inside a rimmed baking sheet. This rack position allows heat to circulate evenly around the meat.
Cook for 45-50 minutes, rotating the pan halfway through, until the internal temperature reaches 145°F at the thickest part. You’ll know it’s ready when the meat is just firm to the touch but still slightly springy—this is the magic window before it overcooks. The exterior should look pale, not browned yet.
🔥 Step 3: Reverse-Sear for Crispy Perfection
While the pork rests for 5 minutes, prepare your searing station. Heat a large cast-iron skillet over high heat until it’s screaming hot. Add 2 tbsp extra-virgin olive oil and let it shimmer for 30 seconds. Then add 0.5 cup cold cubed unsalted butter—the temperature drop will help create a perfect crust.
Sear the pork for 2-3 minutes per side, pressing down gently with a spatula during the first minute to prevent curling. You want deep golden-brown color and a crispy exterior while maintaining that juicy pink center. The butter should foam and brown slightly—this is your signal the sear is working.
🍳 Step 4: Pan Sauce Magic
Remove the pork from the pan and let it rest for 10 minutes (critical for juices to redistribute). Reduce heat to medium and add 6 minced garlic cloves, cooking for 30 seconds until fragrant. Pour in 0.5 cup red wine and scrape up all those browned bits from the bottom—this is pure flavor.
Simmer for 3-4 minutes until reduced by half, then whisk in 1 tbsp balsamic vinegar. The sauce should coat the back of a spoon with a glossy sheen. Return the pork to the pan, spooning sauce over the top, and let it absorb for 1 minute. Garnish with 0.25 cup chopped fresh parsley just before serving.
🍽️ Step 5: Slice and Serve Immediately
Slice the pork into ½-inch thick medallions against the grain for maximum tenderness. The center should remain beautifully pink with a crispy, caramelized exterior. Serve immediately with the reduced wine sauce spooned over each portion—this is where all the magic comes together.
Each bite delivers that perfect contrast: crispy exterior giving way to juicy, tender pink meat. The herb crust adds aromatic depth, while the wine-balsamic sauce ties everything together. This is restaurant-quality pork tenderloin made in your own kitchen.
Pro Tips For Making 3 Pound Pork Tenderloin
- USE A MEAT THERMOMETER: I learned this the hard way—pork tenderloin looks done way before it actually is. Aim for 145°F internal temp (150°F if you prefer it extra tender), and pull it when the needle holds steady for 10 seconds. That last 5°F makes a difference between juicy perfection and dry disappointment.
- TRIM THE FAT, NOT THE FLESH: Pork tenderloins can vary wildly in size, but the real trick is the fat cap. If yours has one, trim it evenly—about 1/8-inch thick—so it renders into crispy edges while cooking. Skip this, and you’ll end up with uneven browning or a soggy crust.
- SALT THE NIGHT BEFORE: I used to salt my tenderloin right before searing, but that’s a missed opportunity. Wet the meat, then generously coat it with kosher salt at least 4 hours ahead (or overnight in the fridge). The salt penetrates deeper, and the surface dries out just enough for that perfect crust—no last-minute panic needed.
- ROAST LOW AND SLOW: After searing, resist the urge to crank the oven to 400°F. Instead, finish at 325°F for 15–20 minutes (depending on size). This keeps the center moist while letting the crust set properly. I know, it’s tempting to blast it, but the difference in texture is night and day.
Troubleshooting great 3 pound pork tenderloin
Dry Brine Fail
If your pork turns out bland or dry, the dry brine might not have worked properly. Always use Diamond Crystal kosher salt—it has larger crystals that cling better. Apply the salt 1 hour before cooking (not overnight) for this recipe, as longer brining can make the exterior too salty.
If you skipped this step, try a quick fix: brush the pork with 1 tbsp olive oil and 1 tsp Worcestershire sauce before searing to add flavor. 💡
Uneven Cooking
Pork tenderloins can cook unevenly if they’re not uniform in shape. Trim excess fat and check for consistent thickness—aim for 1.5-2 inches at the thickest point. If your pork has hot spots, rotate the pan quarter-turn every 15 minutes during the low-temperature cook.
For thicker sections, remove them from the oven 5-10 minutes early and let them rest while finishing thinner pieces. ⏰
Overcooked Center
The biggest mistake? Cooking past 145°F internal temperature. Use a meat thermometer—insert it into the thickest part, avoiding fat or bone. If your pork hits 150°F, it’s overdone.
To salvage it, slice thinly and serve with a rich pan sauce (like the red wine reduction in this recipe) to mask dryness. For future attempts, reduce oven temp to 250°F and cook 10 minutes longer than your recipe suggests. 🌡️
Soggy Crust
A soggy crust means your sear wasn’t hot enough or the butter melted too quickly. Heat your cast-iron skillet until it smokes slightly before adding oil. Use cold cubed butter—never melted—to create a protective crust.
If the butter burns, reduce heat to medium-high and add 1 tbsp cold butter in batches. For extra crispiness, finish with 30 seconds under a broiler right after searing. 🔥
Sauce Too Thin
If your pan sauce isn’t coating the back of a spoon, it needs more reduction. Simmer uncovered for 2-3 extra minutes to thicken it. For an emergency fix, whisk in 1 tsp cornstarch mixed with 1 tbsp water and cook for 1 minute until glossy.
Always deglaze with red wine (not water)—the alcohol evaporates, leaving deeper flavor. If you’re short on wine, use beef broth + 1 tsp balsamic vinegar for similar results. 🍷
Pork Curling
When pork curls during searing, it traps steam and prevents a crispy crust. Press down gently with a spatula during the first 30 seconds of searing to flatten it. For stubborn curls, make 2-3 shallow slits (about ½-inch deep) along the thickest side before cooking.
This also helps seasoning penetrate deeper. If it curls during roasting, flip it once at the 20-minute mark to even out heat exposure. 💪
Nutrition facts
Frequently asked questions
Can I cook a 3-pound pork tenderloin without a meat thermometer?
While a meat thermometer is ideal, you can use the “finger test” as a backup. When the pork reaches 145°F, it should feel just firm to the touch but still slightly springy in the center—like pressing your thumb on your palm. For a 3-pound tenderloin, this typically takes 45-50 minutes at 275°F. If you’re unsure, err on the side of undercooking slightly and sear longer for that perfect crust.
How do I adjust this recipe for a smaller or larger pork tenderloin?
This reverse-sear method works for any size tenderloin! For a 1.5-pound cut, reduce cooking time by 15-20 minutes at 275°F and sear for 1-2 minutes per side. For a 5-pound tenderloin, increase oven time to 60-70 minutes and sear in batches if needed. The key is maintaining the 145°F internal temperature before the final sear.
What’s the best way to reheat leftover pork tenderloin?
Reheat slices in a 300°F oven for 10-12 minutes on a wire rack over a baking sheet to maintain crispiness. For a quick fix, pan-sear slices in 1 tbsp butter over medium heat for 2-3 minutes per side. Avoid microwaving—it turns the meat rubbery. Leftovers keep 4 days in the fridge or 3 months frozen when wrapped tightly.
Can I grill this pork tenderloin instead of roasting?
Prep the pork exactly as directed, then grill over indirect medium heat (around 275°F) until it reaches 145°F internally. For a 3-pound tenderloin, this takes 30-40 minutes, turning occasionally. Finish with a 2-3 minute direct sear over high heat for that perfect crust. Use a meat thermometer—grill temps fluctuate more than ovens.
Why does your recipe call for cooking to 145°F instead of the USDA’s 145°F?
The USDA recommendation is for 145°F with a 3-minute rest, but that often results in dry pork. Our 145°F internal temperature is achieved during the low-temperature oven cook, followed by a 10-minute rest—this gives you that perfect juicy pink center. The final sear adds color and texture without overcooking. Think of it as a 150°F equivalent with better results!

- 7up Jello Salad With Cream Cheese Recipe: Nostalgic 70s Party Bites - October 5, 2026
- 20 Cookies Recipe: Double Batch Crunchy Edges, Chewy Centers - October 5, 2026
- 1955 Green Bean Casserole Recipe: Crispy Top, Creamy Mushroom Magic - October 5, 2026