
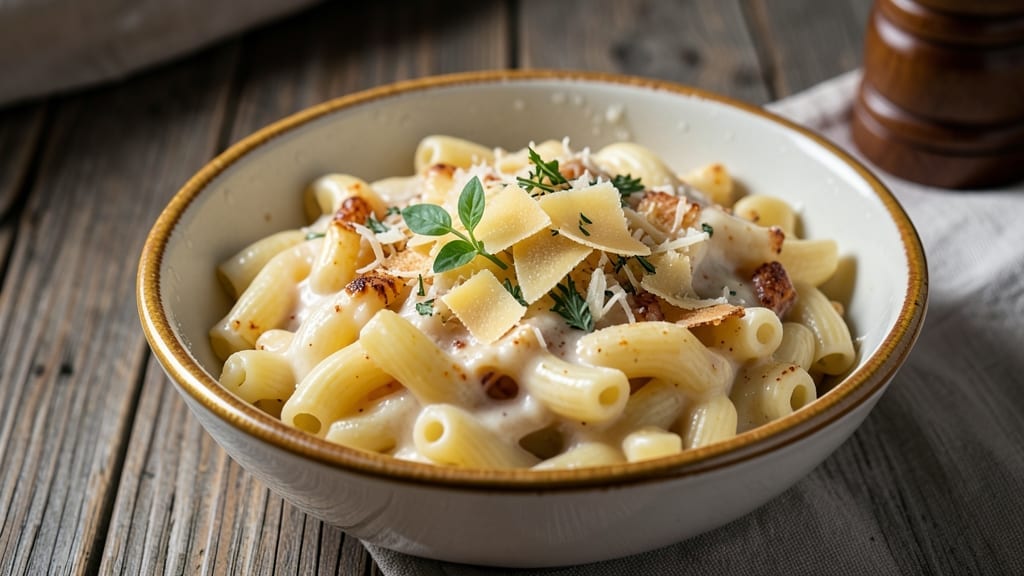
This 30-minute mac and cheese delivers restaurant-style comfort in record time—creamy, cheesy, and ready to serve without the wait. 🔥 The secret? A foolproof technique that skips the stove-top stirring drama while keeping every bite velvety and rich.
I perfected this version after burning through three batches (don’t ask), and now it’s my go-to for busy weeknights or game day crowds.
What makes this recipe work is the two-step sauce method: first, a quick roux locks in flavor, then a blend of sharp cheddar and Gruyère melts into a luscious, clingy sauce that coats every noodle.
No fancy equipment, no waiting for cheese to melt forever—just 15 minutes of active prep and 10 minutes of baking for that perfect golden crust (if you’re feeling fancy). The pasta cooks in the same pot as the sauce, so cleanup is a breeze.
By the time you’re done, you’ll have a creamy, stretchy, melt-in-your-mouth masterpiece that’s crispy in spots and gooey in the middle—exactly how mac and cheese should be. The best part? It’s foolproof enough for beginners but impressive enough for dinner guests.
Serve it as a side or a main dish (with a side salad, because balance matters), and watch it disappear faster than you can say “extra cheese.”
Pro tip: Double the sauce and freeze half for next time—because this recipe is that good. Let’s get cooking!
Ingredients for 30 minute mac and cheese
Pantry staples plus a few cheesy upgrades—this is your 30-minute game-changer.
| Ingredient | Amount | Notes |
|---|---|---|
| Elbow Macaroni 🍝 | 12 oz | Dry, uncooked pasta |
| Unsalted Butter 🧈 | ½ cup | Cold, cubed for roux |
| All-Purpose Flour 🌾 | ½ cup | For roux base |
| Sharp White Cheddar Cheese 🧀 | 2 cups | Shredded, block preferred |
| Gruyère Cheese 🧀 | 1 cup | Shredded, nutty flavor |
| Whole Milk 🥛 | 1 ½ cups | Full-fat for creaminess |
| Yellow Mustard 🍯 | 1 tbsp | For tangy depth |
| Garlic Cloves 🧄 | 2 cloves | Minced for aroma |
| Salt 🧂 | 1 ½ tsp | Kosher or sea salt |
| Black Pepper 🌶️ | ½ tsp | Freshly ground preferred |
| Dried Parsley 🌿 | 1 tsp | For garnish |
| Breadcrumbs 🍞 | ¼ cup | Panko for crispy topping |
| Olive Oil 🫒 | 1 tbsp | For breadcrumb mix |
The cheese is non-negotiable here. Sharp white cheddar gives that tangy bite, while Gruyère adds nutty depth—don’t skimp. Grab block cheese and shred it yourself (pre-shredded gets clumpy). Whole Foods or specialty cheese shops have the best selection, but any grocery store’s deli section works too. For the pasta, elbow macaroni is classic, but cavatappi or shells work great if you’re feeling fancy. The butter? Cold and cubed is key for that perfect roux—no melting it first.
No Gruyère? Substitute with extra sharp cheddar or Swiss cheese—just add a pinch more salt. Running low on milk? Heavy cream at half the amount makes it even richer. The mustard might seem odd, but it cuts through the richness beautifully. Dijon or whole-grain mustard works if you’re out of yellow. For the breadcrumbs, panko is your best friend—it stays crispy and adds texture. No panko? Toast regular breadcrumbs in the oven for 5 minutes to dry them out.
Make the sauce ahead and keep it in the fridge for up to 3 days—it actually gets better overnight. For the crispy topping, bake it separately for 3-4 minutes at 375°F until golden. The leftovers reheat beautifully—just add a splash of milk to loosen it up. Double the recipe and freeze half for next time (trust me, you will). Store the dry pasta in an airtight container to keep it fresh.
Why You’ll Love This Recipe
- One-Pot Magic: I swear by this recipe when I’m too tired to scrub pots—just boil the pasta, make the roux in the same pot, and stir in the cheeses. The Gruyère melts into that velvety sauce while the cheddar adds sharp little bites, all with zero extra dishes.
- Cheese Lover’s Dream: That combo of sharp white cheddar and nutty Gruyère? It’s like a hug in sauce form. The roux thickens just enough to coat every noodle without being gluey, and the butter adds this rich, almost decadent finish—like a fancy dinner but with elbow pasta.
- Lunchbox Hero: Between us, this is my go-to for meal prep. I make a big batch on Sundays, portion it into containers, and it stays creamy (not soggy) for days. Kids? They’ll eat it cold or reheated—no complaints. Adults? They’ll ask for seconds.
- Budget Buster: Honestly, this feeds four for under $8 using store-brand cheddar and Gruyère. The flour and butter are pantry staples, and elbow macaroni is always on sale. It’s the kind of dish that makes me feel like I’m feeding a crowd without breaking the bank.
Step-by-step instructions for 30 minute mac and cheese
Here’s how to make creamy, velvety mac and cheese that’s ready in under 30 minutes.
🍳 Step 1: Cook the Elbow Macaroni to Perfection
Bring a large pot of water to a rolling boil and add 12 oz elbow macaroni. Stir to prevent sticking, then cook for 8-9 minutes until al dente. You want the pasta to have a slight bite—it’ll finish cooking in the oven. Drain the pasta in a colander and set aside, reserving ½ cup of pasta water.
Real talk: Don’t rinse the pasta after draining. The starch on the surface helps create that creamy sauce later. If you rinse, you’ll end up with dry mac and cheese. Trust me on this one!
👨🍳 Step 2: Make the Ultimate Creamy Cheese Sauce
In a large skillet over medium heat, melt the ½ cup unsalted butter until foamy. Whisk in the ½ cup all-purpose flour and cook for 1-2 minutes until a smooth roux forms—it should smell nutty and look like wet sand. This is your flavor foundation.
Slowly whisk in the 1.5 cups whole milk and continue cooking for 3-4 minutes until the mixture thickens. Remove from heat and stir in the 2 cups sharp white cheddar cheese, 1 cup gruyère cheese, 1 tbsp yellow mustard, 1.5 tsp salt, ½ tsp black pepper, and 2 cloves minced garlic. Stir until completely melted and smooth.
🥘 Step 3: Combine Pasta and Sauce
Add the cooked macaroni to the cheese sauce and stir gently to coat every strand. If the sauce is too thick, add some of the reserved pasta water 1 tablespoon at a time until you reach a velvety consistency. The sauce should cling to the pasta beautifully—this is where the magic happens.
Here’s the thing—don’t worry if it looks a little runny at first. The sauce will thicken up perfectly in the oven. Taste and adjust seasoning if needed, adding more salt or pepper as necessary.
🔥 Step 4: Bake to Golden, Bubbly Perfection
Preheat your oven to 375°F. Transfer the mac and cheese to a greased 8×8-inch baking dish and spread it evenly. In a small bowl, mix the ¼ cup breadcrumbs with the 1 tbsp olive oil and 1 tsp dried parsley. Sprinkle this mixture evenly over the top of the mac and cheese.
Bake for 15-20 minutes until the top is golden brown and bubbly. You’ll know it’s ready when the edges are crispy and the cheese is melted through. If the top browns too quickly, tent with foil for the last few minutes to prevent burning.
🍽️ Step 5: Rest and Serve
Let the mac and cheese rest for 5 minutes before serving. This allows the sauce to set slightly and makes it easier to scoop. The breadcrumb topping should be crispy on top while the cheese underneath remains creamy and gooey.
Serve immediately with a side of steamed broccoli or a simple green salad. Each bite should deliver that perfect combination of creamy, cheesy goodness with a crispy breadcrumb finish. You’ve just made restaurant-quality mac and cheese in your own kitchen!
Pro Tips For Making 30 Minute Mac And Cheese
- Cook pasta al dente: DESCRIPTION: I learned this the hard way—undercooked elbows turn mushy when they soak up the cheese sauce. Boil elbows in salted water until they’re just firm to the bite (about 2 minutes less than package instructions), then drain immediately and shock with cold water for 30 seconds. This stops cooking and keeps them from turning to glue in the sauce.
- Melt cheese low and slow: DESCRIPTION: After burning three batches, I finally figured out: once the roux is golden, reduce heat to medium-low and add cheese in two batches. Stir like your life depends on it for the first 30 seconds—Gruyère especially clumps if you rush. If it looks curdled, splash in a tablespoon of warm milk and keep stirring.
- Grate cheese aggressively: DESCRIPTION: Pre-shredded cheese is coated in anti-caking agents that make it behave like sand in your sauce. Use a box grater for both cheddar and Gruyère—even if it’s a pain—and pulse the Gruyère in a food processor for 5 seconds to break up any large crystals. Your sauce will be silky, not grainy.
- Add butter last: DESCRIPTION: Tossing in cold butter at the very end (when the sauce is off heat) creates a glossy, velvety finish—no extra effort, just better texture. I skip this when I’m lazy, but the dish is noticeably richer when I don’t. Use about 1 tablespoon, let it melt into the sauce, then mix in.
Best sauces and condiments for this dish
Classic Mustard Sauce
The yellow mustard in this recipe isn’t just for flavor—it’s the secret weapon that prevents the sauce from becoming too heavy. I use 1 tablespoon of high-quality yellow mustard (like French’s or Annie’s), which adds a bright, tangy contrast to the richness of the cheese.
The mustard also helps emulsify the sauce, giving it that signature velvety texture. If you’re feeling adventurous, swap it for Dijon mustard for a more complex, slightly peppery kick. 💛
Creamy Milk Base
Don’t skimp on the whole milk—it’s what transforms this dish from ordinary to extraordinary. The 1.5 cups of full-fat milk create a luscious, creamy sauce that clings perfectly to every noodle.
For an even richer version, replace ½ cup of the milk with heavy cream, but be warned: the sauce will be even harder to resist. If you’re watching calories, you can use 2% milk, though the texture will be slightly lighter.
The key is to heat the milk gently to avoid curdling when mixed with the cheese.
Buttery Roux Foundation
The ½ cup of cold, cubed butter and ½ cup of flour create a golden roux that forms the backbone of this sauce.
Cooking the roux over medium heat for 1-2 minutes until it turns a light golden color is crucial—this step develops a nutty flavor that elevates the entire dish. If your roux darkens too quickly, reduce the heat immediately to avoid a burnt taste.
For extra flavor, I sometimes add a pinch of nutmeg or smoked paprika to the roux, but keep it subtle.
Cheese Blend Magic
The combination of sharp white cheddar and Gruyère is non-negotiable for that perfect balance of tangy and nutty flavors. The cheddar provides the classic cheesy bite, while the Gruyère adds depth and a slight sweetness.
If you can’t find Gruyère, Swiss cheese or extra sharp cheddar work well, but add an extra ¼ teaspoon of salt to compensate for the milder flavor. Always shred the cheese yourself—pre-shredded cheese contains anti-caking agents that make the sauce grainy. 🧀
Crispy Breadcrumbs
The ¼ cup of panko breadcrumbs mixed with 1 tablespoon of olive oil create the perfect crispy topping that contrasts beautifully with the creamy cheese underneath. For extra flavor, toss in 1 teaspoon of dried parsley or a pinch of garlic powder.
If you don’t have panko, toast regular breadcrumbs in the oven at 375°F for 5 minutes until golden and crispy. This topping is what gives this mac and cheese its restaurant-quality finish—don’t skip it! The breadcrumbs should be golden and crunchy, not soggy.
Sauce Boosters
Want to take your mac and cheese to the next level? Try adding 1 tablespoon of cream cheese to the sauce for extra creaminess, or stir in ½ cup of cooked bacon bits for a smoky twist.
For a pop of color and freshness, fold in ¼ cup of finely chopped chives or green onions just before serving. If you love heat, sprinkle ¼ teaspoon of cayenne pepper or red pepper flakes over the top before baking.
These little upgrades turn a simple dish into a showstopper. ✨
Nutrition facts
Frequently asked questions
Can I make this mac and cheese without baking it?
For a stovetop version, combine the cooked pasta and cheese sauce in a pot over low heat for 5-7 minutes, stirring constantly until fully melted and creamy. Stir in the breadcrumb topping at the end and let it sit for 2 minutes to get slightly crispy. This method cuts your time to just 20 minutes total. The texture will be creamier without the baked crust, but still delicious!
Why did my mac and cheese turn out grainy?
Grainy texture usually means one of three things: using pre-shredded cheese (it contains anti-caking agents), not heating the cheese sauce long enough, or adding cold cheese directly to hot milk. Always shred your own cheese and make sure the sauce reaches a gentle simmer before stirring in the cheese. If it happens, stir in 1 tablespoon of milk and ½ teaspoon of cornstarch to smooth it out.
What’s the best way to reheat leftovers?
Leftovers reheat best in the microwave with a splash of milk to restore creaminess. Cover with a damp paper towel and heat in 30-second intervals, stirring between each, until warmed through. For oven reheating, cover with foil and bake at 350°F for 10-15 minutes until bubbly. Never microwave uncovered—it dries out the sauce instantly. Store leftovers in an airtight container for up to 4 days.
Can I make this mac and cheese ahead of time?
Yes! Prepare the cheese sauce up to 3 days ahead and store it in the fridge. When ready to serve, simply cook the pasta fresh, combine with the chilled sauce, and bake as directed. The sauce actually improves overnight as flavors meld. For the breadcrumb topping, make it fresh right before baking to maintain crispiness. This is a great make-ahead option for busy weeknights!
What’s the secret to getting that perfect golden crust?
The golden crust comes from three things: using panko breadcrumbs (they stay crispy), mixing them with olive oil (for browning), and baking at 375°F until deep golden. For extra insurance, broil for 1-2 minutes at the end—watch closely to avoid burning! If your oven runs hot, tent with foil for the last 5 minutes of baking. The crust should be crispy on top but still creamy underneath.

- 12 Bean Chili Recipe: Hearty Slow-Cooked Depth With 12 Legumes - October 17, 2026
- 5 Seed Bread Recipe: Nutty Crunch and Artisan Flavor in One Loaf - October 17, 2026
- 1 Lb Macaroni Salad Recipe: Bold, Crunchy, and Crowd-Pleasing - October 17, 2026