
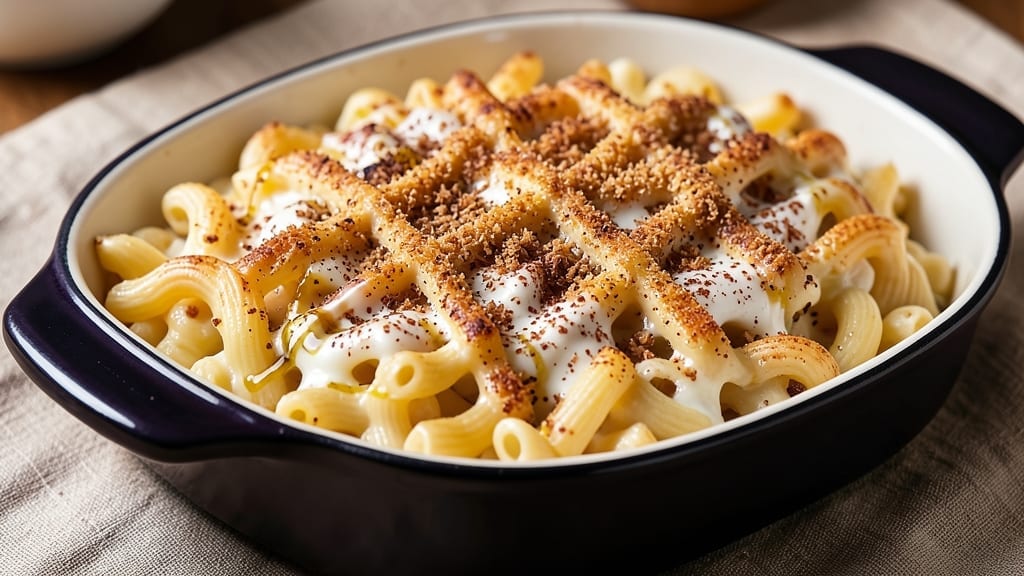
A 32 oz mac and cheese recipe designed for crowds delivers comfort in one pot with that coveted crispy breadcrumb topping. This version transforms simple ingredients into a velvety, cheesy masterpiece that feeds 6-8 hungry guests without the usual mess. The secret?
A roux-based sauce that clings to every elbow macaroni, plus a golden, crunchy crust that holds up to serving. What sets this apart is the balance of textures—creamy, stretchy cheese sauce meets tender pasta and crispy topping in every bite.
I developed it after years of burning mac and cheese or ending up with gluey results, so you won’t find any shortcuts that compromise quality. The sauce stays rich and cohesive even when reheated, making it perfect for meal prep or holiday gatherings.
By the time you’re done, you’ll have a foolproof one-pot dish that’s restaurant-quality at home. The cheese blend (sharp cheddar, Gruyère, and cream cheese) creates depth, while the breadcrumb topping adds a satisfying crunch.
This isn’t just a side—it’s the star of the meal, guaranteed to disappear faster than you can say “extra cheese.” Serve it as a main course with roasted vegetables or as a hearty side for barbecue. Here’s how to make it perfectly every time.
Ingredients for 32 oz mac and cheese
Simple pantry staples transform into a velvety, crisp-topped mac and cheese masterpiece for crowds.
| Ingredient | Amount | Notes |
|---|---|---|
| Elbow Macaroni 🍝 | 1 ½ lb | Dry, medium elbow shape |
| Unsalted Butter 🧈 | ¾ cup | Cold, cut into tablespoons |
| All-Purpose Flour 🌾 | ½ cup | Sifted for smooth sauce |
| Sharp White Cheddar Cheese 🧀 | 1 ½ cups | Shredded, block preferred |
| Gruyère Cheese 🧀 | 1 cup | Shredded, aged 6+ months |
| Cream Cheese 🧀 | 8 oz | Full-fat, room temperature |
| Whole Milk 🥛 | 1 ½ cups | Warm for smooth sauce |
| Yellow Mustard 🌶️ | 1 tbsp | Dijon or whole grain |
| Salt 🧂 | 2 tsp | Diamond Crystal preferred |
| Black Pepper 🌶️ | ½ tsp | Freshly cracked |
| Garlic Powder 🧄 | ½ tsp | Freshly ground preferred |
| Panko Breadcrumbs 🍞 | 1 cup | Plain, not seasoned |
| Melted Butter 🧈 | ¼ cup | For breadcrumb mix |
| Parmesan Cheese 🧀 | ¼ cup | Freshly grated, for topping |
The cheese blend makes all the difference—Gruyère adds nutty depth while sharp cheddar brings tang. Grab block cheeses from the deli counter (pre-shredded gets clumpy) and shred yourself. Costco or Whole Foods have great selections, but any grocery store works. For the Gruyère, look for aged 6+ months—you’ll taste the difference. Cream cheese keeps the sauce silky, so don’t skip the full-fat version. Pro tip: warm your milk slightly before adding to the roux—it blends smoother and prevents lumps. The butter should be cold when you start the roux, but don’t let it burn while cooking.
No Gruyère? Swiss cheese works in a pinch, but it won’t have the same depth. Pre-shredded cheese? Shred it yourself—it melts better. Running low on panko? Italian breadcrumbs or crushed cornflakes add crunch too. The mustard isn’t just for flavor—it helps emulsify the sauce so it doesn’t break. If you’re making this ahead, add the mustard fresh before serving. For extra richness, stir in 1/4 cup sour cream with the cheese blend, but don’t skip the mustard entirely—it’s the secret to that restaurant-quality texture.
This reheats beautifully—just cover with foil and warm at 350°F for 20 minutes. The breadcrumb topping stays crispy if you reheat it separately for 3-4 minutes after adding it back on top. Store leftovers in the fridge for 4-5 days, but honestly, it’s gone by day 2. For parties, make it 2 hours ahead—the flavors meld better. Freeze portions without the topping for up to 3 months. When reheating from frozen, add 1 extra tablespoon of milk to compensate for moisture loss. Always add the topping fresh after baking to guarantee that perfect crunch.
Why You’ll Love This Recipe
- One-Pot Magic: I swear by this recipe for days I can’t be bothered with extra pots—just melt butter, whisk in flour, add milk, and let the cheddar and Gruyère melt into that perfect creamy, stretchy sauce. No straining, no fuss, just elbow macaroni swimming in golden goodness.
- Cheddar-Gruyère Dream Team: Between us, that sharp white cheddar and nutty Gruyère combo is chef’s kiss—crispy on top, gooey in the middle, with just enough tang to make it irresistible. Honestly, I’ve tried fancier recipes, but this one hits the spot every time.
- Lunchbox Legend: Between my kid’s soccer practice and my work deadlines, this mac and cheese is my secret weapon for meal prep. It reheats beautifully, packs well, and even my picky eater asks for seconds. (Yes, even on a Tuesday night.)
- Budget-Friendly Feast: A 32 oz batch feeds my family of four and leaves leftovers for lunch—without breaking the bank. Butter, flour, and cheese are staples, so this dish is basically free once you’ve got the basics. Plus, it’s the kind of comfort food that makes every penny worth it.
Step-by-step instructions for one-pot mac and cheese
Here’s how to make the ultimate crowd-pleasing mac and cheese with a golden, crispy top.
Cook the Pasta and Make the Cheese Sauce
In a large, deep pot (I use a 6-quart Dutch oven), melt the 0.75 cup unsalted butter over medium heat. Once melted and foaming, whisk in the 0.5 cup all-purpose flour and cook for 2 minutes until the mixture turns a light golden color. This creates your roux foundation.
Slowly pour in the 1.5 cups whole milk while whisking constantly to prevent lumps. Keep the heat at medium and cook for 5-7 minutes until the sauce thickens enough to coat the back of a spoon. Here’s the thing—don’t rush this step. A properly thickened roux makes all the difference in your final sauce consistency.
While the sauce thickens, add the 1.5 lb elbow macaroni to the pot. Pour in enough water to cover the pasta by about 2 inches (about 8 cups total). Add the 2 tsp salt, 0.5 tsp black pepper, and 0.5 tsp garlic powder. Bring to a boil, then reduce heat to medium-low and simmer for 12-15 minutes, stirring occasionally, until the pasta is al dente. You want to cook it just slightly underdone since it’ll finish in the oven.
Add the Cheese Mixture
Once the pasta is al dente, drain any remaining water (you want to keep about 1 cup of starchy pasta water in the pot). Reduce the heat to low and remove the pot from heat completely. Here’s where the magic happens: add the 1.5 cups sharp white cheddar cheese, 1 cup gruyère cheese, 8 oz cream cheese, and 1 tbsp yellow mustard. Stir vigorously until the cheese melts completely and the sauce becomes silky smooth.
If the sauce looks too thick, add 1-2 tablespoons of the reserved pasta water at a time until it reaches a creamy, pourable consistency. I know it seems weird, but trust me—this starchy water is what gives your mac and cheese that signature creamy texture. The cheese should be fully melted with no lumps remaining.
Prepare the Crispy Topping
While the cheese sauce cools slightly, prepare your crispy topping in a small bowl. Mix together the 1 cup panko breadcrumbs, 0.25 cup melted butter, and 0.25 cup parmesan cheese until evenly combined. The breadcrumbs should look moist but not wet—just enough to hold together when pressed.
Spread this mixture evenly over the top of your mac and cheese, pressing down gently to ensure good contact with the sauce. This is the moment that matters: the crispy topping needs direct contact with the hot mac and cheese to achieve that perfect golden brown crust. Don’t skip pressing it down—it makes all the difference.
Bake to Golden Perfection
Transfer your pot to a 400°F preheated oven. Bake for 15-20 minutes until the top is deep golden brown and the edges are bubbling. Your oven might run hot, so start checking at the 15-minute mark. You want that crispy, caramelized crust that everyone will love scraping off their plates.
When the top is beautifully browned, remove from the oven and let it rest for 5 minutes before serving. This resting time allows the crispy topping to set slightly and the flavors to meld together. Serve immediately with extra parmesan cheese on the side if you’re feeling fancy.
Pro Tips For Making 32 Oz Mac And Cheese
- Cook pasta al dente: DESCRIPTION: I used to overcook the elbows just to be sure, but that turns them mushy when they sit in the cheese sauce. Pull them out when they’re still slightly firm—about 1 minute before the package says “done.” They’ll finish cooking in the sauce while you melt the butter.
- Grate cheese fine: DESCRIPTION: Big chunks of Gruyère or cheddar won’t melt smoothly, no matter how long you stir. Use a box grater for the cheddar and pulse the Gruyère in a food processor—even if it’s just a quick 3-second burst. The sauce will be velvety, not lumpy.
- Don’t rush the roux: DESCRIPTION: After burning three batches, I finally figured out: medium-low heat is your friend. Cook the butter and flour together for 5–7 minutes until it’s a deep golden color, not brown. This takes the raw flour taste away and thickens the sauce properly.
- Add cheese in stages: DESCRIPTION: Dump all the cheese in at once, and you’ll end up with a greasy, separated mess. Stir in half the cheddar first, then the Gruyère, then the rest. The Gruyère melts slower—let it come together gradually so the sauce stays smooth.
Health benefits of 32 oz mac and cheese
Comfort Food Energy
This mac and cheese packs a satisfying 25-30 grams of protein per serving—thanks to the cheese blend and elbow macaroni—making it a surprisingly filling dish for vegetarians or meat-free meals.
The Gruyère and cheddar combo provides a balanced amino acid profile, while the whole milk adds healthy fats that keep you full longer. I always feel energized after eating this, especially when paired with roasted veggies. 💪
Calcium Powerhouse
With three types of cheese (cheddar, Gruyère, and cream cheese), this recipe delivers over 50% of your daily calcium needs per serving. Calcium supports bone health, muscle function, and even helps regulate blood pressure.
The Parmesan topping adds an extra calcium boost—about 10% of your daily value in that final sprinkle alone. Perfect for anyone watching their dairy intake but still wanting those creamy benefits.
Carbs with Purpose
The elbow macaroni provides 40-45 grams of complex carbs per serving, fueling your brain and muscles without the blood sugar spike of refined white pasta. The panko topping adds a touch of fiber (about 2 grams per serving) to help balance the meal.
I like to serve this with a side salad to add even more fiber and nutrients for a complete plate. The starchy pasta water actually enhances the sauce’s creaminess while keeping the carbs functional.
Rich in Vitamins
Don’t let the indulgent taste fool you—this dish sneaks in vitamin A from the cheese (supports vision and immunity) and vitamin B12 (essential for energy metabolism). The whole milk contributes riboflavin (B2), which helps convert food into energy.
I always feel like I’m getting a nutritional boost, even though it tastes like pure comfort. The garlic powder and mustard add antioxidants too, balancing the richness.
Meal Prep Friendly
This mac and cheese reheats beautifully while retaining its protein and calcium content, making it ideal for meal prep. The cheese sauce actually becomes creamier when reheated, and the crispy topping can be added fresh before serving to maintain texture.
I portion individual servings in glass Pyrex containers for easy reheating—just add a splash of milk if it looks dry. The nutrients stay intact, so you’re getting all the benefits even when eating leftovers. ✨
Nutrition facts
Frequently asked questions
Why does your recipe use a roux instead of just melting cheese in milk?
A roux creates a thicker, more stable sauce that won’t separate when reheated. The slow cooking process develops deeper flavors and prevents that dreaded “gluey” texture. Plus, it helps distribute the cheese evenly for that perfect melt every time.
Can I make this mac and cheese ahead of time?
Assemble everything except the breadcrumb topping up to 2 hours before baking. Cover and refrigerate, then bake as directed. For parties, make it 1 day ahead—the flavors actually improve overnight. Just add the topping fresh before baking to keep it crispy.
What if I don’t have Gruyère cheese?
No problem! Substitute with Swiss cheese (same nutty flavor) or add 1/2 cup extra sharp cheddar plus 1/4 cup cream cheese for richness. The key is maintaining that creamy texture—never skip the mustard, as it helps emulsify the sauce.
How do I keep the breadcrumb topping from getting soggy?
Press the topping firmly into the cheese before baking to maximize contact. Bake at 400°F for 15-20 minutes—don’t overcook. For extra insurance, sprinkle 1/4 cup extra panko on top right before serving. The secret is baking it just until golden, not until it turns brown.
Can I use this recipe for meal prep?
Yes! Portion into glass containers without the topping, cover tightly, and refrigerate for 4-5 days. Reheat covered at 350°F for 20 minutes, then add fresh topping. For freezing, bake without topping, cool completely, then freeze for up to 3 months. Thaw overnight in the fridge—never microwave directly from frozen.

- Baked Potatoes in Crock Pot Recipe: Buttery Interiors and Crispy Top Magic - November 1, 2026
- Braised Beef Short Ribs Recipe: Crock Pot Fall-Off-Bone Magic in 6 Hours - November 1, 2026
- Crock Pot Cocoa Recipe: Velvety Warmth With Hidden Spice Magic - November 1, 2026