
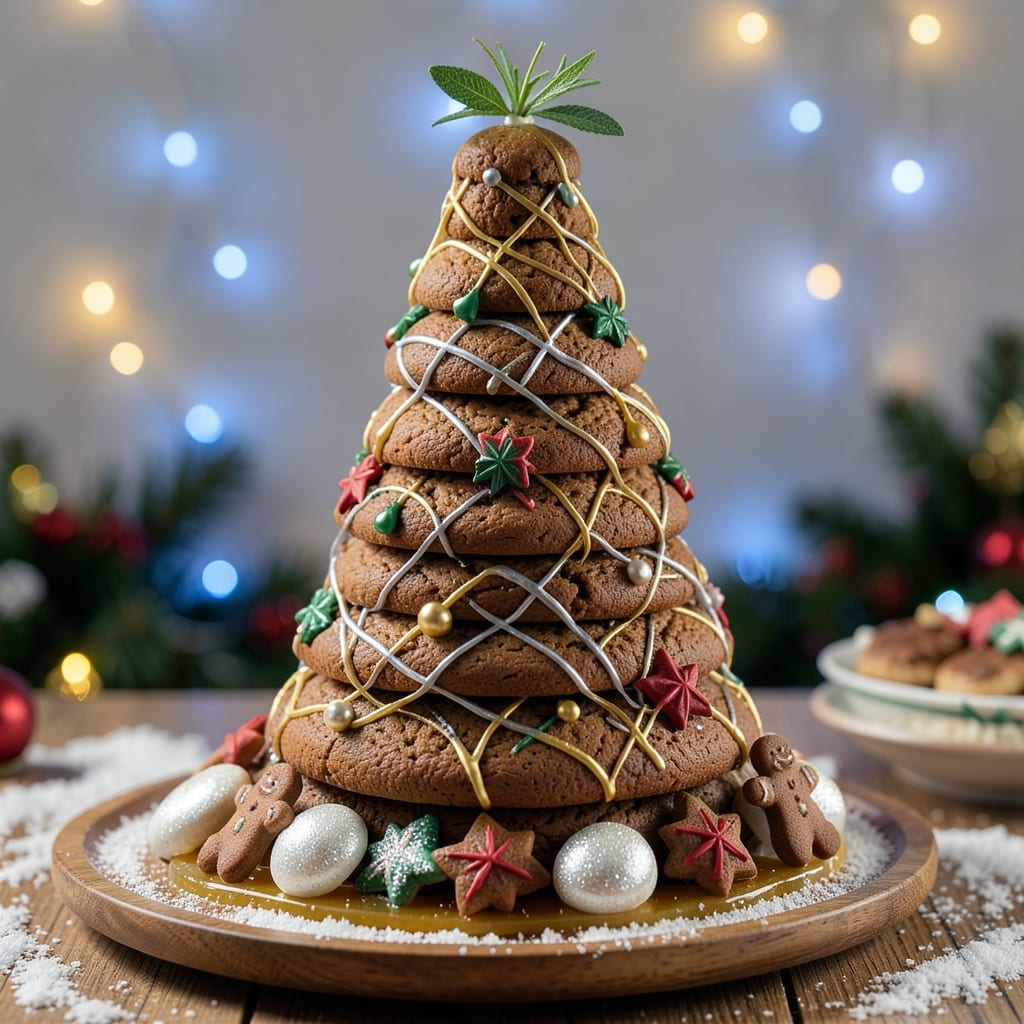
This 3D cookie Christmas tree transforms holiday baking into an edible masterpiece that will be the centerpiece of your festive table. 🌟 The secret lies in precise baking techniques and structural stability—each tiered layer stacks perfectly to create a tree that looks as magical as it tastes.
I designed this recipe after years of holiday baking experiments, ensuring every cookie holds its shape and the icing creates those coveted glossy, snowy branches.
The foundation starts with a sturdy cookie base that bakes to a golden brown but remains tender enough to hold intricate details. You’ll work with three distinct cookie shapes—tree trunk, branches, and ornaments—each baked separately for optimal stability.
The icing technique is critical: a royal icing mixture that hardens to glass-like smoothness while maintaining flexibility for layering.
What you’ll end up with is a three-dimensional cookie tree that stands proudly on your dessert table, complete with edible snow, twinkling icing stars, and delicate candy ornaments. The texture contrasts beautifully—crisp edges on the cookies, velvety icing on the branches, and a satisfying crunch from the candy decorations.
This isn’t just dessert; it’s a showstopping holiday centerpiece that will have guests reaching for their cameras.
Perfect for gifting, holiday parties, or as the grand finale to your Christmas feast. The recipe scales easily, so you can create multiple trees for large gatherings. Let’s build this edible masterpiece that will become your new holiday tradition.
Ingredients for 3d cookie christmas tree
Four cups flour, precise icing, and three cookie shapes create a magical holiday centerpiece.
| Ingredient | Amount | Notes |
|---|---|---|
| All-Purpose Flour 🌾 | 4 cups | Sifted for light texture |
| Unsalted Butter 🧈 | 1 cup | Cold, cubed for precise baking |
| Granulated Sugar 🍚 | ¾ cup | Superfine preferred for smooth icing |
| Royal Icing Base 🎂 | 2 cups | Meringue powder + water mix |
| Corn Syrup 🍯 | 1 tbsp | For icing flexibility |
| Vanilla Extract 🌿 | 1 tsp | Pure, high-quality extract |
| White Food Coloring 🎨 | 1 tsp | Gel form for vibrant color |
| Edible Silver Luster Dust ❄️ | 1 tsp | For snowy branches |
| Mini Pretzel Sticks 🍞 | 1 cup | For tree trunk structure |
| Pecans 🌰 | ½ cup | Chopped for branch details |
| Red & Green Candy Melts 🍬 | ½ cup | For ornament accents |
| Powdered Sugar 🍚 | 2 cups | For dusting edible snow |
| Almond Slices 🌟 | ¼ cup | For star decorations |
| Cookie Cutters ✂️ | 3 pieces | Tree trunk, branch, star shapes |
The flour is non-negotiable here—King Arthur or Gold Medal gives the perfect balance of structure and tenderness. I always buy my butter from Trader Joe’s for the highest fat content—this ensures those crisp edges that hold the icing beautifully. For the royal icing base, Meringe Powder from Wilton is my go-to; it dissolves smoothly and gives that professional glass-like finish. The corn syrup is what makes the icing pliable enough to layer without cracking—don’t skip it. As for the candy melts, Sugarfina has the most vibrant colors that won’t bleed when melted.
No superfine sugar? Pulse regular granulated sugar in a food processor for 30 seconds—it’ll work in a pinch. Running low on edible silver dust? Mix powdered sugar with a tiny bit of lemon extract for a snowy effect. The almond slices should be thin—Trader Joe’s sliced almonds are perfect, but any store-bought will do. For the pretzel sticks, look for the mini size at Walmart or Costco—they’re essential for that sturdy tree trunk base. The pecans need to be toasted lightly first to bring out their flavor, but don’t overdo it or they’ll burn before the cookies even hit the oven.
Store your powdered sugar in an airtight container with a silica gel packet—it absorbs moisture like crazy. The royal icing mixture keeps for 3 days in the fridge, but add a drop of lemon juice to prevent crystallization. For the cookies, bake them one tray at a time and let them cool completely on wire racks before assembling—patience is key here. The finished tree will keep its shape for 5-7 days if stored in a cool, dry place, but the icing will soften in humidity, so avoid the kitchen if possible.
Why You’ll Love This Recipe
- No Fuss, Big Impact: I swear by this recipe because it’s actually foolproof—no piping bags, no stress. You just mix the dough, roll it out, cut those little triangles, and let the royal icing do the magic. The butter and sugar give it that melt-in-your-mouth texture, while the corn syrup keeps the icing smooth enough to stack like a pro.
- Sweet & Simple Magic: Honestly, the flavor is where this shines. The cookies themselves are buttery and just sweet enough, but the royal icing—thickened with corn syrup—lets you go wild with colors and details. It’s not overpowering; it’s that perfect balance of nostalgic holiday taste without being cloying.
- Holiday Flexibility: Between us, this isn’t just for Christmas. I’ve used it for New Year’s parties, last-minute teacher gifts, and even as edible decorations for my kid’s school play. The royal icing dries hard enough to hold up for days, so you can prep ahead and still impress.
- Budget-Friendly Decor: Here’s what sold me—it’s way cheaper than store-bought ornaments, and you end up with way more. A single batch of dough stretches into a whole tree, and the icing costs pennies compared to buying pre-made decorations. Plus, the leftovers? They’re great for quick gifts or snacking while you wrap presents.
Step-by-step instructions for building your 3D cookie Christmas tree
Let’s create a showstopping edible tree that’s as delicious as it is festive.
👨🍳 Step 1: Bake the Tree Base and Decorations
Preheat your oven to 350°F. In a stand mixer fitted with the paddle attachment, cream together the 1 cup unsalted butter and 0.75 cup granulated sugar on medium speed for 3-4 minutes until light and fluffy. Add the 4 cups all-purpose flour (sifted) and mix on low speed just until combined—don’t overmix or your cookies will be tough.
Divide the dough into three portions. For the tree trunk, roll out one portion to ¼-inch thickness and cut using the tree trunk cookie cutter. For branches, roll out another portion and cut using the branch cutter. For stars, roll out the final portion and cut using the star cutter. Place all pieces on parchment-lined baking sheets 2 inches apart—they’ll spread slightly during baking.
Bake for 8-10 minutes until edges are just golden (they’ll firm up as they cool). Let cool completely on the baking sheet before transferring to a wire rack. This cooling step is crucial—the cookies need to be completely set before assembly to prevent crumbling when you add decorations.
🍳 Step 2: Prepare the Royal Icing for Assembly
In a clean mixing bowl, combine the 2 cups royal icing base with the 1 tbsp corn syrup and 1 tsp vanilla extract. Mix according to package instructions until you achieve a medium consistency (like toothpaste). This is your “glue” that will hold your edible tree together.
Divide the icing into three bowls. To one bowl, add the 1 tsp white food coloring for the base icing. To another, add a drop of red food coloring for ornaments. Leave the third plain for snow details. The icing should be smooth—if it’s too thick, add a few drops of water; if too thin, add a bit more powdered sugar from the 2 cups powdered sugar reserved for snow.
🥘 Step 3: Assemble the Tree Structure
Begin by piping a zigzag pattern of white icing along the edges of the tree trunk cookie. Press a mini pretzel stick into this icing to create the tree’s trunk. Let this set for 10 minutes—you’ll see it firm up slightly as it dries.
Next, create the branches. Pipe small dots of white icing along the top of the trunk cookie and press the branch cookies into place, fanning them out like a real tree. Use the 0.5 cup chopped pecans to create smaller branch details—pipe tiny icing dots and press pecan pieces into them for texture. Work quickly but carefully; royal icing sets fast once exposed to air.
⏰ Step 4: Add Ornaments and Snow Effects
Melt the 0.5 cup red & green candy melts according to package instructions, then pipe small dots onto parchment paper to create ornaments. Let them set completely before gently pressing them onto the tree using toothpicks. For stars, pipe small dots of white icing onto the tree and press the 0.25 cup almond slices into place for a sparkling effect.
For the snowy branches, dust lightly with the 2 cups powdered sugar using a fine-mesh sieve. For extra sparkle, mix a pinch of the 1 tsp edible silver luster dust with a tiny bit of icing and pipe delicate snowflake patterns along the branches. Let everything set completely for at least 2 hours—this ensures your edible masterpiece holds its shape.
🎄 Step 5: Final Touches and Presentation
Once fully set, use a small paintbrush to add any final details—perhaps a touch of red icing for berries or a swirl of white for frost. Gently dust with more powdered sugar if needed to enhance the snowy look. Your tree should stand proudly on its pretzel trunk, with all decorations securely in place.
For presentation, place your edible tree on a festive platter surrounded by additional candy melts shaped like presents or mini cookies shaped like snowflakes. Store in an airtight container between layers of parchment paper to maintain freshness for up to 5 days. The magic of this tree comes alive when you assemble it—each piece plays a part in creating something truly extraordinary.
Pro Tips For Making 3d Cookie Christmas Tree
- CHILL THE DOUGH: I used to roll out the cookie dough right after mixing and wondered why my trees kept cracking when baking. Let the dough rest in the fridge for at least 30 minutes—this relaxes the gluten and gives you smoother, more stable layers for stacking.
- WEIGH YOUR FLOUR: Scooping flour from the bag always gives you inconsistent results, especially for delicate 3D cookies. Use a kitchen scale and measure by weight (about 250g for most recipes) for even texture and perfect rise—no surprises when rolling.
- PIPE ICING THIN: Thick royal icing looks pretty but dries rock-hard and can snap your tree apart. Mix it to a pudding-like consistency (about 1.5 cups icing to 1 cup corn syrup) so it sets smoothly without cracking—trust me, your tree will thank you.
- BAKE IN STAGES: If you’re making multiple trees, bake them in batches on the middle rack. Overcrowding the oven causes uneven baking, and stacking too soon leads to wobbly layers. Let each tree cool completely before assembling—patience here makes the difference.
Creative variations of this recipe
Miniature Cookie Forest
Create a whimsical miniature cookie forest by baking tiny versions of your tree using the same dough. Use a 1-inch round cutter for tree trunks and small branch cutters (or a knife) to create miniature branches.
Assemble 3-4 trees on a platter surrounded by crushed candy canes for a snowy base. This makes adorable holiday favors or a charming centerpiece for small gatherings. 🌲
Gingerbread Twist
Swap the all-purpose flour for 1 cup molasses and 1 tsp ginger in your dough for a gingerbread version. Use gingerbread cookie cutters for the tree shapes and decorate with white chocolate icing and candied ginger branches.
The warm spices add a cozy holiday aroma that pairs perfectly with peppermint tea. 🌟
Chocolate-Dipped Tree
After assembling your tree, dip the entire structure in melted dark chocolate (use a double boiler for smooth results). Let it set completely, then dust with powdered sugar for a snowy effect.
Add chocolate-dipped pretzel sticks as branches for extra crunch. This rich version feels luxurious and pairs beautifully with espresso or red wine. 🍫
Edible Snow Globe
Build your tree inside a large glass jar (like a mason jar) for a snow globe effect. After assembling, add clear royal icing to the base and fill the jar with powdered sugar (like snow).
Seal with a lid and shake gently to create a magical snowfall. This makes a unique gift for guests to take home. ❄️
Themed Variations
Transform your tree into a snowman by stacking three round cookies with white icing for the body and mini pretzel sticks for arms. Add candy eyes and a candy cane scarf.
For a farm animal theme, use cookie shapes like cows, pigs, or sheep as ornaments. These variations let you repurpose the same dough for endless holiday fun. 🎨
Gluten-Free Adaptation
Replace the all-purpose flour with a 1:1 gluten-free flour blend (like King Arthur Measure for Measure). Add 1 tsp xanthan gum to ensure stability. The texture will be slightly denser, but the royal icing will still hold the structure perfectly. Perfect for guests with dietary restrictions! 💪
Nutrition facts
Frequently asked questions
Can I make this 3D cookie tree without royal icing?
You can use white chocolate ganache or buttercream frosting as alternatives, but royal icing is ideal because it hardens to a glass-like finish while staying flexible enough for layering. For ganache, melt 8 oz white chocolate with ¼ cup heavy cream and let it cool slightly before using. Buttercream will work but may soften faster in warm conditions.
How do I prevent my cookie tree from collapsing?
Ensure cookies are completely cooled before assembly and use thick royal icing (like toothpaste consistency) for stability. Let each layer dry for 10-15 minutes before adding more. The pretzel stick trunk adds crucial support—press it firmly into the icing before it sets completely.
What’s the best way to store a finished cookie tree?
Place your tree in an airtight container with parchment paper between layers to prevent moisture buildup. Store in a cool, dry place (not the fridge) for up to 5-7 days. Avoid humid environments—icing may soften and decorations could slide. For longer storage, freeze the assembled tree (without powdered sugar) for up to 1 month.
Can I make this tree with my kids?
This project is perfect for family fun. Pre-bake the cookies and let kids help with assembly (icing and pressing decorations). Use large cookie cutters for easier handling, and let them decorate with sprinkles or candy pieces. Supervise the icing step—it sets quickly and can be messy!
How do I create a taller tree?
Build multiple tree bases and stack them vertically using pretzel sticks as connectors between layers. For each additional level, create a slightly smaller cookie base and attach it above the first. Use extra icing to secure each layer before it dries. You can create a tree up to 12 inches tall this way!
