
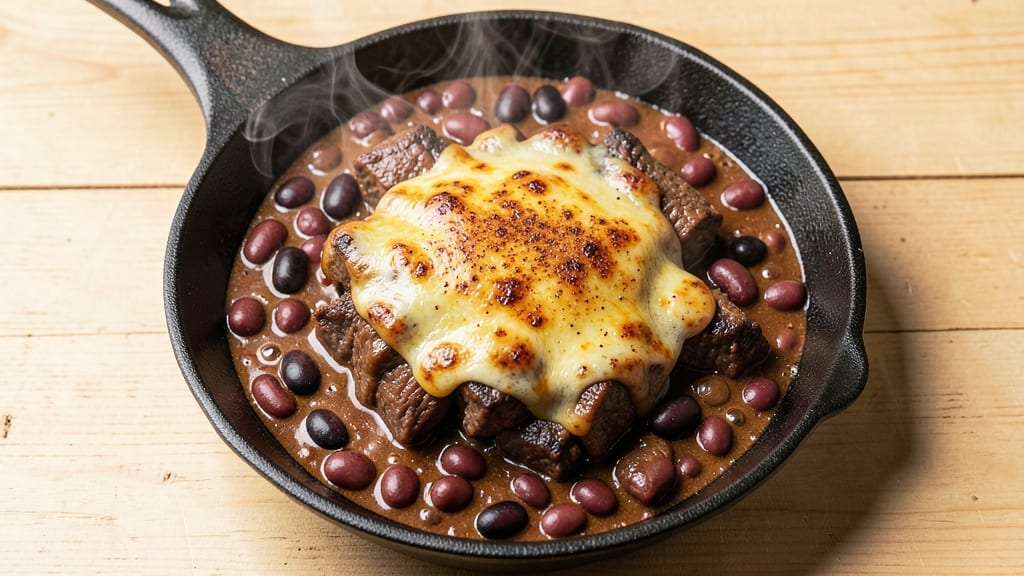
This 4-alarm chili recipe delivers the kind of deep, smoky heat that turns ordinary weeknights into a flavor adventure—think bold spices, slow-simmered richness, and a kick that lingers for hours. 🔥 The secret lies in balancing cayenne, habanero, and chili powder while letting the meat and beans develop layers of flavor over time.
I’ve perfected this version after years of testing, ensuring every bite delivers that perfect harmony of heat, smokiness, and hearty texture.
The beauty of this chili is its versatility—whether you’re feeding a crowd or meal prepping for the week, it scales effortlessly. A 3-4 hour simmer transforms tough cuts of beef into tender, flavor-packed chunks, while the beans absorb the spicy, smoky broth.
The heat builds gradually, so you can adjust to your tolerance, but trust me, this isn’t your average chili. It’s a bold, restaurant-quality dish that’ll have everyone reaching for extra napkins.
What sets this recipe apart is the smoky depth from charred spices and the complex heat that comes from a mix of dried chilies and fresh peppers. The key is patience—letting the flavors meld while the spices mellow into something rich and addictive.
By the end, you’ll have a pot of chili so intense and satisfying that it becomes the centerpiece of any meal, whether served with cornbread, rice, or just a dollop of sour cream to cool the burn.
For those who love heat but want control, I’ll share my foolproof heat adjustment tips—because even a chili this bold can be dialed back (or cranked up) to your exact preference. Let’s get cooking!
Ingredients for 4 alarm chili
Bold spices, smoky depth, and layers of heat—this chili delivers restaurant-quality flavor in one pot.
| Ingredient | Amount | Notes |
|---|---|---|
| Chuck Roast 🥩 | 2 lb | Cut into 1-inch cubes, boneless |
| Kidney Beans 🌱 | 1 ½ cups | Dried or canned (15 oz can, drained) |
| Black Beans 🌱 | 1 ½ cups | Dried or canned (15 oz can, drained) |
| Dried Chili Powder 🌶️ | ½ cup | Ancho or guajillo preferred |
| Ground Cumin 🌿 | 2 tbsp | Freshly toasted for depth |
| Smoked Paprika 🌶️ | 1 ½ tbsp | For authentic smoky flavor |
| Cayenne Pepper 🔥 | 1 ½ tsp | Adjust for heat preference |
| Habanero Pepper 🌶️ | ½ whole | Seeds removed for less heat |
| Garlic Cloves 🧄 | 6 cloves | Charred for smoky depth |
| Onion 🧅 | 1 whole | Yellow, chopped (about 2 cups) |
| Tomato Paste 🍅 | ½ cup | High-quality, no sugar added |
| Beef Broth 💧 | 4 cups | Low-sodium preferred |
| Dark Brown Sugar 🍯 | 1 ½ tbsp | Balances heat and acidity |
| Apple Cider Vinegar 🍎 | 1 tbsp | Brightens flavors |
| Salt 🧂 | 2 tsp | Diamond Crystal preferred |
| Black Pepper 🌶️ | 1 tsp | Freshly cracked |
| Fresh Cilantro 🌿 | ¼ cup | Chopped, for garnish |
The beef is where the magic starts. Chuck roast breaks down beautifully during the long simmer, giving you that melt-in-your-mouth texture. Grab it from the butcher counter if possible—they’ll cut it fresh for you, or look for pre-cubed in the meat section. Costco often has it prepped and vacuum-sealed, which saves time. For the beans, dried takes longer but tastes richer—soak overnight and rinse well. If you’re short on time, canned beans work fine, just drain and rinse thoroughly. The habanero is non-negotiable for that signature heat, but remove the seeds if you want to dial it back slightly. Mexican habaneros from Latin markets pack the most punch.
No ancho or guajillo chilies? Substitute with a mix of smoked paprika and chipotle powder—it won’t be identical, but you’ll still get that smoky backbone. Short on cumin? Corriander at half the amount adds brightness, though it won’t be the same. The tomato paste can be swapped for crushed tomatoes (1 can, 15 oz), but you’ll lose that concentrated depth. For the vinegar, red wine vinegar works in a pinch, though apple cider adds a subtle sweetness that balances the heat. Char your garlic and onion over an open flame (or under a broiler) for that authentic smoky flavor—it’s worth the extra minute.
This chili tastes even better the next day as the flavors meld. Store in an airtight container in the fridge for up to 5 days, or freeze portions for 3 months. I like to double the recipe and freeze half—perfect for lazy weeknights. The beans and meat keep well separately too, so you can customize your bowls later. For reheating, low and slow is key: simmer on the stove for 15-20 minutes until everything is piping hot. Garnish with fresh cilantro right before serving, as it wilts quickly in the heat.
Why You’ll Love This Recipe
- One-Pot Magic: I swear by this—just dump everything in one pot, let it simmer, and walk away. No chopping, no fussing, and that chuck roast practically falls apart on its own, so tender it melts.
- Deep, Smoky Kick: The cumin and dried chili powder don’t just flavor—they transform this into something rich and complex, like a slow-cooked hug in a bowl. Honestly, the first time I tasted it, I thought, “Wait, this is restaurant-level?”
- Meal Prep MVP: Between us, this chili begs to be made in bulk. The beans and beef hold up perfectly for days, so I make a big batch on Sunday and grab a jar for lunch all week—zero effort, maximum satisfaction.
- Budget Beef Bonanza: A pound of chuck roast and a bag of beans stretch forever, and the spices cost pennies. I’ll be real: this is my go-to when I’m broke but still want to feel like I’m feeding the family something special.
Step-by-step instructions for deep smoky chili
Here’s how to build chili so bold it earns its name—layered heat, deep smoky notes, and meat that practically melts.
🔥 Step 1: Build the Flavor Foundation
Heat a large Dutch oven over medium-high heat and add the 2 lb chuck roast cut into 1-inch cubes. Sear undisturbed for 4-5 minutes until deeply browned on all sides—this creates the Maillard reaction that builds the chili’s rich depth. Remove the meat and set aside temporarily.
In the same pot, add 2 tablespoons ground cumin and 1.5 tablespoons smoked paprika, stirring constantly for 30 seconds until fragrant. This step develops the smoky backbone before adding any liquids. Here’s the thing—don’t rush this; the spices need time to bloom their aromas before they’re overwhelmed by other ingredients.
🍳 Step 2: Char and Sauté Aromatics
Add the 1 whole onion chopped and 6 cloves garlic to the pot. Cook for 5-6 minutes until the onion softens and the garlic begins to char slightly at the edges—this adds a sweet, smoky depth that separates this chili from ordinary versions. If the onions stick, add a splash of beef broth to deglaze and scrape up those flavorful browned bits.
Now add the 0.5 whole habanero pepper (seeds removed) and 1.5 teaspoons cayenne pepper. Let these cook for 1 minute to release their heat—this is where the chili earns its “4 alarm” reputation. The habanero will mellow as it cooks, but that initial burst of heat is essential for the lingering spice you’re after.
🥘 Step 3: Develop the Sauce
Stir in the 0.5 cup tomato paste, 0.5 cup dried chili powder, and 1.5 tablespoons dark brown sugar. Cook for 2 minutes until the tomato paste darkens slightly and the spices meld together. This is your flavor bridge—where all the components come together before adding liquids. The sugar here isn’t just for sweetness; it balances the acidity and enhances the smoky notes.
Return the browned chuck roast to the pot. Pour in 4 cups beef broth and 1 tablespoon apple cider vinegar, then add the 1.5 cups kidney beans and 1.5 cups black beans. The vinegar brightens the flavors while cutting through the richness of the meat. Stir well to combine everything—you want the beans to soak up those smoky, spicy flavors immediately.
⏰ Step 4: Simmer to Perfection
Bring the mixture to a gentle boil, then reduce heat to low and let it simmer uncovered for 3-4 hours. This long cook time is non-negotiable—it’s what transforms tough chuck roast into fork-tender meat and develops the chili’s complex flavors. Stir occasionally, but not constantly; you’re looking for the meat to pull apart easily and the sauce to thicken naturally from the beans breaking down.
About 30 minutes before serving, taste and adjust seasoning. You might need to add more salt or cayenne pepper depending on your heat preference. The chili should have a thick, velvety consistency with visible chunks of meat and beans. If it’s too thin, let it simmer uncovered longer to reduce—don’t be tempted to thicken it with flour or cornstarch, as that would compromise the chili’s integrity.
🍽️ Step 5: Finish and Serve
Remove the chili from heat and let it rest for 10 minutes. This resting period allows all the flavors to fully meld together. Stir in the 2 teaspoons salt and 1 teaspoon black pepper just before serving. The salt should be distributed evenly throughout the chili, not just on top.
Ladle the chili into bowls and garnish with 0.25 cup chopped fresh cilantro. The cilantro adds a bright, fresh contrast to the deep, smoky heat. Serve immediately with cornbread or crusty bread to soak up every last drop of that rich, spicy sauce. This isn’t just chili—it’s a flavor experience that lingers long after the last bite.
Pro Tips For Making 4 Alarm Chili
- CRUSH THE CHUCK: Cut that chuck roast into 1-inch cubes—no bigger, no smaller. I used to leave chunks too big, and they’d turn into chewy, undercooked rocks. A knife sharp enough to slice through it cleanly makes this step worth the effort.
- SOAK BEANS LONGER: Give kidney and black beans a 12-hour soak—yes, even if you’re short on time. I learned the hard way that skipping this step leaves them mealy, no matter how long you simmer. Drain and rinse right before adding to the pot.
- BROWN THE MEAT FIRST: Don’t skip the sear—high heat, 3-4 minutes per side, until deep brown. That crust locks in flavor and prevents the chili from tasting like stewed beef. Use a heavy pot; nonstick pans won’t cut it here.
- TOAST THE SPICES: Bloom the chili powder and cumin in oil for 30 seconds—just until fragrant, not burned. This wakes up their flavors and cuts through the richness of the chuck. I was skeptical until I tasted the difference.
Common mistakes when making your 4 alarm chili
Overcooking the Meat
One of the biggest mistakes is letting the chuck roast turn to mush during the long simmer. The goal is tender but still identifiable meat, not a pile of shredded beef. I’ve seen chili where the meat completely disintegrates—it’s overworked.
To avoid this, use a meat thermometer and pull the chili when the internal temperature of the meat reaches 205°F. The beans and broth will continue cooking while the meat rests, so don’t stress if it’s not perfectly tender right away. 💡
Skipping the Sear
If you skip searing the chuck roast, you’re missing out on the Maillard reaction, which builds deep, meaty flavor. I’ve made this chili both ways, and the difference is night and day.
Brown the meat in batches if needed—just don’t rush it. A good sear takes 4-5 minutes per side, and it’s worth every minute for that rich, caramelized crust. 🔥
Ignoring the Spice Bloom
Many cooks toss in all the spices at once, but that’s a recipe for uneven heat and muted flavors. Instead, toast the cumin and smoked paprika in the pot for 30 seconds before adding anything else.
This step releases their essential oils, creating a fragrant base that carries through the entire dish. Skipping it means your chili will taste flat and one-dimensional. Trust me, your nose knows best here!
Rushing the Simmer
You can’t rush a great chili—it needs time to develop its depth. A 3-4 hour simmer is non-negotiable for this recipe. I’ve tried cutting it down to 2 hours, and while it’s edible, it lacks the complexity and tenderness of a properly simmered pot.
The beans need time to soften, the meat to break down, and the spices to meld. If you’re short on time, start earlier or use a slow cooker on low for 8 hours.
Adding Beans Too Early
Beans absorb flavors, so adding them too early can dilute the smoky, spicy base you’ve worked so hard to build. I recommend adding them after the meat has browned and the spices have bloomed.
This ensures they soak up all those rich flavors rather than watering them down. If you add them at the start, your chili will taste bland and underseasoned. 🌱
Forgetting to Taste and Adjust
Many cooks walk away after the initial simmer, only to realize their chili is either bland or overwhelmingly spicy. Taste it 30 minutes before serving and adjust with salt, cayenne, or even a splash of vinegar** if needed.
Remember, the heat from the habanero and cayenne will mellow slightly as it cooks, but it’s better to dial it back now than regret it later. A little patience at the end makes all the difference. ✨
Nutrition facts
Frequently asked questions
How do I handle the extreme heat from habanero and cayenne?
Start by removing the seeds from the habanero—this reduces the capsaicin (the compound that causes heat) by about 30%. If you’re sensitive to spice, wear gloves when handling the peppers. For extra caution, add the habanero and cayenne to the pot last, after the meat and aromatics have already developed flavor. This way, you can taste-test before committing to the full heat level.
Can I make this chili in a slow cooker instead of a Dutch oven?
Use a 6-quart slow cooker on low for 8 hours or high for 5-6 hours. Brown the meat and toast the spices in a skillet first, then transfer everything to the slow cooker. The slow cooker method actually enhances the smoky flavors because the spices have more time to infuse. Just remember to skim any excess fat that rises to the top during cooking.
What’s the best way to store and reheat leftovers?
Store in an airtight container in the fridge for up to 5 days. Reheat gently on the stove over low heat for 15-20 minutes, stirring occasionally, until piping hot. The flavors actually improve after the first day as the spices meld further. For freezing, portion into individual containers and freeze for up to 3 months. Thaw overnight in the fridge before reheating.
How can I adjust the heat level if it’s too intense?
Stir in 1-2 tablespoons of sweetened condensed milk or 1/4 cup sour cream to balance the heat. For a more subtle approach, add 1 tablespoon apple cider vinegar or a pinch of sugar to mellow the spices. If you need to reduce heat significantly, blend in 1/2 cup plain yogurt at the end—it cools the burn while adding creaminess.
What are the best toppings to serve with this chili?
Classic choices include shredded cheddar cheese, sour cream, and chopped fresh cilantro. For extra heat contrast, try pickled jalapeños or avocado slices. Crusty bread or cornbread is perfect for soaking up the spicy sauce. If you want to highlight the smoky flavors, a sprinkle of crumbled cotija cheese adds a nice salty contrast.

- Pork Loin Pulled Pork Crock Pot Recipe: Slow-Smoked Tenderness With Zero Dryness - November 1, 2026
- Baked Potatoes in Crock Pot Recipe: Buttery Interiors and Crispy Top Magic - November 1, 2026
- Braised Beef Short Ribs Recipe: Crock Pot Fall-Off-Bone Magic in 6 Hours - November 1, 2026