
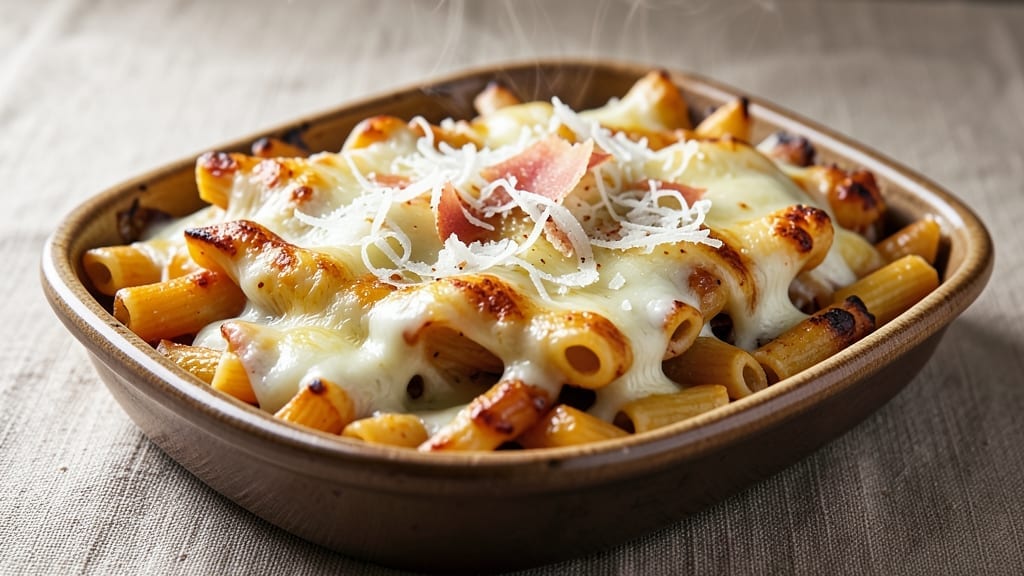
This 4 cheese baked ziti recipe delivers the ultimate comfort food experience with layers of creamy ricotta, gooey mozzarella, sharp parmesan, and nutty romano—all topped with crispy herbed breadcrumbs.
The secret lies in precise layering and baking at the right temperature to create that signature bubbly, golden crust while keeping the pasta perfectly tender inside. I’ve perfected this technique over years of testing, ensuring every bite delivers melty cheese perfection without a single dry noodle.
The magic happens when you combine freshly cooked ziti with a rich cheese sauce that blends ricotta for creaminess, mozzarella for stretch, and parmesan plus romano for depth.
What sets this recipe apart is the herbed breadcrumb topping—it adds texture and flavor while preventing the cheese from turning into a soupy mess. The result is a casserole with a crispy exterior and gooey, cheesy layers that make it impossible to stop at just one serving.
By the time it emerges from the oven, you’ll have a dish that’s restaurant-quality at home—golden brown on top, bubbling with melted cheese, and with that irresistible aroma that fills your kitchen. The herbed breadcrumbs add a savory crunch that contrasts beautifully with the creamy cheese filling.
This is the kind of recipe that becomes a family favorite, perfect for feeding a crowd or meal prepping for the week ahead.
Serve with a simple side salad or garlic bread to soak up any remaining cheese sauce. The instructions are straightforward, but the results are anything but ordinary—this is baked ziti done right. Let’s get started on creating your new comfort food masterpiece.
Ingredients for 4 cheese baked ziti
Four cheeses, crispy crumbs, and the perfect balance of creamy and chewy.
| Ingredient | Amount | Notes |
|---|---|---|
| Ziti Pasta 🍝 | 1 ½ lb | Freshly cooked, not overcooked |
| Whole Milk Ricotta Cheese 🧀 | 15 oz | Full-fat for creaminess |
| Mozzarella Cheese 🧀 | 12 oz | Fresh mozzarella, sliced |
| Parmesan Cheese 🧀 | ½ cup | Freshly grated from block |
| Romano Cheese 🧀 | ½ cup | Finely grated, nutty flavor |
| Large Eggs 🥚 | 2 whole | Beaten for sauce binding |
| Heavy Cream 🥛 | ½ cup | Full-fat for richness |
| Garlic Cloves 🧄 | 4 cloves | Minced for flavor depth |
| Extra-Virgin Olive Oil 🫒 | ¼ cup | For sautéing garlic |
| Italian Seasoned Breadcrumbs 🍞 | ¾ cup | Panko works too |
| Fresh Basil Leaves 🌿 | ¼ cup | Chopped for garnish |
| Dried Oregano 🍃 | 1 tsp | For breadcrumb seasoning |
| Salt 🧂 | 1 ½ tsp | Kosher or sea salt |
| Black Pepper 🌶️ | ½ tsp | Freshly ground preferred |
| All-Purpose Flour 🌾 | 2 tbsp | For thickening sauce |
The cheeses are what make this dish sing. Ricotta brings that signature creaminess, but grab the full-fat kind—it makes all the difference. For the mozzarella, fresh is non-negotiable—the pre-shredded stuff gets rubbery when baked. I always buy a wedge from the deli counter because it’s worth it. The Parmesan and Romano should be freshly grated too—pre-grated has anti-caking agents that make the sauce grainy. If you’re short on time, the Costco or Whole Foods cheese sections have great options. Look for vibrant color and no yellowing on the rind for freshness.
No ricotta? Cottage cheese blended smooth works in a pinch, though it won’t be as creamy. Short on mozzarella? Fontina melts beautifully too. The breadcrumbs can be homemade (toast stale bread, then pulse in a food processor) or store-bought—just make sure it’s Italian seasoned. Fresh basil is ideal, but dried oregano at half the amount gets you close. For the garlic, I usually grab a head and mince it myself, but jarred minced works if you’re in a hurry. The flour is just for thickening—don’t skip it if your sauce feels too thin.
This reheats beautifully—honestly better the next day once everything melts together. Portion into 8×8-inch baking dishes for easy serving. Keeps in the fridge for 4-5 days and freezes for 3 months. I always make extra because it disappears fast. The breadcrumb topping gets crispy again when reheated, so just pop it under the broiler for a couple minutes if you want that fresh-out-of-the-oven crunch.
Why You’ll Love This Recipe
- One-Pot Magic: I swear by this recipe because it’s literally one bowl, one pan, and done. Toss the cooked ziti with ricotta, mozzarella, and that salty punch of Romano—no measuring cups, no fuss—just layer it, bake it, and watch the cheese pull into golden strings. Honestly, the cleanup is almost as good as the meal.
- Cheese Overload: Between the creamy ricotta, the stretchy mozzarella, and the sharp bite of Romano, every forkful is a flavor party. The Parmesan on top? Crunchy, salty perfection that makes this dish dangerously hard to stop eating. (Yes, even on a Tuesday night.)
- Weeknight to Party: This recipe works for lazy nights and when you’re feeding a crowd. Double the batch, freeze half, and you’ve got a meal ready for when you’re too tired to cook. My daughter picks out the Romano bits first—proof it’s good enough for picky eaters.
- Budget-Friendly Feast: Four cheeses sound fancy, but they’re actually affordable staples. A block of mozzarella, a tub of ricotta, and a little Parmesan go a long way. Plus, leftovers reheat like a dream—crispy top, creamy center, no sad soggy pasta here.
Step-by-step instructions for 4 cheese baked ziti
Here’s how to assemble layers of cheesy perfection with that signature crispy breadcrumb topping.
Cook the Ziti to Al Dente Perfection
Bring a large pot of well-salted water to a rolling boil. Add the 1.5 lb ziti pasta and cook until 1 minute before the package instructions for al dente. This ensures it finishes cooking in the oven without becoming mushy. Reserve 1 cup of pasta water before draining—this starchy liquid is essential for creating a silky cheese sauce later. I always drain the pasta directly into the baking dish you’ll use, creating a slight nest for the cheese layers to cling to.
While the pasta cooks, I like to prep the cheeses. Slice the 12 oz mozzarella cheese into ¼-inch thick rounds and grate the 0.5 cup parmesan cheese and 0.5 cup romano cheese using a fine grater. The finer the grate, the better the cheese will melt and blend throughout the dish. Keep these ready so you can layer them immediately after cooking the pasta.
Prepare the Creamy Ricotta Mixture
In a large bowl, combine the 15 oz whole milk ricotta cheese, 2 whole large eggs, 0.5 cup heavy cream, 1 tsp dried oregano, 1.5 tsp salt, and 0.5 tsp black pepper. Mix until completely smooth—no lumps should remain. I use a hand mixer for this step as it creates a lighter, airier texture that prevents the filling from becoming too dense. The mixture should be thick but spreadable, almost like a rich custard.
In a separate small bowl, whisk together the 2 tbsp all-purpose flour and 0.25 cup extra-virgin olive oil. This creates a simple roux that will help thicken the cheese sauce when combined with the pasta water. The olive oil adds a subtle richness that complements the four cheeses perfectly. Keep both mixtures ready for the next step.
Assemble the Cheese Layers
Spread half of the cooked ziti evenly in the bottom of a 9×13-inch baking dish. I use a fork to break up any clumps and distribute the pasta as evenly as possible—this prevents uneven baking and ensures each bite has perfect texture. Sprinkle half of the grated parmesan cheese and romano cheese over the pasta, followed by half of the sliced mozzarella cheese. This layering creates that signature melty texture throughout every bite.
Spread half of the ricotta mixture evenly over the cheese layer, then top with the remaining ziti pasta. Repeat the process with the remaining cheeses and ricotta mixture, finishing with the last layer of pasta. The final layer should be the pasta to create a clean surface for the breadcrumb topping. Press down gently on each layer to help the filling adhere to the pasta.
Create the Crispy Breadcrumb Topping
In a small bowl, combine the 0.75 cup italian seasoned breadcrumbs, 0.25 cup chopped fresh basil leaves, 2 tbsp extra-virgin olive oil, 0.5 tsp salt, and 0.25 tsp black pepper. Mix until the breadcrumbs are evenly moistened but not soggy. The oil helps create a crispy, golden crust while the basil adds a fresh herbal note that cuts through the richness of the cheese.
Sprinkle the breadcrumb mixture evenly over the top of the ziti, pressing down lightly with your fingers to help it adhere. This topping is what gives this dish its signature texture contrast—crispy on top, creamy and gooey inside. Bake uncovered at 375°F for 30-35 minutes until the top is golden brown and the edges are bubbling. The dish is done when the cheese is fully melted and the breadcrumbs have turned a deep golden color.
Rest and Serve with Confidence
Remove the baking dish from the oven and let it rest for 10-15 minutes before serving. This resting period allows the cheeses to set slightly and the layers to firm up, making it easier to slice without losing all the gooey goodness. I always serve this with a simple green salad and garlic bread to soak up any extra cheese sauce that might escape.
The first bite should deliver that perfect combination of textures—crispy breadcrumbs on top, creamy ricotta filling, and melty mozzarella throughout. Each forkful should be rich but not heavy, with the sharpness of the romano and parmesan cutting through the creaminess. If you want to make it ahead, assemble the dish up to the breadcrumb topping, cover, and refrigerate for up to 24 hours before baking—just add 5-10 minutes to the baking time if it’s cold.
Pro Tips For Making 4 Cheese Baked Ziti
- Drain pasta—then shock it: The moment you pull ziti from boiling water, run it under cold water for 10 seconds. I learned this the hard way—skipping it means your pasta keeps cooking in the cheese sauce, turning mushy. Works like a charm, even when you’re in a hurry.
- Mix ricotta with eggs first: Whisk your whole milk ricotta with 1 egg before adding other cheeses. This keeps the sauce creamy instead of grainy, and the egg helps bind everything together. (Yes, even if you’re skeptical—it makes a real difference.)
- Layer cheese like lasagna: Don’t just dump all the cheese on top. Spread half the mozzarella and Romano between pasta layers, then top with the rest. The cheese melts more evenly, and you avoid that sad, dry top layer.
- Bake uncovered for the last 5 minutes: Cover your ziti with foil for 20 minutes, then uncover and crank the heat to 425°F for the final stretch. This gives you that golden, bubbly crust without burning the top. (Your future self will thank you.)
Dietary considerations for this recipe
Gluten-Free Adaptation
For a gluten-free version, replace the ziti with gluten-free pasta like Barilla or Jovial—both hold up well during baking. Use a gluten-free breadcrumb mix (check the Italian seasoning aisle) for the topping.
I’ve tested this with De Cecco gluten-free penne, which works beautifully. Just ensure all cheeses are certified gluten-free (some contain anti-caking agents with wheat). 🌱
Dairy-Free Options
Swap the ricotta for cashew ricotta (blend 1 cup soaked cashews + ¼ cup lemon juice + ½ cup water until smooth). Use dairy-free mozzarella (Miyoko’s or Violife brands melt well) and nutritional yeast for parmesan/romano flavor.
The breadcrumbs can stay the same, but add 1 tbsp olive oil to help crispiness. The texture will be lighter but still rich!
Lower-Carb Version
Cut carbs by using shirataki noodles (soaked in pasta water for 10 minutes) instead of ziti. Reduce ricotta to 8 oz and add ¼ cup almond flour to the breadcrumb mix for structure.
Top with extra chopped basil and crushed pork rinds (for crunch without gluten). Bake at 375°F for 25 minutes—the noodles cook faster than pasta. 🥦
Lactose-Sensitive Friendly
Opt for aged cheeses (like sharp cheddar or Gouda) which contain less lactose. Use lactose-free ricotta (Trader Joe’s carries one) and lactose-free mozzarella (Green Valley Creamery). The breadcrumbs remain unchanged, but add 1 tsp garlic powder to enhance flavor. This version keeps the creamy texture while being gentler on digestion.
Vegetarian Protein Boost
Add 1 cup cooked lentils or crumbled tempeh to the ricotta mixture for extra protein. Sauté the lentils with 1 tsp Italian seasoning before mixing in. For tempeh, marinate in 1 tbsp balsamic vinegar + 1 tsp smoked paprika for 15 minutes before crumbling.
The dish stays vegetarian but gains hearty texture. 💪
Nutrition facts
Frequently asked questions
Can I use pre-shredded cheese instead of freshly grated?
Pre-shredded cheese works in a pinch, but it won’t melt as beautifully. The anti-caking agents in pre-shredded cheese make the sauce grainy and can prevent that perfect gooey texture. If you must use it, remove any additives by rinsing the cheese in a fine-mesh strainer before adding it to your dish. For the best results, always grate your own parmesan and romano.
Why did my breadcrumb topping get soggy?
Soggy breadcrumbs usually mean the dish wasn’t baked long enough or the topping wasn’t pressed down firmly. Always bake until the top is golden brown and crispy—about 30-35 minutes at 375°F. Press the breadcrumbs down gently with your fingers before baking to help them adhere better. If your topping still gets soggy, try adding an extra 1 tbsp of olive oil to the breadcrumb mixture for extra crispiness.
How do I make this recipe ahead of time?
You can assemble the dish up to the breadcrumb topping, cover it tightly with foil, and refrigerate for up to 24 hours before baking. When ready to bake, add 5-10 extra minutes to the baking time if the dish is cold. For freezing, assemble the dish completely (including the breadcrumb topping), cover it tightly with plastic wrap and foil, and freeze for up to 3 months. Thaw overnight in the refrigerator before baking, adding 10-15 extra minutes to the baking time.
Can I substitute any of the cheeses?
For a richer flavor, swap the romano for pecorino romano. If you’re short on ricotta, use full-fat cottage cheese blended smooth—though it won’t be as creamy. For mozzarella, fontina or provolone work well too. Just remember that each cheese brings a unique texture and flavor, so experiment to find your favorite combination. The key is balancing creamy (ricotta), stretchy (mozzarella), and sharp (parmesan/romano) cheeses.
How do I prevent the pasta from getting mushy?
Cook the ziti 1 minute less than the package instructions and finish cooking it in the oven. Always drain the pasta directly into the baking dish to create a nest for the cheese layers. Avoid overmixing the ricotta filling—keep it thick and spreadable. Finally, don’t overcrowd the baking dish—stick to the 9×13-inch size for the perfect bake. These steps ensure your pasta stays al dente and holds its shape.

- 12 Bean Chili Recipe: Hearty Slow-Cooked Depth With 12 Legumes - October 17, 2026
- 5 Seed Bread Recipe: Nutty Crunch and Artisan Flavor in One Loaf - October 17, 2026
- 1 Lb Macaroni Salad Recipe: Bold, Crunchy, and Crowd-Pleasing - October 17, 2026