
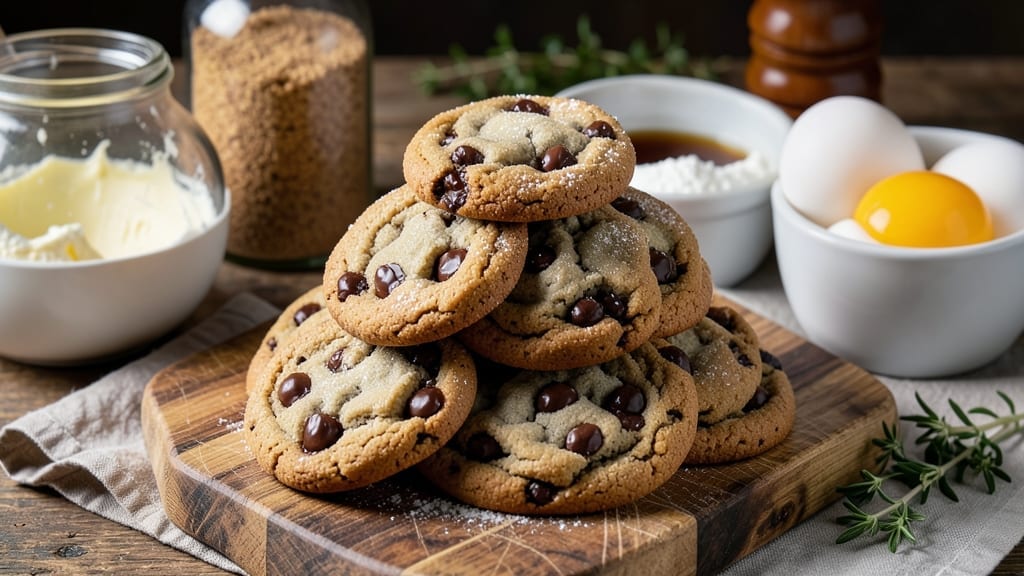
This 4 dozen chocolate chip cookie recipe delivers the perfect balance of crispy edges and gooey centers—every time. 💛 The secret lies in the right ratio of brown and white sugar, which creates that signature caramelized flavor while keeping the texture just right.
I’ve baked hundreds of batches, and this method never fails to impress, whether you’re feeding a crowd or stocking up for holiday gifts.
What sets this recipe apart is the foolproof technique that ensures consistent results across all 4 dozen cookies. The dough rests for 30 minutes (critical for even baking), and the baking time is precisely timed to avoid overcooking.
With just 10 ingredients, you’ll achieve restaurant-quality cookies without the fuss—no special equipment or advanced skills required.
By the time they emerge from the oven, you’ll have golden-brown cookies with crisp edges and soft, chewy centers, plus pockets of melted chocolate that stay gooey even after cooling. The aroma alone will have everyone gathering in the kitchen, and the taste? Pure, nostalgic comfort in every bite.
These cookies stay fresh for up to 5 days in an airtight container, making them perfect for meal prep or gifting. Whether you’re hosting a party, packing lunches, or simply craving a classic treat, this recipe delivers professional-quality results with minimal effort. Let’s get baking!
Ingredients for 4 dozen chocolate chip cookie
Ten essential ingredients for foolproof cookies with crispy edges and gooey centers every time.
| Ingredient | Amount | Notes |
|---|---|---|
| Unsalted Butter 🧈 | 2 cups | Cold, cubed for even distribution |
| Granulated White Sugar 🍚 | 1 ½ cups | Superfine preferred for smoother texture |
| Packed Light Brown Sugar 🍚 | 1 cup | Contains 3% molasses for caramel flavor |
| Large Eggs 🥚 | 2 whole | Room temperature for even mixing |
| Vanilla Extract 🌿 | 2 tsp | Pure, high-quality extract |
| All-Purpose Flour 🌾 | 4 ½ cups | Sifted, spooned and leveled |
| Diamond Crystal Kosher Salt 🧂 | 1 ½ tsp | Fine grain for even distribution |
| Baking Soda 🧪 | 1 tsp | Freshly opened for potency |
| Chocolate Chips 🍫 | 3 cups | Semi-sweet or milk chocolate |
| Flaky Sea Salt 🧂 | 1 tbsp | For finishing before baking |
The butter quality makes all the difference—Plugrá or Land O’Lakes are my go-to brands for reliable results. Purchase unsalted so you control the saltiness, and keep it cold when mixing to prevent overdevelopment. The sugars? Domino brand is my preferred choice for consistent texture, though any quality granulated and light brown will work. For the chocolate chips, Ghirardelli or Nestlé Toll House are standards, but any high-quality chips will melt beautifully. The vanilla extract should be pure—Nielsen-Massey or McCormick are reliable choices. Flour matters too: Gold Medal is my default, but any all-purpose brand works if stored properly.
No vanilla extract? Vanilla bean paste works in a pinch, or scrape seeds from a vanilla bean. Out of baking soda? Baking powder at 3x the amount is a substitute, though the texture may vary slightly. For chocolate chip alternatives, white chocolate chips or butterscotch chips add variety. The sea salt finishing is key—Maldon flaky salt is ideal, but any flaky salt will enhance flavor. If you prefer a softer cookie, reduce the flour by 1/4 cup, but be prepared for slightly thicker cookies. For extra richness, replace 1/4 cup of butter with an equal amount of nutella or caramel chips.
Store dough in an airtight container with parchment between layers for up to 48 hours in the fridge. Baked cookies stay fresh for 5 days in an airtight container at room temperature, or freeze for 3 months for maximum freshness. For gifting, package in cellophane bags with a ribbon—these cookies make stunning presents. To reheat, warm in a 200°F oven for 3-5 minutes to restore crispiness. The aroma alone will bring everyone running when they come out of the oven.
Why You’ll Love This Recipe
- Foolproof Mixing: I swear by the creamy butter-egg combo here—just cream, mix, fold. No stand mixer required, and the dough comes together faster than I can finish a podcast episode. That’s the magic of brown sugar’s natural moisture balancing the white sugar’s crisp edge.
- Chewy-Crispy Balance: The secret’s in the 350°F bake—edges get that perfect snap while the center stays soft enough to melt in your mouth. Honestly, the moment I pull them out, my kitchen smells like nostalgia, and that’s before the first bite.
- Party in a Jar: Between us, these are my go-to for holiday gifts, school bake sales, or when my book club needs a snack. Portion them into jars, tie a ribbon, and boom—you’ve just saved $20 on store-bought cookies. (Yes, even on a Tuesday night.)
- Dollar Stretch: Four dozen for under $10? That’s right—this recipe turns pantry staples into pure joy. The butter and sugars last for months, and eggs? Well, you’ll use them before they spoil. My wallet thanks me every time.
Step-by-step instructions for batch-baked chocolate chip cookies
Here’s the method for achieving perfect texture every time—crisp edges, gooey centers, and a batch that bakes evenly.
👨🍳 Step 1: Cream the Butter and Sugars for Maximum Flavor
In a stand mixer fitted with the paddle attachment, beat the 2 cups unsalted butter (cold, cubed) with the 1.5 cups granulated white sugar and 1 cup packed light brown sugar on medium speed for 3-4 minutes. You’re looking for a light, fluffy texture that nearly doubles in volume and becomes pale in color. This creaming process incorporates air, which creates those signature crackly tops and helps control spread.
The reason we use cold butter is that it creates a more stable dough that holds its shape better during baking. If your butter starts to melt too quickly, reduce the mixer speed to low and let it cool slightly before continuing. Watch for the mixture to become smooth and pale—this ensures proper aeration for the perfect cookie texture.
👨🍳 Step 2: Incorporate Eggs and Vanilla for Structure
Add the 2 whole large eggs one at a time, mixing on low speed for 30 seconds after each addition until fully incorporated. Then add the 2 teaspoons vanilla extract and mix for another 10 seconds. The eggs provide structure while the vanilla adds depth of flavor. Here’s the thing—don’t overmix at this stage, or you’ll develop gluten and end up with tough cookies.
After adding the eggs, the mixture might look slightly curdled, but that’s normal. The dry ingredients will smooth everything out. I always use room-temperature eggs because they blend more easily and create a more uniform dough. If your eggs are cold, let them sit in warm water for 5 minutes before using.
👨🍳 Step 3: Combine Dry Ingredients and Chocolate Chips
In a separate bowl, whisk together the 4.5 cups all-purpose flour, 1.5 teaspoons diamond crystal kosher salt, and 1 teaspoon baking soda. Add this mixture to the wet ingredients and mix on low speed for 30-45 seconds until just combined—you should still see a few flour streaks. Overmixing develops gluten and makes cookies tough.
Remove the bowl from the mixer and gently fold in the 3 cups chocolate chips using a silicone spatula. I like to use a mix of semi-sweet and milk chocolate chips for depth of flavor. Make sure they’re evenly distributed throughout the dough. The chocolate should be cold to prevent premature melting during the chilling process.
⏰ Step 4: Chill the Dough for Perfect Texture
Cover the bowl with plastic wrap and refrigerate for at least 30 minutes (I prefer 1 hour or even overnight). Chilling solidifies the butter, which prevents the cookies from spreading too thin in the oven. It also allows the flour to fully hydrate, creating better texture. This step makes a MASSIVE difference in the final result.
Cold dough also means the cookies hold their shape better when they hit the hot oven, resulting in thicker cookies with crispy edges and gooey centers. If you’re short on time, you can chill the dough in the freezer for 15 minutes instead, but refrigerating gives the best results. Don’t skip this step—I learned the hard way that warm dough leads to flat, cakey cookies.
🔥 Step 5: Bake for Crispy Edges and Gooey Cores
Preheat your oven to 350°F and line two baking sheets with parchment paper. Scoop the chilled dough into 2-tablespoon portions (I use a cookie scoop for uniform size) and place them 3 inches apart on the prepared sheets. The dough will be cold and firm, but it’ll soften slightly as it warms in the oven.
Bake for 11-13 minutes until the edges are golden brown but the centers still look slightly underdone. They’ll continue cooking on the hot pan after you remove them from the oven. Let them cool on the baking sheet for 5 minutes before transferring to a wire rack. This resting period helps set the cookies and prevents them from spreading further.
🍽️ Step 6: Finish with Flaky Sea Salt for Contrast
Before the cookies completely cool, sprinkle each one with a pinch of the 1 tablespoon flaky sea salt. The salt enhances the sweetness and adds a delightful textural contrast. I like to do this when the cookies are still warm but firm to the touch—around the 3-4 minute mark after removing them from the oven.
Serve the cookies warm for the ultimate experience. Each bite should deliver crispy edges, a soft but not mushy center, and pockets of melted chocolate. Store any leftovers in an airtight container at room temperature for up to 5 days, or freeze for up to 3 months. The cookies will keep their texture better if you let them cool completely before storing.
Pro Tips For Making 4 Dozen Chocolate Chip Cookie
- Chill the Dough: DESCRIPTION: Stick the dough in the fridge for at least 2 hours—yes, even if you’re impatient. I used to skip this and ended up with flat, greasy cookies that spread like pancakes. Cold dough holds its shape and develops deeper flavor, and it’s the only way to guarantee those thick, chewy centers everyone loves.
- Measure Butter Right: DESCRIPTION: Use the “packed” method for brown sugar—no scooping. Press it firmly into the measuring cup so it’s level, or you’ll end up with cookies that taste like they’re missing something. And for the butter, soften it completely but don’t melt it—you want it to hold the dough together, not turn it into a gooey mess.
- Avoid Overmixing: DESCRIPTION: Mix the dough just until the flour disappears—about 30 seconds past that point. I learned this the hard way when my cookies turned out tough and dry. Overworking the dough develops gluten, and that’s the last thing you want in a tender chocolate chip cookie.
- Use Room-Temp Eggs: DESCRIPTION: Take the eggs out of the fridge 30 minutes before mixing—no need to go full-blown warm, just slightly softer. Cold eggs can cause the dough to seize up or create pockets of heat that cook unevenly, leading to cookies that bake faster on one side than the other. Trust me, this small step makes a real difference.
Regional styles of these flavors
Classic American Style
This is the cookie style most Americans grew up with—thick, chewy centers with crispy edges and plenty of melted chocolate. The key is using 1 cup brown sugar for that deep caramel flavor while keeping the texture soft.
I like to bake these on parchment-lined sheets at 350°F for 12 minutes to get that perfect balance. 🍪 These are the cookies you’ll find at any holiday gathering, and they’re the base for all other variations.
Thin & Crispy New England
In New England, they prefer their cookies thin and crispy—almost like a shortbread cookie with chocolate chips. The trick is using 1 extra cup of flour (total 5.5 cups) and baking at 375°F for 9-10 minutes. I also swap half the butter for shortening to reduce spread.
These cookies stay crisp for days, making them perfect for cookie platters or gifting. The secret? Underbaking by 1-2 minutes and letting them cool completely on the sheet.
Soft & Cakey Southern Style
Southern bakers take a different approach—softer, almost cake-like cookies with a tender crumb. They use 1 extra egg (total 3 eggs) and 1/4 cup more flour to create a denser texture. Bake at 325°F for 14-16 minutes until just set.
I like to add 1/2 teaspoon cornstarch to the flour for extra tenderness. These cookies are perfect with a glass of sweet tea and hold up well for 5-7 days in an airtight container.
Chewy & Thick Texas-Style
Texas takes the classic cookie and makes it even thicker and chewier. The dough gets chilled overnight (24 hours) for maximum flavor development, and they use 1/2 cup more brown sugar (total 1.5 cups) for deeper caramelization.
Bake at 350°F for 14-16 minutes until the edges are golden but the centers are still soft. The result? A cookie with a thick, pillowy center that’s almost like eating warm cookie dough. 💪
Buttery & Crunchy Pacific Northwest
In the Pacific Northwest, they love their cookies extra buttery with a crunchy exterior. The dough includes 1/4 cup melted butter mixed into the dry ingredients for extra richness. They also add 1/4 teaspoon cinnamon to the dough for warmth.
Bake at 375°F for 10-12 minutes on silicon baking mats for that perfect crunch. These cookies pair beautifully with a cup of chai tea and stay fresh for up to 7 days when stored properly.
Gluten-Free Adaptation
For those avoiding gluten, swap the all-purpose flour with a 1:1 gluten-free baking flour blend (like Bob’s Red Mill). Add 1/4 cup cornstarch to help bind the dough. Bake at 350°F for 11-13 minutes—these cookies will be slightly denser but still delicious.
I like to use almond flour for half the flour amount to add extra richness. The texture won’t be identical, but they’re a great alternative for dietary needs. ✨
Nutrition facts
Frequently asked questions
Why does this recipe use both brown and white sugar?
The 1 cup light brown sugar adds deep caramel flavor and moisture, while the 1.5 cups white sugar creates a crispy edge and helps control spread. Together, they create that perfect balance of chewy centers and crispy edges you crave in every bite.
Can I make these cookies without a mixer?
Use a sturdy wooden spoon or rubber spatula to cream the butter and sugars by hand for 5-7 minutes until light and fluffy. For the eggs, whisk them separately and add gradually while mixing vigorously. The key is to work the dough until it’s smooth and holds together—just don’t overmix after adding the flour.
How do I prevent my cookies from spreading too much?
Chilling the dough for at least 30 minutes (or up to 24 hours) is critical—it firms up the butter. Also, scoop the dough into 2-tablespoon portions and place them on parchment-lined sheets with 3 inches between each. Bake at 350°F for 11-13 minutes until just golden. Overbaking causes more spread!
What’s the best way to store these cookies?
Keep them fresh for 5 days in an airtight container at room temperature, or freeze for 3 months for maximum freshness. For gifting, package in cellophane bags with a ribbon—these cookies stay delicious for weeks! To restore crispiness, warm in a 200°F oven for 3-5 minutes before serving.
Can I use melted butter instead of cold?
I don’t recommend it—the cold butter creates stable dough that holds its shape during baking. However, if you must use melted butter, chill the dough for at least 1 hour before baking. The texture will be slightly softer, but still delicious. For best results, stick with the cold butter method for that signature crispy edge!

- Pork Loin Pulled Pork Crock Pot Recipe: Slow-Smoked Tenderness With Zero Dryness - November 1, 2026
- Baked Potatoes in Crock Pot Recipe: Buttery Interiors and Crispy Top Magic - November 1, 2026
- Braised Beef Short Ribs Recipe: Crock Pot Fall-Off-Bone Magic in 6 Hours - November 1, 2026