
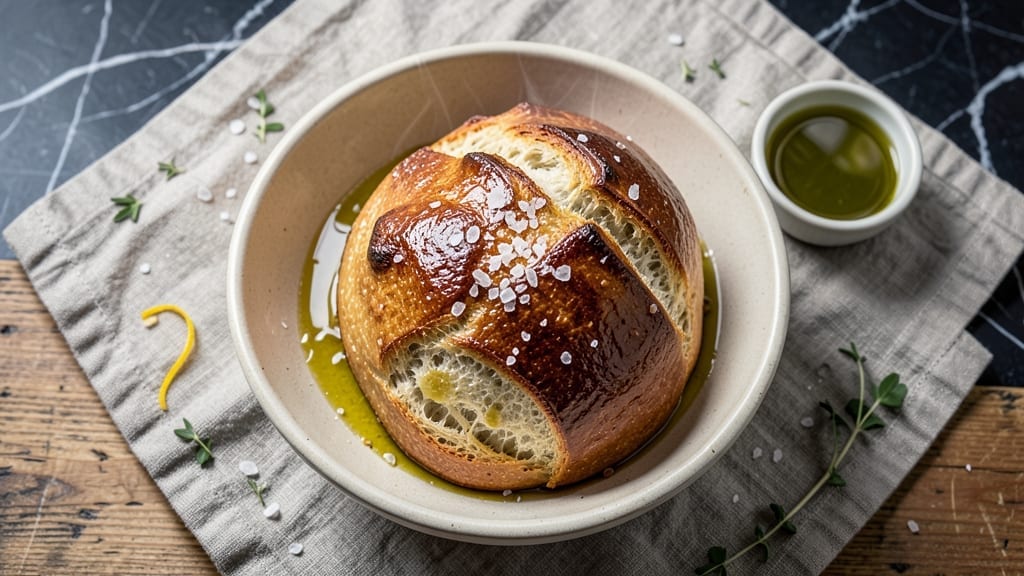
A 4-hour bread recipe transforms ordinary loaves into restaurant-quality artisanal bread with a crusty exterior and open crumb structure—no fancy equipment required. The secret lies in slow fermentation, which develops deep, complex flavors and a chewy texture that store-bought bread can’t match.
I’ve perfected this method after years of baking, and it consistently delivers that coveted crackling crust and airy interior.
This recipe requires minimal hands-on time but rewards patience with unmatched flavor development. You’ll mix, knead, and let the dough rise at room temperature for 2 hours before shaping and a final 2-hour proof in the fridge.
The cold slows fermentation, intensifying gluten structure and flavor—no yeast overproofing here. Even beginners can achieve professional results with this step-by-step approach.
By the time you slide that golden-brown loaf from the oven, you’ll have a crusty, aromatic bread with a satisfying crunch and tender crumb. The slow rise creates a natural sweetness and nutty depth that makes every slice worth savoring.
This technique works for classic baguettes, boules, or dinner rolls—just adjust shaping and baking times.
Serve warm with olive oil and flaky sea salt, or use it for sandwiches that hold up perfectly. The beauty of this method is its flexibility—make it ahead, freeze dough for later, or experiment with whole grains and seeds. Here’s how to create your best loaf yet.
Ingredients for 4 hour bread
Quality flour, precise hydration, and slow fermentation create restaurant-quality bread at home.
| Ingredient | Amount | Notes |
|---|---|---|
| Bread Flour 🌾 | 4 cups | High-protein, 12-14% protein content |
| Active Dry Yeast 🍞 | ¼ tsp | Freshly opened, not expired |
| Granulated Sugar 🍚 | ½ tsp | Feeds yeast for activation |
| Salt 🧂 | 1 ½ tsp | Diamond Crystal preferred |
| Water 💧 | 1 ½ cups | Lukewarm, 90-95°F |
| Extra-Virgin Olive Oil 🫒 | 1 tbsp | For dough enrichment |
| Cornmeal 🌽 | ¼ cup | For dusting work surface |
| Semolina Flour 🌾 | ¼ cup | For dusting banneton |
| Flaky Sea Salt 🧂 | ½ tsp | For final crust enhancement |
| Ice Cubes ❄️ | 1 cup | For cold water bath |
| Whole Wheat Flour 🌾 | ½ cup | Optional for nutty flavor |
| Sesame Seeds 🌱 | 1 tbsp | Optional topping |
The bread flour is non-negotiable here—King Arthur or Caputo are my go-tos for their high gluten content. Look for 12-14% protein on the package; anything lower yields a gummy crumb. If you can’t find bread flour, substitute all-purpose with 1 tbsp vital wheat gluten per cup. The yeast should be freshly opened—check the expiration date, even if it’s been in your pantry for months. For the water, lukewarm is crucial—too hot kills yeast, too cold slows activation. I use a kitchen thermometer to confirm 90-95°F. The whole wheat flour is optional but adds beautiful flecks and nutty depth; if using, replace 10% of the bread flour with it.
No bread flour? All-purpose plus vital wheat gluten works in a pinch, though texture won’t be identical. Running out of sesame seeds? Poppy seeds or sunflower seeds add similar crunch. The semolina for dusting is worth hunting down—it prevents sticking better than regular flour. For the flaky sea salt, Maldon or Jacobsen are my top picks, but any flaky variety works. The ice cubes might seem odd, but they’re essential for the cold water bath that intensifies flavor during final proofing. If you’re short on time, substitute 1 cup ice water instead of a full ice bath, though flavor development won’t be as pronounced.
Store the flour in an airtight container in a cool, dark place—it keeps best for 6-12 months. The yeast should be refrigerated once opened and used within 3 months for optimal performance. For the dough, you can prep it up to 24 hours ahead—just cover tightly and refrigerate. The shaped loaf can be frozen for up to 3 months; thaw overnight in the fridge before baking. Freshly baked bread? Best enjoyed within 2-3 days, though it freezes beautifully for longer storage. Wrap cooled loaves in a clean kitchen towel before storing in plastic to maintain moisture.
Why You’ll Love This Recipe
- Here’s what sold me: that perfect balance of a crackly crust and a soft, airy center. The yeast does all the work, giving you bread that’s light but sturdy—no dry, dense loaves here.
- No-Knead Magic: I swear by this—just mix the bread flour, yeast, sugar, salt, and water in a bowl, let it sit for 4 hours, then bake. That’s it. No stress, no fancy tools, just hands-off simplicity while you handle life.
- Crusty-Center Perfection: Here’s what sold me: that perfect balance of a crackly crust and a soft, airy center. The yeast does all the work, giving you bread that’s light but sturdy—no dry, dense loaves here.
- Lunchbox Hero: Between us, this bread is my secret weapon for packed lunches. It stays fresh for days, slices beautifully, and even holds up to sandwiches without getting soggy. (Yes, even on a Tuesday night.)
Step-by-step instructions for slow-rise crusty loaf
Mastering this 4-hour process yields a bread with unmatched crust and open crumb structure.
Activate the Yeast with Precision
In a small bowl, combine the 1.5 cups water with 0.5 tsp granulated sugar and warm it to 90-95°F—it should feel comfortably warm to your wrist but not hot. Sprinkle the 0.25 tsp active dry yeast over the surface and let it sit for 5-10 minutes until frothy. This activation step is critical; if the yeast doesn’t foam, your dough will fail.
Once properly activated, the yeast will create a bubbly, effervescent foam that expands across the surface. This indicates the yeast is alive and ready to work. If you notice any slow activation, wait an additional 2-3 minutes before proceeding—rushing here will compromise your final loaf.
Develop the Dough with Intentional Technique
In a large mixing bowl, combine the 4 cups bread flour, 1.5 tsp salt, and 0.5 cup whole wheat flour (if using). Create a well in the center and pour in the yeast mixture along with the 1 tbsp extra-virgin olive oil. Using a wooden spoon, gently mix until the dough begins to come together, then switch to your hands to knead for 5 minutes.
The dough should be shaggy and slightly sticky at this stage—this is normal. After kneading, cover the bowl with a damp towel and let it rest for 30 minutes. This initial rest period allows the gluten to relax, making the subsequent shaping easier and producing a more extensible dough that yields better oven spring.
Perform the Cold Fermentation for Deep Flavor
After the 30-minute rest, wet your hands and gently shape the dough into a loose round. Place it in a lightly oiled bowl, cover with plastic wrap, and refrigerate for 3 hours. This cold fermentation is where the magic happens—it slows yeast activity, allowing for more complex flavor development and better gluten structure.
During this time, the dough will rise slowly but steadily. When you remove it from the refrigerator, it should have nearly doubled in size and feel light when pressed gently. This cold proof is what gives this bread its signature depth of flavor and crisp crust. Don’t skip this step—it’s non-negotiable for achieving the promised results.
Shape and Prepare for Final Proof
Lightly dust your work surface with 0.25 cup cornmeal. Turn out the chilled dough and gently shape it into a tight, smooth boule by pulling the edges toward the center and tucking them under. Place the shaped loaf seam-side down on a parchment-lined baking sheet, cover loosely with plastic wrap, and let it proof at room temperature for 1 hour.
During this final proof, the dough should rise noticeably—about 50-75% of its volume. The surface should look slightly domed and feel springy when pressed gently with one finger. This is your cue that the dough is ready for the oven. If you’re unsure, do the “poke test”—press your finger into the dough; if it springs back slowly, it’s ready.
Bake for Maximum Crust Development
Preheat your oven to 450°F with a Dutch oven inside for 45 minutes. This high heat is essential for creating that signature crisp crust. Once preheated, carefully transfer the dough (still on its parchment) into the hot Dutch oven, cover tightly, and bake for 20 minutes.
After 20 minutes, remove the lid and continue baking for an additional 15-20 minutes until the crust is a deep golden brown and sounds hollow when tapped on the bottom. Immediately after removing from the oven, brush the crust with water and sprinkle generously with 0.5 tsp flaky sea salt and 1 tbsp sesame seeds (if using). Let the bread cool completely on a wire rack before slicing—this ensures clean cuts and prevents gumminess.
Pro Tips For Making 4 Hour Bread
- Bloom the Yeast First: Skip mixing yeast straight into flour—it wakes up faster in warm water with sugar. Stir in 1 tsp sugar and ¼ tsp yeast with ¼ cup warm (110°F) water, then wait 5–10 minutes until frothy before adding to the dough. I learned this the hard way when my dough took twice as long to rise because the yeast was sluggish.
- Measure Flour by Weight: Scoop bread flour into a scale, not cups—it’s packed differently. A standard 500g batch should yield ~4 cups, but scooping adds air and throws off hydration. My first loaves were dense until I switched to grams; now the texture’s consistent every time.
- Don’t Over-Knead the Dough: Stop when the dough springs back slowly after poking. Overworking it develops gluten too much, making bread tough. I used to knead until my arm ached—now I rest it after 8–10 minutes and let the mixer do the work.
- Use a Thermometer for Water: Too hot and you kill the yeast; too cold and it won’t activate. Aim for 110°F—just warm enough to touch without burning. I was skeptical until I tried it; now my dough rises reliably in the 4-hour window.
Dietary considerations for this 4 hour bread
Gluten-Free Adaptation
For a gluten-free version, replace the 4 cups bread flour with a 1:1 gluten-free flour blend like King Arthur Measure for Measure or Bob’s Red Mill 1-to-1. Add 1 tsp xanthan gum to help mimic gluten’s structure.
Keep all other ingredients the same, but expect a slightly denser crumb. I’ve found that gluten-free dough benefits from an extra 15 minutes of kneading to develop elasticity. 🌾
Low-Carb/Keto Options
Transform this into a keto-friendly loaf by swapping flour for almond flour and coconut flour in a 3:1 ratio. Use 1 tbsp psyllium husk powder per cup of flour blend to bind the dough. Reduce water to 1 cup and increase olive oil to 2 tbsp for moisture.
The yeast amount stays the same, but fermentation time may need adjustment—watch for proper rise. This version is best for small batches due to density.
Dairy-Free Considerations
This recipe is naturally dairy-free, but if you’re using optional whole wheat flour, check for cross-contamination warnings. For added richness, replace the olive oil with avocado oil or coconut oil.
The flaky sea salt topping remains dairy-free, but if you want a cheesy flavor, sprinkle with nutritional yeast after baking. Always verify all flour brands for dairy processing warnings if you have severe allergies.
Allergen-Friendly Swaps
For nut allergies, use sunflower seed flour instead of almond flour in keto versions. Egg-free bakers can omit the optional whole wheat flour entirely. If sesame is a concern, substitute with toasted pumpkin seeds.
For soy allergies, ensure your yeast and vital wheat gluten (if used) are certified soy-free. I keep a separate flour bin for allergen-free baking to prevent cross-contamination. 💡
Sugar-Free Version
Skip the 0.5 tsp granulated sugar entirely—yeast will still activate with the flour’s natural sugars. For extra sweetness without sugar, add 1 tsp erythritol or monk fruit sweetener to the dough.
The cold fermentation actually enhances natural sweetness development, so you won’t miss the sugar. This works particularly well with the whole wheat flour variation for a nutty-sweet flavor profile.
Nutrition facts
Frequently asked questions
Why does this bread need a 4-hour process instead of a quick rise?
The extended 4-hour fermentation creates a more complex flavor profile through slow yeast activity and gluten development. This cold rise enhances the bread’s crusty exterior and open crumb structure, giving it that artisanal quality. Skipping the cold proof will result in a less flavorful, denser loaf with a weaker crust.
Can I make this bread without a Dutch oven?
Yes! If you don’t have a Dutch oven, try baking on a baking sheet with a metal bowl inverted over the loaf for the first 20 minutes to trap steam. Alternatively, use a pizza stone or cast-iron skillet. The key is to create steam for that signature crust. For best results, preheat your oven with the baking sheet inside for 30 minutes before adding the dough.
What if my dough doesn’t rise properly during the cold fermentation?
If your dough isn’t rising after 3 hours in the fridge, check these common issues: expired yeast, water that was too hot/cold, or too much salt. Try activating the yeast separately first to confirm it’s alive. If the dough rises slightly but not fully, extend the cold proof by 1-2 hours. If it still doesn’t rise, start fresh with fresh yeast and properly warmed water.
How do I know when the bread is fully baked?
Your bread is done when the crust is deep golden brown and sounds hollow when tapped on the bottom. The internal temperature should reach 190-200°F. If unsure, cut a small slice—it should be fully set with no raw dough center. For extra assurance, use an instant-read thermometer. The bread will continue cooking slightly after removal, so pull it out when it’s just shy of fully browned.
Can I make this bread ahead of time?
Shape the dough up to 24 hours ahead and refrigerate it. On baking day, let it come to room temperature for 1 hour before baking. For even better results, let it proof at room temperature for 2 hours after removing from the fridge. The bread also freezes beautifully—wrap cooled loaves tightly and freeze for up to 3 months. Thaw at room temperature before serving.

- 12 Bean Chili Recipe: Hearty Slow-Cooked Depth With 12 Legumes - October 17, 2026
- 5 Seed Bread Recipe: Nutty Crunch and Artisan Flavor in One Loaf - October 17, 2026
- 1 Lb Macaroni Salad Recipe: Bold, Crunchy, and Crowd-Pleasing - October 17, 2026