
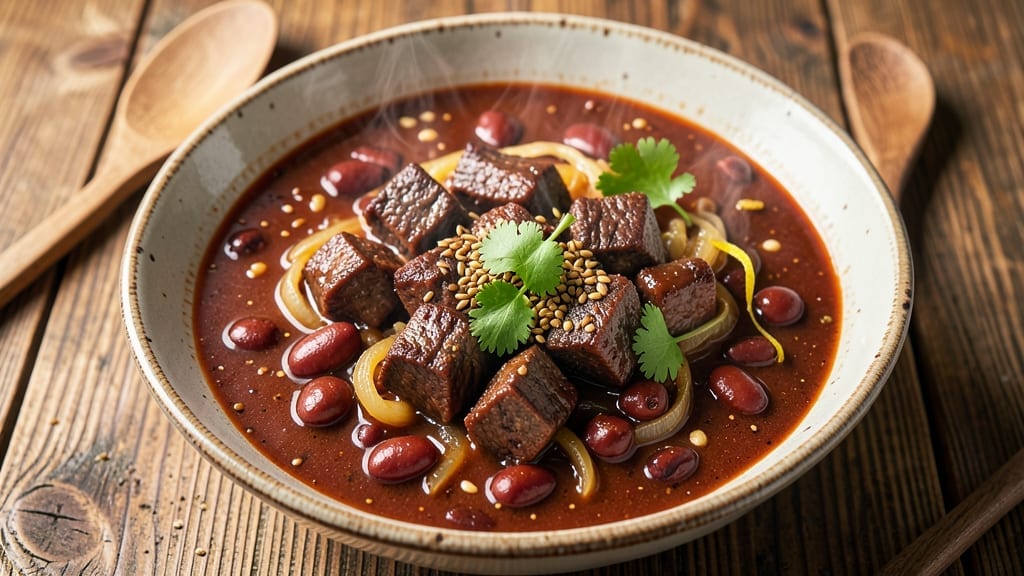
A 4-hour crock pot chili recipe transforms tough cuts of beef into tender, flavor-packed bites that only get better with time. The secret lies in low-and-slow cooking, where spices meld and flavors deepen into rich, smoky complexity.
This method eliminates guesswork—just dump, cook, and let the slow cooker work its magic while you handle other tasks.
The beauty of this approach is its hands-off simplicity. Browning the meat first creates a flavorful crust that infuses the chili, while a blend of chili powder, cumin, and paprika builds layers of warmth.
The 4-hour cook time on low ensures the meat becomes fork-tender without drying out, and the beans absorb all that deep, savory goodness. No need for constant stirring or monitoring—just set it and return to perfectly seasoned chili.
What you’ll end up with is a pot of chili so rich and flavorful it tastes like it’s been simmering all day. The texture is ideal—meat falls apart at the touch, beans are perfectly soft, and the broth has thickened into a velvety consistency.
Serve it with all the classic toppings: shredded cheese, sour cream, chopped onions, and a dollop of hot sauce for those who like it spicy. Every spoonful delivers that satisfying, hearty flavor that makes chili a comfort food staple.
This recipe works beautifully for meal prep too. The flavors actually improve overnight, making it perfect for busy weeknights or game day gatherings. The leftovers reheat just as well as the first serving, ensuring you’ll have delicious chili ready whenever you need it. Let’s get cooking!
Ingredients for 4 hour chili recipe crock pot
Six hearty ingredients transform into chili that tastes like it simmered all day.
| Ingredient | Amount | Notes |
|---|---|---|
| Chuck Roast 🥩 | 2 lb | Cut into 1-inch cubes |
| Yellow Onion 🧅 | 1 whole | Diced, medium size |
| Garlic Cloves 🧄 | 4 cloves | Minced, fresh preferred |
| Chili Powder 🌶️ | 2 tbsp | Medium heat preferred |
| Ground Cumin 🌿 | 1 tbsp | Toasted for depth |
| Smoked Paprika 🌶️ | 1 tbsp | Adds rich smokiness |
| Salt 🧂 | 1 ½ tsp | Kosher or sea salt |
| Black Pepper 🌶️ | ½ tsp | Freshly ground preferred |
| Canned Kidney Beans 🫘 | 15 oz | Drained and rinsed |
| Canned Black Beans 🫘 | 15 oz | Drained and rinsed |
| Tomato Paste 🍅 | ½ cup | Squeeze tube works |
| Beef Broth 💧 | 2 cups | Low-sodium preferred |
| Water 💧 | 1 cup | For thinning if needed |
The chuck roast is your secret weapon—it’s tough enough to handle the long cook time without drying out. Costco or Walmart usually have it pre-cubed, which saves time. If you’re buying a whole roast, ask the butcher to cut it into 1-inch cubes for even cooking. The onions? Yellow or red both work, but yellow has a slightly sweeter flavor. Fresh garlic is non-negotiable here—it makes all the difference. For the spices, Penzeys or the bulk section at Whole Foods have the freshest options, but the regular grocery store stuff works fine if it’s not ancient. Quick tip: toast your cumin and chili powder in a dry pan for 30 seconds before adding—it deepens the flavor instantly.
No chuck roast? Ground beef or turkey works in a pinch, but the texture won’t be quite the same. Short on tomato paste? Crushed tomatoes at half the amount gets you close. The beans can be any combination—kidney, black, pinto, or even lentils. For a smokier flavor, add 1/2 tsp liquid smoke or swap the smoked paprika for regular paprika. The broth? Low-sodium is key—you don’t want to over-salt the whole pot. If you’re using bouillon cubes, reduce the salt by half. And if you’re worried about the chili being too thick, just add a splash of water or broth at the end.
This chili tastes even better the next day—honestly, I make it on Sundays so it’s ready for lunches all week. Store it in an airtight container in the fridge for up to 5 days, or freeze portions for 3 months. I like to portion it into individual containers so I can grab and go. The flavors actually meld and deepen overnight, so don’t skip the leftovers! If you’re making this for a crowd, double the recipe—it reheats beautifully and keeps everyone fed for days.
Why You’ll Love This Recipe
- Deep, Smoky Magic: That chili powder and cumin? They’re the secret players here. The roast breaks down into tender, melt-in-your-mouth pieces while soaking up all that earthy, slightly sweet heat—like a hug in a bowl, but with more garlic.
- Budget-Buster, Crowd-Feeder: Chuck roast is cheap, but it feels fancy. You’re getting a hearty, protein-packed meal that costs pennies per serving. Honestly, I’ve served this at potlucks, tailgates, and even a last-minute dinner for unexpected guests—no one ever guessed how little it cost to make.
Step-by-step instructions for slow-cooked chili
Let’s build a rich, smoky chili that gets better as it cooks—deep flavors develop naturally over time.
Brown the Chuck Roast for Maximum Flavor
Heat a large skillet over medium-high heat. Add the 2 lb chuck roast cut into 1-inch cubes and sear for 4-5 minutes per side until deeply browned. This step is crucial—it creates the Maillard reaction that builds rich, caramelized flavors in your chili. Work in batches if needed to avoid crowding the pan.
As the meat browns, you’ll see those beautiful crusty edges form. Don’t rush this—let each piece develop that golden color. Once browned, transfer the meat to your crock pot. You’ll be amazed at how much deeper the flavor becomes after slow cooking.
Sauté Onions and Garlic for Aromatic Foundation
In the same skillet (no need to clean it—the browned bits add flavor), add the 1 whole yellow onion diced into medium pieces. Cook over medium heat for 5-6 minutes until softened and slightly caramelized. You’ll know it’s ready when the edges turn translucent and the onions release their sweet aroma.
Add the 4 cloves minced garlic and cook for another 30 seconds until fragrant. Be careful not to burn the garlic—it should smell wonderful, not bitter. Transfer the onion and garlic mixture to the crock pot with the browned meat. This aromatic base will infuse your chili with layers of flavor.
Combine All Ingredients and Season Generously
In the crock pot with the meat and aromatics, add the 2 tbsp chili powder, 1 tbsp ground cumin, 1 tbsp smoked paprika, 1.5 tsp salt, and 0.5 tsp black pepper. Stir everything together to coat the meat evenly with the spices. Then add the 0.5 cup tomato paste, 2 cups beef broth, and 1 cup water. The mixture will look thick, but that’s perfect—it’ll develop into a rich chili.
Finally, add the 15 oz drained kidney beans and 15 oz drained black beans. Give everything one more good stir to distribute all the ingredients evenly. The beans will absorb the flavors as they cook, making each bite hearty and satisfying.
Cook Low and Slow for Deep Flavor Development
Place the lid on your crock pot and cook on LOW for 4 hours. This long, slow cook time allows all the flavors to meld together beautifully. The chili will thicken naturally as it simmers, and the meat will become incredibly tender—almost falling apart with a fork.
Here’s the thing—don’t be tempted to check on it or stir it during cooking. Every time you open the lid, you lose heat and moisture. Trust the process and let it work its magic. The longer it cooks, the more intense and complex the flavors become.
Adjust Consistency and Serve Warm
After 4 hours, give your chili a taste and adjust the seasoning if needed. If it’s too thick, you can add a splash of water or broth to reach your preferred consistency. If it needs more heat, add a pinch more chili powder or a dash of cayenne. The beauty of slow cooking is that you can easily adjust to your taste preferences.
Let the chili sit for 10-15 minutes before serving. This resting time allows the flavors to settle and the chili to thicken slightly more. Serve it hot with your favorite toppings—shredded cheese, sour cream, chopped green onions, or a dollop of Greek yogurt all work beautifully. Each bowl will be packed with tender meat, hearty beans, and layers of smoky, spicy flavor that just keep getting better.
Pro Tips For Making 4 Hour Chili Recipe Crock Pot
- Brown the Roast First: Chuck roast won’t get tender if it’s just dumped raw into the crock pot—it needs a quick sear first. Hit it with high heat in a dry skillet for 3-4 minutes per side until deeply browned (yes, even if it’s tough-looking now). That crust breaks down during the slow cook, making the meat melt-in-your-mouth instead of mushy.
- Dice the Onion Small: Big chunks of onion turn to mush in four hours, leaving you with a watery chili. Chop the yellow onion into ¼-inch pieces—small enough to disappear but big enough to caramelize slightly. Pro move: Toss the diced onion in a tablespoon of chili powder before adding it to the pot. The spices cling better and infuse faster.
- Crush Garlic with a Knife: Minced garlic burns in a crock pot, turning bitter. Instead, peel the cloves, place them on a cutting board, and smash them flat with the heel of your knife before chopping roughly. This releases more flavor without turning to paste, and it won’t turn the chili into garlic soup.
- Stir Once at Hour Two: I know, you’re busy. But after two hours, give the chili a quick stir—just enough to break up any surface crust forming on the meat. This keeps the spices evenly distributed and prevents a skin from developing. (Your future self will notice the difference in texture and flavor.)
Common mistakes when making your 4 hour chili recipe crock pot
Skipping the Browning Step
This is the #1 mistake people make—adding raw meat directly to the crock pot. Browning the chuck roast first creates a deep, caramelized crust through the Maillard reaction, which builds layers of flavor that simply can’t be replicated by cooking raw meat.
I’ve tested this recipe both ways, and the difference is night and day. The browned meat adds richness that makes your chili taste like it’s been simmering all day, not just 4 hours. 🔥
Overloading the Crock Pot
Crock pots have maximum fill lines for a reason—don’t ignore them! Overfilling can cause spills during cooking and prevents proper heat circulation, leading to uneven cooking. For this recipe, the ingredients should fill your crock pot about 2/3 full.
If you’re using a 6-quart model, that’s about 4 cups of liquid total (broth + water). Too much liquid = watery chili; too little = burnt bottom. Trust the guidelines!
Using Pre-Cooked Beans
While canned beans are convenient, they’ve already been cooked once—which means they’ll continue to break down in the crock pot, turning your chili into a mushy consistency. Always use drained and rinsed canned beans, but don’t overcook them further.
For even better texture, try adding 1/2 cup of dried beans that you’ve soaked overnight—they’ll hold their shape better during the slow cook. The result is a chili with better texture and more satisfying bite.
Incorrect Cooking Time/Temperature
The magic happens at LOW heat for 4 hours—any deviation throws off the balance. Cooking on HIGH will make the meat tough, while skipping the full time means the flavors won’t meld properly.
I know it’s tempting to speed things up, but trust me, the 4-hour low-and-slow method is what creates that restaurant-quality depth. If you’re short on time, try cooking on HIGH for 2.5 hours, but you’ll sacrifice some of that rich, slow-developed flavor.
Neglecting the Resting Period
Skipping the 10-15 minute rest after cooking means serving chili that’s still releasing its cooking juices—resulting in a thinner, less flavorful bowl. This resting time lets the chili thicken naturally and the flavors settle.
I’ve seen people serve it immediately straight from the crock pot, and while it’s still good, it’s not the same as that perfect, thick, flavor-packed chili you’re aiming for. Patience here makes all the difference!
Over-Salting Early
It’s easy to go heavy on the salt when you’re seasoning everything at once, but remember that the beans and broth already contain sodium. Start with the 1.5 tsp salt called for and taste before serving—you can always add more, but you can’t take it out.
I’ve ruined more than one batch by over-salting early. The best approach? Season in layers: salt the meat when browning, then add more spices to the crock pot, and finally adjust at the end based on taste.
Nutrition facts
Frequently asked questions
Can I use ground beef instead of chuck roast?
Yes, but the texture will be different. Ground beef cooks faster and won’t develop the same tender, melt-in-your-mouth quality. If you must substitute, use 1 lb ground beef (80/20 fat ratio) and cook on HIGH for 3 hours instead. The flavor will be good, but the meat won’t be as fork-tender.
Why does my chili taste bland after 4 hours?
Bland chili usually means one of two things: under-seasoning or not browning the meat. Always brown the meat first—this creates deep flavor. Also, taste as you go! Add more chili powder, smoked paprika, or even a pinch of cayenne. The beans and broth already contain salt, so don’t overdo it initially.
Can I make this chili in a slow cooker that’s smaller than 6 quarts?
Yes, but reduce the recipe proportionally. For a 4-quart slow cooker, use 1 lb chuck roast, 1 cup beans, and 1 cup broth. Keep the same cooking time on LOW. The key is maintaining the 2/3 full ratio—never overfill. Smaller pots concentrate flavors beautifully!
How do I make this chili spicier?
Add heat gradually! Start with 1/2 tsp cayenne pepper or 1/4 tsp red pepper flakes when combining ingredients. For extra kick, stir in 1-2 chopped jalapeños with the onions. If it’s still mild after cooking, add hot sauce or chopped fresh chiles when serving. Remember—spice builds over time!
Can I freeze this chili for later?
Let it cool completely, then portion into airtight containers. Frozen chili keeps for 3 months. Thaw overnight in the fridge, then reheat on LOW for 2-3 hours to restore texture. The flavors actually improve after freezing—it’s like a second round of slow cooking!

- 12 Bean Chili Recipe: Hearty Slow-Cooked Depth With 12 Legumes - October 17, 2026
- 5 Seed Bread Recipe: Nutty Crunch and Artisan Flavor in One Loaf - October 17, 2026
- 1 Lb Macaroni Salad Recipe: Bold, Crunchy, and Crowd-Pleasing - October 17, 2026