
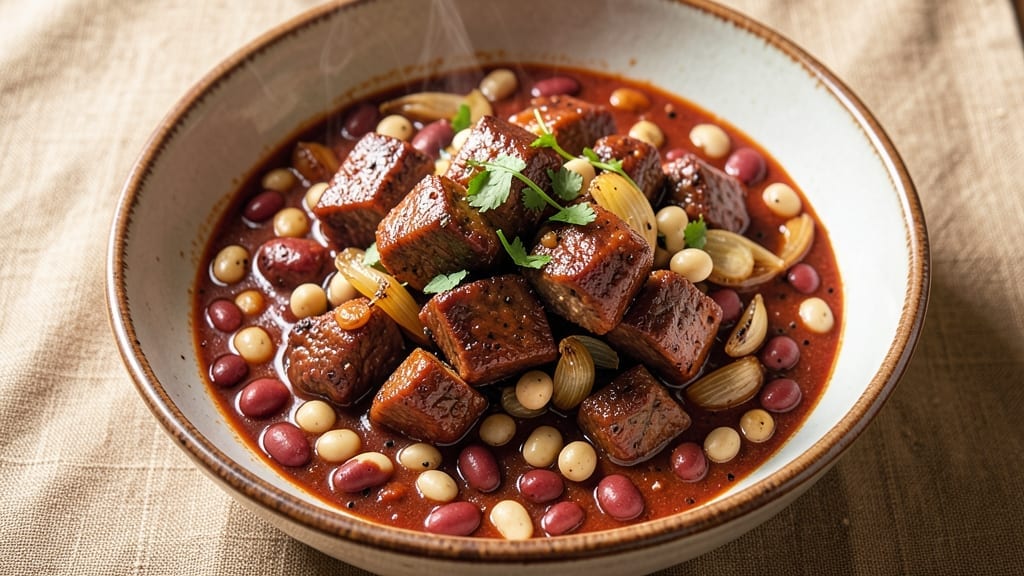
A 4-hour chili recipe transforms simple ingredients into a deeply flavorful stew that tastes even better the next day. The slow simmering process develops rich, smoky notes that penetrate every bite, creating a hearty meal perfect for feeding a crowd or meal prepping.
This isn’t your basic chili—it’s a deeply satisfying dish with tender meat, melt-in-your-mouth beans, and a thick, velvety sauce that clings to every spoonful.
The secret lies in the low-and-slow cooking method, which allows flavors to meld and deepen over time. Unlike quick chili recipes, this one rewards patience with layers of complexity—caramelized onions, toasted spices, and beef that practically falls apart.
No fancy techniques required, just a pot, a stove, and the time to let the magic happen. The result? A pot of chili so rich and flavorful, it becomes the star of any meal.
By the time you’re done, you’ll have a deeply aromatic, smoky chili with a texture that’s both hearty and comforting. The slow cooking breaks down the meat into tender strands, while the beans absorb the flavors, creating a dish that’s as satisfying as it is delicious.
Serve it with crusty bread, tortilla chips, or a dollop of sour cream for the perfect balance of heat and creaminess.
This recipe scales effortlessly—double or triple it for gatherings, or make a small batch for a cozy weeknight dinner. The beauty of chili is its versatility, and this version delivers on every level. Ready to make the most flavorful chili you’ve ever tasted? Here’s how to do it right.
Ingredients for 4 hour chili
Sixteen ingredients. Four hours. One pot that becomes the heart of your meal.
| Ingredient | Amount | Notes |
|---|---|---|
| Chuck Roast 🥩 | 2 ½ lb | Pre-cubed, 1-inch pieces |
| Yellow Onions 🧅 | 2 whole | Diced, medium size |
| Garlic Cloves 🧄 | 6 cloves | Minced, fresh preferred |
| Black Beans 🌱 | 2 cups | Drained, rinsed |
| Kidney Beans 🌱 | 2 cups | Drained, rinsed |
| Tomato Paste 🍅 | ½ cup | Smooth, not chunky |
| Beef Broth 💧 | 4 cups | Low-sodium preferred |
| Chili Powder 🌶️ | 2 tbsp | Medium heat, not hot |
| Ground Cumin 🌿 | 1 tbsp | Toasted for depth |
| Smoked Paprika 🌶️ | 1 tbsp | For authentic smokiness |
| Salt 🧂 | 1 ½ tsp | Adjust to taste |
| Black Pepper 🌶️ | ½ tsp | Freshly cracked |
| Dark Brown Sugar 🍯 | 1 tbsp | For subtle sweetness |
| Cayenne Pepper 🔥 | ¼ tsp | Optional, for heat |
| Olive Oil 🫒 | 2 tbsp | For caramelizing onions |
The chuck roast is non-negotiable here—it’s what gives you that melt-in-your-mouth texture. Costco or Walmart usually have it pre-cubed, which saves time, but if you’re buying a whole roast, ask the butcher to cut it into 1-inch pieces. Look for good marbling—those little fat streaks are what keep the meat tender during the long cook. For the onions, I always grab the yellow ones—they caramelize better than red or white. If you’re short on time, Trader Joe’s sells pre-diced onions in a bag, which is a total game-changer. The garlic? Fresh is ideal, but if you’re using dried, use half the amount—it’s way more concentrated.
No chili powder? Mix 1 tbsp paprika + 1 tsp cumin + ½ tsp oregano as a substitute. Running low on kidney beans? Black beans or pinto beans work just fine—just make sure to rinse them well. The tomato paste can be from a tube or a can—just avoid the chunky kind. For a deeper flavor, toast your spices in a dry pan for 30 seconds before adding to the pot. That little step makes a huge difference. And if you’re worried about the sugar making it too sweet, don’t be—the smoky spices and beef will balance it out perfectly. The beef broth? Low-sodium is key—you’ll be adding plenty of salt later.
This chili tastes even better the next day, so make extra. It keeps for 5 days in the fridge or 3 months in the freezer. I like to portion mine into individual containers for easy lunches—just reheat with a splash of water or broth. The flavors only get richer over time, so if you can, let it sit overnight before serving. For serving, I always keep sour cream, shredded cheese, and chopped cilantro on hand. The chili itself is hearty enough to stand alone, but those toppings take it to the next level.
Why You’ll Love This Recipe
- Deep, Meat-Smoked Richness: That chuck roast? It falls apart like it’s been cooking for days, but we’re only talking four hours. The onions caramelize just enough to sweeten the pot, while the garlic cloves (whole, peeled, and smashed—don’t skip this!) infuse every bite. The beans soak up all the smoky, savory goodness—no dry mouthfuls here.
- Game for Any Day: This isn’t just a bowl of chili—it’s my go-to for tailgates, lazy Sundays, or when friends drop by unannounced. Serve it with cornbread for a full spread, or let people build their own bowls with toppings. Even my picky teenage nephew asks for seconds when it’s on the table.
- Budget-Friendly Powerhouse: A single chuck roast stretches into six servings, and the beans? They’re cheap, filling, and packed with protein. I make a double batch, freeze half, and boom—next month’s dinner is already solved. Honestly, the only thing costing extra is the good tortilla chips I buy to eat while I cook.
Step-by-step instructions for deep, smoky chili
Here’s how to build rich, complex chili that tastes even better the next day.
Sear the Chuck Roast for Maximum Flavor
Heat a large Dutch oven over medium-high heat and add the 2 tablespoons olive oil. Working in batches if needed, add the 2.5 lb chuck roast (pre-cubed) and sear for 3-4 minutes per side until deeply browned. This step creates the Maillard reaction that builds deep, meaty flavor.
Don’t overcrowd the pan or the meat will steam instead of brown. You want each piece to develop a rich crust. Once all the meat is browned, transfer it to a plate and set aside. You’ll notice the kitchen smells incredible at this point—that’s your first sign the chili is going to be amazing.
Build the Flavor Base with Onions and Spices
In the same Dutch oven, add the 2 whole yellow onions (diced) and cook for 8-10 minutes until softened and golden. The onions should caramelize slightly, adding sweet depth to the chili. Stir occasionally to prevent burning.
Add the 6 minced garlic cloves and cook for 30 seconds until fragrant. Then stir in the 2 tablespoons chili powder, 1 tablespoon ground cumin, 1 tablespoon smoked paprika, 1.5 teaspoons salt, 0.5 teaspoon black pepper, 1 tablespoon dark brown sugar, and 0.25 teaspoon cayenne pepper. Cook for 1 minute to toast the spices and release their aromas.
Simmer the Chili for Deep Flavor Development
Return the seared chuck roast to the pot. Stir in the 0.5 cup tomato paste and cook for 2 minutes to thicken slightly. Pour in the 4 cups beef broth and bring to a gentle boil. Then reduce heat to low and let it simmer uncovered for 2 hours.
Here’s where the magic happens: the chuck roast will break down into tender, shreddable pieces while infusing the broth with incredible flavor. Stir occasionally, but don’t worry about constant attention—the chili will develop its own texture. You’ll know it’s ready when the meat is fork-tender and the flavors have melded beautifully.
Finish with Beans and Adjust Seasoning
Add the 2 cups black beans and 2 cups kidney beans (drained and rinsed) to the chili. Stir well to combine and let the chili simmer for another 30-45 minutes to heat through. The beans will absorb the rich flavors and become part of the chili’s texture.
Taste and adjust seasoning if needed. You might want to add a bit more salt or a splash of water if the chili is too thick. The beans should be heated through but not mushy. This is where you can really taste all the layers of flavor you’ve built—smoky, spicy, sweet, and savory all working together.
Rest and Serve for Perfect Texture
Let the chili rest for 10-15 minutes off the heat before serving. This allows the flavors to continue melding and the chili to thicken slightly. The resting period also makes serving easier—no more ladling thick chili that needs to be stirred constantly.
Serve the chili hot with your favorite toppings like shredded cheese, sour cream, chopped green onions, or a dollop of Greek yogurt. The flavors will be even better the next day as the chili continues to develop its complex character. This recipe makes 6 servings, perfect for a family dinner or meal prep for the week.
Pro Tips For Making 4 Hour Chili
- BROWN THE ROAST FIRST: Chuck roast loves a good sear—crisp the edges in a hot Dutch oven for 5-6 minutes before adding anything else. I learned this the hard way: skipping this step means flavorless chili, no matter how long you simmer.
- DICE ONIONS SMALL: Tiny onion pieces (1/4-inch or smaller) disappear into the chili without leaving chunks. I used to cut them in big wedges—now I just pulse them in a food processor for 2 seconds. Your future self will thank you for not chewing onion surprises later.
- ADD BEANS LATE: Tossing in black and kidney beans at the 30-minute mark keeps them tender instead of mushy. I used to dump them in early and ended up with a sad, grainy texture—now I treat them like the delicate guests they are.
- SIMMER COVERED AFTER 2 HOURS: The first 2 hours of simmering need the lid off to deepen the flavors, but after that, cover it up to lock in moisture. After burning three batches with uneven cooking, I finally realized this simple switch makes all the difference.
Essential equipment for great 4 hour chili
Dutch Oven Essentials
A 5-7 quart Dutch oven is my go-to for this chili—it provides enough space for the meat to brown properly while allowing room for the liquid to simmer without boiling over. I recommend a Lodge cast iron Dutch oven for its even heat distribution and durability.
If you don’t own one, a heavy-bottomed stainless steel pot works too. Just avoid thin aluminum—it won’t hold heat well enough for consistent simmering. 🔥
Meat Thermometer
Invest in a meat thermometer to check the internal temperature of your chuck roast. Aim for 203°F for perfectly tender meat. I love the Thermoworks Smoke for its precision and durability.
If you don’t have one, use the fork test: the meat should shred easily when pierced with a fork. This ensures the chili has the right texture without being mushy.
Wooden Spoon
A wooden spoon is a must for stirring chili—it won’t scratch your Dutch oven like metal utensils. Look for one with a long handle (at least 12 inches) to avoid burns.
A Oxo Good Grips wooden spoon is my favorite because it’s sturdy and easy to grip. Avoid plastic spoons—they can melt or warp over time, especially with prolonged heat exposure.
Slow Cooker Option
If you prefer hands-off cooking, a 6-quart slow cooker works beautifully. I use my Crock-Pot 6-quart for this recipe, setting it to Low for 6-8 hours. The key is to brown the meat separately in a skillet before transferring it to the slow cooker.
This step ensures deep flavor development, just like the stovetop method. Just remember to leave the lid slightly ajar during the last 30 minutes to prevent overflow.
Bean Rinser
Rinsing beans thoroughly removes excess starch, which can make your chili gummy. A fine-mesh colander or a bean rinser (like the OXO Good Grips) makes this task effortless. I rinse beans under cold water until the water runs clear.
This small step makes a big difference in the final texture of your chili. If you’re short on time, a clean kitchen towel can work in a pinch—just give the beans a good shake to remove excess moisture.
Storage Containers
For meal prep, use airtight glass containers to store your chili. I prefer Pyrex 4-cup containers because they’re microwave-safe and stackable. Label them with the date to keep track of freshness. Chili tastes even better the next day, so portion it out immediately after cooking.
If freezing, leave 1 inch of headspace to prevent ice crystals from forming. Reheat on the stovetop over medium-low heat for the best texture. ❄️
Nutrition facts
Frequently asked questions
Can I use ground beef instead of chuck roast for this chili?
Ground beef works beautifully, especially if you prefer a more finely textured chili. Use 1.5 pounds of 80/20 ground chuck (the higher fat content adds richness) and brown it thoroughly in the Dutch oven before adding other ingredients. The cooking time remains the same, but you’ll want to stir occasionally to prevent burning.
How can I make this chili vegetarian?
Swap the beef for 1.5 pounds of crumbled tempeh or extra-firm tofu (pressed and pan-fried first) and add 1 cup of diced mushrooms for umami depth. Use vegetable broth instead of beef broth, and consider adding 1 tablespoon soy sauce or 1 teaspoon liquid smoke to mimic the meaty flavor. The beans will still provide plenty of heartiness!
Why does my chili taste bland after 4 hours?
Bland chili usually means one of three things: insufficient browning, under-seasoning, or not enough simmering time. First, ensure you properly seared the meat—this builds deep flavor. Second, taste and adjust seasoning before adding beans (they dilute flavors). Finally, let it simmer uncovered for the full 4 hours so moisture evaporates slightly, intensifying flavors.
Can I make this chili in an Instant Pot?
Yes! Sauté the onions and spices as directed, then add all ingredients (including meat) and cook on High Pressure for 20 minutes, followed by a 10-minute natural release. The beans will absorb flavors quickly, so you may want to add them only after the initial pressure cook. Finish with a quick stir on the sauté function to thicken the sauce if needed.
What’s the best way to reheat leftover chili?
Reheat gently on the stovetop over medium-low heat with a splash of water or broth to prevent drying. Microwaving works too, but stir every 30 seconds to distribute heat evenly. Avoid high heat—it can make the beans mushy. For extra richness, stir in a pat of butter or a drizzle of olive oil while reheating.

- Pea Soup Instant Pot Recipe: Velvety Green Smoothness in 20 Minutes - November 1, 2026
- Pork Loin Pulled Pork Crock Pot Recipe: Slow-Smoked Tenderness With Zero Dryness - November 1, 2026
- Baked Potatoes in Crock Pot Recipe: Buttery Interiors and Crispy Top Magic - November 1, 2026