
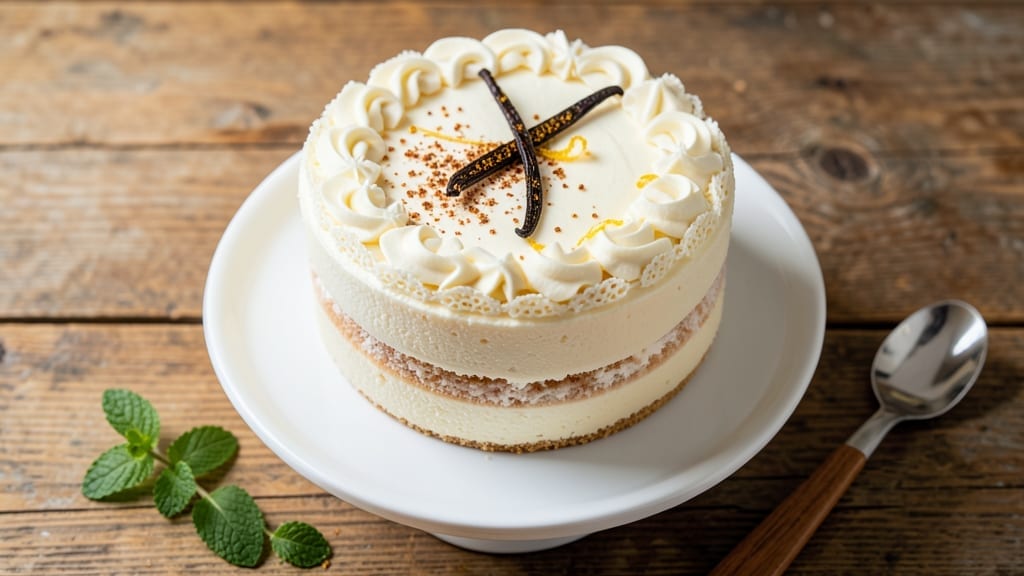
This 9-inch white cake recipe delivers the perfect balance of tender crumb and delicate vanilla flavor—ideal for birthdays, weddings, or any celebration that calls for elegant simplicity. The secret lies in a vanilla bean swirl baked into the layers, creating subtle pockets of flavor that elevate every bite.
Unlike dense white cakes, this version stays moist for days, thanks to a precise butter-to-flour ratio and a touch of cream cheese for stability.
Baking at 325°F ensures a golden, even rise without over-browning, while the buttery frosting layers add a professional touch that’s surprisingly easy to achieve. Whether you’re a beginner or an experienced baker, this recipe builds confidence with clear steps—no fancy techniques required.
The frosting, made with vanilla buttercream, is rich enough to hold its shape but light enough to spread smoothly.
What you’ll end up with is a three-layer white cake that’s visually stunning and delicious—each slice offering a harmonious blend of vanilla, butter, and a hint of creaminess.
The swirls create a marbled effect that’s both elegant and approachable, perfect for decorating with fresh berries, edible flowers, or a dusting of powdered sugar. This cake isn’t just a dessert; it’s a centerpiece.
The beauty of this recipe is its versatility. Serve it as-is for a classic look, or customize it with fillings like raspberry jam or lemon curd.
It’s also freezer-friendly, so you can bake ahead and assemble when needed. Let’s get started on creating a cake that’ll impress every time.
Ingredients for 9 inch white cake
Twelve ingredients for a showstopping white cake with swirls you’ll want to slice into immediately.
| Ingredient | Amount | Notes |
|---|---|---|
| All-Purpose Flour 🌾 | 3 cups | Sifted for light texture |
| Unsalted Butter 🧈 | 1 ½ cups | Softened to room temperature |
| Granulated Sugar 🍚 | 2 cups | Superfine preferred for smoothness |
| Vanilla Bean Paste 🌿 | 2 tbsp | Real vanilla bean seeds preferred |
| Large Eggs 🥚 | 6 whole | Room temperature for even mixing |
| Cream Cheese 🧀 | 8 oz | Full-fat for stability |
| Vanilla Extract 🍶 | 2 tsp | Pure vanilla extract preferred |
| Baking Powder 🌶️ | 1 ½ tsp | Freshly opened for lift |
| Salt 🧂 | ½ tsp | Fine sea salt preferred |
| Whole Milk 🥛 | 1 cup | Room temperature for smooth batter |
| Powdered Sugar 🍚 | 4 cups | For frosting, sifted |
| Heavy Whipping Cream 🥛 | 1 cup | Cold for stiff peaks |
| Vanilla Bean Seeds 🌿 | 1 whole | Scraped from 1 vanilla bean |
The butter and cream cheese are your cake’s foundation—don’t skimp on quality. Plugrá brand butter melts beautifully, and Philadelphia cream cheese is the gold standard for stability. Grab a vanilla bean from Penzeys or a specialty store if you want that extra depth—it’s worth the splurge. The flour? King Arthur or Gold Medal are my go-tos for reliable results. Always measure flour by weight if you can (360g for 3 cups) for consistency, but if you’re scooping, spoon it in and level off. Eggs should be the same size—large works best for even baking.
No vanilla bean? Vanilla bean paste is the next best thing, but pure extract in a pinch works too—just double the amount. Running low on powdered sugar? Process granulated sugar in a food processor for a quick substitute, though it won’t be as smooth. The heavy cream for frosting needs to be cold—pop it in the freezer for 15 minutes before whipping if your kitchen’s warm. For the swirl effect, use a piping bag with a star tip (Wilton 1M works great) and pipe the vanilla buttercream in a zigzag before spreading the cake layers. No piping bag? A plastic bag with the corner cut off does the trick.
Cake layers keep beautifully wrapped in plastic for 3 days at room temperature, or 1 week in the fridge. Frosting? It’s best used within 2 days of making, but you can extend that to 5 days by storing it pressed between parchment paper in the fridge. For freezing, wrap each layer individually—they’ll thaw at room temp in about 2 hours. Pro tip: Brush the cooled layers with simple syrup (equal parts sugar and water, heated) before frosting to keep them moist. This cake also freezes beautifully assembled—just wrap tightly and thaw overnight in the fridge.
Why You’ll Love This Recipe
- No Mixer Needed: I swear by this recipe when I’m in a rush—just cream the butter and sugar by hand (or use a fork in a pinch), fold in the flour, and you’re done. That vanilla bean paste? It’s the secret to cutting corners without sacrificing flavor.
- Buttery Vanilla Bliss: The moment you taste that first bite—rich, tender crumb with layers of vanilla that don’t taste like extract—you’ll understand why I keep this on repeat. The butter isn’t just a fat; it’s the star, making every slice feel like a hug.
- Birthday to Brunch: This cake is my go-to for celebrations and lazy mornings. Frost it with whipped cream for a quick dessert, or slice it into squares for a no-fuss breakfast with coffee. (Yes, even on a Tuesday.)
- Leftovers That Last: Bake one, eat it for days. The texture stays perfect when stored in the fridge, and it reheats beautifully—whether you’re packing it for lunch or serving it at a potluck. Budget-friendly? Absolutely. Reliable? Even more so.
Step-by-step instructions for vanilla bean swirl cake
Here’s how to bake a showstopping white cake with signature vanilla bean swirls and velvety buttercream.
Prepare the Cake Batter
Preheat your oven to 350°F and grease two 9-inch round cake pans, then line the bottoms with parchment paper. In a medium bowl, whisk together the 3 cups all-purpose flour, 1.5 teaspoons baking powder, and 0.5 teaspoon salt. Sift this dry mixture directly into a large mixing bowl for a light, airy texture.
In a separate bowl, cream together the 1.5 cups unsalted butter (softened) and 2 cups granulated sugar on medium speed until light and fluffy—about 3-4 minutes. Add the 6 whole large eggs, one at a time, mixing well after each addition. Scrape down the sides of the bowl to ensure everything is fully incorporated.
Alternate adding the dry ingredients and 1 cup whole milk, beginning and ending with the flour mixture. Mix on low speed just until combined—overmixing develops gluten and can make your cake dense. Fold in the 2 tablespoons vanilla bean paste and 1 whole vanilla bean seeds (scraped from the pod) until evenly distributed.
Create the Vanilla Bean Swirls
Divide the batter evenly between the two prepared cake pans. To create the signature swirls, pour half of the remaining batter into a separate bowl. Using a rubber spatula, gently scrape the bottom of one pan to create a thin layer of batter. Then, carefully pour the reserved batter in a zigzag pattern across the top.
With the spatula, gently swirl the batter in the pan, creating a marbled effect. Repeat this process with the second pan. This technique ensures each slice has those beautiful vanilla bean swirls throughout. Tap the pans gently on the counter to release any air bubbles before baking.
Bake the Cake Layers
Bake the cakes for 25-30 minutes, or until a toothpick inserted into the center comes out clean. Rotate the pans halfway through baking for even browning. The cakes should be golden on top and spring back when gently pressed in the center.
Once done, remove the cakes from the oven and let them cool in their pans for 10 minutes. Then, transfer them to a wire rack to cool completely. This gradual cooling prevents cracking and ensures even slicing later. While the cakes cool, prepare the frosting.
Make the Buttery Frosting
In a large bowl, beat the 8 ounces cream cheese and 1.5 cups unsalted butter (softened) on medium speed until smooth and creamy—about 2-3 minutes. Add the 4 cups powdered sugar, 2 teaspoons vanilla extract, and a pinch of salt. Beat on high speed until light and fluffy, scraping down the sides as needed.
In a separate bowl, whip the 1 cup heavy whipping cream (chilled) to stiff peaks. Gently fold this into the cream cheese mixture until fully combined. The frosting should be thick enough to hold its shape but still spreadable. Taste and adjust sweetness if needed—this is your chance to perfect the flavor.
Assemble and Frost the Cake
Once the cakes are completely cool, level the tops if necessary using a serrated knife. Place one cake layer on a cake stand or plate. Spread a thin layer of frosting (about 1/4 cup) over the top to create a “crust.” This prevents the frosting from seeping into the cake layers.
Add the second cake layer on top, then spread the remaining frosting evenly over the entire cake, using an offset spatula to create smooth sides. For extra flair, pipe decorative swirls or rosettes around the edges. Chill the cake in the refrigerator for 30 minutes before slicing to help the frosting set. Serve at room temperature for the best texture and flavor.
Pro Tips For Making 9 Inch White Cake
- Cream Butter Slowly: I learned this the hard way—whipping cold butter and sugar too fast just makes a greasy mess. Use room-temperature butter (soft but not melted) and beat it with the sugar on medium speed for 3-4 minutes until it’s light and fluffy. That’s when the air gets trapped, and your cake won’t end up dense.
- Sift That Flour: Skimping on sifting the flour saves 30 seconds but ruins the texture. A 9-inch white cake needs lightness, and sifting removes lumps while aerating the batter. Do it right before folding it into the butter-sugar mix—no need to pre-sift if you’re in a rush, but don’t skip it entirely.
- Don’t Overmix Eggs: Crack those eggs into a separate bowl first—shells in the batter are a nightmare. Then, whisk them just until the yolks and whites are fully combined. Overmixing turns the batter tough, and you’ll end up with a cake that’s more like a brick.
- Test for Doneness Early: The recipe says bake until a toothpick comes out clean, but that’s not always enough. Start checking at 20 minutes—if the edges are pulling away but the center’s still jiggly, tent with foil and let it set another 5-10 minutes. Overbaking dries out a white cake faster than you’d think.
Make-ahead tips for this dish
Bake Ahead Timeline
Plan to bake your cake layers 24 hours before serving if possible. This gives the flavors time to meld beautifully and makes assembly a breeze. I like to bake in the morning, let them cool completely, then wrap each layer in plastic wrap and store at room temperature.
The frosting can be made the day before—just store it in an airtight container in the fridge. 📅
Freezing Layers
For maximum make-ahead convenience, freeze your baked cake layers individually. Wrap each layer tightly in plastic wrap, then place them in a freezer bag with all the air squeezed out.
They’ll keep for up to 3 months in the freezer. When ready to assemble, thaw overnight in the fridge. This method preserves moisture perfectly—no dry cake here! ❄️
Frosting Prep
Make your buttercream frosting 1 day ahead and store it in the fridge between layers of parchment paper. The paper prevents it from drying out. When you’re ready to assemble, let it sit at room temperature for 30-45 minutes to soften.
I find this timing works perfectly—it’s soft enough to spread but still holds its shape when piped. 🧈
Assembly Day Tips
On the day you’ll serve the cake, let all components come to room temperature before assembling. This prevents condensation from making your frosting soggy. Work quickly once you start spreading—have your offset spatula, piping bags, and decorations ready.
I like to keep a damp paper towel handy to wipe off any frosting smudges immediately. 🎂
Storage After Serving
Any leftover cake can be stored in an airtight container at room temperature for 3 days. For longer storage, move it to the fridge where it’ll keep for up to 5 days.
To refresh, let it sit at room temperature for 1 hour before serving. The flavors actually improve with a day or two of resting—trust me, it gets better! 💫
Decorating Shortcuts
Prep your decorations the night before if you’re feeling fancy. Fresh berries can be washed and dried, and edible flowers can be stored in a paper towel-lined container in the fridge.
For chocolate shavings, use a vegetable peeler on a 12-ounce bar of dark chocolate the day before and store in an airtight container. This saves time and keeps everything looking fresh. ✨
Nutrition facts
Frequently asked questions
Can I make this 9-inch white cake with fewer layers?
This recipe works perfectly as a single-layer cake or even cupcakes. For a single layer, bake one 9-inch pan for 25-30 minutes and frost immediately after cooling. For cupcakes, fill liners ⅔ full and bake for 18-20 minutes at 350°F. The vanilla swirl technique still works—just pipe the batter in a spiral pattern before baking.
Why does my white cake turn out dense?
Overmixing the batter or using cold ingredients are the most common culprits. Always mix on low speed after combining wet and dry ingredients, and ensure butter, eggs, and milk are at room temperature. Another tip: don’t overfill your pans—batter should come ⅔ up the sides. Tap pans gently on the counter before baking to release air bubbles.
Can I substitute cream cheese in the frosting?
Yes, but the texture will change. For a lighter frosting, replace half the cream cheese with 1 cup softened butter. For a tangier flavor, try 8 oz mascarpone cheese instead. If you’re avoiding dairy, use vegan cream cheese and ensure all other ingredients (butter, heavy cream) are plant-based. The frosting will still be delicious!
How do I get the swirls to look perfect?
Practice makes perfect! Use a piping bag with a star tip (Wilton 1M works great) to create clean lines. For a more rustic look, use a plastic bag with the corner cut off. Pipe the vanilla buttercream in a zigzag pattern before spreading the cake layers. Chill the cake for 30 minutes** before slicing—this helps the swirls hold their shape beautifully.
Is this cake good for beginners?
Yes, this recipe is beginner-friendly! The key steps are simple: mix, bake, cool, and frost. The swirl technique just takes a little practice, but even if they’re not perfect, your cake will still taste amazing. Start with room-temperature ingredients and follow the recipe closely—those small details make all the difference for first-timers.

- Pea Soup Instant Pot Recipe: Velvety Green Smoothness in 20 Minutes - November 1, 2026
- Pork Loin Pulled Pork Crock Pot Recipe: Slow-Smoked Tenderness With Zero Dryness - November 1, 2026
- Baked Potatoes in Crock Pot Recipe: Buttery Interiors and Crispy Top Magic - November 1, 2026