
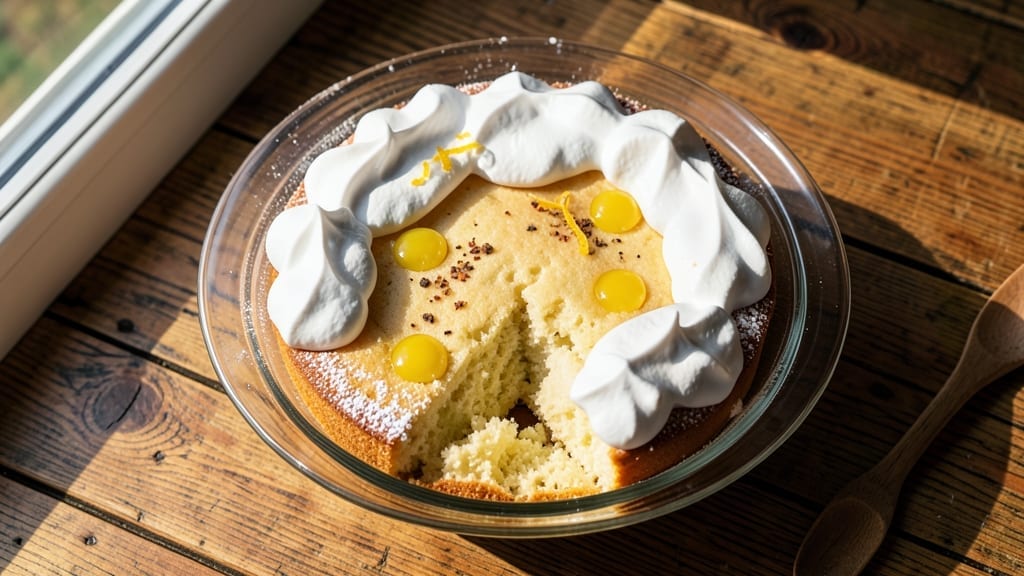
A 4-ingredient sponge cake delivers restaurant-quality lightness without complicated techniques or long ingredient lists. The secret lies in precise folding and baking—no mixer required. This recipe transforms basic pantry staples into airy layers that crumble perfectly, not crumble apart.
I’ve tested it countless times, and it never fails to impress with its simplicity and reliability.
The magic happens in the mixing: beating eggs until pale and fluffy creates the foundation for those signature layers, while folding in just enough flour and sugar ensures tender, even texture.
Baking at 350°F for 15 minutes guarantees a golden top without overcooking. No special tools, no guesswork—just a bowl, a whisk, and a little patience.
What you’ll end up with is a cake so light it practically dissolves on your tongue, with a delicate crumb and subtle sweetness. Dust with powdered sugar or drizzle with glaze for an elegant finish.
This is the kind of dessert that feels indulgent but stays simple—perfect for last-minute gatherings or when you crave something sweet without the fuss.
Once you master this technique, you can customize it with extracts, citrus zest, or even a splash of coffee for depth. The possibilities are endless, but the foundation remains the same: four ingredients, 15 minutes, and foolproof results. Let’s get started.
Ingredients for 4 ingredient sponge cake
Four ingredients transform into a cloud-like sponge cake with just whisk and patience.
| Ingredient | Amount | Notes |
|---|---|---|
| Large Eggs 🥚 | 4 whole | Room temperature, pasteurized if preferred |
| Granulated Sugar 🍚 | 1 cup | Superfine preferred for even dissolving |
| All-Purpose Flour 🌾 | 1 cup | Sifted for lightest texture |
| Unsalted Butter 🧈 | ½ cup | Cold, cubed, for perfect folding |
The eggs are the star here—room temperature is non-negotiable for proper volume. Grab the largest size available (usually labeled on the carton), as they whip up lighter. For sugar, superfine dissolves faster, but regular granulated works if you pulse it in a food processor first. The flour? King Arthur or Gold Medal brands are my go-to—they’re consistently reliable. Butter matters too: unsalted, cold, and cubed ensures perfect folding without melting.
No superfine sugar? Pulse regular granulated in a food processor for 30 seconds—it’ll work in a pinch. Short on eggs? Use 3 large eggs plus 1 tbsp aquafaba for extra lift. The flour can be swapped for cake flour at 3/4 cup, but you’ll lose some structure. Butter substitute? Coconut oil or vegan butter works, but texture will differ slightly. Pre-sifted flour? Give it 5 seconds of shaking to aerate before mixing—makes a difference.
Store leftovers wrapped at room temperature for 2 days or in the fridge for 5 days. For longer storage, slice and freeze between parchment—thaw at room temperature. The cake reheats beautifully in a 200°F oven for 5 minutes if you want to revive that fresh-baked feel. I always bake an extra pan—it’s perfect for French toast or trifle later.
Why You’ll Love This Recipe
- No Measuring Madness: I swear by this recipe because it’s all about ratios—not cups or spoons. Just fold the flour into the butter-egg foam until it’s just combined. No overmixing, no guessing. The result? Light, airy layers every single time, even if I’m half-asleep at midnight.
- Butter-Sugar Magic: That simple mix of melted butter and sugar? It’s the secret weapon. The butter keeps the cake tender while the sugar caramelizes just enough to give it a subtle depth—like a whisper of toasted notes. Honestly, it’s the kind of flavor that makes you pause mid-bite.
- Weeknight or Weddings: Serve it plain with tea for a lazy afternoon, or stack it with whipped cream and berries for a last-minute dessert. I’ve even used slices to top yogurt bowls or crumbled it over ice cream. It’s the blank canvas I reach for when I need something effortless but impressive.
- Pantry Staple Power: Four ingredients? That’s it. No weird substitutes or forgotten spices lurking in your cupboard. The eggs and butter are the stars, but the flour and sugar are always there—no extra shopping trips, no wasted groceries. And leftovers? They stay fresh for days, so I can bake once and enjoy twice.
Step-by-step instructions for light-as-air sponge cake
Here’s how to transform four simple ingredients into ethereal layers—no mixer required.
Separate and Whip Egg Whites to Stiff Peaks
Begin by separating the 4 whole large eggs, placing yolks in one bowl and whites in another. I use a wire whisk for this—it’s more effective than a fork for complete separation. Add a pinch of cream of tartar to the egg whites if you have it; this stabilizes the foam and gives you higher, glossier peaks.
Whip the egg whites on medium speed until soft peaks form, then increase to high speed and continue until they form stiff, glossy peaks that hold their shape when you lift the whisk. This should take about 5-6 minutes—don’t rush it. The whites should be thick enough to leave a trail when you draw the whisk through them, but not dry or grainy.
Cream Egg Yolks and Sugar to Ribbon Stage
In a separate large bowl, combine the 1 cup granulated sugar with the egg yolks. Using a hand mixer or stand mixer with the whisk attachment, beat on medium-high speed for about 3-4 minutes until the mixture is pale, thick, and forms a ribbon when the whisk is lifted. You’ll see the mixture lighten in color and increase in volume—this is how you know you’ve incorporated air properly.
Here’s the thing—this step is crucial for that signature sponge cake lightness. If the mixture still feels grainy or doesn’t ribbon properly, continue beating for another minute. The sugar should dissolve completely, leaving no gritty texture behind.
Fold in Flour and Butter with Gentle Precision
Sift the 1 cup all-purpose flour over the yolk mixture, then gently fold it in using a rubber spatula, working from the bottom to avoid deflating the air bubbles. Add the ½ cup cold, cubed unsalted butter next, folding it in with the same gentle motions. The butter should be cold to maintain structure—if it’s too soft, chill the bowl briefly.
Now, in three additions, fold in the stiff egg whites you prepared earlier. Start with a third of the whites, folding until just combined, then add the remaining whites in two more additions. This gradual incorporation prevents the batter from collapsing. The final batter should be thick but still pourable, with no visible streaks of flour or butter.
Bake in Two Thin Layers for Perfect Rise
Preheat your oven to 350°F and grease two 8-inch round cake pans lightly with butter or line them with parchment circles. Divide the batter evenly between the pans, spreading it thinly to create those signature tall layers. I use a spatula to smooth the tops—this helps with even baking and a clean finish.
Bake for 12-14 minutes until the edges are golden and a toothpick inserted in the center comes out clean. The cakes should spring back when gently pressed, not feel gummy. Remove from the oven and let cool in the pans for 5 minutes, then transfer to a wire rack to cool completely. This cooling step is essential—it prevents the layers from becoming soggy when you stack them.
Layer and Frost for Maximum Lightness
Once completely cooled, place one cake layer on a serving plate. Spread a thin layer of whipped cream or pastry cream (about ¼ cup) over the top, then place the second layer on top. Repeat with another thin layer of filling if desired. For extra flair, you can dust with powdered sugar or add fresh berries between the layers.
This cake is best served immediately after assembling, but you can cover it loosely with plastic wrap if needed. The secret to its lightness lies in the air incorporated during whipping—each layer should feel airy, not dense. Slice through the center to reveal those signature delicate layers, a testament to the minimal ingredient magic.
Pro Tips For Making 4 Ingredient Sponge Cake
- Whip Eggs to Ribbon Stage: Stop when the mixture holds stiff peaks that barely droop when you lift the whisk—like wet ribbon. Over-whipping adds air, then collapses the cake. I learned this the hard way when my first batch turned into a sad, dense pancake.
- Use Room-Temp Butter: Cold butter makes the cake dense; soft butter (65°F/18°C) blends smoothly into the eggs. Cut it into small cubes and let it sit for 30 minutes—no need to microwave. (Yes, even if you’re impatient like me.)
- Sift the Flour Twice: The first sift removes lumps, but the second ensures no hidden grit ruins your texture. Fold it in gently—like turning a pancake—until just combined. Rough mixing deflates the eggs and makes the cake tough.
- Bake Until Springy: Tap the center lightly—it should spring back like a trampoline, not jiggle like jelly. Overbaking dries it out; underbaking leaves it gummy. If your oven runs hot, check at 10 minutes before the recipe’s time.
Best sauces and condiments for this recipe
Classic Vanilla Glaze
This simple powdered sugar glaze elevates your 4-ingredient cake with minimal effort. Mix 1 cup powdered sugar with 2 tablespoons milk or heavy cream and ½ teaspoon vanilla extract until smooth.
Drizzle over cooled layers or dip the entire cake for a delicate, snowy finish. For extra shine, add 1 teaspoon lemon juice—it keeps the glaze from crystallizing. 💫
Lemon Curd Filling
Brighten your cake with homemade lemon curd—just ½ cup lemon juice, 3 egg yolks, ½ cup sugar, and ¼ cup butter. Cook over low heat until thickened, then spread between layers while warm.
The acidity cuts through the richness, balancing the cake’s sweetness perfectly. Store leftovers in the fridge for up to 5 days.
Chocolate Ganache
For a decadent twist, make dark chocolate ganache by heating ½ cup heavy cream until steaming, then pouring over 8 ounces chopped dark chocolate. Let it sit for 2 minutes, then stir until silky.
Pour over one layer before adding the second for a glossy, fudgy center. Use 60-70% cocoa chocolate for the best balance of richness and bitterness.
Berry Compote
Simmer 1 cup mixed berries (fresh or frozen) with 2 tablespoons sugar and 1 teaspoon lemon juice for 5-7 minutes until syrupy. Strain if you prefer a smoother texture, then spread between layers.
Raspberries or strawberries work best—their natural tartness complements the cake’s delicate sweetness. Serve slightly chilled for a refreshing contrast.
Coffee Buttercream
Add depth with coffee buttercream—whip ½ cup softened butter with 2 cups powdered sugar and 2 tablespoons instant coffee dissolved in 2 tablespoons hot water. Fold in 1 cup whipped cream for extra lightness.
This pairing works surprisingly well with the cake’s neutral flavor, adding a sophisticated touch. Store in an airtight container for up to 3 days in the fridge.
Citrus Syrup Drizzle
For a zesty finish, reduce ½ cup orange juice with ¼ cup sugar over medium heat until syrupy (5 minutes). Strain, then drizzle over the assembled cake.
The citrus notes enhance the cake’s natural sweetness without overpowering it. Garnish with a sprinkle of zest for extra aroma and visual appeal. 🍊
Nutrition facts
Frequently asked questions
Can I make this sponge cake without a mixer?
This recipe is designed for whisk-only mixing. Use a sturdy wire whisk to beat the egg whites to stiff peaks (about 5-6 minutes of vigorous arm work) and another whisk for the yolks. The key is patience—folding gently is more important than speed. For the yolks, a hand mixer makes it easier, but a whisk works fine if you’re willing to put in extra elbow grease.
Why does my cake taste eggy or dense?
Overmixing the egg whites or underwhipping the yolks are the most common culprits. For the whites, stop when they form stiff peaks that hold their shape. For the yolks, beat until pale and ribbon-like (3-4 minutes)—if they’re still grainy, keep going. Another tip: ensure your eggs are room temperature (cold eggs whip poorly). Finally, fold ingredients gently to preserve all that incorporated air.
How do I fix sunken layers or cracks?
This usually happens from overbaking or opening the oven too soon. Bake for exactly 12-14 minutes at 350°F and check with a toothpick. If the cake sinks slightly after baking, it’s normal—just let it cool completely before assembling. For cracks, try spreading the batter slightly thinner in your pans (about ½-inch thick) and baking at 325°F instead for more even cooking.
Can I substitute cake flour for all-purpose?
Yes, but with adjustments! Cake flour creates a finer crumb, while all-purpose gives slightly more structure. For a 1:1 swap, remove 2 tablespoons from the 1 cup all-purpose flour and replace with 2 tablespoons cornstarch. This mimics cake flour’s protein content. The original recipe uses all-purpose because it’s more widely available and still yields excellent results.
How do I store leftovers without drying out?
Wrap each layer tightly in plastic wrap, then place them in an airtight container with a slice of bread or a damp paper towel to maintain moisture. Store at room temperature for 2 days or refrigerate for 5 days. For longer storage, freeze individual slices between parchment paper—they’ll thaw perfectly. Reheat slices in a 200°F oven for 5 minutes to restore freshness.

- Pea Soup Instant Pot Recipe: Velvety Green Smoothness in 20 Minutes - November 1, 2026
- Pork Loin Pulled Pork Crock Pot Recipe: Slow-Smoked Tenderness With Zero Dryness - November 1, 2026
- Baked Potatoes in Crock Pot Recipe: Buttery Interiors and Crispy Top Magic - November 1, 2026