
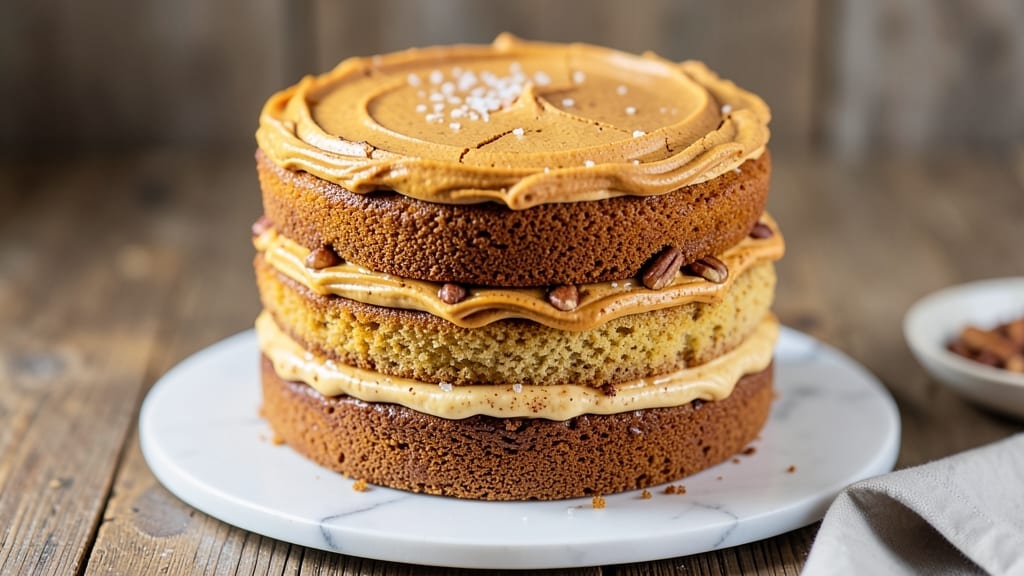
This 4-layer pumpkin cake recipe delivers the perfect balance of spiced moistness and velvety cream cheese frosting—each layer more decadent than the last.
The secret lies in precise baking techniques that ensure even layers and a tender crumb, while the cream cheese filling adds a luxurious contrast to the warm pumpkin flavor. I’ve perfected this recipe over years of baking, and it’s become a fall favorite that impresses every time.
The cake itself is baked at 350°F for 25-30 minutes per layer, yielding a moist, flavorful base that holds up beautifully under fillings. Between each layer, a luscious cream cheese frosting—infused with pumpkin spice for harmony—creates a creamy, tangy contrast that ties everything together.
The frosting isn’t just sweet; it’s rich, smooth, and perfectly balanced to complement the cake’s natural sweetness.
What sets this recipe apart is the attention to detail—proper cooling times, even layering, and a frosting that stays stable even in warm kitchens. The result is a cake that’s moist, flavorful, and visually stunning, with each bite offering a perfect harmony of spiced pumpkin and creamy frosting.
Whether you’re baking for a holiday gathering or a cozy weekend treat, this recipe delivers restaurant-quality results at home.
For added convenience, I’ve included tips for making this cake ahead of time, ensuring it stays fresh and delicious for days. The layers can be baked and filled a day in advance, making it ideal for busy schedules.
Serve with a sprinkle of cinnamon or a dollop of whipped cream for the ultimate fall dessert experience.
Ingredients for 4 layer pumpkin cake
Twelve ingredients for a showstopper cake—moist layers and dreamy frosting await!
| Ingredient | Amount | Notes |
|---|---|---|
| Canned Pumpkin Puree 🎃 | 1 ½ cups | Unsweetened, not pumpkin pie filling |
| All-Purpose Flour 🌾 | 3 cups | Sifted, spooned and leveled |
| Granulated Sugar 🍚 | 2 ½ cups | White or light brown |
| Light Brown Sugar 🍚 | ½ cup | Packed firmly |
| Baking Soda 🧂 | 1 tsp | Freshly opened |
| Ground Cinnamon 🌿 | 2 tsp | High-quality, not dusty |
| Ground Ginger 🌿 | 1 ½ tsp | Freshly ground preferred |
| Ground Nutmeg 🌿 | ½ tsp | Freshly grated nutmeg |
| Ground Cloves 🌶️ | ¼ tsp | Lightly toasted for warmth |
| Salt 🧂 | ½ tsp | Diamond Crystal preferred |
| Large Eggs 🥚 | 4 whole | Room temperature |
| Unsalted Butter 🧈 | 1 cup | Melted, full-fat preferred |
| Vanilla Extract 🌸 | 2 tsp | Pure, high-quality |
| Cream Cheese 🧀 | 16 oz | Full-fat, room temperature |
| Powdered Sugar 🍚 | 4 cups | Sifted for smooth frosting |
| Heavy Whipping Cream 🥛 | 1 cup | Cold, full-fat |
| Pumpkin Pie Spice 🌿 | 1 tsp | For frosting infusion |
The pumpkin puree is non-negotiable—Libby’s unsweetened is my go-to, but any good-quality canned pumpkin works. For the spices, Penzeys or bulk bins at natural markets are worth the splurge—freshly ground cinnamon and nutmeg make all the difference. The cream cheese? Philadelphia brand melts perfectly, but any full-fat block works if you grate it yourself. Eggs should be room temperature to blend smoothly—just pop them out 30 minutes before mixing. And that vanilla? Heinz pure is my secret weapon—it’s budget-friendly but tastes like luxury.
No pumpkin pie spice? Mix 1 tsp cinnamon, 0.5 tsp ginger, 0.25 tsp nutmeg, and a pinch of cloves—it’s the same thing! Running low on powdered sugar? Sift granulated sugar in a blender for a quick substitute, but it won’t be as smooth. The frosting needs to be stable, so use cold cream cheese and cold cream—let them sit out just until they’re soft, not melted. For a deeper pumpkin flavor in the frosting, add 1 tbsp pumpkin puree to the cream cheese before beating. And if you’re feeling fancy, swap the vanilla for 1 tsp bourbon—trust me on that one.
Bake the layers ahead and store them at room temperature in an airtight container for 2 days, or freeze them for up to 3 months. The frosting keeps 3 days refrigerated—just re-whip it before spreading. For a make-ahead showstopper, assemble the cake a day in advance and refrigerate. Bring it to room temperature before serving so the frosting softens beautifully. And if anyone asks, the secret to restaurant-quality layers? Don’t overmix the batter—just combine until smooth.
Why You’ll Love This Recipe
- Pantry Magic: I swear by this recipe when my fridge is bare—just pumpkin puree, flour, and sugar. No fancy ingredients, no last-minute store runs. That brown sugar layer? Pure caramel magic with zero effort.
- Spiced Perfection: The moment you taste that moist pumpkin cake with its warm cinnamon notes, you’ll understand. It’s not just dessert—it’s like hugging a pie in cake form. The layers? Each one richer than the last.
- Holiday Ready: Between us, this is my Thanksgiving secret weapon. Make it ahead, slice it up, and watch it disappear. Guests will ask for the recipe, and you’ll just smile—because you already know it’s foolproof.
- Leftovers Win: Honestly, I always bake two. The cake keeps beautifully for days, and the slices reheat in seconds. Perfect for breakfast, a snack, or when you just need something sweet without the fuss.
Step-by-step instructions for 4 layer pumpkin cake
Here’s how to build that perfect spiced cake with layers of moist pumpkin perfection.
Prepare the Cake Batter
Preheat your oven to 350°F and grease four 6-inch round cake pans, lining the bottoms with parchment paper. In a large mixing bowl, combine the 1.5 cups canned pumpkin puree, 1 cup melted unsalted butter, and 2.5 cups granulated sugar. Whisk until completely smooth and all the sugar dissolves.
In a separate bowl, sift together the 3 cups all-purpose flour, 1 tsp baking soda, 0.5 tsp salt, 2 tsp ground cinnamon, 1.5 tsp ground ginger, 0.5 tsp ground nutmeg, and 0.25 tsp ground cloves. Gradually add this dry mixture to the pumpkin mixture while mixing on low speed. Add the 4 whole large eggs one at a time, mixing just until each is incorporated. Finally, stir in the 2 tsp vanilla extract.
Divide the batter evenly among the prepared pans. The batter should fill each pan about ⅔ full. Here’s the thing—don’t overmix after combining all ingredients. You want a smooth, thick batter that holds its shape when poured, ensuring those tender layers.
Bake the Layers to Perfection
Bake each layer for 25-30 minutes, or until a toothpick inserted into the center comes out clean. I rotate the pans halfway through baking for even browning. The cakes should have a slightly domed top and pull away from the sides of the pan easily when done.
Let the cakes cool in their pans for 10 minutes before transferring them to a wire rack to cool completely. This gradual cooling prevents cracking. While they cool, prepare your work surface with parchment paper—you’ll be assembling this cake soon.
Make the Cream Cheese Frosting
In a large mixing bowl, beat the 16 oz cream cheese and 4 cups powdered sugar together on medium speed until completely smooth and creamy. This is where the magic happens—don’t rush this step. Scrape down the sides of the bowl as needed to ensure even mixing.
Add the 1 cup cold heavy whipping cream and 1 tsp pumpkin pie spice, then beat on high speed until the frosting is light and fluffy. You’re aiming for soft peaks that hold their shape but still spread easily. If it’s too thick, add 1 tablespoon cream at a time until you reach the perfect consistency.
Assemble the Cake Layers
Place the first cake layer on your prepared surface. Spread a generous layer of frosting on top, about ¼ inch thick. Here’s the trick—don’t use too much frosting between layers or it will ooze out the sides. Place the second layer on top and repeat the process.
For the final layer, spread frosting on top and around the sides of the cake. Use a long spatula to smooth the sides, creating that perfect tiered look. Chill the assembled cake in the refrigerator for 30 minutes before decorating to help the frosting set.
Decorate and Serve
Once chilled, use the remaining frosting to create swirls or rosettes on top. I like to pipe simple swirls with a star tip for an elegant look. For extra flair, dust with a little extra pumpkin pie spice or sprinkle with chopped pecans.
Slice and serve immediately for the most moist experience. Each layer should be tender with just the right amount of spice, while the frosting adds that perfect creamy contrast. The cake keeps well in the refrigerator for up to 5 days, though I doubt it will last that long!
Pro Tips For Making 4 Layer Pumpkin Cake
- Whisk the Pumpkin First: Mix the canned pumpkin puree with the wet ingredients (eggs, oils, sugars) before adding dry flour—this prevents lumps and ensures a smoother batter. I learned this the hard way after scraping a gummy mess from my mixer blades.
- Sift the Flour Twice: Light brown sugar and baking soda cling to flour like glue. Sift the dry ingredients together, then sift again after folding them into the wet mix—this cuts grit and guarantees even layers. Yes, it’s extra work, but your cake’s texture will thank you.
- Rotate the Pan: After 20 minutes in the oven, swap the cake pans front-to-back and top-to-bottom. This evens out baking and prevents the edges from overcooking while the center stays dense. I used to ignore this, and half my cakes would be cakey one side, brick the other.
- Chill the Layers: Let each layer cool completely on a wire rack, then refrigerate for 30 minutes before adding frosting. Warm layers melt buttercream, and you’ll end up with a soggy disaster. (Trust me, I’ve cried over this.)
Common mistakes when making perfect results
Overmixing the Batter
This is the #1 mistake I see with pumpkin cakes—the batter gets overworked after all ingredients are combined. When you mix beyond smoothness, you develop the gluten in the flour, creating dense, tough layers instead of tender, moist ones.
After combining all ingredients, stop mixing as soon as everything is just incorporated. The batter should be thick and smooth but still slightly lumpy—this ensures that signature cakey texture. 🥄
Uneven Layer Thickness
Inconsistent layer thickness leads to uneven baking and structural weaknesses. Use a kitchen scale to divide the batter evenly among your four pans—aim for ⅔ full capacity in each.
I also recommend using a ruler to check thickness after pouring; each layer should be within ¼ inch of the same height. Uneven layers bake at different rates, causing some to be dry while others remain underdone.
Skipping Cooling Times
Rushing the cooling process is a fast track to cracked layers and frosting disasters. Let each cake layer cool in the pan for 10 full minutes before transferring to a rack. Then, cool completely (at least 1 hour) before assembling.
The temperature differential between hot layers and cold frosting causes layers to shift or even collapse. Patience here makes all the difference for a sturdy cake. ⏳
Incorrect Frosting Temperature
Using warm cream cheese or cream in your frosting leads to a soupy mess that won’t hold its shape. Both ingredients should be cold but soft enough to beat—about 60°F. If your kitchen is warm, chill the bowl and beaters for 10 minutes before starting.
The frosting needs to be thick enough to spread but still pipeable. Too warm? Pop it in the fridge for 15 minutes to firm up before using.
Overfilling Between Layers
Piling too much frosting between layers creates a structural weak point that can cause the cake to slump or ooze out the sides. Use only ¼ inch of frosting per layer—about ⅓ cup total. For the sides, spread a thin, even layer after placing the top layer.
The frosting should support the cake, not overwhelm it. I like to use a small offset spatula to create clean edges for a polished look. 🎂
Not Chilling Before Slicing
Serving the cake immediately after assembly leads to messy slices and frosting that slides off. Always chill the assembled cake for 30 minutes in the refrigerator before decorating and slicing. This allows the frosting to set slightly, making it easier to work with and preventing a sticky mess.
If you’re in a hurry, pop it in the freezer for 10 minutes—just be careful when removing it to avoid condensation.
Nutrition facts
Frequently asked questions
Can I use this recipe for a smaller or larger cake?
This recipe is designed for four 6-inch layers, but you can easily adjust. For a 3-layer cake, increase each layer’s batter by 25% and bake in 8-inch pans. For a 6-layer cake, reduce each layer’s batter by 20% and use 5-inch pans. Always check doneness with a toothpick—25-30 minutes at 350°F is your guide.
How do I prevent the cake layers from cracking?
Cracking happens when layers cool too quickly or aren’t properly supported. Let each layer cool in the pan for 10 minutes, then transfer to a wire rack. Avoid placing them directly on cold surfaces, and never stack hot layers. For extra stability, chill the assembled cake for 30 minutes before slicing. A humid kitchen can also cause cracks—use a cake dome or tent with foil if needed.
Can I make this cake ahead of time?
Bake the layers 1-2 days ahead and store them at room temperature in an airtight container. The frosting can be made 3 days ahead and kept refrigerated—just re-whip before using. Assemble the cake 24 hours before serving and refrigerate. Bring to room temperature 1 hour before slicing for the best texture. This makes it perfect for holiday gatherings!
What if my frosting isn’t fluffy enough?
Cold ingredients are key! Ensure your cream cheese and heavy cream are cold but soft (about 60°F). Beat on high speed for 3-4 minutes—don’t rush it. If it’s still too thick, add 1 tbsp cream at a time. For extra stability, chill the bowl and beaters for 10 minutes before starting. A hand mixer works, but a stand mixer gives better results.
Can I substitute ingredients for dietary restrictions?
For a vegan version, replace butter with 1 cup coconut oil, eggs with 4 flax eggs (1 tbsp ground flax + 3 tbsp water per egg), and cream cheese with 16 oz vegan cream cheese. Use dairy-free powdered sugar and heavy cream. For gluten-free, swap flour for a 1:1 gluten-free blend. Test baking times may vary—check with a toothpick. Always adjust spice levels to taste!

- Pea Soup Instant Pot Recipe: Velvety Green Smoothness in 20 Minutes - November 1, 2026
- Pork Loin Pulled Pork Crock Pot Recipe: Slow-Smoked Tenderness With Zero Dryness - November 1, 2026
- Baked Potatoes in Crock Pot Recipe: Buttery Interiors and Crispy Top Magic - November 1, 2026