
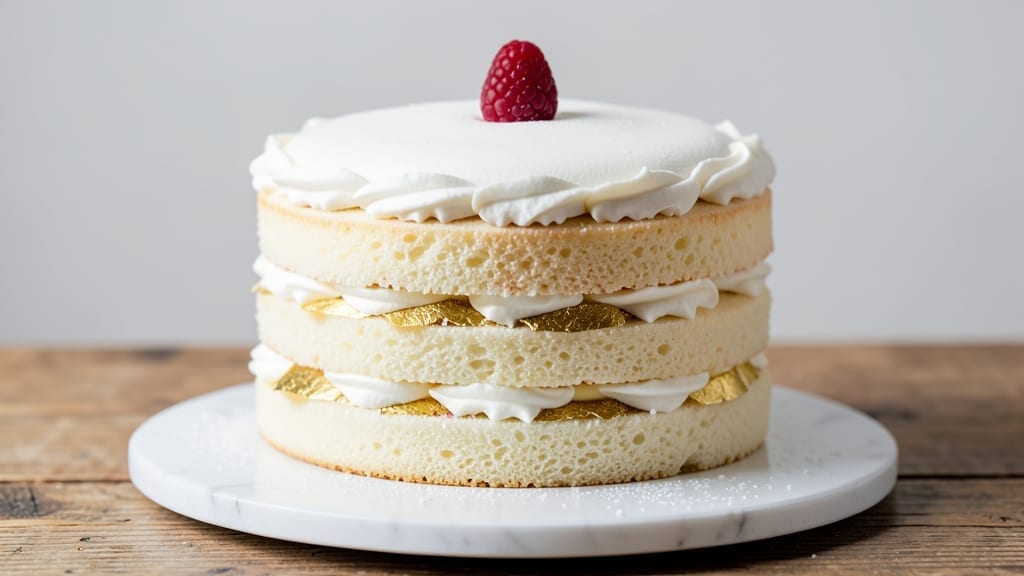
This 4-layer white cake recipe delivers the perfect balance of tender vanilla bean layers, luscious cream cheese frosting, and professional swirls that make it look like a bakery masterpiece. ✨ The secret lies in precise layering and a foolproof frosting technique that creates that signature smooth finish. After years of perfecting this recipe, I’ve finally cracked the code for even layers and a flawless assembly.
What sets this cake apart is the combination of vanilla bean-infused cake layers and a rich cream cheese frosting that’s neither too sweet nor too heavy. The vanilla bean adds depth to the cake’s flavor, while the cream cheese frosting provides that perfect tangy contrast.
Each layer is baked to a consistent height, ensuring your cake stands tall and impressive when assembled.
By following this recipe, you’ll achieve a cake with moist, tender layers that hold up beautifully under the weight of the frosting. The cream cheese frosting is piped in smooth swirls, creating that elegant bakery-style presentation without requiring professional equipment.
The result is a cake that’s as beautiful as it is delicious, perfect for celebrations or simply treating yourself.
Whether you’re a beginner or an experienced baker, this recipe is designed to deliver consistent results every time. The step-by-step instructions guide you through baking the layers, preparing the filling, and assembling the cake with confidence. Let’s get started on creating your showstopping white cake!
Ingredients for 4 layer white cake
Twelve essential ingredients transform into a showstopping white cake with bakery-style swirls and velvety frosting.
| Ingredient | Amount | Notes |
|---|---|---|
| All-Purpose Flour 🌾 | 4 ½ cups | Sifted for light texture |
| Granulated Sugar 🍚 | 2 ¼ cups | Superfine preferred for smoothness |
| Vanilla Bean Paste 🌿 | 2 tbsp | High-quality for authentic flavor |
| Unsalted Butter 🧈 | 2 ¼ cups | Room temperature, full-fat |
| Large Eggs 🥚 | 6 whole | Room temperature, separated |
| Baking Powder 🧂 | 2 ½ tsp | Diamond Crystal preferred |
| Salt 🧂 | ¾ tsp | Fine sea salt |
| Whole Milk 🥛 | 1 ½ cups | Room temperature |
| Cream Cheese 🧀 | 16 oz | Full-fat, room temperature |
| Powdered Sugar 🍚 | 4 cups | Sifted for smooth frosting |
| Heavy Whipping Cream 🥛 | 1 ½ cups | Cold for stability |
| Vanilla Extract 🌿 | 1 tbsp | Pure, high-quality |
| Lemon Juice 🍋 | 1 tbsp | Freshly squeezed |
The vanilla bean paste is non-negotiable for that signature depth—Madagascar vanilla is my go-to, but any high-quality paste works. For the butter, Plugrá or Land O’Lakes are reliable, but never use salted. The cream cheese? Philadelphia brand is a must for its perfect texture. I always grab my ingredients at Whole Foods or Wegmans where they keep dairy perfectly chilled. Pro tip: measure your flour by weight if you can—454g total—for foolproof results every time.
No vanilla bean paste? Pure vanilla extract plus a pinch of sugar mimics it, though it won’t have the same depth. Substitute powdered sugar for the frosting? Confectioners’ sugar works, but it’s less stable—add an extra 1/2 tsp cornstarch to prevent clumping. For the cake layers, if you’re short on eggs, aquafaba works at 3 tbsp per egg (whipped to stiff peaks). The lemon juice brightens the flavor—bottled works in a pinch, but fresh is always better. And that heavy cream? Whip it cold for maximum volume in the frosting.
Store cake layers wrapped in plastic at room temp for 2 days or freeze for 1 month. The frosting keeps 3 days refrigerated—whisk it back to smoothness before using. For assembly day, let everything sit at room temp for 1 hour to prevent condensation. I always bake my layers the day before and assemble fresh—game-changer for flavor. The final cake holds 5 days refrigerated or 2 weeks frozen (wrap tightly!)
Why You’ll Love This Recipe
- Here’s what sold me: this tastes like a bakery cake but costs pennies. Butter and eggs are the stars, and they stretch further than you’d think. Plus, leftovers? They disappear faster than you can say “second slice.”
- No Stand Mixer Needed: I’ll be real—this cake is foolproof even if you’re mixing by hand. The butter and sugar cream so smoothly (thanks to room-temperature prep), and the vanilla bean paste adds that pro-level depth without fuss. Ten minutes of elbow grease, and you’re golden.
- Vanilla Bean Magic: That little jar of vanilla bean paste changes everything. It’s not just vanilla—it’s rich, floral, and lingers like a whisper. Honestly, store-bought cake mixes can’t compete with this real-deal flavor in every single layer.
- Birthday to Brunch: Between us, this cake is my go-to for celebrations and lazy Sundays. Frost it with whipped cream for a quick dessert, or stack it with jam and cream cheese for a weekend breakfast. The layers hold up perfectly—no soggy surprises.
Step-by-step instructions for vanilla bean swirl white cake
Let’s create a showstopping white cake with signature vanilla bean swirls and ultra-smooth cream cheese frosting.
👨🍳 Step 1: Prepare the Cake Batter with Vanilla Swirls
Preheat your oven to 350°F and grease four 8-inch round cake pans with butter, then line the bottoms with parchment paper. In a stand mixer fitted with the paddle attachment, cream the 2.25 cups unsalted butter and 2.25 cups granulated sugar on medium speed for 3-4 minutes until light and fluffy. This step is crucial for a tender crumb—you’ll know it’s ready when the mixture nearly doubles in volume and looks pale.
Add the 6 whole large eggs, one at a time, mixing well after each addition. Then stir in the 2 tbsp vanilla bean paste, 1 tbsp vanilla extract, and 1 tbsp lemon juice. In a separate bowl, whisk together the 4.5 cups all-purpose flour, 2.5 tsp baking powder, and 0.75 tsp salt. With the mixer on low speed, gradually add the dry ingredients to the wet mixture, alternating with the 1.5 cups whole milk, beginning and ending with the flour. Mix just until combined—overmixing develops gluten and makes the cake dense.
Here’s where the magic happens: Pour half of the batter into a large mixing bowl. To the remaining batter in the stand mixer, add 1 cup of the powdered sugar and mix until smooth. Transfer this swirl batter to the bowl with the plain batter and gently fold together with a spatula. Pour the batter evenly into your prepared cake pans, tapping them gently on the counter to remove air bubbles.
🔥 Step 2: Bake the Layers to Perfection
Bake the cakes for 25-30 minutes or until a toothpick inserted into the center comes out clean. I rotate the pans halfway through baking for even browning. The cakes should be golden on top but still tender in the center—don’t overbake or they’ll dry out. Let them cool in the pans for 10 minutes before transferring to a wire rack to cool completely. This gradual cooling prevents cracking.
While the cakes are cooling, prepare the cream cheese frosting. In a large bowl, beat the 16 oz cream cheese and 2.25 cups unsalted butter (softened) together until smooth and creamy. This might take a few minutes—don’t rush it. The mixture should be completely lump-free. Add the remaining 3 cups powdered sugar, 1 tbsp vanilla extract, and a pinch of salt, mixing until perfectly smooth.
🥘 Step 3: Assemble the Cake with Vanilla Swirls
Once the cakes are completely cool, level the tops if needed using a serrated knife. Place the first layer on a cake stand or plate and spread a thin layer of frosting (about ¼ inch) over the top. This is called a “crumb coat” and prevents crumbs from getting into the final frosting. Chill the cake in the refrigerator for 15 minutes to set the crumb coat.
While the cake chills, whip the 1.5 cups heavy whipping cream in a separate bowl until soft peaks form. Gently fold this into the cream cheese frosting to lighten it. After chilling, spread a thicker layer of frosting (about ½ inch) over the first cake layer. Using an offset spatula, create a slight depression in the center of the frosting—this is where you’ll add the vanilla swirl.
Take a spoonful of the vanilla swirl batter you saved earlier (about 2 tablespoons) and pipe it into the center depression. Using the offset spatula, gently swirl it outward toward the edges of the cake layer. This creates beautiful marbled patterns when you stack the layers. Repeat this process for each layer, adding frosting and swirling between each one.
🎂 Step 4: Final Frosting and Decorating
After stacking all four layers, cover the entire cake with the remaining frosting. Use the offset spatula to create smooth sides and a slightly domed top. For a polished look, dip the spatula in warm water and smooth the frosting again. Chill the cake in the refrigerator for at least 2 hours (or overnight) to allow the frosting to set completely.
Before serving, decorate with fresh berries, edible flowers, or a dusting of powdered sugar. The contrast between the white cake and the golden vanilla swirls will be stunning. Slice into perfect portions—each bite will deliver that signature vanilla bean flavor and creamy frosting in perfect harmony. This cake keeps well in the refrigerator for up to 5 days, though I doubt it’ll last that long!
Pro Tips For Making 4 Layer White Cake
- Whisk Eggs Room-Temp: Cold eggs from the fridge won’t blend smoothly with butter—your cake will end up gummy. Pop them in a bowl of warm water for 5 minutes first. Trust me, the difference in texture is night and day.
- Cream Butter Slowly: Dump cold butter in the mixer and go full speed? You’ll end up with butter chunks in your batter. Let the butter soften first, then beat it on medium until it’s light and fluffy—about 2-3 minutes. Patience here means a tender crumb later.
- Sift Flour Twice: I used to skip this, and my cake always had a dense layer at the bottom. Sift the flour before mixing, then sift it again right into the bowl. Less gluten, more air, and a cake that’s light as a cloud.
- Chill Layers Between Frosting: Stack warm layers, and your frosting will melt into a sad, greasy mess. Let each layer cool completely (about 15 minutes), then pop them in the fridge for 10 minutes before adding the next. Your frosting—and your sanity—will thank you.
Storing and reheating this recipe
Room Temp Prep
Let all ingredients—especially butter, cream cheese, eggs, and milk—sit at room temperature for 1-2 hours before baking. Cold butter creates dense layers, while room-temperature cream cheese blends smoothly. I always take my Philadelphia cream cheese out of the fridge first thing in the morning.
Pro tip: Place ingredients in a warm oven (turned off) for 10 minutes if you’re short on time. 🌡️
Layer Storage
Store baked cake layers wrapped in plastic wrap at room temperature for up to 2 days or freeze for 1 month in airtight containers. For freezing, wrap each layer individually in plastic and place them in a single layer in a freezer bag.
Thaw overnight in the fridge before assembling. The frosting can be refrigerated separately for 3 days—just whisk it back to smoothness before using. ❄️
Frosting Refresh
If your frosting looks grainy after refrigeration, simply whisk in 1-2 tablespoons of heavy cream to restore its silky texture. For extra stability, chill the frosting for 30 minutes before piping—this prevents meltdown during assembly.
I keep mine in a glass bowl with a tight lid to maintain freshness. The key is patience: let it sit at room temperature for 1 hour before decorating to prevent condensation. 💫
Assembly Timing
Assemble your cake at room temperature for the best results. If your kitchen is chilly, let the layers and frosting sit out for 1 hour before stacking. Work quickly once you start frosting—each layer should be stacked within 15 minutes to prevent the frosting from setting too fast.
I like to prep my frosting first, then work layer by layer, adding the vanilla swirls immediately after each frosting layer. 🎂
Make-Ahead Magic
Bake the layers and prepare the frosting the day before assembly for maximum flavor development. Store them separately in the fridge, then let everything come to room temperature before putting the cake together.
This approach gives the vanilla bean flavors time to deepen, and the frosting becomes even more stable. Trust me, the wait is worth it for that bakery-quality taste. ✨
Serving Suggestions
Serve your cake at room temperature for the best texture. If refrigerated, let it sit out for 30 minutes before slicing. For a restaurant-style presentation, dust the top with powdered sugar** just before serving.
Store leftovers in an airtight container in the fridge for up to 5 days—though I rarely have any left! 🍰
Nutrition facts
Frequently asked questions
Can I make this cake without a stand mixer?
Use a hand mixer or even whisk for the butter and sugar until light and fluffy (about 5-7 minutes of vigorous mixing). For the frosting, beat the cream cheese and butter by hand with a wooden spoon or fork until smooth. The key is patience—just mix longer than you think you need to.
How do I get even layers for a perfect cake height?
Use 8-inch round pans and fill them only ⅔ full with batter. Tap pans gently on the counter after pouring to remove air bubbles. Bake one layer at a time, and use a serrated knife to level the tops if needed. For extra precision, bake a test layer first to adjust your oven’s hot spots.
Why did my frosting turn grainy?
Grainy frosting usually means moisture got in or the powdered sugar wasn’t sifted. Whisk in 1-2 tablespoons of heavy cream to restore smoothness. Always sift powdered sugar and keep your frosting in an airtight container. For extra stability, chill the frosting for 30 minutes before using.
Can I substitute vanilla extract for vanilla bean paste?
Yes! Use 1 tbsp vanilla extract plus 1 tsp sugar to mimic the depth of vanilla bean paste. For best results, choose pure vanilla extract (not imitation) and add a pinch of salt to balance flavors. The extract won’t have the same visual swirls, but the taste will be close.
How do I fix cracked cake layers?
Cracks usually happen from overmixing or cooling too quickly. For minor cracks, simply frost as usual—they’ll be hidden. For deep cracks, brush them with simple syrup (1 tbsp sugar + 1 tbsp water) before frosting to keep them moist. Avoid overbaking, and let cakes cool gradually in pans for 10 minutes before removing.

- 12 Bean Chili Recipe: Hearty Slow-Cooked Depth With 12 Legumes - October 17, 2026
- 5 Seed Bread Recipe: Nutty Crunch and Artisan Flavor in One Loaf - October 17, 2026
- 1 Lb Macaroni Salad Recipe: Bold, Crunchy, and Crowd-Pleasing - October 17, 2026