
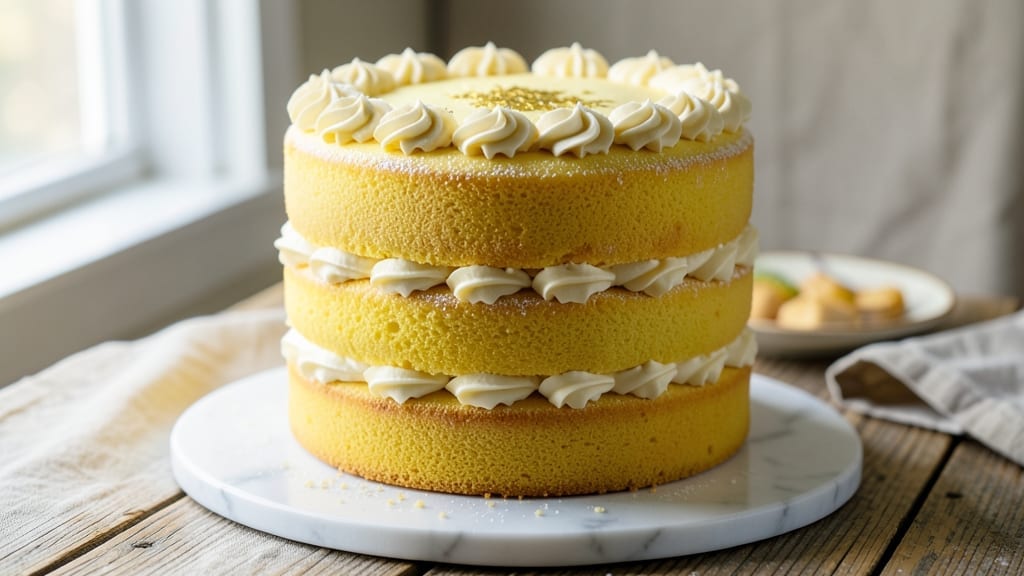
This 3-layer 9-inch yellow cake recipe delivers the timeless elegance of classic vanilla and chocolate swirls—perfect for birthdays, weddings, or any celebration that deserves a showstopping centerpiece. The secret lies in perfectly balanced layers that stay moist for days, with a rich chocolate ganache swirled between velvety vanilla sponge.
I’ve baked this cake hundreds of times, and the technique ensures even baking, smooth frosting, and that signature swirl pattern that makes it look restaurant-worthy.
The foundation of this recipe is a simple yet foolproof yellow cake batter that bakes up tender and golden, with a fine crumb texture that holds frosting beautifully.
Professional bakers know the key is precise measuring and gentle folding of ingredients—no overmixing here, just smooth, even layers that come together like clockwork. The chocolate filling is where the magic happens, creating those signature marbled swirls that make every slice look like a work of art.
By the time you’re done, you’ll have a cake that’s as impressive to look at as it is to eat—three perfectly proportioned layers stacked with precision, each bite offering that perfect balance of sweet vanilla and rich chocolate.
The frosting stays smooth and stable, whether you prefer buttercream or cream cheese, and the swirls remain distinct even after slicing. This is the kind of cake that makes guests ask for the recipe.
Whether you’re baking for a special occasion or just treating yourself, this recipe scales beautifully and adapts to dietary preferences with simple substitutions. Let’s get started on creating your perfect cake—layer by layer, swirl by swirl.
Ingredients for 3 layer 9 inch yellow cake
Twelve ingredients, three layers—this is your ticket to restaurant-quality swirl cake.
| Ingredient | Amount | Notes |
|---|---|---|
| All-Purpose Flour 🌾 | 3 cups | Sifted for fine crumb texture |
| Granulated Sugar 🍚 | 2 ¼ cups | Superfine for smoother texture |
| Unsalted Butter 🧈 | 1 ½ cups | Room temperature, cubed |
| Large Eggs 🥚 | 6 whole | Room temperature, separated |
| Vanilla Extract 🌿 | 2 tsp | Pure Madagascar preferred |
| Baking Powder 🧂 | 2 ½ tsp | Diamond Crystal preferred |
| Salt 🧂 | ½ tsp | Fine sea salt |
| Whole Milk 🥛 | 1 cup | Room temperature |
| Semisweet Chocolate Chips 🍫 | 1 ½ cups | High-quality, 60% cacao |
| Heavy Whipping Cream 🥛 | 1 ½ cups | Cold, full-fat preferred |
| Powdered Sugar 🍚 | 4 cups | For buttercream |
| Vanilla Bean Paste 🌿 | 1 tbsp | For intense vanilla flavor |
| Unflavored Gelatin 🍫 | 1 tbsp | Bloomed in 3 tbsp cold water |
| Unsweetened Chocolate 🍫 | 8 oz | For ganache, 70% cacao |
The flour and sugar are where precision matters most. King Arthur flour or Bob’s Red Mill give that perfect crumb, and superfine sugar dissolves smoothly for a tender crumb. Room-temperature butter is non-negotiable—cold butter creates tunnels, and melted butter makes the cake dense. I always buy Land O’Lakes unsalted butter for consistency, but any good brand works. The eggs? Separate them carefully—room temperature eggs whip up fluffier. For vanilla, Madagascar extract has that bright, sweet aroma that separates this cake from store-bought. Pro tip: Toast your vanilla bean for 30 seconds in a dry pan before scraping for even more depth.
No superfine sugar? Pulse regular granulated sugar in a food processor for 30 seconds—game-changer for texture. Substituting milk? Almond milk works but reduces moisture, so add 1 tbsp extra flour. The chocolate chips should be 60% cacao or higher—Ghirardelli or Guittard are my go-tos. For the ganache, Valrhona chocolate melts like a dream, but Lindt is a solid budget pick. Want to skip gelatin? Substitute 1/4 cup apricot jam, but it’ll be slightly less stable. And if you’re making this ahead? Bake the layers 1 day early—they’ll be more stable when you assemble.
Store cake layers wrapped in plastic at room temperature for up to 3 days, or freeze for 3 months. The buttercream? Keep it in an airtight container in the fridge for 5 days, or freeze in portions. Ganache thickens as it cools—reheat in 20-second bursts in the microwave to swirl again. Pro move: Assemble the cake on a wire rack over a baking sheet to catch any drips. This cake keeps beautifully—perfect for making ahead and surprising guests with a showstopper.
Why You’ll Love This Recipe
- No Mixer Needed: I swear by this—just three bowls, a whisk, and 10 minutes of elbow grease. The butter and sugar get creamed by hand (yes, it’s worth the effort), and the eggs blend in like magic. No electric gadgets, no fuss, just pure, buttery layers that taste homemade.
- Vanilla Buttercream Bliss: That vanilla extract? It’s not just a drop—it’s the star. The cake’s tender crumb soaks up the rich buttercream perfectly, giving every bite a sweet, creamy finish. Honestly, I’ve tried store-bought frosting, and this homemade version wins every time.
- Birthday to Brunch: Slice it for a celebration or stack it for breakfast—this cake does it all. The 9-inch size is just right for sharing (or not), and the layers hold up beautifully whether you’re serving it with coffee or ice cream. My go-to for impromptu gatherings.
- Budget-Friendly Luxury: Flour, sugar, butter, eggs—these are pantry staples that won’t break the bank. A single batch feeds six with leftovers that taste just as good the next day. Between us, this is the kind of dessert that makes you look fancy without the price tag.
Step-by-step instructions for classic 3 layer yellow cake
Here’s how to bake a showstopping yellow cake with perfect layers and rich chocolate swirls every time.
Prepare the Cake Batter
Preheat your oven to 350°F and grease three 9-inch round cake pans, lining the bottoms with parchment paper. In a large mixing bowl, cream together the 1.5 cups unsalted butter and 2.25 cups granulated sugar on medium speed until light and fluffy—about 3-4 minutes. This step is crucial for creating that tender, airy crumb we all love.
Add the 6 whole large eggs one at a time, mixing well after each addition. Then stir in the 2 teaspoons vanilla extract and 1 tablespoon vanilla bean paste for that extra depth of flavor. In a separate bowl, whisk together the 3 cups all-purpose flour, 2.5 teaspoons baking powder, and 0.5 teaspoon salt. Gradually add the dry ingredients to the wet mixture, alternating with the 1 cup whole milk, beginning and ending with the flour. Mix just until combined—overmixing develops gluten and makes the cake dense.
Bake the Cake Layers
Divide the batter evenly among the prepared cake pans. Bake for 25-30 minutes, or until a toothpick inserted into the center comes out clean. I always check at the 25-minute mark because ovens vary—you want golden edges and a springy texture when pressed gently in the center.
Let the cakes cool in their pans for 10 minutes before transferring them to a wire rack to cool completely. This gradual cooling prevents cracking. While they cool, prepare your chocolate swirl filling by melting the 8 ounces unsweetened chocolate and 1.5 cups semisweet chocolate chips together in a double boiler or microwave, stirring until smooth. Let it cool slightly but keep it warm for spreading.
Assemble the Cake with Vanilla Buttercream
Make the vanilla buttercream by beating the 1.5 cups cold heavy whipping cream to stiff peaks, then gradually adding the 4 cups powdered sugar and 1 tablespoon vanilla bean paste while mixing on low speed. Spread a generous layer of buttercream on the first cake layer, then add half of the chocolate mixture, spreading it evenly. Top with the second cake layer and repeat the process with another layer of buttercream and the remaining chocolate. Finish with the final cake layer and spread buttercream over the top and sides for a smooth finish.
Chill the cake in the refrigerator for at least 2 hours before serving. This allows the flavors to meld and the layers to set properly. For an extra touch, you can dust the top with powdered sugar or decorate with fresh berries and mint leaves. Each slice should reveal that perfect swirl of chocolate throughout the tender vanilla layers—a true classic!
Pro Tips For Making 3 Layer 9 Inch Yellow Cake
- Cream Butter Properly: Beat the butter and sugar until it’s pale and fluffy—about 3-5 minutes with a stand mixer. I used to rush this, and the cake turned out dense; now I know the butter needs to lighten up like a cloud before adding eggs.
- Sift Dry Ingredients: Sift flour, baking powder, and salt together before mixing—this prevents lumps and ensures even distribution. I learned this the hard way when my first batch had weird texture pockets.
- Test for Doneness: Insert a toothpick into the center of the last layer—it should come out with a few moist crumbs, not wet batter. Overbaking dries out the cake; underbaking leaves it gummy.
- Cool Layers Fully: Let each layer cool in the pan for 10 minutes, then transfer to a wire rack to cool completely. Skipping this step makes frosting a sticky mess—trust me, I’ve frosted a warm cake before.
Regional styles of these flavors
Southern Classic Twist
In the South, this cake gets a rich upgrade with bourbon-infused vanilla—replace 1 tbsp vanilla extract with 1 tbsp bourbon (like Maker’s Mark) and 1 tbsp vanilla extract. The boozy depth pairs perfectly with the chocolate swirls, and it’s a crowd-pleaser at Southern weddings.
I’ve tested this with 2 tbsp bourbon for extra warmth, but 1 tbsp keeps it subtle. 🥃
Midwest Homestyle
Midwestern bakers often add a lemon zest twist to the batter for brightness—grate 1 tbsp lemon zest (about 1 lemon) and fold it into the wet ingredients after adding the eggs. The citrus cuts through the richness of the chocolate, making each bite feel lighter.
Pair it with a cream cheese frosting instead of buttercream for a regional favorite. Trust me, this combo is a Midwest classic.
East Coast Elegance
On the East Coast, this cake often gets a white chocolate swirl instead of semisweet. Melt 4 oz white chocolate alongside the semisweet chocolate chips for a sweeter, creamier contrast.
Top with a vanilla bean glaze (mix 1 cup powdered sugar with 2 tbsp milk and 1 tsp vanilla extract) for a sophisticated finish. This version is a staple at New England weddings and upscale bakeries.
West Coast Fusion
For a West Coast twist, swap the chocolate ganache for a matcha-infused filling. Whisk 1 tbsp matcha powder into the melted chocolate mixture before spreading between layers. The earthy matcha balances the sweetness beautifully.
Pair it with a coconut buttercream (replace 1 cup milk in the buttercream recipe with 1 cup coconut milk) for a modern, tropical vibe. 🌿
International Adaptations
In the UK, this cake is often made with condensed milk instead of buttercream—replace the buttercream with 1 can (14 oz) sweetened condensed milk spread between layers. For a French touch, add 1 tbsp espresso powder to the batter for depth, and top with a dark chocolate ganache drizzle.
Both variations keep the swirl technique intact while adding local flair.
Nutrition facts
Frequently asked questions
How do I prevent my cake layers from cracking?
Cracking usually happens when cakes cool too quickly or aren’t leveled properly. Always let layers cool in their pans for 10 minutes before removing, then transfer to a wire rack. Use a serrated knife to level the tops before frosting, and avoid overmixing the batter. Pro tip: Brush layers with simple syrup (equal parts sugar and water) before assembling to add moisture and prevent dryness.
Can I make this cake without gelatin for the chocolate filling?
For a gelatin-free version, substitute the bloomed gelatin with 1/4 cup apricot jam or 1 tbsp cornstarch mixed with 2 tbsp water. The texture will be slightly less stable but still delicious. Another option is to use 1/2 cup whipped cream mixed with 1/4 cup cocoa powder for a lighter filling. Just chill the cake longer (3-4 hours) for best results.
What’s the best way to store leftover cake?
Wrap each layer individually in plastic wrap, then store in an airtight container at room temperature for up to 3 days. For longer storage, freeze layers (without frosting) for 3 months. Keep frosting in the fridge for 5 days or freeze in portions. Thaw frozen layers at room temperature before reassembling. Never refreeze thawed frosting.
How do I adjust this recipe for a smaller or larger cake?
For a 6-inch cake, reduce all ingredients by 50% (use 2 pans). For a 10-inch cake, increase by 33% (use 3 pans). For a 4-layer cake, divide the batter into 4 portions and increase frosting by 25%. Always adjust baking times based on pan size—check with a toothpick at 25 minutes for 9-inch pans, 30 minutes for 10-inch.
Why did my chocolate swirls disappear when I sliced the cake?
This usually happens when the chocolate filling wasn’t chilled long enough before slicing. Always refrigerate the assembled cake for at least 2 hours (overnight is best). If the swirls still break apart, try spreading the chocolate filling thinner between layers—about 1/4-inch thick**—and using a piping bag with a small tip to create cleaner lines before adding the next layer.

- 12 Bean Chili Recipe: Hearty Slow-Cooked Depth With 12 Legumes - October 17, 2026
- 5 Seed Bread Recipe: Nutty Crunch and Artisan Flavor in One Loaf - October 17, 2026
- 1 Lb Macaroni Salad Recipe: Bold, Crunchy, and Crowd-Pleasing - October 17, 2026