
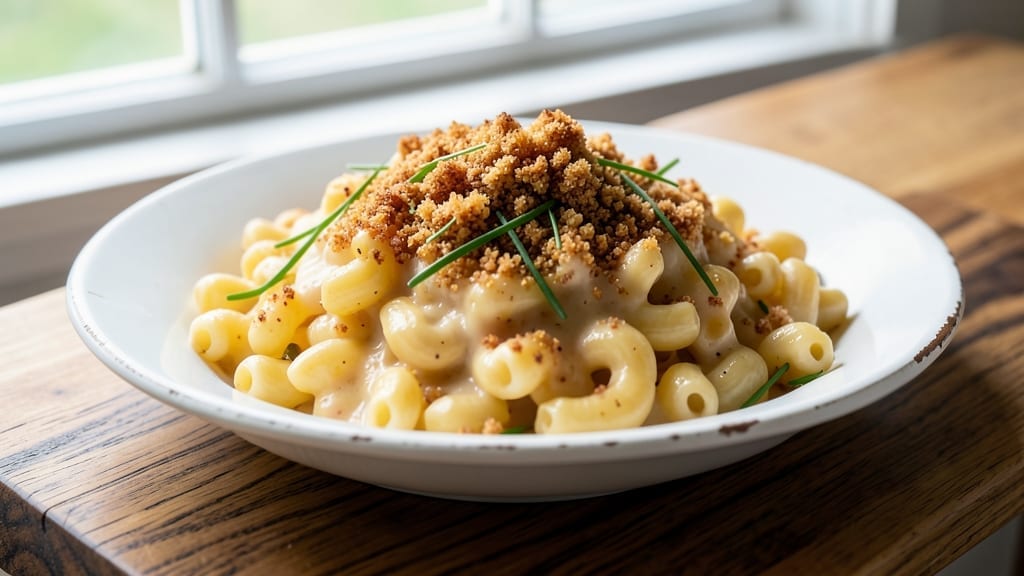
This 4-serving mac and cheese recipe delivers ultra-creamy sauce with a crispy breadcrumb topping that transforms a simple side into the star of the meal.
The secret lies in a proper roux foundation—cooked butter and flour that creates a stable base for the cheese blend—while the breadcrumb crust adds irresistible texture. I’ve perfected this version to ensure every bite is rich, velvety, and perfectly balanced between cheesy indulgence and crispy contrast.
The recipe uses three essential cheeses—sharp cheddar for bold flavor, Gruyère for nutty depth, and cream cheese for unmatched creaminess—all melted together for a sauce that coats each noodle perfectly.
A 15-minute bake transforms the dish from comforting to showstopping, with the breadcrumbs turning golden and crunchy while the cheese stays luxuriously smooth underneath. This isn’t just mac and cheese; it’s a foolproof technique that delivers restaurant-quality results at home.
What sets this apart is the crispy texture that stays intact even when serving, paired with a sauce so rich it clings to every strand of pasta. The 30-minute total time makes it ideal for weeknight dinners or holiday gatherings, scaling effortlessly to feed four with precise measurements.
Whether you’re feeding a family or hosting guests, this recipe guarantees a crowd-pleaser that disappears faster than you can say “extra cheese.”
For extra indulgence, add cooked bacon or jalapeños to the cheese mixture, or swap the breadcrumbs for panko for an even crunchier topping. The key is patience—letting the sauce simmer until thick and smooth ensures no lumps or separation.
Trust the process, and you’ll have a creamy, crispy masterpiece that rivals your favorite takeout spot.
Ingredients for 4 serving mac and cheese
These 13 ingredients transform simple pasta into a velvety, crispy masterpiece—no shortcuts needed.
| Ingredient | Amount | Notes |
|---|---|---|
| Elbow Macaroni 🍝 | 12 oz | Dry, medium or short elbow shape |
| Unsalted Butter 🧈 | ¾ cup | Cold, cut into small cubes |
| All-Purpose Flour 🌾 | ¾ cup | For roux foundation |
| Sharp White Cheddar Cheese 🧀 | 2 cups | Shredded, block preferred |
| Gruyère Cheese 🧀 | 1 cup | Shredded, aged 12+ months |
| Cream Cheese 🧈 | 8 oz | Full-fat, room temperature |
| Whole Milk 🥛 | 1 cup | Warmed slightly for blending |
| Yellow Mustard 🍯 | 1 tbsp | For tangy depth |
| Garlic Powder 🧄 | 1 tsp | Freshly ground preferred |
| Ground Black Pepper 🌶️ | ½ tsp | Freshly cracked |
| Panko Breadcrumbs 🍞 | ¾ cup | For crispy topping |
| Extra-Virgin Olive Oil 🫒 | 1 tbsp | For breadcrumb crispiness |
| Diamond Crystal Kosher Salt 🧂 | 1 ½ tsp | For seasoning |
The cheeses are non-negotiable here. Sharp white cheddar delivers that signature tang, while aged Gruyère adds nutty complexity—both should be freshly shredded from blocks, not pre-grated. Costco or specialty cheese shops are your best bets for Gruyère; look for labels showing at least 12 months of aging. Cream cheese is the secret weapon for silkiness, so don’t use low-fat. The elbow macaroni should be medium or short—long noodles get mushy in the sauce. For the butter, grab Plugrá or Land O’Lakes from the freezer section—they hold up better when cubed cold.
No sharp cheddar? Extra-sharp cheddar at half the amount works in a pinch, though it’ll be milder. Gruyère unavailable? Parmesan or Emmental both add depth, but Gruyère’s melt is unmatched. The mustard is crucial—it cuts through the richness. French’s or Hellmann’s are reliable, but any yellow mustard will do. For the breadcrumbs, Panko is a must—it stays crispy while regular breadcrumbs turn soggy. Short on olive oil? Melted butter works too, though it’ll be less crisp. The garlic powder can be swapped for fresh minced garlic at double the amount, but it burns easily during baking.
Prep the pasta first—it needs to cool slightly before mixing with the sauce. The sauce reheats beautifully, but add a splash of milk when warming to prevent drying. Store leftovers covered in the fridge for 4-5 days, or freeze portions for 3 months. For extra crispiness, broil the baked mac and cheese for 2-3 minutes at the end. The breadcrumbs will get golden and irresistible—just watch them like a hawk. Double the recipe if you’re feeding a crowd; it scales perfectly.
Why You’ll Love This Recipe
- One-Pot Magic: I swear by this—just toss everything into one pot, stir, and walk away. No measuring cups cluttering your counter, no extra bowls to wash. The elbow macaroni cooks right in the roux, and by the time the cheeses melt, you’ve got a creamy masterpiece with zero fuss.
- Cheddar-Gruyère Dream Team: That sharp white cheddar brings the tang, while Gruyère adds nutty depth—like a hug for your taste buds. Honestly, the first bite makes me pause mid-spoonful. The texture? Perfectly balanced: tender pasta with a glossy, stretchy sauce that clings just right.
- Leftovers That Don’t Suck: Between us, most mac and cheese turns into sad, watery glue after reheating. Not this one. The butter-flour roux locks in the richness, so even day-old portions reheat like they’re fresh off the stove. I’ve sent it to work lunches—no complaints, just empty containers.
- Budget-Friendly Crowd-Pleaser: Four servings for under $10, and it disappears faster than my willpower at a buffet. The elbow macaroni is cheap, the cheeses stretch far, and the butter? Well, a little goes a long way when it’s the star. It’s the dish I make when friends drop by unannounced—or when I’m pretending to be a generous host.
Step-by-step instructions for ultra-creamy mac and cheese
Here’s how to build the perfect cheesy bake—silky sauce, crispy topping, and that addictive pull-apart texture.
Cook the Elbow Macaroni to Al Dente Perfection
Bring a large pot of water to a rolling boil and add the 12 oz elbow macaroni. Stir immediately to prevent sticking, then add 1.5 tsp diamond crystal kosher salt—the water should taste like the ocean. Cook until 1 minute before the package directions call for al dente (about 10-12 minutes).
Drain the pasta in a colander, but don’t rinse it—those surface starches are what help create the creamy sauce. Give it a quick shake to break up any clumps. I like to return the drained pasta to the pot and toss it with 1 tbsp extra-virgin olive oil right away to prevent sticking while we make the cheese sauce.
Build the Roux and Cheese Sauce
In a large, heavy-bottomed saucepan, melt the 0.75 cup unsalted butter over medium heat. Once the butter has completely melted and starts to foam, whisk in the 0.75 cup all-purpose flour all at once. Cook for 2-3 minutes, stirring constantly, until the mixture turns a light golden color and smells nutty—this is your roux.
Slowly pour in the 1 cup whole milk while whisking vigorously to prevent lumps. Bring the mixture to a gentle simmer and cook for 3-4 minutes until it thickens enough to coat the back of a spoon. Remove from heat and let it cool slightly for 1 minute. Now add the 2 cups sharp white cheddar cheese, 1 cup gruyère cheese, and 8 oz cream cheese, stirring until completely melted and smooth.
Combine Pasta and Sauce for Maximum Creaminess
Pour the cheese sauce over the cooked elbow macaroni in the pot. Stir gently but thoroughly to coat every strand of pasta. Add the 1 tbsp yellow mustard, 1 tsp garlic powder, and 0.5 tsp ground black pepper, mixing well. The mustard adds a subtle tang that balances the richness, and the garlic powder gives it depth without overpowering.
Taste and adjust seasoning if needed—sometimes the cheddar is salty enough that you might not need additional salt. Transfer the mixture to a 9×9-inch baking dish or 8×8-inch dish, spreading it evenly. Here’s the thing—don’t press it down. We want that pull-apart texture, so let it settle naturally.
Create the Crispy Breadcrumb Topping
Preheat your oven to 375°F. In a small bowl, mix together the 0.75 cup panko breadcrumbs and 1 tbsp extra-virgin olive oil until evenly coated. Sprinkle this mixture evenly over the top of the mac and cheese, pressing down very lightly with the back of a spoon to help it adhere.
Bake for 20-25 minutes until the top is deep golden brown and the edges are bubbling. The cheese sauce should be creamy but not runny—it should hold its shape when you give it a gentle shake. If it looks too dry, tent with foil for the last 5 minutes of baking to prevent over-browning.
Rest and Serve for Maximum Gooeyness
Remove the baking dish from the oven and let it rest for 5-10 minutes before serving. This resting time is crucial—it allows the cheese to set slightly and the flavors to meld together. The dish will be hot, so handle with care, especially if you’ve got kids around.
Slice into 4 equal portions and serve immediately. The contrast between the creamy, cheesy interior and the crispy breadcrumb topping is what makes this mac and cheese truly special. Real talk: leftovers reheat beautifully, but they won’t be quite as crispy on top—so enjoy it while it’s hot!
Pro Tips For Making 4 Serving Mac And Cheese
- Cook pasta al dente: DESCRIPTION: Pull the elbows just before the package says “done”—they’ll finish cooking in the cheese sauce, and overcooked noodles turn to mush. I learned this the hard way after slurping a sad, gluey batch straight from the pot.
- Melt butter low and slow: DESCRIPTION: Heat the butter over medium-low until it foams but doesn’t brown—too hot, and the flour will scorch before forming a roux. I used to rush this, and the whole dish tasted bitter. Trust the process.
- Grate cheese fresh, not pre-shredded: DESCRIPTION: Pre-shredded cheese has anti-caking agents that make the sauce grainy. Use a box grater for sharp cheddar and Gruyère—it melts smoother and tastes richer. Yes, it’s a pain, but it’s worth it.
- Add cheese in stages: DESCRIPTION: Stir in half the cheese to the roux first, then remove the pot from heat before adding the rest. This prevents scorching and lets the cheese melt evenly. I skip this and end up with lumps every time.
Essential equipment for this recipe
Roux Pan Essentials
The heavy-bottomed saucepan is non-negotiable for this recipe—it prevents burning and ensures even heat distribution when making the roux. I recommend a 3-quart stainless steel pan like the All-Clad Stainless or Calphalon Classic for professional-level results.
These pans distribute heat evenly and handle the high heat needed to cook the roux properly without scorching. 🔥
Baking Dish Size
Use either a 9×9-inch baking dish or 8×8-inch dish for even baking and crispy edges. I prefer Ceramic or glass dishes like Pyrex because they hold heat well and allow you to check the color of the breadcrumb topping without opening the oven.
Avoid dark-colored metal pans—they can cause the bottom to over-bake while the top stays pale.
Whisk for Smooth Sauce
A balloon whisk or French whisk is essential for blending the roux and milk into a lump-free sauce. I use a OXO Good Grips Balloon Whisk—it’s sturdy, easy to grip, and gets the job done without splashing.
Whisking vigorously when adding milk prevents lumps that can ruin the creamy texture of your mac and cheese.
Measuring Tools
Precision matters when measuring ingredients like cheese and flour. Use a digital kitchen scale for cheeses to ensure accurate portions—OXO Good Grips is my go-to. For dry ingredients, a stainless steel measuring cups set like Farberware gives consistent results.
The 1/4 tsp for pepper and 1 tsp for garlic powder need exact measurements to balance flavors.
Breadcrumbs Prep
Mixing the panko breadcrumbs with olive oil requires a small bowl—Rubbermaid Take-Along or Pyrex glass works well. A silicon spatula helps distribute the oil evenly without crushing the breadcrumbs.
For extra crispiness, I lightly press the mixture onto the mac and cheese with the back of a spoon to help it adhere during baking.
Oven Thermometer
Your oven might not be accurate—oven thermometers like Thermoworks Oven Thermometer are a game-changer. I’ve found that many home ovens run 15-25°F hotter than set, which can burn the breadcrumb topping if you’re not careful.
Adjust your baking time if your oven runs hot, or reduce the temperature by 25°F if needed. 🌡️
Nutrition facts
Frequently asked questions
Why does this recipe use three different cheeses?
Each cheese brings something special: sharp white cheddar delivers that classic tangy flavor, Gruyère adds nutty depth, and cream cheese creates unmatched creaminess. Together, they create a perfectly balanced sauce that’s richer than single-cheese versions but never greasy. The blend also melts more smoothly than pre-shredded cheese alone.
Can I make this mac and cheese ahead of time?
Assemble the dish (including the breadcrumb topping) up to 24 hours ahead and refrigerate uncovered. Before baking, bring it to room temperature, then bake at 375°F for 25-30 minutes (covered with foil for the first 15 minutes to prevent over-browning). The texture will be slightly firmer but still delicious. For leftovers, reheat covered at 350°F for 15 minutes.
What’s the best way to get crispy breadcrumbs?
Use panko breadcrumbs (not regular breadcrumbs) and mix them with 1 tbsp olive oil before sprinkling. Press them down lightly with the back of a spoon to help them adhere. Bake uncovered at 375°F for 20-25 minutes—if they’re browning too quickly, tent with foil. For extra crunch, broil for 1-2 minutes at the very end, watching closely to avoid burning.
Can I make this recipe vegetarian?
Yes! Simply replace the butter with vegetable oil or vegan butter and use vegan cheeses that melt well (like Miyoko’s or Violife brands). The roux method still works—just ensure your flour is 100% plant-based. The texture will be slightly different but still creamy. For extra richness, add 2 tbsp nutritional yeast to the cheese sauce.
What if my sauce gets too thick or too thin?
If it’s too thick, whisk in 1-2 tbsp warm milk to loosen it. If it’s too thin, remove from heat and let it cool slightly, then whisk in 1 tbsp flour mixed with 1 tbsp butter until smooth. Never add cold milk directly—it can cause the cheese to seize. For baked mac and cheese, a slightly thicker sauce helps create that perfect pull-apart texture when baked.

- 3 Layer Spice Cake Recipe: Warm Vanilla, Chocolate, and Spiced Swirls - September 25, 2026
- 4 Serving Mac and Cheese Recipe: Ultra-Creamy Bake With Crispy Breadcrumbs - September 25, 2026
- 4 Egg Frittata Recipe: Oven-Baked Fluffiness With Zero Leftovers - September 25, 2026