
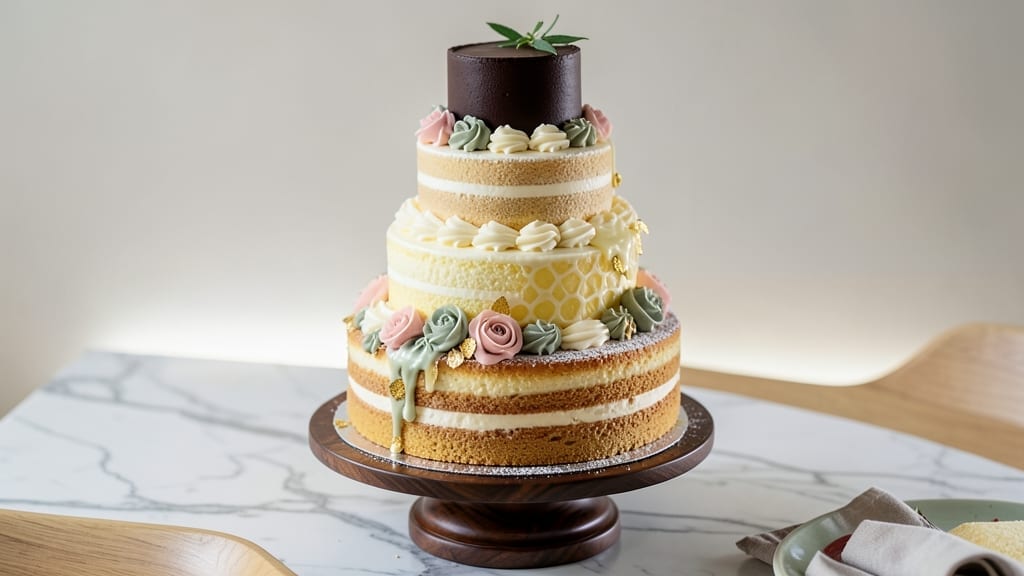
A 4-tier wedding cake isn’t just dessert—it’s the centerpiece of your celebration, where every layer tells a story of love and joy. 💫 The secret to a showstopping cake lies in sturdy construction, flawless flavor, and elegant design that wows from afar.
This recipe guides you through baking perfect layers, assembling tiers with stability in mind, and decorating with grace—so your cake stands tall and delicious through every slice.
We’ll start with a vanilla butter cake base—moist, tender, and sturdy enough to support multiple tiers without crumbling. The filling? Rich, velvety buttercream that holds its shape and tastes like pure happiness.
For the finish, we’ll cover in smooth fondant (or a lighter alternative) and add delicate piping and edible flowers that make it look like it belongs in a bridal magazine. No fancy equipment required—just patience and a steady hand.
What makes this recipe special is the foolproof assembly method that keeps tiers aligned and stable, even when guests start cutting. We’ll share tricks for stacking, crumb-coating, and transporting your cake without a hitch. Plus, I’ll include a simple gluten-free adaptation so no one’s left out of the celebration.
By the end, you’ll have a cake that’s as beautiful as it is delicious—ready to steal the show at your wedding.
Whether you’re baking for your own big day or a loved one’s, this cake delivers restaurant-quality layers with a homemade touch. Let’s get started—your guests will thank you for every bite!
Ingredients for 4 tier wedding cake
Four tiers of perfection start with these quality ingredients—each one chosen for sturdy structure and flawless flavor.
| Ingredient | Amount | Notes |
|---|---|---|
| All-Purpose Flour 🌾 | 6 cups | Sifted for light texture, gluten-free blend for adaptation |
| Granulated Sugar 🍚 | 3 ½ cups | Superfine for smoother crumb |
| Unsalted Butter 🧈 | 2 ½ cups | Room temperature, European-style preferred |
| Large Eggs 🥚 | 8 whole | Room temperature for even baking |
| Vanilla Extract 🌿 | 2 tbsp | Pure Madagascar bourbon preferred |
| Baking Powder 🧂 | 1 ½ tsp | Freshly opened for lift |
| Salt 🧂 | 1 ½ tsp | Fine sea salt for balance |
| Whole Milk 🥛 | 1 ½ cups | Room temperature for tenderness |
| Confectioners' Sugar 🍚 | 4 cups | For buttercream, sifted |
| Heavy Whipping Cream 🥛 | 2 cups | Cold for stable buttercream |
| Vanilla Bean Paste 🌿 | 1 tbsp | For deeper vanilla flavor |
| White Fondant 🎂 | 2 lb | Premium white for smooth coverage |
| Edible Gold Leaf 💛 | 1 sheet | For elegant finishing touch |
| Fresh Flowers 🌸 | ½ cup | Edible varieties for decoration |
The foundation is all in the flour and butter. King Arthur or Gold Medal flour gives that tender crumb, while Plugrá or European-style butter adds richness—don’t skimp here. For vanilla, Madagascar bourbon extract has the best depth, but imitation works in a pinch. Room-temperature eggs and milk are non-negotiable; cold ingredients cause cracks in your layers. Pro tip: buy your butter a day ahead so it softens naturally in the fridge. The confectioners’ sugar should be sifted through a fine mesh—lumps ruin buttercream texture. And if you’re gluten-free? Bob’s Red Mill 1:1 blend works perfectly.
No vanilla bean paste? Double the extract and add a pinch of cinnamon for warmth. Short on buttercream time? Meringue powder speeds up the process—just add hot water. Fondant too expensive? Marshmallow fondant (like Wilton) is budget-friendly and still elegant. For flowers, local florists carry edible varieties—rose petals and violets are wedding favorites. And if you’re nervous about stacking tiers, dowels and crumb coats are your best friends—we’ll cover that in assembly. The gold leaf? Michael’s Crafts sells it in small sheets perfect for cake accents.
Store cake layers wrapped in plastic at room temp for 2 days max—longer risks drying. Buttercream keeps 3 days refrigerated or 2 months frozen (thaw overnight). Fondant loses moisture fast, so store it in an airtight bag with a damp towel. Flowers? Use them within 24 hours—they wilt faster than you’d think. For transport day, place the cake on a sturdy board with a base to catch crumbs. And if you’re baking ahead? Assemble the cake day-of—fondant looks best when fresh.
Why You’ll Love This Recipe
- No-Fuss Layers: I swear by this recipe because it’s built on a classic vanilla sponge—light as a cloud, thanks to the butter and eggs. No dense, heavy tiers here; just that perfect crumb that makes every slice feel special without the stress of complicated techniques.
- Butter-Sugar Magic: That butter-to-sugar ratio? It’s the secret weapon. The butter keeps it tender while the sugar caramelizes just enough to give every bite a subtle, warm sweetness. Honestly, the vanilla extract ties it all together like a whisper—simple but unforgettable.
- Tier Time Flex: Between us, this recipe works for any occasion—birthdays, baby showers, or just because. You can bake the tiers ahead, decorate them fresh, and still have a showstopper. Plus, the base recipe scales effortlessly, so whether it’s a small gathering or a full wedding, the math stays easy.
- Leftovers? No Problem: The sponge keeps beautifully for days, so you’re not stuck with a whole cake going stale. Slice it, wrap it, and freeze it—those vanilla notes only get richer over time. (Yes, even on a Tuesday night, I’ve pulled out a slice straight from the freezer and called it a win.)
Step-by-step instructions for building your 4-Tier wedding cake masterpiece
Here’s how to assemble each tier with precision and grace—your cake deserves this attention.
👨🍳 Step 1: Bake and Cool the Cake Layers
Preheat your oven to 350°F. Grease and line four 8-inch round cake pans with parchment paper. In a stand mixer, cream the 2.5 cups unsalted butter and 3.5 cups granulated sugar on medium speed until light and fluffy—this should take about 4-5 minutes. Add the 8 whole large eggs one at a time, mixing well after each addition.
In a separate bowl, whisk together the 6 cups all-purpose flour, 1.5 tsp baking powder, and 1.5 tsp salt. Gradually add this dry mixture to the wet ingredients, alternating with the 1.5 cups whole milk, beginning and ending with the flour. Mix on low speed just until combined—overmixing develops gluten, which can make your cake dense.
Divide the batter evenly among the prepared pans. Bake for 25-30 minutes or until a toothpick inserted into the center comes out clean. Let the cakes cool in their pans for 10 minutes, then transfer to a wire rack to cool completely. Here’s the thing—cooling completely prevents condensation that can make your filling soggy later.
🥘 Step 2: Prepare the Vanilla Buttercream
While the cakes cool, prepare the buttercream by beating the 2 cups heavy whipping cream in a chilled bowl until stiff peaks form. In a separate large bowl, beat the 2.5 cups unsalted butter (softened but not melted) until smooth and creamy. Gradually add the 4 cups confectioners’ sugar, 2 tbsp vanilla extract, and 1 tbsp vanilla bean paste, mixing on medium speed until light and fluffy.
Gently fold in the whipped cream until fully incorporated. This buttercream should be smooth, thick, and pipeable. If it’s too thick, add 1-2 tablespoons milk to loosen it. The key here is consistency—you want it to hold its shape when piped but still be smooth enough to spread easily between layers.
🍳 Step 3: Assemble and Fill the Cake Tiers
Once the cakes are completely cool, place the first tier (bottom cake) on a cake stand or plate. Spread a generous layer of the vanilla buttercream over the top, leaving about a ½-inch border uncovered. Place the second tier on top and repeat the process, creating a crumb coat by spreading a thin layer of buttercream over the entire cake. Chill in the refrigerator for 15 minutes—this helps set the crumb coat and makes the final layering cleaner.
After chilling, apply the final layer of buttercream, smoothing it evenly with a spatula. Repeat this process for the remaining two tiers, stacking them carefully. Use a leveling tool to ensure each tier is perfectly even—this is critical for a polished finish. I always check with a ruler or cake leveler to guarantee each tier sits flush with the one below.
🎨 Step 4: Cover with Fondant and Decorate
Roll out the 2 lb white fondant on a clean, lightly floured surface to a thickness of about ¼ inch. Cover the entire cake with the fondant, smoothing it gently with your hands or a fondant smoother. Use a small amount of water or fondant smoother spray to help it adhere to any rough spots. Trim any excess fondant neatly with a sharp knife or fondant cutter.
For the finishing touches, carefully apply the edible gold leaf to the top of each tier, using a small amount of water or edible glue to help it adhere. Arrange the 0.5 cup fresh flowers decoratively around the base and top tiers, pressing them lightly into the fondant to secure them. The gold leaf adds a luxurious touch, while the fresh flowers bring a natural elegance that complements the cake’s sophistication.
⏰ Step 5: Final Touches and Serving
Let the cake rest at room temperature for at least 1 hour before serving to allow the fondant to set completely. This resting time also helps the flavors meld together, giving you that perfect balance of sweetness and richness. When it’s time to serve, use a serrated knife to cut the first slice—this helps create clean edges for the rest of the cake.
Slice each tier carefully, starting from the bottom to maintain the cake’s structural integrity. Serve immediately so your guests can enjoy the cake at its best. The result should be a stunning, elegant centerpiece that steals the show at your wedding reception.
Pro Tips For Making 4 Tier Wedding Cake
- Cream Butter First: Take those cold butter cubes and pulse them in the food processor until they’re the size of small peas—this prevents greasy layers when mixing. I used to just chop it roughly, and the cake always felt dense. Five minutes of extra effort here makes a real difference in texture.
- Room Eggs Overnight: Pop those eggs out of the fridge 12-24 hours before baking—no need to stress over lukewarm. I learned this the hard way when my eggs were straight from the icebox, and the cake’s structure suffered. Let them sit in the bowl you’ll use to mix them for even consistency.
- Sift That Flour: Don’t just scoop and dump—sift the flour twice into your bowl to aerate it. Wedding cakes rely on lightness, and unsifted flour packs down like a brick. I skip this when I’m tired, but the difference in crumb is noticeable.
- Chill the Cake Layers: After baking, let the tiers cool completely on a wire rack, then refrigerate them for at least 2 hours before assembling. I was impatient once and stacked them warm—they collapsed under their own weight. Patience here guarantees clean tiers and a stable cake.
Essential equipment for this recipe
Must-Have Baking Tools
Start with a stand mixer—I swear by my KitchenAid Artisan Series—it handles the buttercream and batter with ease. A 9×13-inch baking pan for testing flavors before committing to your cake tiers is a game-changer.
For leveling, a cake turntable (like the Wilton Cake Stand) spins smoothly while you apply fondant, and a leveling tool ensures perfect flat tops. Don’t skip the offset spatula—it’s essential for spreading buttercream evenly. 💫
Fondant and Decorating Essentials
For fondant work, a fondant smoother (or a clean acrylic roller) creates that ultra-smooth finish. I love the Wilton Fondant Smoother Set—it’s affordable and does the job. A sharp fondant knife or pizza cutter trims excess cleanly, while a small paintbrush helps adhere gold leaf.
For flowers, a tweezers set lets you place delicate petals precisely. Pro tip: Keep a damp cloth nearby to wipe sticky hands during assembly.
Stability and Transport Gear
Your cake’s structural integrity depends on dowels (I use 3/8-inch wooden dowels for each tier) and a cake board with a base support (like the CakeLovers Cake Board Base). A cake turntable isn’t just for decorating—it helps transport tiers safely.
For the big day, a cake carrier (like the CakeLovers Cake Carrier) protects your masterpiece during transport. Don’t forget a serrated knife for clean slices—it’s sharper than a regular knife and prevents crumbs.
Budget-Friendly Swaps
Skip the expensive turntable? Use a sturdy cake stand or even a large cake plate with a level surface underneath. No fondant smoother? A clean acrylic plate works in a pinch. For gold leaf, try edible gold dust (like Wilton Gold Dust)—it’s cheaper and just as elegant.
A hand mixer can replace a stand mixer for buttercream if you’re short on funds. The key is creativity—your cake’s beauty comes from attention to detail, not pricey tools.
Pro Tips for Smooth Assembly
Invest in parchment paper circles (cut to fit your pans) to prevent sticking and ensure clean layers. A piping bag with a star tip (like Wilton 1M tip) adds decorative borders or ruffles. For flowers, a small bowl of water keeps stems fresh while you arrange them.
And here’s a secret: Chill your cake between layers—it prevents buttercream from melting and keeps everything neat. A digital scale ensures precise measurements, especially for fondant.
Nutrition facts
Frequently asked questions
How do I keep my 4-tier cake from toppling over?
Use 3/8-inch wooden dowels (3-4 per tier) inserted into the bottom cake, extending into the second tier, and so on. A cake board with base support distributes weight evenly, and chilling the cake for 15 minutes between layers adds stability. Always place the heaviest tier at the bottom!
Can I make this cake gluten-free or vegan?
Replace flour with a 1:1 gluten-free blend (like Bob’s Red Mill) and use vegan butter (Miyoko’s or Earth Balance) for both cake and buttercream. For vegan fondant, try marshmallow-based fondant or store-bought vegan fondant like Wilton’s. The vanilla extract remains the same—just ensure it’s vegan-certified.
How far ahead can I bake the cake layers?
Bake layers up to 2 days ahead and store wrapped in plastic at room temperature. For buttercream, refrigerate for up to 3 days or freeze for 2 months. Fondant loses moisture—keep it in an airtight bag with a damp towel. Assemble the cake day-of for the freshest look and texture.
What’s the best way to transport my cake to the venue?
Place the cake on a sturdy cake board with base support and secure it in a cake carrier (like CakeLovers). Use a cake turntable for stability during transport. Keep the venue cool (65°F) to prevent fondant from melting. Avoid direct sunlight—it can cause colors to fade or fondant to soften.
How do I fix a crooked tier after assembly?
Gently warm the buttercream with a hairdryer (low heat) to soften, then carefully nudge the tier into place. For fondant, use a fondant smoother to reshape and smooth any uneven areas. If the issue persists, trim the fondant slightly and reapply—precision is key for a polished finish!

- 77 Texas BBQ Taco Sauce Recipe: Smoky Chipotle Heat With Caramelized Depth - October 19, 2026
- 1930’s Chocolate Cake Recipe: Vintage Richness With Vanilla Bean Swirls - October 19, 2026
- 6 Ingredient Bread Recipe: No-Knead Wonder With Pantry Staples - October 19, 2026