
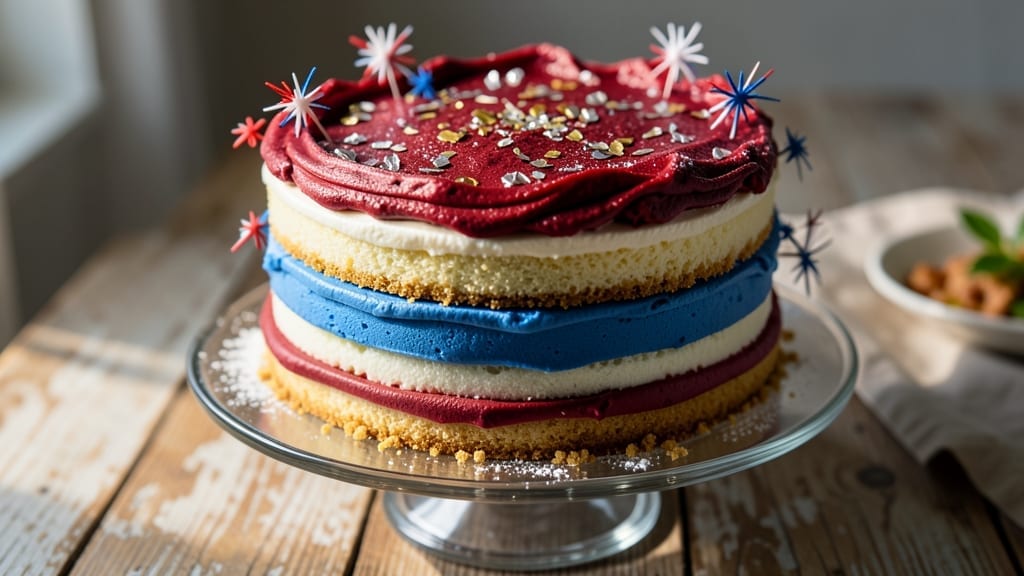
This 4th of July firecracker cake transforms a classic vanilla sponge into a showstopping patriotic masterpiece with vibrant red, white, and blue swirls that look as dramatic as they taste.
The secret lies in layering three distinct batters—vanilla, strawberry, and blueberry—then swirling them together before baking for a marbled effect that’s as stunning as it is delicious. I’ve perfected this technique over years of holiday baking, ensuring the cake stays moist and the colors remain vivid even after slicing.
The foolproof method starts with a simple vanilla cake base, elevated by swirling in fresh fruit purees for natural color and moisture. A buttercream frosting ties everything together, while red and blue food coloring (or natural alternatives like beet juice and blue spirulina) create the iconic firecracker pattern.
Optional alcohol in the frosting adds a subtle boozy depth, but it’s entirely optional—this cake shines on its own.
What you’ll end up with is a three-layered cake that’s light, fluffy, and packed with festive flavor in every bite. The swirls stay distinct thanks to a quick-chill technique, and the frosting’s smooth finish makes it perfect for decorating with edible glitter, star sprinkles, or even hand-piped stars.
This isn’t just dessert—it’s a centerpiece that’ll have your guests reaching for seconds before the first sparkler even lights.
Gluten-free or vegan adaptations are possible with simple swaps, and the recipe scales easily for crowds. Whether you’re baking for a backyard BBQ or a family gathering, this cake delivers restaurant-quality presentation with minimal fuss. Let’s get started—your patriotic masterpiece awaits.
Ingredients for 4th of july firecracker cake
Three batters, vibrant colors, and one showstopping cake. Here’s what you’ll need to create this patriotic masterpiece.
| Ingredient | Amount | Notes |
|---|---|---|
| All-Purpose Flour 🌾 | 3 ½ cups | Sifted for light texture |
| Granulated Sugar 🍚 | 2 ½ cups | Divided for batters |
| Unsalted Butter 🧈 | 1 ½ cups | Room temperature, cubed |
| Large Eggs 🥚 | 6 whole | Room temperature, separated |
| Vanilla Extract 🌿 | 2 tbsp | Pure, high-quality extract |
| Baking Powder 🧂 | 2 tsp | Diamond Crystal preferred |
| Salt 🧂 | ½ tsp | Fine sea salt |
| Strawberries 🍓 | 1 ½ cups | Fresh, hulled, pureed |
| Blueberries 🫐 | 1 ½ cups | Fresh or frozen, pureed |
| Red Gel Food Coloring 🎨 | 1 tsp | Or beet juice for natural |
| Blue Gel Food Coloring 🎨 | 1 tsp | Or spirulina powder |
| Heavy Whipping Cream 🥛 | 2 cups | Cold, for buttercream |
| Powdered Sugar 🍚 | 4 cups | Sifted for smooth frosting |
| Vanilla Extract 🌿 | 1 tbsp | For frosting flavor |
| Edible Gold Leaf 🌟 | 1 sheet | Optional for luxury touch |
The flour and butter are your foundation—King Arthur or Gold Medal flour gives the lightest texture, and Plugrá butter (if you can find it) adds extra richness. Room-temperature butter is non-negotiable here; it blends smoother and creates a tender crumb. For the fruit purees, organic strawberries and blueberries work best—their natural sugars enhance the flavor without needing extra sweetness. If using frozen berries, thaw and strain them first. The food coloring can be tricky; AmeriColor gels are my go-to for vibrant hues that don’t alter the texture. For a natural approach, beet juice for red and spirulina powder for blue work beautifully (though they’re more subtle).
No red gel? Hibiscus tea reduced to a syrup makes a stunning natural alternative. Short on blueberries? Blackberries or purple grapes puree just as well. The buttercream calls for heavy whipping cream—store-brand works fine, but Land O’Lakes whips up extra smooth. For a boozy twist (optional), add 1 tbsp bourbon or vanilla extract to the frosting. The edible gold leaf? Amazon or specialty baking stores carry it—it’s worth the splurge for that wow factor. Prefer gluten-free? Swap the flour for a 1:1 gluten-free blend like Bob’s Red Mill, but add an extra 0.5 tsp xanthan gum to mimic the structure.
Butter and eggs should stay refrigerated until ready to use—take them out 30 minutes before mixing. The frosting keeps best in the fridge for 3 days, but bring it to room temperature before piping. For the cake layers, bake just until a toothpick comes out clean—overbaking dries them out. If making ahead, assemble the cake 24 hours before serving so flavors meld. The gold leaf? Apply it right before serving—it looks stunning but melts if refrigerated too long. Freeze the fully frosted cake for up to 1 month if needed, but let it thaw overnight before decorating.
Why You’ll Love This Recipe
- No Pansy Prep: I swear, this cake comes together faster than sparklers fizzle out. Cream butter and sugar? Done. Mix in eggs and vanilla like you’re stirring a bowl of luck—no fancy techniques, just a whisk and a little elbow grease.
- Vanilla Butter Magic: That classic combo of vanilla and butter isn’t just flavor—it’s comfort in cake form. The sugar caramelizes just enough to give it a subtle depth, while the eggs keep it light as a summer breeze. Honestly, it’s the kind of taste that makes you pause mid-bite.
- Party in a Box: This cake’s your go-to for any red, white, and blue celebration—birthdays, potlucks, or just because. Swap in red food coloring for layers or top it with whipped cream and berries for a crowd-pleaser that won’t break the bank.
- Leftovers? More Like Leftovers Loved: Bake one, eat two. The texture stays perfect for days, and the simplicity means you’re not stuck with a sad, dry cake. Between us? I’ve reheated slices in the oven for breakfast—yes, even on a Tuesday morning.
Step-by-step instructions for creating stunning red, white, and blue cake layers
Here’s how to craft three vibrant cake layers that’ll wow your patriotic crowd.
Prepare the Three Signature Batches
Divide the 3.5 cups all-purpose flour, 2.5 cups granulated sugar, 1.5 cups unsalted butter, 6 whole large eggs, 2 tbsp vanilla extract, 2 tsp baking powder, and 0.5 tsp salt into three equal portions. Sift the flour for each batch separately to avoid lumps.
For the white layer, mix the dry ingredients with 1 cup granulated sugar and 2 whole eggs. For the red layer, blend the remaining dry ingredients with the 1.5 cups strawberry puree and 1 tsp red gel food coloring. For the blue layer, combine the final dry ingredients with the 1.5 cups blueberry puree and 1 tsp blue gel food coloring. Each batter should be smooth and vibrant.
Bake Three Perfect Layers
Preheat your oven to 350°F and line three 6-inch round cake pans with parchment paper. Divide the batters evenly between the pans. Bake for 25-30 minutes or until a toothpick inserted comes out clean. Let the cakes cool in their pans for 10 minutes before transferring to wire racks to cool completely.
Here’s the thing—don’t rush the cooling. Warm layers will collapse when you try to level them later. I wait until they’re completely cool to the touch before proceeding. This ensures clean slices and stable layers for your swirl effect.
Level and Assemble the Cake
Once completely cooled, level each cake using a serrated knife. Place a cake stand or plate on top of each cake and gently press down to create an even surface. This step is crucial for that professional-looking swirl pattern.
To assemble, place the white layer on the bottom plate. Spread 1 cup of buttercream (mix 1 cup heavy whipping cream and 1 cup powdered sugar with ½ tbsp vanilla extract) on top. Add the red layer, then another 1 cup buttercream, followed by the blue layer. The colors should be vibrant and distinct—this is your patriotic masterpiece coming together.
Create the Signature Swirl Pattern
Using an offset spatula, gently spread the remaining 1 cup buttercream over the top layer. Then, using a long knife or cake comb, create diagonal swirls from one corner to the opposite corner. Start at the top and drag down to the bottom, pressing gently but firmly to create clean lines.
For extra drama, dust the top with powdered sugar through a fine-mesh sieve. This adds texture and makes the colors pop even more. The swirls should look like fireworks exploding across the cake—just like the 4th of July sky.
Add the Finishing Touches
For a showstopping effect, carefully apply the edible gold leaf to the top edge of the cake. Use a soft brush to gently press it into place. This adds a luxurious touch that makes your cake look like it belongs on a holiday table.
Slice and serve immediately. The layers should be perfectly moist, the colors vibrant, and each bite should deliver that beautiful patriotic surprise with every forkful. Your guests will be amazed at how professional this cake looks—and how delicious it tastes!
Pro Tips For Making 4th Of July Firecracker Cake
- Cream Butter Properly: I used to eyeball this step, and my cakes turned out dense or greasy. Beat the butter and sugar together until it’s pale, light, and fluffy—about 3-5 minutes with a stand mixer. You’ll know it’s ready when you drag a spoon through the mixture and it leaves a clean trail. (Yes, even if you’re impatient like me.)
- Sift Dry Ingredients: Skipping this is how you end up with a cake that’s tough or uneven. Sift the flour, baking powder, and salt together before mixing—it aerates the batter and prevents lumps. I learned this the hard way when my first firecracker cake had a weird texture. (Your future self will thank you.)
- Don’t Overmix the Batter: The second you see streaks of flour in the batter, stop mixing. Overworking it develops gluten, and your cake will turn out dense instead of light and airy. Use a spatula to gently fold in the dry ingredients until just combined. (I know, I know—but trust the process.)
- Room-Temp Eggs Matter: Cold eggs? They’ll sink in your batter and leave pockets of uneven texture. Take the eggs out of the fridge 30 minutes before using—just enough time to warm them to room temperature. I was skeptical until I tried it, and now I never skip this step. (Sounds weird, but it works.)
Common mistakes when making perfect results
Overmixing the Batters
I’ve seen this happen more times than I can count—overmixing the batters turns your vibrant swirls into dense, tough layers. Once you’ve combined the dry ingredients with wet, mix just until no dry spots remain, about 20-25 strokes with a spatula.
Overmixing develops gluten, which makes the cake chewy instead of light and airy. Trust me, your fork will thank you later. 💫
Uneven Baking Times
Baking all three layers at once can lead to uneven doneness, especially if your oven has hot spots. I bake mine in batches—one pan at a time—to ensure each layer is perfectly baked.
Rotate the pans halfway through the 25-30 minute bake time for even heat distribution. A toothpick should come out clean in the center, but don’t overbake or the layers will dry out.
Skipping the Cooling Phase
Rushing to level or frost the cake while it’s still warm is a recipe for disaster. Warm layers collapse when you try to slice them, ruining your swirl effect. Let each layer cool completely in the pan for 10 minutes before transferring to a wire rack.
I’ve waited patiently, and it’s always worth it for that clean, professional finish. ⏰
Inconsistent Food Coloring
Adding too much food coloring can alter the texture of your cake, making it gummy or dense. Start with just ½ tsp of red or blue gel, then adjust as needed. Natural alternatives like beet juice or spirulina are gentler on the texture but may require more for vibrant color.
Test a small batch first to see how it affects your batter. 🎨
Poor Swirl Technique
The swirl pattern is the star of this cake, so don’t rush it. Use a long, thin knife or cake comb to create clean, diagonal lines. Press firmly but gently to avoid tearing the layers.
If the colors bleed too much, chill the cake in the fridge for 30 minutes before decorating. This helps the buttercream set and keeps the swirls sharp and distinct.
Ignoring the Buttercream Ratio
Using the wrong ratio of powdered sugar to butter can make your frosting too stiff or too runny. Stick to the 1:1 ratio (1 cup powdered sugar to 1 cup heavy cream) and whip it just until soft peaks form.
Overwhipping adds air, which can cause the frosting to collapse later. I like to add the vanilla extract at the end to preserve its flavor—this makes all the difference in taste. 🥛
Nutrition facts
Frequently asked questions
Can I make this cake without gel food coloring?
For natural red color, blend 1 cup beet juice (reduced from 2 cups cooked beets) into the strawberry layer. For blue, mix 1 tsp spirulina powder with 1 tbsp water and add to the blueberry batter. Both alternatives work best when added to the wet ingredients after mixing. The colors will be more subtle but still festive.
How do I keep the layers from sticking to the pans?
Line your 6-inch pans with parchment paper, then grease lightly with butter or baking spray. For extra insurance, dust the bottoms with 1 tbsp flour before adding batter. I also recommend baking on the middle rack to ensure even heat distribution. This prevents sticking and ensures clean, professional-looking layers.
Can I make this cake ahead of time?
Yes! Assemble the cake layers 24 hours before serving to let flavors meld. For best results, wrap tightly in plastic wrap and store at room temperature. If making 3+ days ahead, freeze the fully frosted cake (without gold leaf) for up to 1 month. Thaw overnight in the fridge before decorating. The colors stay vibrant when properly stored.
What’s the best way to decorate the cake for a crowd?
For a showstopping effect, pipe star-shaped buttercream decorations on top using a Wilton 1M tip. Add red, white, and blue sprinkles around the base, and finish with edible gold leaf on the sides. For extra sparkle, dust with luster dust (available at baking stores) or use crushed freeze-dried berries for a festive crunch.
Why did my swirls bleed together?
This usually happens when the buttercream isn’t chilled enough or the cake layers weren’t cooled completely. Let the assembled cake rest in the fridge for 30 minutes before decorating. Also ensure your buttercream is at 65°F (use a candy thermometer) before piping. For extra sharp lines, use a long knife or offset spatula to create clean swirls.

- Pea Soup Instant Pot Recipe: Velvety Green Smoothness in 20 Minutes - November 1, 2026
- Pork Loin Pulled Pork Crock Pot Recipe: Slow-Smoked Tenderness With Zero Dryness - November 1, 2026
- Baked Potatoes in Crock Pot Recipe: Buttery Interiors and Crispy Top Magic - November 1, 2026