
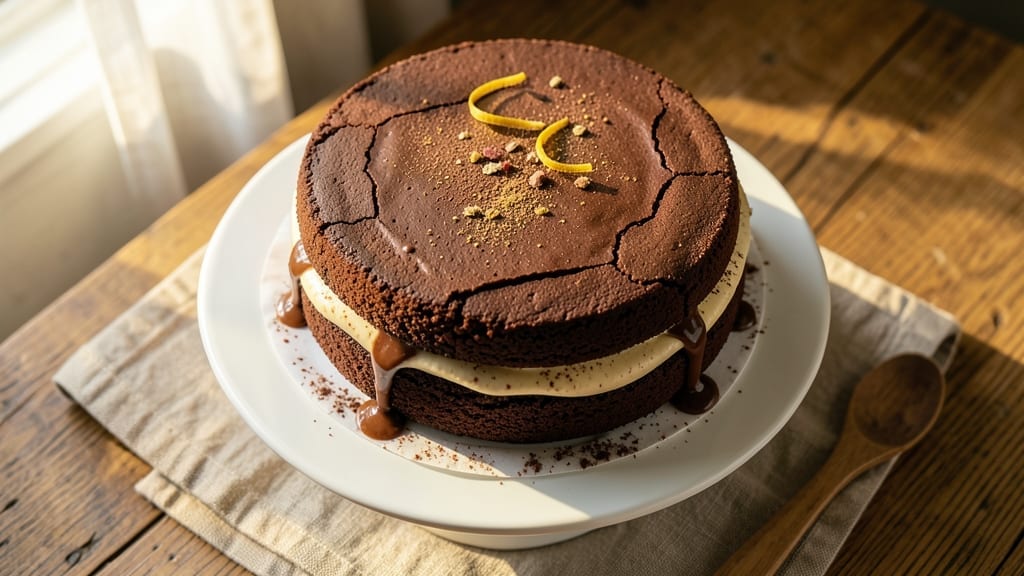
A 5-inch chocolate cake with rich, dense layers and a crispy crust edge is the perfect centerpiece for any celebration—whether it’s a birthday, anniversary, or just because.
This recipe delivers a moist yet sturdy crumb, deep cocoa flavor, and that coveted caramelized edge that makes it look (and taste) like it came from a bakery. The secret? A precise baking technique and a simple but effective layering method that ensures every slice is perfect.
The foundation of this cake lies in its foolproof structure: a balanced ratio of cocoa powder, melted butter, and eggs creates a dense yet tender crumb, while the addition of sour cream keeps it moist without being heavy.
Baking at 350°F for 25-30 minutes in a well-greased pan guarantees a crispy crust while maintaining a fudgy interior. No special equipment is needed—just patience and attention to detail.
Once cooled, the cake’s layers are stacked with a smooth chocolate buttercream that binds beautifully, ensuring clean slices every time. The frosting’s velvety texture contrasts perfectly with the cake’s dense crumb, and optional sprinkles or chocolate shavings add a professional touch.
This recipe is designed to impress, whether you’re baking for a crowd or treating yourself to a decadent dessert.
Ready in about 1 hour from start to finish, this cake is ideal for beginners and experienced bakers alike. The instructions walk you through every step—from mixing to frosting—so you can achieve bakery-quality results at home. Let’s get started on creating your perfect chocolate masterpiece.
Ingredients for 5 inch chocolate cake
Eight essential ingredients create bakery-style chocolate perfection with crispy edges and fudgy layers.
| Ingredient | Amount | Notes |
|---|---|---|
| Unsalted Butter 🧈 | 1 cup | Melted and cooled to room temperature |
| Granulated Sugar 🍚 | 2 cups | Superfine preferred for even texture |
| Dutch-Processed Cocoa Powder 🍫 | ¾ cup | High-quality for deep chocolate flavor |
| Large Eggs 🥚 | 2 whole | Room temperature for even mixing |
| Vanilla Extract 🌿 | 1 tbsp | Pure Madagascar bourbon preferred |
| All-Purpose Flour 🌾 | 1 ½ cups | Sifted for light, airy texture |
| Baking Powder 🍞 | ½ tsp | Aluminum-free for best results |
| Salt 🧂 | ¼ tsp | Fine sea salt preferred |
| Sour Cream 🥛 | ½ cup | Full-fat for moisture |
| Hot Water 💧 | ½ cup | For cocoa powder activation |
| Heavy Whipping Cream 🥛 | 1 cup | Cold for buttercream |
| Confectioners' Sugar 🍚 | 3 cups | Sifted for smooth frosting |
| Dark Chocolate Chips 🍫 | ½ cup | 70% cocoa for garnish |
The cocoa powder is non-negotiable—Valrhona or Guittard make all the difference here. Bulk bins at Williams Sonoma often have great options, but any high-quality Dutch-processed will do. For the butter, Plugrá or Land O’Lakes unsalted work beautifully, but avoid salted at all costs. The sour cream keeps this cake moist without being heavy, so don’t skip it. Pro tip: Room temperature eggs mix more smoothly—just let them sit out for 30 minutes before cracking. The superfine sugar ensures even texture, but if you only have regular granulated, pulse it in a food processor first.
No cocoa powder? Melted dark chocolate at 1.5x the amount works in a pinch, but the texture won’t be identical. Short on sour cream? Plain Greek yogurt at the same quantity is a decent swap. The vanilla extract matters—imitation vanillacool heavy cream at the same amount works too. The chocolate chips for garnish? Enjoy Life brand is my go-to for allergies, but any 70% cocoa will do. The baking powder must be fresh—if it’s more than 6 months old, toss it and buy a new can.
This cake keeps beautifully—3 days at room temperature covered with plastic, or 1 week refrigerated in layers with parchment between them. For longer storage, freeze the unfrosted layers for up to 3 months. The buttercream can be made ahead and refrigerated for 5 days, just re-whip before using. The secret to that crispy crust edge? Don’t overmix the batter—just combine until just combined, and always bake in a well-greased pan.
Why You’ll Love This Recipe
- No Bowl Needed: I swear by this trick—just melt the butter, mix everything right in the pan. No extra dishes, no fuss, and that rich cocoa butter blend? It’s like the cake hugs your taste buds.
- Rich Without Bitter: That Dutch-processed cocoa powder is the secret—deep, velvety chocolate without the aftertaste. The eggs add structure, but the vanilla? It’s the cherry on top that makes it dangerously good.
- Birthday or Breakfast: Slice it for a kid’s party or grab a piece straight from the fridge for your morning coffee. Same cake, two vibes—no guilt, no stress, just pure chocolate joy.
- Leftovers? Even Better: This cake keeps for days, and honestly? It tastes better the second time around. Plus, the cost per serving is a steal—just butter, sugar, and cocoa doing all the heavy lifting.
Step-by-step instructions for rich chocolate cake with crispy edges
Here’s how to bake a decadent 5-inch chocolate cake with fudgy layers and that coveted crispy crust.
Prepare the Cake Batter for Maximum Moisture
Preheat your oven to 350°F and grease two 5-inch round cake pans with the 1 cup unsalted butter, then line the bottoms with parchment circles. Melt the butter in a heatproof bowl over simmering water, then let it cool to room temperature—this prevents steam from forming and keeps your cake tender.
In a separate large bowl, whisk together the 2 cups granulated sugar, 0.75 cup Dutch-processed cocoa powder, 1.5 cups all-purpose flour, 0.5 tsp baking powder, and 0.25 tsp salt. Sift the dry ingredients directly into the bowl to eliminate lumps. In another bowl, beat the 2 large eggs until just combined, then mix in the 1 tbsp vanilla extract and 0.5 cup sour cream.
With the mixer on low speed, gradually add the dry ingredients to the wet mixture, alternating with 0.5 cup hot water in 3 additions. Scrape the bowl frequently to ensure even distribution. The batter should be thick but pourable—this consistency guarantees that dense, moist texture you crave. Fold in the 0.5 cup dark chocolate chips at the end.
Bake to Perfection for Crispy Edges
Divide the batter evenly between the prepared pans. Tap each pan firmly on the counter to release any air bubbles. Bake for 30-35 minutes until a toothpick inserted into the center comes out with moist crumbs but no wet batter. The edges should be deep golden brown and slightly crispy—this is your cue that the cake is ready.
Here’s the secret: Don’t overbake. The cake will continue cooking as it cools. If you pull it out too early, the center will be underdone and gummy. If you let it bake too long, the edges will become tough. The moment the toothpick test passes and the edges are set is when you remove it from the oven.
Cool and Prepare for Buttercream
Let the cakes cool in their pans for 10 minutes, then transfer them to a wire rack to cool completely. This gradual cooling prevents cracking. While they cool, prepare the buttercream by beating the 1 cup cold heavy whipping cream with an electric mixer until soft peaks form. Gradually add the 3 cups confectioners’ sugar, mixing on low speed until smooth.
For extra richness, add the cooled 1 cup melted butter (from earlier) to the cream mixture and beat until fully incorporated. The buttercream should be light, fluffy, and pipeable. If it’s too thick, add 1-2 teaspoons hot water to loosen it. Taste and adjust sweetness if needed—this is the moment to ensure your cake lives up to its decadent promise.
Assemble with Confidence
Once the cakes are completely cool, level the tops if necessary using a serrated knife. Place one cake on a serving plate and spread a generous layer of buttercream over the top. Press the second cake onto the buttercream layer, then cover the entire exterior with the remaining buttercream. Use an offset spatula to create smooth, even sides.
For that showstopping finish, dust the top with a sifting of confectioners’ sugar or press additional dark chocolate chips into the sides. The contrast between the crispy edges and the velvety layers is what makes this cake unforgettable. Serve immediately for the best texture, or refrigerate for up to 2 days if you can wait that long.
Pro Tips For Making 5 Inch Chocolate Cake
- Melt Butter Slowly: I learned this the hard way—dumping cold butter into hot sugar makes lumps that never dissolve, no matter how long you whisk. Instead, cut the butter into small cubes and let it melt gradually over low heat, stirring constantly. The mixture should be smooth and glossy before you even think about adding eggs.
- Sift the Cocoa: Dutch-processed cocoa is not the same as regular cocoa—it’s denser and clumps easier. Sift it with the sugar before mixing to avoid grainy texture in your cake. (Yes, even if you’re impatient like me—trust the process.)
- Room-Temp Eggs Matter: Cold eggs curdle when added to warm butter, and that’s a fast track to a dense, gummy cake. Let your eggs sit in warm water for 5 minutes before whisking them into the batter. Your future self will thank you.
- Avoid Overmixing: The moment your batter looks thick and glossy, stop stirring. Overmixing introduces too much air, which can cause cracks or a domed top in a small cake. Fold in the vanilla gently—just until combined.
Best sauces and condiments for 5 inch chocolate cake
Classic Chocolate Ganache
This silky chocolate ganache elevates your cake with its velvety texture and deep cocoa richness. Melt ½ cup heavy cream with 8 ounces 70% dark chocolate (I love Ghirardelli or Valrhona) in a heatproof bowl over simmering water.
Stir until smooth, then let cool to 85°F before pouring over the cake layers. The ganache sets beautifully between layers and adds a glossy finish. For extra decadence, swirl in 1 tsp espresso powder before pouring. 🍫
Salted Caramel Drizzle
A salted caramel drizzle cuts through the richness of chocolate cake perfectly. Simmer ½ cup granulated sugar in a saucepan until amber, then whisk in ¼ cup heavy cream and 2 tbsp butter. Finish with a pinch of flaky sea salt.
Let cool slightly before drizzling over the cake. I love using a squeeze bottle for even coverage. This pairing is a crowd-pleaser that balances sweet and salty notes. 🍯
Whipped Cream Alternative
For a lighter option, try Italian meringue buttercream instead of traditional frosting. Whip 1 cup egg whites to stiff peaks, then gradually add 1 cup granulated sugar and ½ cup butter at room temperature.
This frosting holds its shape beautifully and adds a delicate sweetness. For extra flair, dust with cocoa powder or sprinkle with crushed peppermint during the holidays. 🎄
Fruit Compote Options
Brighten your cake with a berry compote made from 1 cup mixed berries (fresh or frozen), 2 tbsp sugar, and 1 tsp lemon juice. Simmer until thickened, then strain for a smooth texture.
Spread between layers or drizzle over the top. For a tropical twist, use mango purée with a touch of lime zest. The acidity balances the chocolate perfectly. 🍓
Spiced Chocolate Sauce
Add warmth with a spiced chocolate sauce by melting ½ cup dark chocolate with ¼ cup heavy cream, ½ tsp cinnamon, and a pinch of cayenne pepper.
Thin with extra cream if needed. This sauce pairs wonderfully with vanilla ice cream for dipping. Store in the fridge for up to 1 week in an airtight container. 🌶️
Nutella Swirl
For a nostalgic touch, spread a thin layer of Nutella between cake layers and swirl it with a knife before adding buttercream. The hazelnut flavor adds a delightful contrast to the pure chocolate.
To make it extra special, toast hazelnuts and sprinkle them on top. This is a kid-friendly favorite that still impresses adults. 🌰
Nutrition facts
Frequently asked questions
Why does my chocolate cake turn out dense instead of light?
Overmixing the batter or using too much flour creates dense cakes. This recipe uses the reverse creaming method (mixing dry ingredients with hot water first) to keep it tender. Also, never overbake—pull it when a toothpick comes out with moist crumbs (30-35 minutes at 350°F).
Can I make this cake in a different size pan?
Yes, but adjust baking time! For a 6-inch pan, reduce time by 5-7 minutes (25-30 minutes). For 8-inch pans, increase by 10-12 minutes (40-45 minutes). Always use the toothpick test. Grease pans well to prevent sticking—especially important for chocolate cakes!
How do I fix cracked layers when assembling?
Cracks happen when cakes cool too quickly or buttercream is too soft. Let cakes cool completely (2 hours) before frosting. Chill the cake in the fridge for 15 minutes after assembling to set the buttercream. For extra stability, use chocolate ganache (from our dynamic content) between layers—it’s firmer than buttercream.
Can I substitute cocoa powder with melted chocolate?
Yes, but expect slight texture differences. Replace 0.75 cup cocoa powder with 5 oz melted dark chocolate (about 1.5x the amount). The cake will be richer but slightly denser. For best results, use 70% cocoa chocolate. Remember to reduce the hot water by 2 tbsp since melted chocolate contains moisture.
What’s the best way to store leftovers?
Keep unfrosted layers wrapped in plastic at room temp for 3 days or freeze for 3 months. Frosted cakes last 2 days refrigerated in an airtight container. For longer storage, freeze the whole cake (unfrosted) and frost when ready to serve. The buttercream can be made ahead and refrigerated for 5 days—just re-whip before using.

- 12 Bean Chili Recipe: Hearty Slow-Cooked Depth With 12 Legumes - October 17, 2026
- 5 Seed Bread Recipe: Nutty Crunch and Artisan Flavor in One Loaf - October 17, 2026
- 1 Lb Macaroni Salad Recipe: Bold, Crunchy, and Crowd-Pleasing - October 17, 2026