
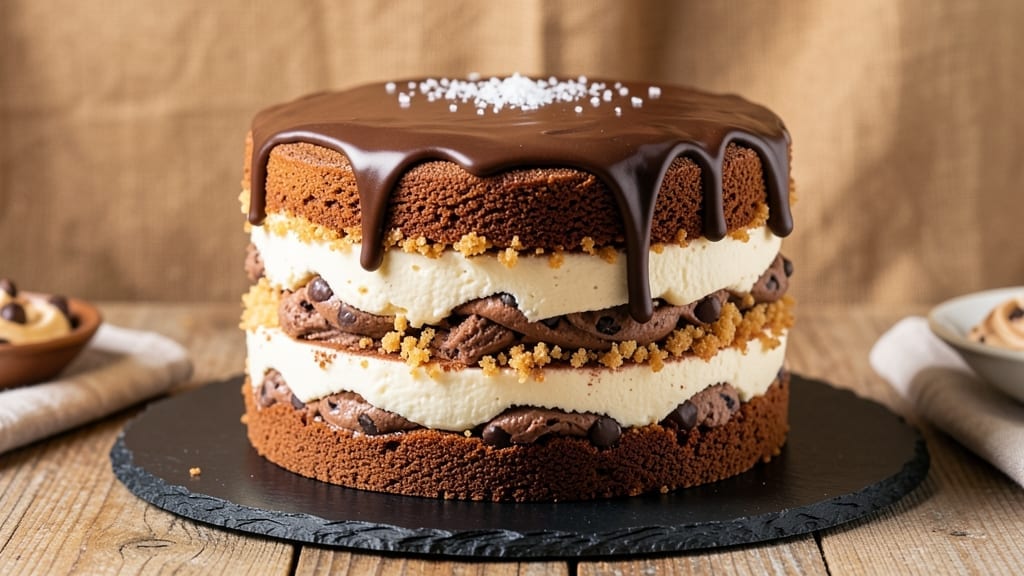
A 5-layer brownie cookie cheesecake delivers the ultimate dessert experience—rich, gooey brownie at the base, crispy cookie crumbles in the middle, and velvety cheesecake layers that melt in your mouth.
The beauty of this recipe is its no-bake ease after baking the brownie foundation, making it perfect for special occasions without the stress. Each layer builds on the last, creating a dessert that looks impressive but comes together with simple techniques and patience.
The secret to success lies in proper layering and chilling times—let each component set before adding the next to prevent a soggy disaster. Start with a fudgy brownie base, then press a buttery cookie crumb mixture into the center before spreading the cheesecake filling.
The final layers of whipped cream and chocolate ganache add that restaurant-quality finish without complicating the process.
What you’ll end up with is a decadent dessert stack that’s rich, textured, and visually stunning—perfect for celebrations or when you want to impress without the fuss. The brownie stays moist, the cookie layer adds crunch, and the cheesecake filling remains silky smooth.
Every bite delivers a perfect balance of flavors and textures that’ll have everyone asking for seconds.
This recipe also offers flexibility—swap regular cheesecake for a vegan version, use gluten-free cookies, or even add a layer of caramel for extra indulgence. Whether you’re baking for a crowd or treating yourself, this dessert delivers professional results with minimal effort. Let’s get started on creating your masterpiece!
Ingredients for 5 layer brownie cookie cheesecake
Rich layers of brownie, cookie crumbs, and cheesecake—this decadent stack needs just 18 ingredients for restaurant-quality results.
| Ingredient | Amount | Notes |
|---|---|---|
| Fudgy Brownie Mix 🍫 | 1 box | High-quality, fudgy brownie mix (like Ghirardelli) |
| Large Eggs 🥚 | 2 whole | Room temperature for even baking |
| Unsalted Butter 🧈 | 1 cup | Melted, full-fat for richness |
| Semisweet Chocolate Chips 🍫 | 1 cup | High-quality for texture (like Ghirardelli) |
| All-Purpose Flour 🌾 | ½ cup | For brownie base structure |
| Granulated Sugar 🍚 | 1 cup | White or light brown |
| Vanilla Extract 🌿 | 1 tbsp | Pure, high-quality extract |
| Salt 🧂 | ½ tsp | Kosher or sea salt |
| Oreo Cookies 🍪 | 24 whole | Crushed for cookie crumb layer |
| Melted Butter (for cookies) 🧈 | ½ cup | Full-fat, cooled slightly |
| Powdered Sugar 🍚 | ¼ cup | For cookie crumb sweetness |
| Cream Cheese (full-fat) 🧀 | 16 oz | Room temperature, high-fat (like Philadelphia) |
| Granulated Sugar (cheesecake) 🍚 | 1 cup | For sweetness balance |
| Sour Cream 🥛 | ½ cup | Full-fat for creaminess |
| Vanilla Extract (cheesecake) 🌿 | 1 tbsp | Pure extract for flavor |
| Heavy Whipping Cream 🥛 | 1 cup | Chilled, full-fat for stability |
| Powdered Sugar (whipped cream) 🍚 | 2 tbsp | For sweet topping |
| Dark Chocolate Ganache 🍫 | 1 cup | Melted chocolate + heavy cream |
The brownie mix is your foundation, so Ghirardelli or high-quality brands make all the difference here. I always grab the fudgy variety—it stays moist longer and pairs perfectly with the cheesecake. For the cookie crumb layer, Oreos are a must (the classic flavor works best), but if you’re feeling fancy, try gluten-free cookies or even crushed graham crackers. The cream cheese? Full-fat Philadelphia is non-negotiable—low-fat versions won’t give you that silky texture. Pro tip: let everything sit at room temperature before mixing—cold butter and cream cheese create lumps.
No Oreos? Crushed chocolate sandwich cookies or gluten-free alternatives work in a pinch. Running short on heavy cream? Whipped coconut cream gives a similar texture (just skip the whipped topping). The ganache can be store-bought, but homemade with high-quality dark chocolate tastes like a million bucks. For the brownie layer, if you prefer a cakey texture, reduce the chocolate chips by 2 tbsp and add 2 tbsp flour. And yes, you can make this vegan—just swap the butter for coconut oil, eggs for flax eggs, and use vegan cream cheese like Kite Hill. The chilling times stay the same, so no stress there!
This dessert is all about patience—each layer needs at least 30 minutes in the fridge before adding the next. The brownie base can be baked a day ahead and stored at room temperature. Cookie crumbs keep for 1 week in an airtight container, and the cheesecake filling stays fresh for 5 days in the fridge. Once assembled, it’s best served within 3 days for peak texture. For a showstopper, garnish with chocolate shavings or fresh berries right before serving—trust me, it’s worth the extra minute.
Why You’ll Love This Recipe
- No Mix-Up Needed: I use a boxed brownie mix—yes, really—and it still tastes like I slaved over it. Just add eggs, butter, and chocolate chips, then layer like a lazy genius. The crust never cracks.
- Fudgy-Creamy Obsession: That first bite of brownie base hits like a warm hug, then the cookie crumbles surprise you, followed by cheesecake so smooth it’s almost cheating. The chocolate chips? They’re the cherry on this decadent sundae.
- Party in a Pan: Birthdays, potlucks, or just because—this feeds 12 but takes less time than ordering pizza. Cut into squares, and no one will guess it’s not homemade from scratch.
- Budget Decadence: A box mix, a few eggs, and butter you already own? This costs half of what a bakery dessert would, but tastes like you spent all weekend baking. Leftovers? They disappear faster than my willpower.
Step-by-step instructions for a 5-Layer brownie cookie cheesecake
This decadent dessert comes together with layers of rich flavors—no baking required after the brownie base.
Prepare the Fudgy Brownie Base
Preheat your oven to 350°F and grease a 9×13-inch baking pan generously. In a large bowl, combine the 1 box fudgy brownie mix, 2 whole large eggs, 1 cup melted unsalted butter, 1 cup semisweet chocolate chips, 0.5 cup all-purpose flour, 1 cup granulated sugar, 1 tbsp vanilla extract, and 0.5 tsp salt. Mix until the batter is smooth and fully combined.
Spread the brownie batter evenly into the prepared pan. Bake for 25-30 minutes or until the edges are set and a toothpick inserted in the center comes out with a few moist crumbs. Let it cool completely before proceeding—this prevents the layers from getting soggy. Here’s the thing: patience at this stage ensures your cheesecake stays sturdy and delicious.
Create the Cookie Crust Layer
While the brownie base cools, pulse the 24 whole Oreo cookies in a food processor until you have fine crumbs. In a bowl, mix the cookie crumbs with 0.5 cup melted butter (for cookies) and 0.25 cup powdered sugar until evenly combined. Press this mixture firmly into the bottom of a 9-inch springform pan to create a solid crust.
Chill the crust in the freezer for 15 minutes while you prepare the cheesecake layer. This step is crucial—it keeps the crust from dissolving when you add the creamy filling. You’ll know it’s ready when it holds its shape and feels firm to the touch.
Make the Cream Cheese Filling
In a large mixing bowl, beat the 16 oz full-fat cream cheese until smooth and creamy. Gradually add the 1 cup granulated sugar (cheesecake), 0.5 cup sour cream, and 1 tbsp vanilla extract (cheesecake), mixing on low speed until fully combined. The mixture should be thick but spreadable—this is your cheesecake layer.
Spread the cheesecake mixture evenly over the chilled cookie crust. Smooth the top with a spatula, then refrigerate for at least 2 hours or until fully set. This chilling time is non-negotiable—it ensures the cheesecake holds its shape and doesn’t turn out runny.
Prepare the Whipped Cream Topping
In a chilled mixing bowl, whip the 1 cup heavy whipping cream with the 2 tbsp powdered sugar (whipped cream) until soft peaks form. Spread this lightly over the set cheesecake layer. The key here is to keep it even—you want just enough to add a touch of creaminess without overwhelming the other layers.
Now, gently warm the 1 cup dark chocolate ganache until it’s smooth and pourable. Drizzle it over the whipped cream layer, allowing it to settle into the crevices. For a polished look, use a spoon to create decorative swirls or zigzags. This final layer adds that luxurious finish that makes the whole dessert feel extra special.
Assemble and Chill the Final Dessert
Once the cheesecake is fully set, carefully remove it from the springform pan. Place the cooled brownie base on a serving platter and position the cheesecake layer on top. If needed, use a bit of whipped cream to help it adhere. The contrast between the warm brownie and cool cheesecake is what makes this dessert truly magical.
Let the assembled dessert chill in the refrigerator for at least 1 hour before serving. This final chilling step allows all the layers to meld together perfectly. Slice into squares and serve with a dollop of extra whipped cream if desired. Trust me, the first bite of this layered masterpiece is worth every minute of prep!
Pro Tips For Making 5 Layer Brownie Cookie Cheesecake
- Melt Butter Slowly: If you dump cold butter into the brownie batter and stir, you’ll end up with lumps that ruin the texture. Instead, melt the butter first, then let it cool to just warm—about 100°F—before mixing. This keeps the batter smooth and prevents the brownie layer from turning greasy.
- Sift That Flour: I used to just scoop the flour from the bag, and the brownie layer always came out dense. Now I sift it directly into the dry ingredients—especially if your mix has a lot of cocoa. This lightens the texture and makes the fudgy layer actually fudgy, not cakey.
- Don’t Overbake the Brownie: The brownie layer is the foundation, and if you bake it until it’s set in the middle, the whole thing will crack later. Pull it out when the edges are just firm and the center still has a slight wiggle—about 2-3 minutes before the recipe says. It’ll firm up as it cools.
- Chill Between Layers: Skipping the 15-minute chill between the brownie and cookie layers is how you end up with a messy, runny middle. Even if you’re eager to keep going, let each layer set in the fridge—it keeps the structure clean and the flavors from bleeding into each other. (Yes, even if you’re impatient like me.)
Make-ahead tips for this dish
Brownie Base Prep
Bake your brownie base a full 24 hours ahead of time if possible—this gives flavors time to develop deeply. Store it in an airtight container at room temperature, and it’ll stay fresh for up to 5 days.
The longer it rests, the more fudgy and flavorful it becomes. I like to wrap it in plastic wrap directly after baking to lock in moisture. 🍫
Cookie Crumb Prep
Make your cookie crumb mixture 1 week ahead and store it in an airtight container in the fridge. The flavors meld beautifully over time, and it’s ready to press into your pan whenever you’re ready.
For extra crunch, toast the cookie crumbs in a 350°F oven for 5 minutes before pressing them into the pan—this adds a delightful texture contrast. 🍪
Cheesecake Filling
Prepare the cheesecake filling 2 days in advance and refrigerate it in a sealed container. This gives the flavors time to meld perfectly, and it’s much easier to spread when it’s cold.
If you’re short on time, you can make it 1 day ahead—just give it an extra 30 minutes of chilling before assembling. The filling will stay fresh for up to 5 days in the fridge. 🧀
Final Assembly
Assemble your dessert 1 day before serving—this ensures all layers are perfectly set and the flavors have time to meld together. Store the fully assembled dessert in the fridge, covered with plastic wrap.
The longer it chills, the more cohesive the layers become, and the easier it is to slice cleanly. Trust me, the wait is worth it! ✨
Freezing Tips
If you need to freeze your dessert, assemble it completely and wrap it tightly in plastic wrap followed by aluminum foil. Freeze for up to 1 month.
Thaw in the fridge overnight before serving—this prevents condensation and keeps everything intact. The brownie base may soften slightly after freezing, but it’ll still taste amazing. ❄️
Serving Suggestions
Serve your dessert at room temperature for the best texture contrast. Let it sit on the counter for 30-60 minutes before slicing. For a showstopper presentation, garnish with chocolate shavings or fresh berries right before serving.
I love adding a sprinkle of crushed pistachios for extra crunch and visual appeal. 💫
Nutrition facts
Frequently asked questions
Can I make this dessert without baking?
The brownie base requires baking, but the remaining layers are completely no-bake! After you bake the brownie foundation, the cookie crumb layer, cheesecake filling, and toppings all assemble at room temperature or refrigerate. This makes it perfect for busy days when you want a showstopping dessert without oven time.
How do I prevent soggy layers?
Proper chilling time is key! Let each layer set completely before adding the next: 30 minutes for the cookie crust, 2 hours for the cheesecake, and 1 hour for final assembly. Also, ensure your brownie base is fully cooled before layering. The cookie crumb mixture should be pressed firmly into the pan to create a solid barrier.
Can I substitute any of the layers?
Swap the cookie crumbs for crushed graham crackers or gluten-free cookies, and use vegan cream cheese for a dairy-free version. For a lighter texture, replace the brownie base with a chocolate cake layer baked in a springform pan. The key is maintaining the same layering order for structural integrity.
How should I store leftovers?
Cover the assembled dessert with plastic wrap and store in the fridge for up to 3 days. For longer storage, freeze the fully assembled dessert (wrapped tightly) for up to 1 month. Thaw overnight in the fridge before serving. The brownie base may soften slightly after freezing but remains delicious.
What’s the best way to slice this dessert?
Use a hot knife (dip in hot water between slices) for clean cuts through all layers. Let the dessert sit at room temperature for 30 minutes before slicing to prevent crumbling. For perfect squares, use a 9-inch springform pan as your guide—each slice will be about 1.5 inches wide.

- 12 Bean Chili Recipe: Hearty Slow-Cooked Depth With 12 Legumes - October 17, 2026
- 5 Seed Bread Recipe: Nutty Crunch and Artisan Flavor in One Loaf - October 17, 2026
- 1 Lb Macaroni Salad Recipe: Bold, Crunchy, and Crowd-Pleasing - October 17, 2026