
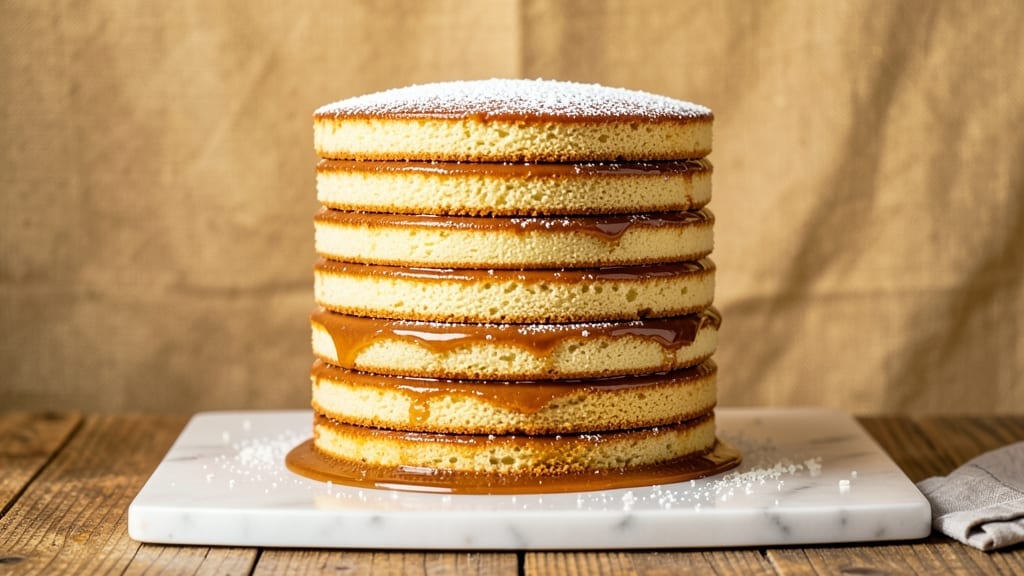
This 14-layer caramel cake recipe delivers the showstopping dessert you’ve been dreaming of—layer upon layer of tender vanilla cake, rich caramel swirls, and velvety buttery frosting that makes every slice worth the effort. 💛 The secret lies in precise layering and patient assembly, transforming simple ingredients into a masterpiece that impresses even the most discerning guests.
What you’ll create is a towering cake with alternating cake and caramel layers, each one meticulously built to create that signature swirled effect.
The process requires patience and attention to detail, but the results are nothing short of spectacular. Each cake layer is baked to perfection, then carefully filled with homemade caramel that’s thick enough to hold its shape yet smooth enough to swirl beautifully.
The buttery frosting ties everything together, creating a cohesive, elegant finish that looks as good as it tastes. This isn’t just dessert—it’s a centerpiece that will have everyone asking for seconds.
What makes this recipe truly special is the balance of textures and flavors: the soft, fluffy cake contrasts with the gooey caramel, while the frosting adds a creamy, buttery finish that ties it all together.
Every bite delivers a harmonious blend of sweetness and richness, making it the perfect dessert for celebrations, holidays, or when you simply want to indulge. The presentation is just as important as the taste, so we’ll walk you through the precise techniques to ensure your cake turns out flawless.
Ready to tackle this ambitious project? The reward is a cake that looks like it belongs in a bakery window but was made with love in your own kitchen. Let’s get started on creating your new signature dessert!
Ingredients for 14 layer caramel cake
Fourteen layers of cake, caramel, and frosting—here’s what you’ll need to build your showstopper.
| Ingredient | Amount | Notes |
|---|---|---|
| All-Purpose Flour 🌾 | 7 cups | Sifted for light texture |
| Granulated Sugar 🍚 | 4 cups | Superfine preferred for smoothness |
| Unsalted Butter 🧈 | 3 ½ cups | Cold, cubed for cutting |
| Large Eggs 🥚 | 14 whole | Room temperature for blending |
| Vanilla Extract 🌿 | 2 tbsp | Pure vanilla bean preferred |
| Baking Powder 🍞 | 1 ½ tbsp | Diamond Crystal preferred |
| Salt 🧂 | 1 ½ tsp | Fine sea salt preferred |
| Heavy Cream 🥛 | 3 cups | Full-fat for best texture |
| Granulated Sugar 🍚 | 4 cups | For caramel (divided) |
| Heavy Cream 🥛 | 2 cups | For caramel |
| Butter 🧈 | 1 cup | Unsalted, for frosting |
| Powdered Sugar 🍚 | 4 cups | Sifted for smooth frosting |
| Vanilla Bean Paste 🌿 | 1 tbsp | For frosting richness |
| Vanilla Extract 🌿 | 1 tbsp | For frosting |
The flour and sugar are your foundation. King Arthur or Bob’s Red Mill flour gives the best texture, but any all-purpose works. Sugar should be superfine—if you’ve got regular granulated, pulse it in a food processor for 30 seconds. Butter matters too—Plugrá or Land O’Lakes unsalted are my go-tos, but keep it cold when creaming. Eggs should be room temperature—cold eggs make the batter gummy. For vanilla, Madagascar bourbon vanilla from Trader Joe’s is my secret weapon, but pure extract works fine. The baking powder? Diamond Crystal rises better than generic brands—trust me on this.
No vanilla bean paste? Add 1 tsp extra vanilla extract and a pinch of ground vanilla bean seeds. Short on heavy cream for caramel? Substitute half with whole milk, but texture will be slightly lighter. For the frosting, powdered sugar should be sifted—lumps make everything look amateur. Want extra richness? Add 2 tbsp mascarpone to the frosting. The caramel sugar should be light amber—not dark brown or burnt. If you’re nervous about making caramel, store-bought caramel sauce works in a pinch, but homemade tastes 100x better. Prefer a sweeter cake? Add 1/4 cup extra sugar to the batter.
Cake layers keep 2 days wrapped at room temp, but frosting is best made fresh. Store frosting in an airtight container between layers—it stays smooth for 3 days. Caramel can be made ahead and stored in the fridge for 1 week. Freeze cake layers between parchment paper for 2 months. The secret to presentation? Chill the cake 1 hour before slicing—keeps everything neat. Serve at room temperature for the perfect texture.
Why You’ll Love This Recipe
- Here’s what sold me: it costs less than half of store-bought caramel cakes, but tastes like you spent hours. The sugar and butter stretch far, and the eggs add that creamy richness without breaking the bank. Leftovers? They’ll disappear faster than you can say “second slice.”
- No-Fuss Layers: I swear, this cake is the kind of recipe that makes you feel like a genius—even if you burn the toast. Just mix, layer, repeat. The batter’s forgiving, and those buttery caramel swirls between each layer mean even if you mess up one, no one will notice.
- Butter-Caramel Magic: That first bite? Pure indulgence. The vanilla-infused cake layers soak up the rich caramel like a sponge, but it’s not too sweet—just sweet enough to make you close your eyes. Honestly, the eggs and butter here do all the heavy lifting for flavor.
- Party in a Box: Between us, this is my go-to for birthdays, holidays, or just because. You can slice it days later (yes, really), and it’s the kind of dessert that makes people pause mid-conversation. Plus, the layers look impressive—no one will guess it’s basically a cake hack.
Step-by-step instructions for decadent vanilla bean caramel cake
This cake requires patience and precision, but trust me—each layer makes it worth it.
👨🍳 Step 1: Prepare the Cake Layers
Preheat your oven to 350°F and grease 14 round 3-inch cake pans. Line the bottoms with parchment paper for easy removal. Sift together the 7 cups all-purpose flour, 1.5 tbsp baking powder, and 1.5 tsp salt in a large bowl. Set aside.
In a stand mixer fitted with the paddle attachment, beat the 3.5 cups unsalted butter and 4 cups granulated sugar on medium speed for 3-4 minutes until light and fluffy. Add the 14 room-temperature eggs one at a time, mixing well after each addition. Scrape down the sides of the bowl as needed.
Add the 2 tbsp vanilla extract and mix until combined. Gradually add the dry ingredients to the wet, mixing on low speed just until combined—don’t overmix. Divide the batter evenly among the 14 prepared pans, filling each about ⅔ full. Bake for 15-18 minutes or until a toothpick inserted in the center comes out clean. Allow the layers to cool in the pans for 5 minutes, then transfer to a wire rack to cool completely.
🍳 Step 2: Make the Vanilla Bean Caramel
In a heavy-bottomed saucepan, combine 2 cups heavy cream and 2 cups granulated sugar from the ingredients list. Bring to a boil over medium-high heat, then immediately reduce the heat to low and simmer for 10-12 minutes without stirring until the mixture thickens to a rich caramel color.
Real talk: Don’t walk away. The caramel can burn quickly, and you want it to thicken just enough to coat the back of a spoon. Once it reaches the right consistency, remove from heat and let it cool slightly. It will thicken further as it cools—this is normal. Stir in 1 tbsp vanilla bean paste and 1 tbsp vanilla extract for that signature vanilla bean flavor.
🥘 Step 3: Assemble the Cake Layers
Place the first cake layer on a serving plate. Spread a thin layer of the cooled caramel over the top—about 1 teaspoon. This ensures the layers stick together without being soggy. Repeat with the remaining 13 layers, adding caramel between each one. You’ll have about 1 cup of caramel left for the final frosting.
Here’s the thing—don’t rush this step. Make sure each layer is level before adding the next. If any layers are uneven, use a serrated knife to trim them. The goal is a perfectly even cake that slices beautifully. Once all layers are stacked, refrigerate the cake for at least 4 hours (overnight is best) to allow the caramel to fully set.
🍳 Step 4: Make the Buttercream Frosting
In a stand mixer fitted with the paddle attachment, beat the 1 cup unsalted butter on medium speed until creamy and smooth, about 2-3 minutes. Gradually add the 4 cups powdered sugar, mixing on low speed until combined. Increase the speed to medium and beat for another 3-4 minutes until light and fluffy.
Add the remaining 1 tbsp vanilla bean paste and 1 tbsp vanilla extract, mixing until fully incorporated. The frosting should be thick but spreadable. If it’s too thick, add a few drops of heavy cream to loosen it. If it’s too thin, add a bit more powdered sugar. You want a frosting that’s stable enough to hold its shape but still easy to spread.
🎂 Step 5: Frost and Decorate the Cake
Remove the cake from the refrigerator and carefully transfer it to a cake stand. Spread the buttercream frosting evenly over the top and sides of the cake, using a spatula to create a smooth, even layer. For extra flair, pipe a border of frosting around the edges using a star tip or use a bench scraper to create clean, sharp lines.
Here’s where it gets fun—use the remaining caramel to drizzle over the top and sides of the cake. Start with a small amount and let it drip naturally. You can also use a piping bag fitted with a small round tip to create intricate designs. Chill the cake for 30 minutes before slicing to let the frosting set. Serve slices at room temperature for the best texture and flavor.
Pro Tips For Making 14 Layer Caramel Cake
- Chill the Layers: After baking each cake layer, let it cool completely before assembling—completely means 20 minutes in the pan, then another 10 on a wire rack. I learned this the hard way when my first attempt had a soggy bottom after stacking warm layers. The caramel filling needs a stable base, not a warm sponge.
- Whip Butter to Room Temp: Unsalted butter straight from the fridge won’t cream properly, and that’s when your cake turns dense. Leave the butter out for 2–3 hours (or microwave it in 10-second bursts) until it’s soft but not greasy—press a finger into it; if it leaves a slight indent, it’s ready. Trust me, your layers will thank you.
- Don’t Overmix the Batter: As soon as the flour disappears into the butter-egg mixture, stop stirring. I used to beat it like I was punishing the bowl, and my cakes ended up tough. The moment the dry ingredients are just incorporated, scrape the batter into the pan—no extra folding, no extra love. Gluten develops fast, and that’s the enemy of a light layer.
- Weigh Your Sugar Precisely: Granulated sugar isn’t just sugar—it’s the difference between a cake that holds its shape and one that collapses. Use a kitchen scale for the butter and sugar (especially the caramel layers); 1 cup of sugar isn’t always 200g. My first attempt with a scooped cup left me with a cake that looked like a deflated soufflé. Precision matters here.
Best sauces and condiments for this recipe
Caramel Variations
For a salted caramel twist, add ½ cup dark brown sugar and 1 tsp flaky sea salt to your caramel sauce while it cools. The salt enhances the sweetness and adds a sophisticated depth—perfect for a gourmet touch.
I like to sprinkle extra flaky salt on top of each slice before serving. 💛
Want a spiced caramel? Infuse your caramel with 1 cinnamon stick and 2 whole cloves while simmering. Remove them before it cools, but the warm spices will linger beautifully. This works especially well if you’re serving the cake at Thanksgiving or Christmas.
Frosting Enhancements
For a creamier frosting, beat in ½ cup whipped cream cheese along with the butter. This adds a tangy contrast that balances the sweetness of the caramel. I often use Philadelphia cream cheese for its smooth texture. Add it after the butter is fully incorporated to avoid curdling.
Need a darker frosting? Replace ½ cup powdered sugar with ½ cup cocoa powder (sifted) for a rich chocolate-vanilla fusion. This creates a stunning two-toned effect when drizzled with caramel. Pair it with chocolate shavings for extra drama.
Topping Ideas
Fresh toasted pecans add crunch and visual appeal. Toast 1 cup pecan halves in a dry skillet over medium heat for 3-4 minutes, stirring constantly, until golden. Sprinkle them over the caramel drizzle while still warm for the best texture. 🌟
For a fruit twist, add ½ cup candied citrus peel (orange or lemon) to the frosting before spreading. The bright, tangy flavor cuts through the richness of the caramel. I like to make my own by simmering peel in sugar syrup, but store-bought works in a pinch.
Gluten-Free Adaptation
Swap the all-purpose flour for a 1:1 gluten-free baking flour blend like Bob’s Red Mill 1-to-1. You may need to add ½ tsp xanthan gum to the dry ingredients for structure. The cake will be slightly denser but still delicious. The caramel and frosting remain unchanged.
For extra stability in gluten-free layers, brush each cake layer with 2 tbsp apricot jam** before adding caramel. This creates a natural “glue” that prevents crumbling. The jam flavor is subtle but helps bind the layers beautifully.
Nutrition facts
Frequently asked questions
How do I make sure all 14 layers are perfectly even?
Use a serrated knife to trim each layer immediately after baking while still warm. Place each layer on a cake turntable and spin gently while trimming to create perfectly level tops. For extra precision, use a leveling guide or even a ruler to check consistency between layers. Pro tip: Chill layers between trimming to prevent warping.
Can I make this cake ahead of time?
Bake the cake layers 1 day ahead and store them wrapped in plastic at room temperature. The caramel can be made 3 days ahead and refrigerated. Assemble the cake 4-6 hours before serving to allow the caramel to set properly. Frosting can be made 1 day ahead and stored in an airtight container.
What’s the best way to store leftovers?
Slice the cake and store individual portions in an airtight container at room temperature for 2 days. For longer storage, wrap slices tightly in plastic wrap and freeze for up to 1 month. Thaw overnight in the refrigerator before serving. Leftovers taste best at room temperature, so let them sit for 30 minutes before eating.
Why did my caramel turn too dark or burn?
Caramel burns quickly—never walk away from the stove! Use a heavy-bottomed saucepan and maintain low heat after boiling. Stir occasionally if needed, but avoid stirring once it starts thickening. For a lighter caramel, reduce the sugar slightly to 1.75 cups and increase cream to 2.25 cups. The perfect caramel should be light amber and coat the back of a spoon.
Can I substitute vanilla extract with vanilla bean paste?
Yes, but adjust the amounts! Use 1 tbsp vanilla bean paste plus 1 tsp vanilla extract to replace 2 tbsp vanilla extract in the cake batter. For the frosting, use 1 tbsp vanilla bean paste plus ½ tsp vanilla extract instead of 1 tbsp vanilla extract. The paste adds beautiful flecks and deeper flavor, but extract works fine if that’s all you have.
