
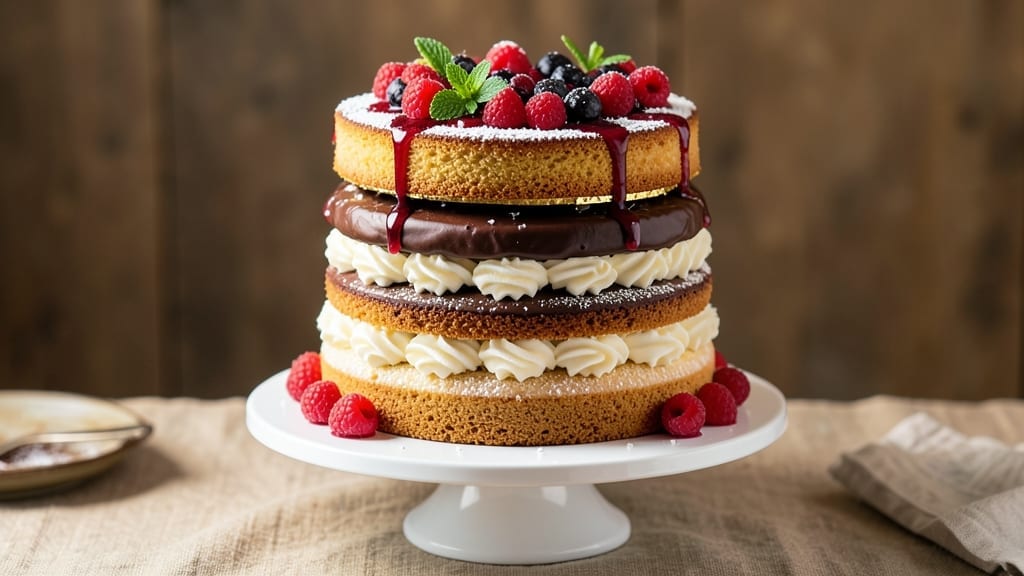
This 5-layer cake recipe delivers the kind of showstopping dessert that makes every celebration feel special. 💫 The secret lies in perfectly balanced vanilla bean swirls and spiced frosting that harmonize in every bite, creating layers of flavor and texture that rival professional bakeries.
What sets this recipe apart is the methodical approach to baking, filling, and assembling each layer—no shortcuts, just precision that ensures a flawless finish.
Each layer begins with a light, airy sponge cake baked to golden perfection, then filled with velvety vanilla buttercream and swirled with real vanilla bean paste for that restaurant-quality touch.
The frosting, infused with warm spices like cinnamon and nutmeg, ties everything together with a smooth, creamy finish that’s impossible to resist. The key to success? Patience—allowing each layer to cool completely and chilling the cake between assembly stages prevents crumbs and ensures clean, professional slices.
By the time you’re done, you’ll have a 5-layer masterpiece with perfectly leveled tiers, no gaps, and a flawless frosting crown.
The vanilla swirls peek through the spiced frosting in elegant patterns, while the crumb coat creates that smooth, polished look that makes it look (and taste) like it came from a patisserie. This isn’t just a cake—it’s a centerpiece that will have everyone asking for the recipe.
The best part? This method is adaptable—swap the vanilla for chocolate, adjust the spices, or even go gluten-free with the right flour blend. Whether it’s for a birthday, wedding, or just because, this cake delivers restaurant-quality results without the fuss. Let’s get baking!
Ingredients for 5 layer cake
Six cups flour, three cups butter, and twelve eggs create the foundation for this showstopping vanilla-spiced masterpiece.
| Ingredient | Amount | Notes |
|---|---|---|
| All-Purpose Flour 🌾 | 6 cups | Sifted for light texture (plus extra for dusting) |
| Granulated Sugar 🍚 | 3 ½ cups | Divided for layers and frosting |
| Unsalted Butter 🧈 | 3 cups | Room temperature, European style preferred |
| Large Eggs 🥚 | 12 whole | Room temperature, separated for cake and meringue |
| Vanilla Bean Paste 🌿 | 2 tbsp | High-quality, real vanilla bean preferred |
| Milk 🥛 | 2 cups | Room temperature, 2% or whole |
| Baking Powder 🧂 | 1 ½ tsp | Diamond Crystal preferred (spoon & level) |
| Salt 🧂 | ½ tsp | Fine sea salt for balance |
| Vanilla Extract 🌿 | 1 tbsp | Pure Madagascar or Tahitian preferred |
| Ground Cinnamon 🍃 | 1 tsp | For spiced frosting (plus extra for dusting) |
| Ground Nutmeg 🌿 | ½ tsp | Freshly grated preferred |
| Heavy Whipping Cream 🥛 | 2 cups | Cold, 36% fat minimum |
| Powdered Sugar 🍚 | 4 cups | For smooth frosting (sifted) |
| Unflavored Gelatin 🍬 | 1 tbsp | Bloomed in 3 tbsp cold water |
| Lemon Juice 🍋 | 1 tbsp | Freshly squeezed for brightness |
The flour and butter are your cake’s backbone—King Arthur or Gold Medal flour gives the best lift, while European-style butter (like Plugrá or President) adds richness. Buy unsalted to control the cake’s saltiness perfectly. Eggs should be fresh but room temperature—separate whites and yolks carefully. Whole Foods or specialty grocers carry the best quality vanilla bean paste, but a good bottle of Madagascar vanilla extract works in a pinch. For the spiced frosting, McCormick’s ground spices are reliable, but freshly grated nutmeg makes all the difference.
No vanilla bean paste? Double the vanilla extract—just know it won’t be as complex. Substituting butter? Vegetable shortening works for structure, but the flavor won’t be as rich. For the gelatin, unflavored is a must—any fruit or floral varieties will overpower the delicate flavors. The heavy cream should be cold straight from the fridge—never thawed. Powdered sugar? Sift it before using to avoid lumps in the frosting. And if you’re short on time, pre-made vanilla buttercream (like Wilton) can be used, but it lacks the homemade elegance.
Store cake layers separated by parchment in an airtight container for 3 days at room temperature. Frosting keeps 5 days refrigerated or 3 months frozen in a sealed container. For assembly day, let everything sit at room temperature for 2 hours before frosting—this prevents melting. I always assemble the cake 12 hours before serving to let flavors meld perfectly. The gelatin in the frosting makes it pipable and stable, so no worries about sliding layers.
Why You’ll Love This Recipe
- Let’s be real: cake tastes better the next day. This one actually improves with time—the layers stay tender, and the frosting sets just right. Plus, with five layers, you’re not left with crumbs after two slices. My freezer’s full of proof.
- No Fuss Layers: I swear, this cake is the kind of recipe that makes baking feel like a breeze. You’re not juggling a dozen bowls—just one batter, layered and leveled in minutes. The secret? Room-temperature butter and eggs blend like butter (literally), so no extra time waiting or overmixing.
- Vanilla Kiss Magic: That little vanilla bean paste? It’s the difference between good cake and unforgettable cake. The rich, floral depth from the paste cuts through the sweetness, and the layers stay moist for days. Honestly, it’s the kind of flavor that makes you want to bake it twice in one weekend.
- Party Ready Always: Birthdays, showers, or just because—this cake handles any occasion without breaking the bank. The layers stack neatly, frosting spreads smoothly, and you can even prep it ahead. Between us, I’ve used it for everything from potlucks to my kid’s soccer awards, and it’s never let me down.
Step-by-step instructions for vanilla bean swirl cake
Precision and patience create this showstopper—follow these steps exactly for perfect layers.
👨🍳 Step 1: Prepare Cake Batter and Divide for Layers
Preheat oven to 350°F and grease five 8-inch round cake pans with unsalted butter, then dust with all-purpose flour (use the extra from ingredients). In a stand mixer, cream the 3 cups unsalted butter and 1.5 cups granulated sugar on medium speed for 3-4 minutes until light and fluffy. This step incorporates air for tender layers.
Add the 12 whole large eggs one at a time, mixing well after each addition. In a separate bowl, whisk together the 6 cups sifted all-purpose flour, 1.5 tsp baking powder, 0.5 tsp salt, 1 tsp ground cinnamon, and 0.5 tsp ground nutmeg. Gradually add the dry mixture to the wet, alternating with 2 cups milk in ⅓-cup increments, ending with flour. Mix on low speed just until combined—overmixing develops gluten.
Divide the batter evenly among the five prepared pans (about ¾ cup per pan). For the signature swirl effect, add 2 tbsp vanilla bean paste to one portion of batter (about ⅕ of total) and swirl it into the center of the third pan before baking. Bake each layer for 20-25 minutes until a toothpick comes out clean. Cool in pans for 10 minutes, then transfer to a wire rack to cool completely.
🍳 Step 2: Create Spiced Frosting and Stabilize with Gelatin
In a medium saucepan, combine 1 cup unsalted butter, 1 cup granulated sugar, 1 tbsp vanilla extract, 1 tsp ground cinnamon, and 0.5 tsp ground nutmeg. Cook over medium heat, stirring constantly, until the mixture reaches 160°F (about 5-7 minutes). Remove from heat and whisk in 1 cup sifted powdered sugar until smooth.
Meanwhile, bloom the 1 tbsp unflavored gelatin in 3 tbsp cold water for 5 minutes until fully dissolved. Heat 2 cups heavy whipping cream in a separate saucepan until steaming (do not boil). Remove from heat, stir in the gelatin mixture, then whisk into the warm butter mixture. Add the remaining 3 cups sifted powdered sugar and 1 tbsp lemon juice, mixing until completely smooth and glossy.
Transfer the frosting to a clean bowl and chill in the refrigerator for 30 minutes until slightly thickened but still spreadable. This step ensures the frosting sets properly between layers without becoming grainy.
🥘 Step 3: Assemble Layers with Vanilla Swirls
Place the first cake layer on a cake stand or plate. Spread a thin layer of frosting (about ¼ cup) over the top, then add the second layer. Repeat this process with the remaining layers, using about ½ cup frosting between each. For the vanilla swirl layer, spread frosting over the fourth layer, then pipe or spoon the vanilla-infused batter from Step 1 into the center. Swirl gently with a knife to create marbled patterns.
Once all layers are stacked, apply a thin crumb coat of frosting (about 1 cup) and chill for 15 minutes to set. This prevents crumbs from mixing into the final frosting layer. After chilling, apply the remaining frosting smoothly, creating clean sides and a slightly domed top. Dust the top with a pinch of ground cinnamon for a professional finish.
⏰ Step 4: Chill and Serve for Optimal Texture
Refrigerate the fully frosted cake for at least 4 hours (or overnight) to allow the frosting to set completely. This step is crucial—rushing will result in a messy, runny frosting. The cake should be served cold for the best texture and flavor balance between the tender cake and rich frosting.
Slice with a sharp, hot knife (dip in hot water and wipe dry between cuts) for clean, professional-looking slices. Each serving should showcase the delicate vanilla swirls and the warm spiced frosting in perfect harmony.
Pro Tips For Making 5 Layer Cake
- Weigh Your Butter: Softened butter at room temp should dent but not smear when pressed—about 68°F (20°C). I learned this the hard way after mixing in butter that was too warm and ending up with a greasy, dense layer. Use a kitchen scale for accuracy; those “eyeball estimates” add up fast in a 5-layer build.
- Scrape the Vanilla: Split the vanilla bean lengthwise and scrape out every last bit of seeds—even the tiny black specks. My first few cakes tasted flat because I only used the paste without scraping. Toss the scraped bean into the batter for extra flavor; it’s the easiest upgrade that actually matters.
- Rotate the Pans: Swap pan positions halfway through baking to even out heat. The oven’s hot spots will dry out one side while the other stays undercooked. I now mark my pans with a dot to remember which side went where—saves time and frustration when checking doneness.
- Cool Flat, Not Stacked: Let each layer cool completely on a wire rack before stacking—even if it means waiting 20 minutes. I used to rush this, and the filling would melt into a soggy mess. A cool layer also makes leveling and frosting a breeze. (Yes, even if you’re impatient like me.)
Flavor customization for these flavors
Vanilla Variations
Swap the vanilla bean paste for 2 tbsp Madagascar vanilla extract if you can’t find paste—though the flavor won’t be as complex. For a chocolate twist, replace vanilla with 2 tbsp cocoa powder and 1 tbsp instant espresso powder in the cake batter.
I’ve also tried a citrus vanilla version by adding 1 tbsp lemon zest to the frosting for a bright, zesty kick.
Spice Swaps
Cinnamon and nutmeg are classic, but don’t be afraid to experiment. Try cardamom (½ tsp) for an exotic touch or allspice (¼ tsp) for warmth. For a Mexican-inspired cake, add ½ tsp chili powder and ¼ tsp smoked paprika to the frosting—it’s surprisingly delicious with vanilla.
Frosting Alternatives
Want a lighter frosting? Replace the buttercream with Italian meringue buttercream—it’s less sweet and has a silky texture. For a dairy-free option, use vegan butter and coconut cream (chilled overnight) instead of heavy cream.
I’ve also made a cream cheese frosting variation by mixing in 8 oz softened cream cheese with the buttercream for extra tang.
Fruit Infusions
Add 1 tbsp raspberry jam or ½ cup finely chopped strawberries to the frosting for a fruity surprise. For a tropical twist, mix in ½ cup mango puree and 1 tsp lime zest—the acidity cuts through the sweetness beautifully.
Just be sure to adjust the sugar slightly if using very sweet fruits.
Nutty Additions
Fold ½ cup toasted pecans or walnuts into the frosting for crunch. For a hazelnut flavor, add 1 tsp hazelnut extract to the cake batter. I once made a praline-infused version by mixing ½ cup chopped pralines into the frosting—it added a caramelized depth that was amazing.
Gluten-Free Adaptation
Replace the all-purpose flour with a 1:1 gluten-free baking flour blend (like Bob’s Red Mill) and add ½ tsp xanthan gum to improve structure. For the frosting, ensure your gelatin is certified gluten-free—some brands contain wheat derivatives.
The texture will be slightly denser, but the flavor remains just as rich.
Nutrition facts
Frequently asked questions
How do I level the cake layers perfectly?
Use a serrated knife and a leveling guide (or a cake leveler tool) to trim the tops of each baked layer. Place the pan on the guide, then gently press down with the knife at a slight angle. For extra precision, chill the layers for 10 minutes after baking—they’ll firm up slightly and hold their shape better. Never rush this step, as uneven layers make stacking difficult.
Can I bake the layers ahead of time?
Bake the layers up to 3 days ahead and store them in an airtight container between parchment paper. To refresh, pop them in a 300°F oven for 8-10 minutes to warm slightly before assembling. The frosting can be made 5 days ahead and refrigerated, or frozen for 3 months. Just let everything sit at room temperature for 2 hours before frosting to prevent melting.
Why is my frosting too runny or grainy?
The gelatin might not have bloomed properly or the frosting wasn’t chilled long enough. For runny frosting, ensure you bloomed the gelatin in cold water for 5 minutes before heating. For graininess, sift the powdered sugar thoroughly and chill the frosting for the full 30 minutes before using. If it’s still too soft, refrigerate another 15 minutes—it will firm up as it sets.
How do I prevent crumbs in the frosting?
Always apply a crumb coat—a thin layer of frosting spread over the entire cake and chilled for 15 minutes before adding the final layer. This traps crumbs and creates a smooth base. Also, make sure your cake layers are completely cool before assembling, and use a sharp knife to slice cleanly. For extra insurance, brush layers with a simple syrup (equal parts sugar and water, heated until dissolved) before frosting.
What’s the best way to store a fully assembled cake?
Keep it refrigerated in an airtight container for up to 5 days to maintain freshness. For longer storage, freeze the fully frosted cake (without the cinnamon dust) for up to 1 month. To serve, let it thaw in the fridge overnight, then bring to room temperature for 1 hour before slicing. Avoid storing at room temperature for more than 2 days**, as the frosting can soften and attract insects.

- Pea Soup Instant Pot Recipe: Velvety Green Smoothness in 20 Minutes - November 1, 2026
- Pork Loin Pulled Pork Crock Pot Recipe: Slow-Smoked Tenderness With Zero Dryness - November 1, 2026
- Baked Potatoes in Crock Pot Recipe: Buttery Interiors and Crispy Top Magic - November 1, 2026