
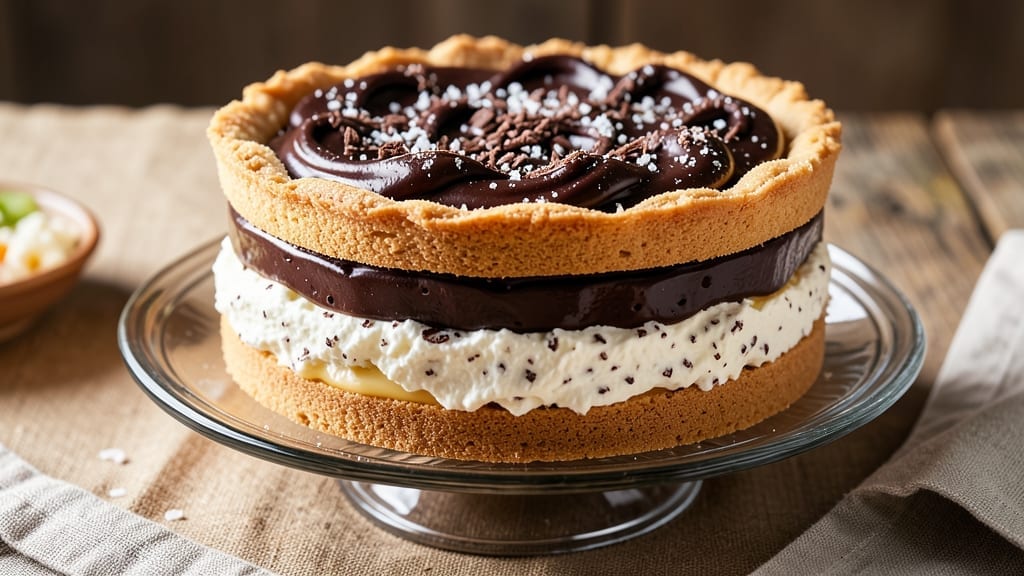
This 5-layer chocolate pie recipe delivers the ultimate dessert experience—where rich fudge, velvety caramel, and buttery pecan layers create a symphony of textures and flavors. 💫 The secret lies in precise layering and baking techniques that ensure each component stays distinct yet harmonious, resulting in a showstopping pie that impresses even the most discerning guests.
Perfecting this pie requires a foolproof crust as the foundation, followed by layers of homemade chocolate fudge, salted caramel, pecan praline, and a final chocolate ganache drizzle. Each layer is baked or assembled in stages, with careful attention to cooling times to prevent sogginess.
The result? A pie that’s restaurant-quality at home, with a perfect balance of sweetness, crunch, and creaminess.
What sets this recipe apart is its versatility—whether you’re baking for a special occasion or treating yourself to a decadent dessert, the techniques here ensure success. For those with dietary restrictions, gluten-free crusts and vegan adaptations are included without sacrificing flavor.
The key to mastering this pie is patience and precision, but the reward is a dessert that tastes like pure indulgence.
Once assembled, the pie needs at least 4 hours to chill before slicing, allowing the layers to set properly. Serve it chilled with a dollop of whipped cream or a scoop of vanilla ice cream to elevate the experience. This isn’t just a pie—it’s a masterpiece worth every bite.
Ingredients for 5 layer chocolate pie
Eight essential ingredients create this luxurious pie’s foundation—where precision meets indulgence.
| Ingredient | Amount | Notes |
|---|---|---|
| All-Purpose Flour 🌾 | 2 ½ cups | For perfect crust texture |
| Unsalted Butter 🧈 | 1 cup | Cold, cubed for flaky crust |
| Granulated Sugar 🍚 | ¼ cup | Plus 2 tbsp for sprinkling |
| Dark Chocolate Chips 🍫 | 12 oz | 70% cocoa for fudge layer |
| Heavy Cream 🥛 | 1 ½ cups | Full-fat for caramel |
| Light Corn Syrup 🍯 | ½ cup | For smooth caramel |
| Pecans 🌰 | 2 cups | Chopped, toasted for praline |
| Brown Sugar 🍚 | 1 cup | Packed for praline base |
| Semisweet Chocolate Chips 🍫 | 8 oz | For ganache drizzle |
| Whole Milk 🥛 | ½ cup | For ganache tempering |
| Salted Butter 🧈 | 4 tbsp | For caramel salt finish |
| Vanilla Extract 🌿 | 2 tsp | Pure vanilla for depth |
| Flaky Sea Salt 🧂 | 1 tbsp | For caramel garnish |
| Whipped Cream 🍦 | 1 ½ cups | Store-bought or homemade |
The crust demands high-quality butter—none of that margarine nonsense. Plugrá brand is my go-to for its 82% fat content, but any European-style butter works. The flour should be King Arthur or Gold Medal for that perfect balance of protein and gluten. Toast your pecans in a dry pan until golden—no butter needed, just watch them like a hawk to avoid burning. For the chocolate, Ghirardelli or Callebaut chips melt like a dream, but Valrhona is worth the splurge if you’re feeling decadent. The key to restaurant-quality caramel? Corn syrup prevents crystallization, and the heavy cream must be cold when you add it—room temperature ruins the texture.
No dark chocolate chips? Melt a bar of Valrhona or Lindt 70% and let it set—just chill it in the fridge for 20 minutes. Running short on pecans? Walnuts or almonds toasted with cinnamon work in a pinch, though they lack that buttery richness. Substituting corn syrup? Agave or maple syrup at 1:1 ratio, but your caramel might be slightly less stable. The whipped cream can be store-bought—just make sure it’s full-fat for that proper texture. And for heaven’s sake, measure your salt. Too much flaky sea salt ruins the balance, but a light sprinkle elevates every layer.
Store your crust dough between parchment paper in the fridge for up to 3 days—it actually improves with a day’s rest. The caramel layer can be made 2 days ahead and kept at room temperature in an airtight container, though it softens slightly. Pecan praline keeps for 1 week if stored properly, but it’s best fresh. The ganache needs at least 2 hours to set before assembly. Once your pie is complete, it must chill for 4+ hours—this isn’t optional. Serve with whipped cream at 60°F for the perfect contrast, and always use a serrated knife to slice through those delicate layers.
Why You’ll Love This Recipe
- No-Fuss Layers: I swear, this pie comes together faster than I can put on a pot of coffee. Flour, butter, sugar—those are the only tools you need to build the crust and layers, and the chocolate chips melt into that creamy center with zero fuss. Honestly, the hardest part is waiting for it to cool.
- Rich Without Guilt: That first bite? Pure chocolate decadence, but the heavy cream keeps it from being too heavy. The dark chocolate chips add little bursts of intensity, and the buttery crust ties it all together—like a hug from a dessert you didn’t know you needed. (Yes, even on a Tuesday night.)
- Party in a Pan: This pie is my secret weapon for birthdays, potlucks, or just because. It’s hearty enough to feed a crowd but still feels special—no one will guess it’s basically a layered trifle. Between us, I’ve served it at holiday dinners and had people ask for the recipe before dessert even hit the table.
- Budget Luxury: Dark chocolate chips and heavy cream might sound fancy, but this pie costs a fraction of what a bakery version would. The crust uses basic ingredients, and leftovers? They’re even better the next day—if they last that long. I’ll be real: I’ve reheated slices in the microwave and still pretended it was homemade magic.
Step-by-step instructions for building a 5-Layer chocolate pie
Layering precision matters—each step builds the perfect foundation for the next.
👨🍳 Step 1: Prepare the Fudge Layer Base
Melt the 12 oz dark chocolate chips and 1 cup unsalted butter together in a heatproof bowl over simmering water, stirring until completely smooth. Remove from heat and whisk in 2 tbsp granulated sugar and 2 tsp vanilla extract until fully combined. This layer needs to be thick and fudgy—spread it evenly into a 9-inch pie crust (pre-baked at 375°F for 12 minutes) and chill for 30 minutes to set firmly.
Here’s the thing—don’t rush this step. The fudge must be completely solid before adding the next layer, or it’ll turn into a messy chocolate soup. I like to press plastic wrap directly onto the surface to prevent skin formation while it chills.
🍳 Step 2: Create the Caramel Layer
In a heavy saucepan, combine 1.5 cups heavy cream, 0.5 cup light corn syrup, and 4 tbsp salted butter. Bring to a boil over medium-high heat, then reduce to medium-low and simmer for 15-20 minutes until it thickens to a golden caramel consistency. You’ll know it’s ready when it coats the back of a spoon and pulls into soft ribbons when drizzled.
Work quickly here—the caramel burns fast. Pour the warm caramel over the chilled fudge layer and spread it evenly with an offset spatula. Let it cool completely at room temperature before proceeding. This layer should be smooth but not runny—if it’s too thin, your pie will be more puddle than slice.
🥘 Step 3: Assemble the Praline Layer
Toast the 2 cups pecans in a dry skillet over medium heat for 5-7 minutes until fragrant and lightly golden. Combine them with 1 cup packed brown sugar and 2 tbsp granulated sugar in a bowl, then spread the mixture evenly over the caramel layer. Bake at 350°F for 8-10 minutes until the sugar melts and forms a glossy praline topping.
Watch the oven closely—the praline should be golden brown but not burnt. Let it cool completely before adding the next layer. The contrast between the crunchy praline and soft layers below is what makes this pie extraordinary.
🍳 Step 4: Make the Ganache Drizzle
Heat 0.5 cup whole milk until steaming, then pour it over 8 oz semisweet chocolate chips in a heatproof bowl. Let it sit for 2 minutes, then whisk until completely smooth. The ganache should be thick but pourable—if it’s too stiff, warm it gently over simmering water. Drizzle this evenly over the cooled praline layer and let it set at room temperature for 1 hour.
For the best results, work with the ganache while it’s still warm but not hot. You want it to spread smoothly but hold its shape as it cools. If it starts to thicken too much, whisk in a few drops of milk to restore the right consistency.
🍽️ Step 5: Finish with Whipped Cream and Garnish
Just before serving, pipe 1.5 cups whipped cream over the ganache layer in decorative swirls. Sprinkle generously with 1 tbsp flaky sea salt for a perfect balance of sweet and salty. Chill the pie for at least 2 hours before slicing—this ensures clean cuts and proper layer separation.
Slice with a warm knife to create clean edges, and serve each piece with an extra dollop of whipped cream if desired. The contrast of temperatures—warm caramel, cool fudge, creamy whipped cream—is what makes this pie truly unforgettable.
Pro Tips For Making 5 Layer Chocolate Pie
- CHILL THE CRUST FULLY: I learned this the hard way—skipping the fridge step means your chocolate layers will melt into a sad, runny mess. Pop the crust in the freezer for 15 minutes before adding fillings, even if you’re eager to assemble. Trust me, the wait prevents a soggy disaster.
- MELT CHOCOLATE LOW AND SLOW: Dark chocolate seizes faster than you can blink when you rush it. Heat the cream to a gentle simmer (not boiling) and pour it slowly over the chocolate chips while stirring constantly. If it looks grainy, you’ve already lost—start over with fresh cream.
- WEIGH THE CREAM: Heavy cream expands when whipped, and eyeballing it leads to either a watery pudding layer or a dry, cakey texture. Use a kitchen scale for the whipped cream layer—aim for 1 cup (240g) of cold cream to get stiff peaks without overworking it.
- LAYER THINLY, PRESS FIRMLY: A thick layer of chocolate ganache or whipped cream will collapse under the next layer. Spread each filling thinly (about ¼-inch thick) and press it down gently with a spatula—this keeps the structure intact and prevents leaks when slicing. Yes, it looks messy at first, but it works.
Pro cooking tips for perfect results
Crust Perfection
Your pie starts with a flaky, sturdy crust that holds all those decadent layers. I swear by chilling the dough for at least 2 hours before rolling—this prevents shrinking. Use a pie weight or dried beans during pre-baking at 375°F for 12 minutes to keep it from puffing.
For extra insurance, brush the baked crust with a light egg wash before adding the fudge layer—it creates a barrier that prevents sogginess. 🌾
Layer Order Matters
Building layers from softest to crunchiest ensures structural integrity. Start with the fudge base (it needs to set), then caramel (warm but not hot), followed by praline (baked for crunch), and finish with ganache (sets at room temp).
The whipped cream topping goes last—it’s purely decorative and adds freshness. Pro tip: Use an offset spatula to spread each layer evenly, pressing gently to eliminate air bubbles.
Temperature Control
Each layer has its own ideal working temperature. The fudge must be completely set (about 65°F) before adding caramel, or it’ll melt into a gooey mess. Caramel should be warm but not steaming when poured—150-160°F is perfect.
The praline bakes at 350°F for just 8-10 minutes—overbaking turns it bitter. For the ganache, work with it at 100°F—too hot and it’ll slide off; too cool and it’ll seize up.
Chilling Stages
Patience is key—never skip chilling. After the fudge layer, chill for 30 minutes before adding caramel. After the praline, let it cool completely before ganache. The final chill (at least 4 hours) is non-negotiable—it lets the layers set properly and makes slicing clean.
I keep my pie in the fridge overnight, and the flavors deepen like a fine wine. ❄️
Equipment Essentials
Skip the cheap tools—your pie deserves better. A 9-inch pie dish (ceramic or glass) distributes heat evenly. Use a digital thermometer to monitor caramel and ganache temps. For spreading, an offset spatula (like OXO Good Grips) is a game-changer.
And invest in a serrated knife for slicing—it glides through layers without tearing. Trust me, your first pie with the wrong tools will be a disaster.
Troubleshooting Tips
Problem: Layers separating when sliced? Fix: Chill longer—6+ hours is better. Problem: Ganache too thick? Fix: Warm gently with 10-second bursts in the microwave, stirring between each. Problem: Praline not crispy? Fix: Bake 2-3 minutes longer and spread it thinner. Problem: Crust soggy? Fix: Blind-bake longer (15 minutes) and brush with apricot jam before adding fudge—it acts as a moisture barrier.
Nutrition facts
Frequently asked questions
Can I make this 5-layer chocolate pie ahead of time?
This pie actually tastes better the next day. Assemble it completely (including whipped cream) and refrigerate for 6-8 hours or overnight. The layers will meld beautifully, and the flavors deepen. Just cover it tightly with plastic wrap to prevent drying. For best texture, serve within 3 days.
What’s the secret to keeping the layers from mixing?
Proper chilling between layers is everything! After each layer (except whipped cream), chill for 30-60 minutes to set completely. The fudge must be firm before adding caramel, and the praline should cool before ganache. Use an offset spatula to spread layers evenly—press gently to eliminate air bubbles.
Can I substitute any of the chocolate layers?
Yes, but with caution! For the fudge layer, try white chocolate ganache or peanut butter fudge>. The caramel layer can be swapped for salted caramel sauce> or coffee-flavored caramel>. For the praline, use toasted hazelnuts with chocolate> instead of pecans. Just adjust baking times—nuts toast faster than pecans!
Why does my crust keep getting soggy?
Soggy crusts happen when moisture seeps through. First, ensure your crust is fully baked> (15 minutes with pie weights). Second, brush the baked crust with apricot jam> before adding fudge—it creates a moisture barrier. Finally, don’t skip the 4-hour chill> before slicing!
How do I make this pie gluten-free?
Use a gluten-free pie crust> (like King Arthur’s blend) and check all ingredients for hidden gluten. For the fudge layer, ensure your chocolate chips are gluten-free. The caramel and praline layers are naturally gluten-free, but always verify sugar and nut brands. A 2-hour extra chill**> helps GF crusts hold up better!

- 12 Bean Chili Recipe: Hearty Slow-Cooked Depth With 12 Legumes - October 17, 2026
- 5 Seed Bread Recipe: Nutty Crunch and Artisan Flavor in One Loaf - October 17, 2026
- 1 Lb Macaroni Salad Recipe: Bold, Crunchy, and Crowd-Pleasing - October 17, 2026