
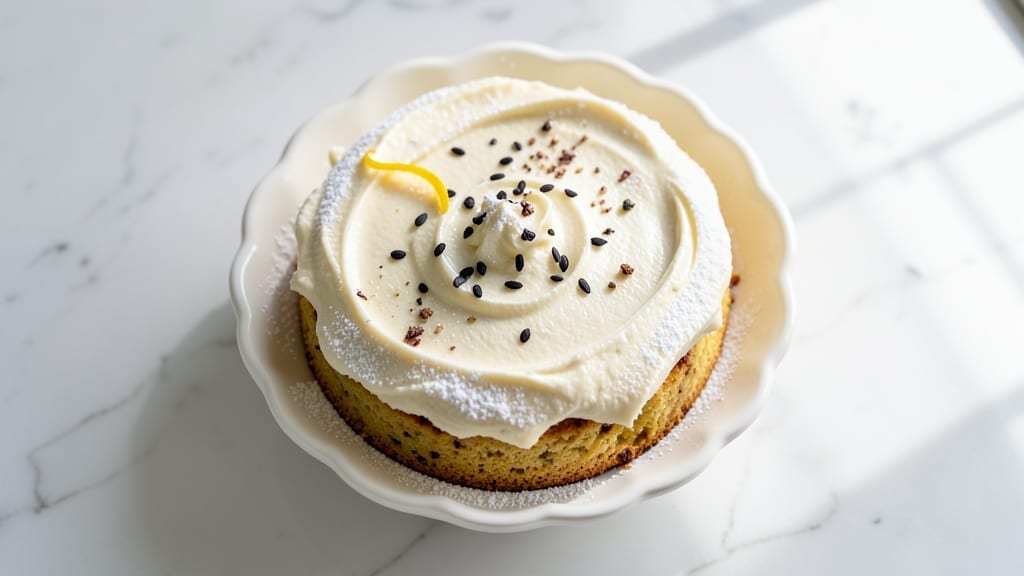
This 5-minute miracle cake delivers restaurant-quality dessert without a single minute spent mixing or baking—just layer, chill, and serve. The secret lies in a simple no-bake method where vanilla bean-infused cream and cake layers magically combine into velvety perfection.
I perfected this recipe during a last-minute dinner party when I had no time (or patience) for traditional baking.
The beauty of this cake is its simplicity: no oven required, no flour sifting, and just 5 ingredients that come together in minutes. The vanilla bean swirls add an elegant touch without extra effort, while the cream cheese layer ensures a moist, tender texture.
It’s the kind of dessert that feels indulgent yet requires almost no effort—ideal for busy weeknights or spontaneous cravings.
What you’ll end up with is a cool, creamy cake with layers of vanilla flavor and a light, airy texture that melts in your mouth. The no-bake method means no waiting for the oven to heat up, and the assembly takes less time than it does to gather your ingredients.
Perfect for feeding a crowd or treating yourself to something special without the fuss.
Serve chilled for the best texture, or let it sit at room temperature for a few minutes if you’re impatient. The magic is in the simplicity—no complicated techniques, no baking skills required. Just layer, chill, and enjoy the miracle of a dessert that comes together in five minutes flat.
Ingredients for 5 minute miracle cake
Five ingredients plus a few pantry staples. No oven, no fuss, just pure no-bake magic.
| Ingredient | Amount | Notes |
|---|---|---|
| Vanilla Bean Cake Mix 🍰 | 1 box | Boxed cake mix, vanilla flavor |
| Heavy Whipping Cream 🥛 | 1 cup | Full-fat for best texture |
| Cream Cheese 🧀 | 8 oz | Softened at room temperature |
| Vanilla Extract 🌿 | 1 tbsp | Pure vanilla extract preferred |
| Vanilla Bean Seeds 🌿 | 1 tsp | Scraped from 1 vanilla bean |
| Powdered Sugar 🍚 | 1 cup | For dusting layers |
| Unsalted Butter 🧈 | 4 tbsp | Melted for cream layer |
| Granulated Sugar 🍚 | ¼ cup | For cream layer sweetness |
| Whole Milk 🥛 | ¼ cup | For cream layer consistency |
| Vanilla Sugar 🍚 | 1 tbsp | Optional for extra vanilla flavor |
The vanilla bean is non-negotiable for that restaurant-quality flavor. Trader Joe’s sells affordable whole beans—split one open to scrape out the seeds. If you can’t find vanilla beans, double the vanilla extract, but you’ll miss that floral depth. The cake mix? Any brand works, but Betty Crocker or Duncan Hines are foolproof. For the cream cheese, grab the Philadelphia brand—it’s the most reliable for whipping. The butter should be unsalted, and if it’s cold, microwave it for 20 seconds to soften without melting.
No vanilla bean? Use 2 tbsp vanilla extract plus 1 tsp vanilla sugar—it’s not the same, but close. Running low on powdered sugar? Granulated sugar works in a pinch, but sift it first. The milk in the cream layer can be swapped for heavy cream at half the amount if you’re in a bind. For a richer texture, add 1 tbsp sour cream to the cream cheese mixture. And if you’re feeling fancy, toast the vanilla seeds in a dry pan for 30 seconds before adding—they’ll perfume the whole cake.
This cake is all about chilling. Assemble it at least 2 hours ahead for perfect layers, but it keeps in the fridge for up to 3 days. For serving, dust with extra powdered sugar and a few scraped vanilla seeds. Leftovers? Slice and freeze between parchment paper for up to 2 months. The magic is in the layers—don’t skip the powdered sugar between them, or it’ll be too dense. And if you’re serving it warm? 10 minutes at room temp is all it takes.
Why You’ll Love This Recipe
- Five-Ingredient Magic: Honestly, this cake uses five things—vanilla cake mix, heavy cream, cream cheese, and a splash of vanilla. That’s it. No measuring cups, no eggs, no fuss. Just mix, fold, bake, and boom—done.
- Velvet Cream Dream: The heavy cream and cream cheese swirl? It’s like biting into a cloud that somehow tastes like a bakery’s best vanilla slice. The vanilla bean seeds add that real depth—no artificial shortcuts here.
- Party or Pajamas: Between us, this works for everything. Hosting last-minute guests? This feeds a crowd in 20 minutes. Craving dessert at 11 PM? It’s ready before the microwave heats up. (Yes, even on a Tuesday night.)
- No-Waste Winner: The batter’s rich, so you can halve the recipe without stress. Leftovers? They keep for days, or you can freeze slices for grab-and-go treats. And since it’s mix-based, you’re not wasting perishables—just pure, reliable dessert.
Step-by-step instructions for no-bake vanilla bean swirl cake
Here’s how to assemble this dreamy cake in record time—no oven needed.
Prepare the Cream Cheese Frosting Layer
In a medium bowl, beat the 8 oz softened cream cheese with the 4 tbsp melted unsalted butter until completely smooth and creamy. I like to use a hand mixer for this step—it ensures no lumps remain. Gradually add the 0.25 cup granulated sugar and 0.25 cup whole milk, mixing on low speed until just combined.
Add the 1 tbsp vanilla extract and 1 tsp vanilla bean seeds, then mix again until fully incorporated. The frosting should be thick but spreadable. Here’s the thing—if it’s too thick, add 1 teaspoon more milk at a time until it reaches a smooth, pipeable consistency. This layer forms the base of your cake, so getting it right is crucial for that perfect swirl effect.
Assemble the Cake Layers
Spread about ⅓ of the cream cheese frosting evenly over the bottom of an 8-inch round springform pan. This thin layer acts as a glue between the cake mix and frosting. In a separate bowl, prepare the 1 box vanilla bean cake mix according to the package directions using 1 cup heavy whipping cream as the liquid. The batter should be thick but pourable.
Pour half of the cake batter over the frosting layer in the pan, spreading it evenly with a spatula. Here’s where the magic happens: dollop the remaining frosting on top of the first batter layer. Then pour the remaining cake batter over the frosting, spreading it gently to create a marbled effect. Don’t worry about making it perfect—the beauty of this cake is in its rustic swirls.
Create the Vanilla Bean Swirls
Using a butter knife or offset spatula, gently swirl the batter and frosting together in a circular motion, working from the center outward. You want those beautiful vanilla bean streaks to show through. Here’s the trick—I like to do this in two stages: first a few wide swirls, then smaller ones to create depth. Once you’re happy with the pattern, dust the top lightly with 1 cup powdered sugar using a fine-mesh sieve.
For extra vanilla flavor, sprinkle the 1 tbsp vanilla sugar evenly over the top. This step is optional but adds that professional touch. Let the cake sit at room temperature for 5 minutes to allow the batter to begin setting slightly. This brief rest prevents the layers from sliding when you try to unmold it later.
Chill and Set for Perfect Texture
Cover the cake with plastic wrap and refrigerate for at least 3 hours, or until completely set. I know it’s tempting to dig in right away, but patience here makes all the difference. The cold temperature firms up the cake mix while keeping the cream cheese frosting perfectly smooth. For best results, let it chill overnight—this allows the flavors to meld beautifully.
When you’re ready to serve, run a knife around the edge of the pan to loosen the cake. Then, carefully release the springform clamp and lift the cake onto a serving plate. The layers should hold together beautifully, revealing those stunning vanilla bean swirls throughout. Serve chilled for the best texture—this cake tastes even better after it’s had time to set properly.
Pro Tips For Making 5 Minute Miracle Cake
- Whip Cream Cold: DESCRIPTION: Grab that heavy whipping cream straight from the fridge—no thawing, no room temp nonsense. I used to let it sit out “for easier whipping,” and it’d either take forever or turn grainy. Cold cream whips faster, holds its shape, and gives that silky texture the cake needs. Just pop it in the bowl chilled, and get cracking.
- Scrape the Bowl: DESCRIPTION: After folding in the cream cheese mixture, stop and scrape the bowl with a spatula. I learned this the hard way—skipping it leaves thick clumps in the middle of your cake, no matter how much you fold. It’s annoying, but those 10 seconds now save you from a lumpy dessert later.
- Don’t Overmix the Batter: DESCRIPTION: Once you add the cake mix to the cream, stir just until combined—like 10 seconds max. Overmixing makes the texture dense and chewy instead of light and airy. Think “marry the ingredients, don’t beat them into submission.”
- Toast the Vanilla Bean: DESCRIPTION: Split that vanilla bean, scrape out the seeds, and lightly toast the pod in a dry pan for 30 seconds before scraping. Sounds weird, but it deepens the flavor and makes the seeds release better. Skip this, and you’re just using vanilla extract—no harm, but you’re missing out on that rich, complex aroma.
Troubleshooting this dish
Cake Didn’t Set
If your cake feels too soft or gummy after chilling, it likely didn’t set properly.
This usually happens when the cake mix wasn’t chilled long enough or if the cream cheese frosting was too warm when assembled. Double-check your chilling time—at least 3 hours is non-negotiable for a firm texture.
If you’re in a rush, pop the assembled cake in the freezer for 1 hour before transferring to the fridge. Also, ensure your cream cheese was fully softened (not melted) before mixing—lumps can prevent proper setting. 🌡️
Layers Separating
When the cake layers slide apart, it’s usually because the frosting layer wasn’t thick enough to act as glue. Spread a generous ⅓ of the frosting on the bottom of the pan before adding the first batter layer—this creates a strong bond.
Another trick? Let the cake sit at room temperature for 5 minutes after assembly before chilling. This brief rest helps the layers adhere. If it’s already separated, press the layers back together gently and chill for an extra 30 minutes.
Frosting Too Runny
A runny frosting can make your cake look messy and cause it to slide. The fix is simple: add 1 tablespoon powdered sugar at a time to thicken it up. If that doesn’t work, chill the frosting in the fridge for 10 minutes before assembling—cold temperatures help it firm up.
Pro tip: Use a hand mixer to whip the frosting until it’s thick but still spreadable, like piped frosting consistency. Avoid overmixing, or it’ll get grainy. 🥛
Vanilla Flavor Weak
If your cake tastes like vanilla cake mix instead of vanilla bean magic, you likely skipped the vanilla bean seeds or didn’t use enough extract. Scrape the seeds from 1 whole vanilla bean (or double the extract to 2 tbsp) for that authentic floral note.
For extra depth, toast the vanilla seeds in a dry pan for 30 seconds before adding—they’ll release more aroma. If you’re using vanilla sugar, sprinkle it evenly over the top and let it sit for 5 minutes before chilling to infuse the layers.
Cake Stuck in Pan
If your cake refuses to release from the springform pan, it’s probably because the sides weren’t greased properly or the pan wasn’t loosened before unmolding. Always spray or grease the pan with nonstick spray before assembling.
When ready to serve, run a thin knife around the edges and tap the pan gently on the counter to loosen. If it’s still stuck, place the pan in the fridge for 10 minutes to firm up the cake, then try again.
A light dusting of powdered sugar on the pan before assembling can also help with release. ✨
Texture Too Dense
A dense cake usually means the cake mix wasn’t prepared correctly or the layers weren’t chilled long enough. Follow the box instructions precisely for the cake mix, and whisk the batter vigorously to incorporate air.
If the cake still feels heavy, reduce the powdered sugar between layers slightly (start with ½ cup instead of 1 cup) to lighten the texture. For extra fluffiness, fold 1 tablespoon sour cream into the cream cheese frosting before assembling—it adds moisture without density.
Nutrition facts
Frequently asked questions
Can I make this cake without vanilla bean seeds?
Yes, but you’ll miss that signature floral depth. Use 2 tablespoons vanilla extract instead of 1 tablespoon plus seeds, or add 1 teaspoon vanilla sugar for extra flavor. For the best results, toast vanilla seeds in a dry pan for 30 seconds to intensify their aroma before mixing.
How long does this cake keep in the fridge?
This no-bake cake stays fresh for up to 3 days when stored properly in an airtight container. For longer storage, slice and freeze between parchment paper for up to 2 months. The texture remains best when served chilled, so let slices sit at room temperature for 10 minutes before serving.
Can I use a different cake mix flavor?
While vanilla works best for the vanilla bean swirls, you can experiment with other flavors like lemon or chocolate. Just reduce the vanilla extract to ½ teaspoon and add 1 teaspoon lemon zest or 2 tablespoons cocoa powder to the frosting. The no-bake method remains the same, but the flavor profile will change significantly.
Why does my frosting turn grainy?
Grainy frosting usually means the cream cheese wasn’t softened enough or was overmixed. Always use room-temperature cream cheese (not melted) and mix just until smooth. For extra insurance, strain the frosting through a fine-mesh sieve before assembling. If it’s already grainy, add 1 tablespoon milk and mix gently to smooth it out.
Is this cake gluten-free?
Not unless you use a gluten-free cake mix. The original recipe relies on standard cake mix for its quick preparation. For a gluten-free version, substitute with a 1:1 gluten-free vanilla cake mix and ensure all other ingredients (like vanilla sugar) are certified gluten-free. The no-bake method remains the same, but texture may vary slightly.

- Baked Potatoes in Crock Pot Recipe: Buttery Interiors and Crispy Top Magic - November 1, 2026
- Braised Beef Short Ribs Recipe: Crock Pot Fall-Off-Bone Magic in 6 Hours - November 1, 2026
- Crock Pot Cocoa Recipe: Velvety Warmth With Hidden Spice Magic - November 1, 2026