
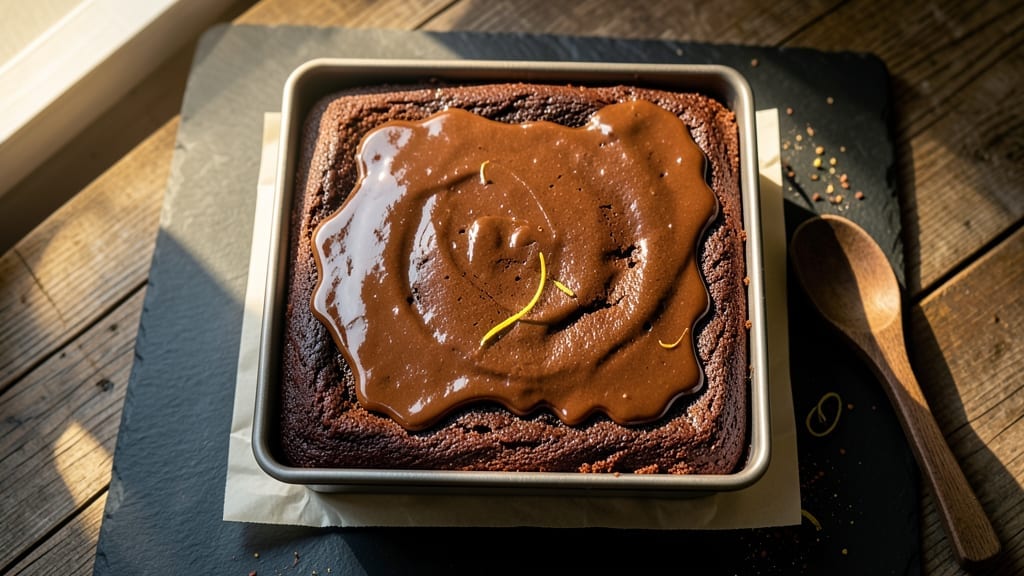
This 9-inch square chocolate cake recipe delivers ultra-moist layers with a fudgy frosting that melts in your mouth—no dry crumbs in sight. The secret lies in precise ingredient ratios and gentle folding techniques that create a tender crumb without overmixing.
I’ve baked this version dozens of times, and it consistently yields a cake that’s rich, deeply chocolatey, and perfectly even from edge to edge.
What sets this recipe apart is the balance of cocoa powder and melted butter, which develops a velvety texture while preventing a dense, heavy bite.
The frosting—made with just powdered sugar, butter, and a splash of milk—stays fudgy at room temperature but softens slightly when warmed, making it ideal for layering or drizzling. No special equipment is needed beyond a standard 9×9-inch pan and a mixer, though a kitchen scale ensures accuracy for foolproof results.
The cake bakes in 30-35 minutes at 350°F, yielding layers that stay moist for days when stored properly. The frosting can be spread warm for a glossy finish or chilled for a firmer consistency, depending on how you plan to serve it.
Whether you’re hosting a dessert party or simply craving a decadent treat, this recipe delivers restaurant-quality results with minimal effort.
For extra indulgence, add a sprinkle of flaky sea salt on top of the frosting or fold in chocolate chips into the batter. The versatility of this cake makes it perfect for birthdays, anniversaries, or anytime you need a rich, satisfying slice.
Let’s get baking—your taste buds will thank you.
Ingredients for 9 inch square chocolate cake
Twelve ingredients, one decadent 9×9-inch chocolate masterpiece—moist layers and fudgy frosting guaranteed.
| Ingredient | Amount | Notes |
|---|---|---|
| Unsalted Butter 🧈 | 1 cup | Melted, full-fat for richness |
| Granulated Sugar 🍚 | 2 cups | White or light brown |
| Dutch-Processed Cocoa Powder 🍫 | ¾ cup | High-quality for deep flavor |
| All-Purpose Flour 🌾 | 1 ½ cups | Sifted, for tender crumb |
| Baking Powder 🧂 | 1 ½ tsp | Aluminum-free preferred |
| Salt 🧂 | ½ tsp | Fine sea salt |
| Vanilla Extract 🌸 | 1 tbsp | Pure, high-quality |
| Whole Milk 🥛 | ½ cup | Room temperature |
| Large Eggs 🥚 | 2 whole | Room temperature |
| Powdered Sugar 🍚 | 2 cups | For frosting, sifted |
| Semisweet Chocolate Chips 🍫 | ½ cup | Optional for extra richness |
| Flaky Sea Salt 🧂 | 1 tsp | For garnish, optional |
The cocoa powder is where the magic happens. Hershey’s Special Dark or Dutch-processed brands deliver that deep, velvety chocolate flavor without bitterness. Grab a small bag from Williams Sonoma or the baking aisle at Whole Foods—just make sure it’s labeled ‘Dutch-processed’ for smoother flavor. The butter needs to be unsalted and full-fat (none of that ‘light’ stuff)—Plugrá or Land O’Lakes are solid choices. For the flour, King Arthur or Gold Medal brands stay consistent, but if you’re at Trader Joe’s, their organic all-purpose works beautifully. Pre-sift your dry ingredients to avoid lumps, and let your eggs and milk sit out for 30 minutes before mixing—room temperature ingredients blend better and yield a lighter texture.
No Dutch-processed cocoa? Natural cocoa powder works at the same amount, but it’ll be slightly more bitter. Running low on butter? Coconut oil at a 1:1 ratio keeps the cake moist, though the flavor will differ. Swap whole milk for evaporated milk or even almond milk—just add a splash more to account for thickness differences. Chocolate chips optional, but if you skip them, fold in 1 tbsp of melted butter for extra richness. The frosting’s powdered sugar can be swapped for confectioners’ sugar if you’re out, but avoid pre-sifted versions—they clump. For a nutty twist, fold in 1/4 cup chopped walnuts or pecans into the batter before baking.
This cake stays moist for 4-5 days when stored in an airtight container at room temperature, or up to 1 week in the fridge. For longer storage, wrap tightly in plastic and freeze for up to 3 months. Thaw at room temperature before serving. The frosting can be made a day ahead—just re-whip briefly before spreading. Garnish with flaky sea salt just before serving for a salted-chocolate contrast that takes it to the next level. Slice with a warm, damp knife for clean cuts every time.
Why You’ll Love This Recipe
- Here’s what sold me: that first bite of fudgy center melting into a crisp edge. The butter and sugar caramelize just enough to make it taste like a bakery slice, not a homemade one.
- One-Bowl Wonder: That’s right—just mix, pour, bake. No fancy layers, no fussing with pans. The Dutch-processed cocoa powder does all the heavy lifting for that rich, velvety texture with zero extra effort.
- Deep Chocolate Magic: Here’s what sold me: that first bite of fudgy center melting into a crisp edge. The butter and sugar caramelize just enough to make it taste like a bakery slice, not a homemade one.
- Leftover Heaven: Between us, this cake improves with time. The texture gets even more tender overnight, and it’s perfect for breakfast toast or a quick snack. I’ve had it last four days in the fridge—still delicious.
Step-by-step instructions for ultra-moist chocolate cake
Here’s how to create a decadent square cake with rich layers and velvety texture.
Prepare the Cake Batter
Preheat your oven to 350°F and grease a 9-inch square baking pan thoroughly with the 1 cup unsalted butter, reserving about 2 tablespoons for later. Line the bottom with parchment paper for easy removal. Melt the butter in a microwave-safe bowl in 30-second intervals, stirring between each, until completely smooth and fully melted.
In a large mixing bowl, whisk together the 2 cups granulated sugar and 0.75 cup Dutch-processed cocoa powder until completely combined. Add the melted butter and mix until smooth. In a separate bowl, sift together the 1.5 cups all-purpose flour, 1.5 teaspoons baking powder, and 0.5 teaspoon salt to remove any lumps. Gradually add the dry ingredients to the wet mixture, alternating with the 0.5 cup whole milk and 1 tablespoon vanilla extract, mixing just until combined.
Add the 2 whole large eggs one at a time, mixing gently after each addition. Fold in the 0.5 cup semisweet chocolate chips (if using) by hand to maintain an even distribution. The batter should be thick but pourable—this consistency ensures a moist crumb. Pour the batter into the prepared pan and smooth the top with a spatula.
Bake Until Perfectly Set
Bake the cake for 35-40 minutes, or until a toothpick inserted into the center comes out with just a few moist crumbs (not wet batter). The edges should be set, but the center should still have a slight wobble—this indicates a tender crumb. Rotate the pan halfway through baking for even heat distribution.
Here’s the thing—overbaking is the enemy of moisture. The cake will continue cooking slightly as it cools, so pull it out when it’s just barely set. Let it cool in the pan for 15 minutes before transferring to a wire rack to cool completely. This gradual cooling prevents cracking and maintains that ultra-moist texture.
Prepare the Fudgy Frosting
While the cake cools, make the frosting by beating the reserved 2 tablespoons butter with the 2 cups powdered sugar until smooth. Add the 1 teaspoon flaky sea salt and mix until fully incorporated. The frosting should be thick but spreadable—if it’s too stiff, add 1-2 teaspoons whole milk to loosen it.
For extra richness, you can melt 2 tablespoons semisweet chocolate chips with 1 teaspoon butter and drizzle over the frosting before spreading. This creates beautiful marbled effects and adds depth of flavor. Spread the frosting evenly over the cooled cake, using a spatula to create clean edges.
Chill and Serve for Best Texture
Place the frosted cake in the refrigerator for at least 1 hour before serving. This chilling time allows the frosting to set properly and enhances the cake’s moisture by preventing it from drying out too quickly. The cake will hold its shape beautifully and slice cleanly.
For the best experience, let it come to room temperature for 10-15 minutes before serving. The contrast between the cool frosting and slightly warmed cake layers creates the perfect texture—moist, rich, and irresistibly fudgy. Cut into squares and enjoy with a glass of cold milk or a cup of coffee.
Pro Tips For Making 9 Inch Square Chocolate Cake
- MEASURE BUTTER COLD: Grab that stick of butter straight from the fridge—no room temp softening needed. Cold butter creates air pockets that make your cake fluffy, and it won’t melt into a greasy mess when you cream it with sugar. I learned this the hard way after a cake turned out dense and heavy.
- SIFT THE DRY INGREDIENTS: Don’t just dump flour and cocoa powder into the bowl—sift them together first. This lightens the texture and prevents lumps, especially with that dense Dutch-processed cocoa. A quick shake in a fine-mesh strainer makes all the difference.
- CHECK DONENESS WITH A TOOTHPICK: Skip the “press the center” test—it’s unreliable. Instead, stick a toothpick in the middle and pull it out. If it comes out clean (or with a few moist crumbs), your cake’s done. A wet toothpick means more baking time, and overbaking turns chocolate cake dry.
- USE A LIGHT HAND WITH FLOUR: After adding the wet ingredients, fold in the flour mixture just until combined—don’t overmix. Overworking the batter develops gluten, which makes your cake tough instead of tender. Stop when the batter looks slightly streaky.
Creative variations of this 9 inch square chocolate cake
Decadent Espresso Twist
Swap 1 tablespoon vanilla extract with 1 tablespoon instant espresso powder dissolved in the 0.5 cup whole milk. This adds a subtle coffee depth that pairs beautifully with the chocolate.
I like to use Starbucks VIA or Nescafé Azera for a smooth, non-bitter flavor. For extra intensity, add ½ teaspoon cinnamon to the batter. 💛
Peanut Butter Swirl
Spread ½ cup creamy peanut butter (like Smucker’s Natural) over the batter before baking, then swirl with a knife. The peanut butter stays gooey in the center while the edges bake perfectly.
Top with a peanut butter glaze—mix ½ cup powdered sugar with 2 tablespoons peanut butter and 1 teaspoon milk—after cooling. This Southern-inspired variation is a crowd-pleaser!
Salted Caramel Layer
Add a caramel drizzle between layers by melting ½ cup caramel sauce (I use Trader Joe’s) with 1 tablespoon butter. Spread over the first layer, then add frosting and a second layer.
Finish with flaky sea salt sprinkled on top. The salt enhances the caramel’s sweetness while balancing the chocolate’s richness.
Orange Zest Brightness
Zest 1 large orange (about 1 tablespoon zest) and fold it into the batter for a citrusy contrast. The acidity cuts through the chocolate’s heaviness. Pair with a white chocolate frosting—mix 2 cups powdered sugar, ½ cup melted white chocolate, and 2 tablespoons milk.
Garnish with extra zest for a pop of color and freshness. 🌟
Spiced Chai Version
Infuse the batter with 1 teaspoon chai spice blend (or mix ½ teaspoon cinnamon, ¼ teaspoon ginger, ¼ teaspoon cardamom, and pinch of cloves).
The warm spices add complexity, making this ideal for fall or holiday baking. Top with a gingersnap crumble—crush ½ cup gingersnaps and sprinkle over the frosting.
Layered Truffle Cake
For a luxurious twist, fold ½ cup chopped dark chocolate truffles (like Ghirardelli Gold Bond) into the batter before baking. After cooling, spread the frosting, then top with chopped truffles and a drizzle of chocolate ganache**.
This version feels like a dessert from a high-end bakery but is surprisingly simple to make. 💫
Nutrition facts
Frequently asked questions
Can I use this recipe for a round 9-inch cake pan instead?
This recipe is specifically designed for a 9×9-inch square pan, which gives you a single, even layer perfect for slicing into squares. If you want a round cake, you’ll need to adjust the batter quantity—reduce it by about 20% (use 1.2 cups flour, 1 cup sugar) and bake in two 9-inch round layers for 25-30 minutes each. The frosting amount stays the same.
Why did my cake turn out dry?
Dryness usually means overbaking or overmixing. Always pull the cake when a toothpick comes out with moist crumbs (not wet batter). For extra moisture, brush warm layers with 2 tablespoons warm milk or simple syrup before frosting. Also, ensure your butter and eggs are room temperature—they help retain moisture.
How do I make this cake gluten-free?
Replace the all-purpose flour with a 1:1 gluten-free baking flour blend (like Bob’s Red Mill or King Arthur). Add ½ teaspoon xanthan gum to help bind the crumb. Reduce the milk by 2 tablespoons to compensate for the blend’s moisture content. Test small batches first—some blends absorb liquids differently.
Can I bake this cake in a convection oven?
Yes! Reduce the oven temperature to 325°F and bake for 25-30 minutes instead of 35-40. Convection ovens circulate air more efficiently, so check for doneness 5 minutes early. Monitor closely—the cake can dry out faster. Rotate the pan halfway through for even baking.
What’s the best way to store leftovers?
Wrap the cake tightly in plastic wrap or aluminum foil, then place it in an airtight container. Store at room temperature for 2-3 days or refrigerate for up to 5 days. For longer storage, freeze slices wrapped individually for up to 3 months. Thaw at room temperature before serving.

- Baked Potatoes in Crock Pot Recipe: Buttery Interiors and Crispy Top Magic - November 1, 2026
- Braised Beef Short Ribs Recipe: Crock Pot Fall-Off-Bone Magic in 6 Hours - November 1, 2026
- Crock Pot Cocoa Recipe: Velvety Warmth With Hidden Spice Magic - November 1, 2026