
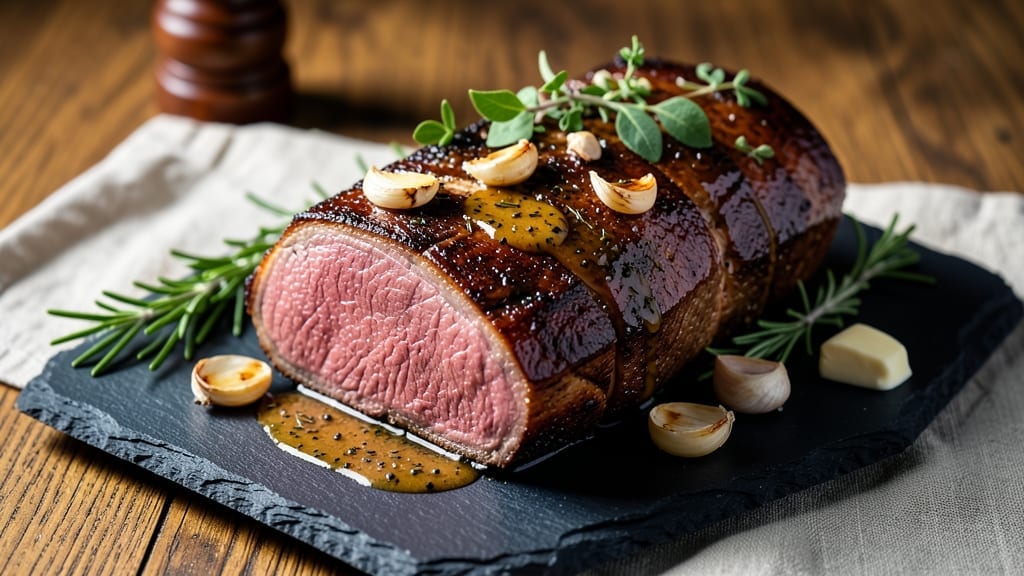
A 5-pound rib eye roast delivers the ultimate showstopper dinner—tender pink centers and a deep, caramelized crust that makes every slice worth the wait. 🔥 After years of perfecting this technique, I’ve cracked the code for achieving that restaurant-quality result at home, where even the most skeptical meat lovers ask for seconds.
The secret lies in precise temperature control, proper resting, and a simple yet effective seasoning approach that enhances rather than overpowers the beef’s natural richness.
This recipe transforms a simple roast into a foolproof centerpiece that requires minimal effort but maximum impact. You’ll need just 30 minutes of active prep time followed by 1.5 to 2 hours in the oven, depending on your preferred doneness.
The high-heat sear creates that coveted crust, while the slow roast ensures the interior stays juicy and tender—no dry, overcooked slices here. Even beginners can nail this with the right technique and a reliable meat thermometer.
What you’ll end up with is a perfectly browned roast that slices effortlessly, revealing that pink core and buttery texture we all crave. The crust is rich and caramelized, with deep, savory notes that develop as it rests.
This isn’t just a roast—it’s a weeknight masterpiece that elevates any meal, whether served with classic mashed potatoes or a fresh garden salad. The best part? Leftovers reheat beautifully, making it a meal prep favorite for busy families.
Ready to impress? This recipe includes pro tips for achieving the ideal crust, how to rest the meat properly, and even suggestions for sides that complement the rich, beefy flavors. Let’s get started—your taste buds (and dinner guests) will thank you.
Ingredients for 5 pound rib eye roast
Foolproof ingredients for that perfect restaurant-quality rib eye roast with juicy pink centers.
| Ingredient | Amount | Notes |
|---|---|---|
| Rib Eye Roast 🥩 | 5 lb | Bone-in, center-cut preferred |
| Kosher Salt 🧂 | 1 ½ tbsp | Diamond Crystal preferred |
| Freshly Ground Black Pepper 🌶️ | 1 ½ tbsp | Coarse grind preferred |
| Unsalted Butter 🧈 | ½ cup | Cold, cut into 1-inch cubes |
| Garlic Cloves 🧄 | 6 cloves | Smashed, skin-on |
| Fresh Rosemary 🌿 | ¼ cup | Chopped, stems removed |
| Fresh Thyme 🌿 | ⅛ cup | Leaves only, stems removed |
| Extra-Virgin Olive Oil 🫒 | 2 tbsp | For crust development |
| Yellow Onion 🧅 | 1 whole | Sliced into 1/4-inch rounds |
| Beef Tallow or Duck Fat 🧈 | 2 tbsp | For extra crust richness (optional) |
| Balsamic Vinegar 🍷 | 1 tbsp | For glaze (optional finishing) |
| Fresh Parsley 🌿 | ⅛ cup | Chopped, for garnish |
The rib eye roast is everything here—bone-in, center-cut is non-negotiable for maximum flavor and tenderness. Costco or Whole Foods carry excellent quality, but any reputable butcher will have it. Look for good marbling—those white fat streaks are what keep the meat juicy. The 5-pound size is ideal for 12 servings, perfect for feeding a crowd without leftovers (unless you’re planning ahead). I always ask for it to be trimmed of excess fat—just enough to render for flavor, not so much it makes the crust greasy. If you can’t find center-cut, rib-eye roll is the next best thing, though it’ll have slightly less marbling.
No fresh rosemary? Dried works at one-third the amount, but trust me on the fresh version—it adds that piney aroma that pairs perfectly with beef. Running short on thyme? Fresh oregano or marjoram in the same quantity keeps things balanced. The butter is critical—cold cubes create steam during roasting, keeping the interior moist. If you’re feeling fancy, swap some of the butter for beef tallow or duck fat for an extra-rich crust. The balsamic vinegar glaze is optional but adds a beautiful sheen and tangy contrast to the rich beef. For the garlic, roasting the cloves whole (skin-on) with the butter creates a caramelized flavor that’s worth the extra minute.
This roast deserves to rest—20-30 minutes at room temperature before slicing is non-negotiable. The internal temperature should hit 125°F for medium-rare (130°F for medium), then rise 5°F while resting. Slice against the grain for maximum tenderness. Leftovers reheat beautifully—wrap tightly in foil and warm in a 350°F oven for 20 minutes. The roast keeps 3-4 days in the fridge, but honestly, it’s so good you won’t have any. For meal prep, portion into individual servings—each slice reheats perfectly for lunches or sandwiches. The herb butter mixture can be made a day ahead and stored in the fridge.
Why You’ll Love This Recipe
- I’ll be real: this feeds a house. Game nights, holidays, or just lazy Sundays—it’s always a hit. The only thing you’ll be stressing over is whether to serve it with mashed potatoes or crusty bread. (Spoiler: both.)
- Foolproof Timing: I swear by this method—just salt, pepper, and roast. No complicated basting or fussing. That butter and garlic tucked under the skin? It bastes itself while you prep sides. Twenty minutes of hands-off cooking while the oven does the heavy lifting.
- Buttery-Garlic Magic: Honestly, the flavor is what makes this roast a no-brainer. The garlic cloves roasted inside the meat melt into the beef, while the butter keeps every bite juicy. That crispy crust? Pure satisfaction—no dry edges here.
- Leftovers for Days: Between us, this roast is the meal prep hero. Slice it thin for sandwiches, dice it for hash, or just reheat with a splash of beef broth. Three days later, my family still begs for seconds. No sad, dry reheats—just rich, tender beef every time.
Step-by-step instructions for 5-Pound rib eye roast
Let’s create a showstopping roast with a perfect pink center and irresistible caramelized crust.
🔥 Step 1: Prep and Season the Roast for Maximum Flavor
Start by patting the 5 lb rib eye roast completely dry with paper towels—this is non-negotiable for crispy skin. I mean really dry, especially in the crevices and around the bone where moisture hides. Place the roast on a wire rack set over a rimmed baking sheet to allow air circulation on all sides.
In a small bowl, combine the 1.5 tbsp kosher salt and 1.5 tbsp freshly ground black pepper. Rub this generously all over the roast, pressing firmly so the seasoning adheres. Don’t forget the cavity if your roast has one—this ensures flavor penetration throughout. Let the seasoned roast sit at room temperature for 30 minutes before roasting, which helps it cook more evenly.
👨🍳 Step 2: Create the Herb Butter Mixture
While the roast comes to room temperature, prepare the herb butter. In a food processor, pulse the 6 smashed garlic cloves (skin-on), 0.25 cup chopped fresh rosemary, and 0.125 cup fresh thyme leaves until finely chopped but not pasty. Add the 0.5 cup cold unsalted butter and pulse until just combined—you want small herb flecks throughout, not a smooth paste.
Transfer this herb butter to a small bowl and let it sit at room temperature for 10 minutes to soften slightly. This makes it easier to spread later. The herb butter will infuse the roast with incredible aroma and help create that coveted caramelized crust. Here’s the thing—don’t skip the cold butter. Warm butter would melt too quickly and make a mess.
🔥 Step 3: Roast to Perfect Medium-Rare
Preheat your oven to 450°F with a rack positioned in the lower third. This high initial temperature helps create that beautiful crust we’re after. Place the seasoned roast on the rack and roast for 20 minutes to sear the exterior.
After the initial sear, reduce the oven temperature to 325°F. Using an oven-safe meat thermometer, check the internal temperature—it should read 115°F at this point. If not, give it a few more minutes. Once it reaches 115°F, remove the roast from the oven and spread the herb butter evenly over the top, pressing gently to help it adhere. Return to the oven and continue roasting until the internal temperature reaches 125°F (about 1.5 to 2 hours total).
⏰ Step 4: Rest and Develop the Crust
When the roast reaches 125°F internally, remove it from the oven and transfer to a cutting board. Here’s where the magic happens: tent loosely with foil and let it rest for 30 minutes. This resting period allows the juices to redistribute, ensuring each slice stays juicy and tender.
While it rests, prepare your finishing touches. In a small saucepan, heat 2 tbsp extra-virgin olive oil and 2 tbsp beef tallow or duck fat over medium heat. Add the 1 whole sliced yellow onion and cook until caramelized (15-20 minutes). Stir in 1 tbsp balsamic vinegar and cook for another 2 minutes until reduced by half. This caramelized onion glaze will elevate your roast to restaurant-quality.
🍽️ Step 5: Slice and Serve with Garnish
After resting, slice the roast against the grain into ½-inch thick slices. The meat should be a perfect medium-rare with a pink center surrounded by a deep caramelized crust. Arrange the slices on a platter and drizzle generously with the caramelized onion glaze.
Garnish with the 0.125 cup chopped fresh parsley for a pop of color and freshness. Serve immediately with your favorite sides—roasted potatoes, a fresh green salad, or crusty bread to soak up those delicious juices. Each bite should deliver that perfect balance of juicy pink meat with a rich, flavorful crust that’ll have everyone asking for seconds.
Pro Tips For Making 5 Pound Rib Eye Roast
- USE A MEAT THERMOMETER: I learned this the hard way—guessing doneness with a rib eye roast leads to either dry, overcooked meat or rare-center disappointment. For a 5-pound roast, pull it at 120–125°F internal temp (medium-rare). The residual heat will carry it to perfect medium as it rests.
- SALT THE MEAT 24 HOURS EARLY: This isn’t just about flavor—it’s about texture. Rib eye has dense muscle fibers that need time to absorb salt and tenderize. Sprinkle 1–2 teaspoons kosher salt per pound (so ~5–10 tsp total) and let it sit uncovered in the fridge. Yes, it’ll look weird, but trust the process.
- SEAR IN BATCHES: Crowding the pan steams the butter instead of browning the meat. Sear the roast fat-side down first until deeply browned (5–7 minutes), then flip and repeat. If your pan gets crowded, work in shifts—just 2–3 minutes per side max to avoid steam.
- GARLIC BUTTER SLATHER AFTER RESTING: I used to slather the butter on pre-searing, and it’d burn before the roast was done. Instead, melt ½ cup unsalted butter with 6 smashed garlic cloves in a small pan, then brush it on after the roast rests. The residual heat finishes the butter while keeping the crust intact.
Serving suggestions for this dish
Classic Potato Pairings
Creamy garlic mashed potatoes are my go-to side for this roast—their buttery texture contrasts perfectly with the beef’s rich crust. I make them with roasted garlic (blend 4 cloves with 2 tbsp butter and ¼ cup heavy cream) for extra depth.
For a lighter option, try crispy roasted baby potatoes tossed with rosemary and olive oil—they add satisfying texture without overpowering the main dish. 🥔
Fresh Garden Sides
A bright arugula salad with shaved fennel, blood orange segments, and a lemon-anchovy dressing cuts through the richness beautifully. I use 1 bunch arugula, 1 small fennel bulb (thinly shaved), and 2 blood oranges for a citrusy pop.
For a heartier option, grilled asparagus with lemon zest and Parmesan adds a touch of elegance. Both sides keep the meal balanced and refreshing.
Bread for Soaking Juices
Nothing beats crusty sourdough bread or focaccia for soaking up those delicious roast juices. I recommend toasting slices until golden and serving them warm with garlic-infused olive oil and flaky sea salt.
For a more rustic touch, cornbread with a hint of honey and cinnamon pairs surprisingly well, especially if you’re serving this roast for a Southern-style gathering. 🍞
Vegetable Medleys
For a well-rounded plate, roasted Brussels sprouts with crispy pancetta and balsamic glaze add a smoky-sweet contrast. Toss 1 lb Brussels sprouts with 4 oz chopped pancetta, 2 tbsp olive oil, and roast at 425°F for 25 minutes.
Finish with 1 tbsp balsamic reduction. Alternatively, sautéed green beans with almonds and slivered garlic bring a lighter, crunchy element to the meal.
Cheesy Comfort Additions
If you love cheese, gruyère and chive scalloped potatoes are a crowd-pleaser. Layer 1 lb thinly sliced potatoes with 1 cup shredded gruyère, ¼ cup heavy cream, and 2 tbsp chopped chives, then bake until bubbly.
For a quicker option, mac and cheese with a crispy breadcrumb topping adds a comforting, indulgent touch that pairs perfectly with the roast’s richness.
Nutrition facts
Frequently asked questions
How do I know when my 5-pound rib eye roast is fully cooked?
Use a meat thermometer to check the internal temperature—125°F for medium-rare (pink center) or 130°F for medium. The thermometer should go into the thickest part, avoiding bone or fat. Never rely on time alone, as oven temperatures can vary. The roast will continue cooking slightly while resting, so pull it out 5°F before your target temp.
Can I cook a 5-pound rib eye roast without a meat thermometer?
You can estimate, but it’s risky. For medium-rare, plan for 1.5 to 2 hours at 325°F after the initial 20-minute 450°F sear. The roast should feel firm but still slightly springy to the touch when pressed gently. Cut into a small section—juices should run clear, not red, and the center should remain pink. Remember, resting time affects final doneness.
Why does my rib eye roast turn out dry?
Overcooking is the #1 cause. Remove the roast when it reaches 125°F (medium-rare) and let it rest 30 minutes—this lets juices redistribute. Another culprit is cutting too soon: slicing immediately releases all the juices. Also, avoid over-trimming fat (it renders flavor) and don’t skip the herb butter basting during roasting. For extra moisture, add 1 tbsp beef broth to the baking sheet.
How do I make the crust extra crispy?
Start with a 450°F oven for the first 20 minutes to create a deep sear. Pat the roast bone-dry before seasoning—moisture prevents browning. Use a mix of butter and oil (like the herb butter in the recipe) for better crust development. For maximum crispiness, finish with 2 tbsp beef tallow or duck fat brushed on after the initial roast, then broil for 2-3 minutes at the end.
Can I cook this roast in a slow cooker or Instant Pot?
This recipe is designed for oven roasting to achieve the perfect crust and pink center. While you could try a slow cooker for 4-5 hours on low (with added liquid), you’d lose that coveted caramelized exterior. The Instant Pot would give you tender meat but no crust—it’s better suited for shredded beef rather than sliced roast. For the best results, stick with the oven method described.

- Pea Soup Instant Pot Recipe: Velvety Green Smoothness in 20 Minutes - November 1, 2026
- Pork Loin Pulled Pork Crock Pot Recipe: Slow-Smoked Tenderness With Zero Dryness - November 1, 2026
- Baked Potatoes in Crock Pot Recipe: Buttery Interiors and Crispy Top Magic - November 1, 2026