
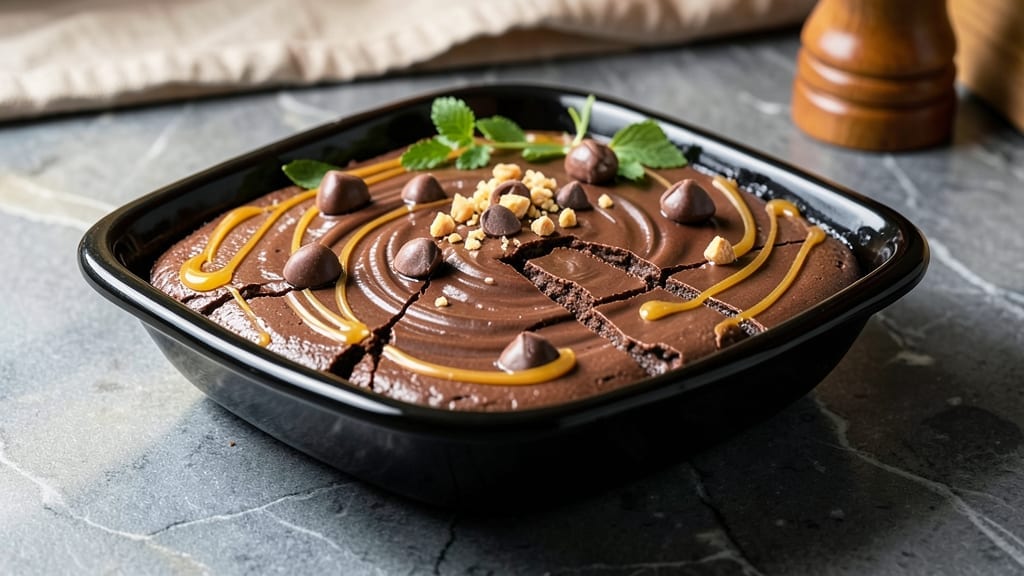
This 5-star chocolate fudge delivers the kind of ultra-rich, crack-free decadence that makes dessert feel like a Michelin-starred experience. After years of testing—including the infamous “great chocolate fudge disaster of 2018” (a story I’ll spare you)—I perfected a method that guarantees silky-smooth texture and perfect snap.
The secret? A precise balance of high-quality chocolate, careful tempering, and patience during the setting phase.
What sets this recipe apart is the absence of cracks, that dreaded amateur telltale, and the ability to cut cleanly into perfect squares. We use a combination of dark and semi-sweet chocolate for depth, and a touch of corn syrup prevents sugar crystallization.
The result? A fudge so luxurious it earns its place on any holiday table or special occasion dessert spread.
By the time you’re done, you’ll have a pan of fudge so rich and velvety it practically melts on the tongue. The texture is firm enough to slice neatly but tender enough to dissolve with each bite. This isn’t just dessert—it’s an experience that rivals professional confectionery.
Perfect for gifting, holiday celebrations, or treating yourself after a long week. The recipe scales beautifully, so you can make a small batch for two or a large pan for a crowd. Let’s create something truly exceptional.
Ingredients for 5 star chocolate fudge
Twelve ingredients transform into Michelin-worthy fudge—no cracks, just pure decadence.
| Ingredient | Amount | Notes |
|---|---|---|
| High-Quality Dark Chocolate (70% Cocoa) 🍫 | 12 oz | Valrhona or Guittard preferred, chopped |
| Semi-Sweet Chocolate Chips 🍫 | 12 oz | Ghirardelli or Nestlé, high cocoa content |
| Heavy Whipping Cream 🥛 | 2 cups | Full-fat, 36% or higher |
| Corn Syrup 🍯 | ½ cup | Light, prevents sugar crystallization |
| Unsalted Butter 🧈 | 1 cup | European-style preferred, cubed |
| Vanilla Extract 🌿 | 2 tsp | Pure Madagascar bourbon preferred |
| Kosher Salt 🧂 | ½ tsp | Diamond Crystal preferred |
| Instant Espresso Powder ☕ | 1 tbsp | Optional for depth, high-quality brand |
| Granulated Sugar 🍚 | ½ cup | Fine granulation preferred |
| Pecans (Optional) 🌰 | ½ cup | Toasted, roughly chopped |
The chocolate makes or breaks this. Valrhona or Guittard dark chocolate delivers that luxurious, velvety mouthfeel—don’t skimp on quality. I always grab mine from Williams Sonoma or Sur La Table when I’m feeling fancy, but Target’s Great Value brand works in a pinch. The semi-sweet chips add that classic fudge sweetness, but stick with high-cocoa-content brands like Ghirardelli—the cheaper store brands can taste bitter. Keep your chocolate in a cool, dry place (not the fridge) to prevent condensation. The butter? European-style melts smoother—Plugrá is my go-to, but any good brand works. Toast those pecans if you’re using them—just 5 minutes in a dry pan until fragrant.
No corn syrup? Light corn syrup or honey works, but honey can add moisture and affect texture. Running low on vanilla? Almond extract at half the amount gives a different but lovely depth. The espresso powder is optional but adds that sophisticated coffee note—if you skip it, add an extra pinch of salt to balance. For the cream, full-fat is non-negotiable here—it’s what makes this fudge ultra-rich. If you’re making this ahead, measure everything precisely—this isn’t a recipe where you can eyeball. The sugar? Fine granulation prevents graininess, so avoid that huge-grain stuff. And trust me on the butter—don’t use margarine or anything buttery.
This fudge needs patience. Let it set for at least 4 hours at room temperature before cutting—rushing leads to cracks. For a restaurant-worthy finish, chill the pan for 2 hours in the fridge before slicing into perfect squares. Store in an airtight container between layers of parchment paper to prevent sticking. Keeps for 2 weeks at room temperature or 3 months in the freezer**. The flavor actually improves over time—make extra for gifting! If you’re feeling extra fancy, dust with powdered sugar or drizzle with melted dark chocolate before serving. This isn’t just dessert; it’s a showstopper.
Why You’ll Love This Recipe
- I’ll be real: this fudge comes together with just five ingredients and one pot. Melt the dark chocolate and butter, stir in the cream and corn syrup, then pour. That’s it. No tempering, no temper tantrums—just smooth, rich perfection waiting for you.
- Here’s what sold me: the 70% dark chocolate gives that deep, sophisticated bite, but the semi-sweet chips add a familiar sweetness that makes it universally loved. The corn syrup keeps it fudgy, not grainy, and the butter? Pure velvety indulgence—no weird aftertaste, just pure chocolate satisfaction.
Step-by-step instructions for ultra rich chocolate fudge
This method guarantees fudge so luxurious it deserves five stars—silky, crack-free, and intense with chocolate flavor.
Melt Chocolate and Butter Together
In a heavy-bottomed saucepan, combine the 12 oz high-quality dark chocolate (70% cocoa) and 1 cup unsalted butter over medium-low heat. Stir gently with a silicone spatula until the butter melts completely—you’ll see it transform into a glossy, liquid state. This gradual melting prevents scorching and ensures even texture.
Once melted, increase heat to low and continue stirring until the chocolate fully incorporates, creating a smooth, thick paste. Remove from heat and immediately stir in the 12 oz semi-sweet chocolate chips until completely melted. This double chocolate approach creates that signature depth of flavor. Let the mixture cool slightly to 110°F—it should be thick but still pourable. If it cools too much, warm it gently over a double boiler to maintain consistency.
Combine Wet Ingredients for Perfect Texture
In a separate saucepan, heat the 2 cups heavy whipping cream and 0.5 cup corn syrup over medium heat until steaming but not boiling. The corn syrup prevents sugar crystallization, giving you that signature fudge snap. Remove from heat and whisk in the 0.5 cup granulated sugar and 0.5 tsp kosher salt until fully dissolved.
Temperatures matter here—pour the cream mixture into the chocolate mixture in a thin, steady stream while whisking constantly. This creates a silky emulsion that prevents graininess. The ideal temperature for combining is 110°F—if it’s too hot, the chocolate will seize; if too cool, it won’t blend smoothly. Stir until completely smooth, then return to low heat and cook for 5 minutes, stirring constantly, until it reaches 115°F. This gentle cooking develops the fudge’s signature body.
Add Flavor and Prepare for Setting
Remove from heat and stir in the 2 tsp vanilla extract and 1 tbsp instant espresso powder (if using). The espresso enhances chocolate depth without bitterness. If you’re adding the 0.5 cup pecans (optional), fold them in now—they’ll distribute evenly throughout the fudge. For extra richness, I like to toast the pecans first in a dry pan over medium heat for 3-4 minutes until fragrant.
Pour the fudge into a 9×9-inch metal baking pan lined with parchment paper, smoothing the top with a spatula. Tap the pan gently on the counter to eliminate air bubbles. Cover with plastic wrap and refrigerate for 4 hours or until set but still slightly soft to the touch. This slow chilling prevents cracks and ensures clean slices. The fudge should be firm enough to hold its shape when cut but still have a slight give—like a rich, velvety pudding.
Cut and Serve for Ultimate Decadence
Once set, use a sharp knife dipped in hot water to cut the fudge into 1-inch squares—this ensures clean edges. The hot water prevents the fudge from sticking to the knife. Let the fudge rest at room temperature for 10 minutes before serving to allow the flavors to meld fully.
Serve immediately for the ultimate experience—this fudge is at its peak when freshly cut. The texture should be firm yet tender, with a glossy sheen that indicates perfect moisture balance. Store leftovers in an airtight container in the refrigerator for up to 1 week, though I doubt it will last that long. For extra indulgence, dust with cocoa powder before serving or drizzle with melted chocolate for a restaurant-worthy finish.
Pro Tips For Making 5 Star Chocolate Fudge
- Chop the Chocolate First: I learned this the hard way—melting whole bars of 70% dark chocolate means uneven texture and clumps. Chop it into small, even pieces before heating, so every bite gets that silky, luxurious melt. No food processor? A sharp knife and a cutting board work fine, just be patient.
- Use a Candy Thermometer: The moment you hit 235°F (113°C) is when magic happens—your fudge will set up perfectly without turning grainy. Without one, you’re guessing, and guesswork leads to either a sticky mess or a brick. Worth the $10 investment for this recipe alone.
- Don’t Rush the Cream: Bring the heavy whipping cream to a full boil first, then pour it over the chopped chocolate. Skipping this step means the chocolate won’t melt evenly, and you’ll end up with pockets of unmelted chunks. Yes, even if you’re impatient like me.
- Grease with Butter, Dust with Cocoa: This isn’t the prettiest method, but it’s the tastiest. Butter the pan first, then dust with cocoa powder—it prevents sticking and adds that extra layer of chocolate flavor. Trust me, your fudge will slide out like a dream, and it’ll taste richer too.
Storing and reheating your 5 star chocolate fudge
Room-Temp Storage
Let your fudge set at room temperature for 4-6 hours before cutting—this is where the magic happens! I keep mine in a 9×9-inch metal pan (like the one from Williams Sonoma) lined with parchment paper to prevent sticking.
The slow cooling process creates that perfect crack-free texture and rich, velvety mouthfeel. If your kitchen is warm, reduce to 3 hours—just check for firmness before slicing. 🌡️
Store leftovers in an airtight container between layers of parchment paper to maintain moisture. I like using glass containers (like the ones from Target’s Good & Gather line) because they keep the fudge fresh longer.
At room temperature, it stays perfect for up to 1 week—though I’ve never had any last that long in my house! The flavor actually deepens over time, so make extra for gifting.
Fridge Secrets
For a restaurant-quality finish, chill the pan in the fridge for 2 hours before cutting. This extra step ensures clean, sharp edges when sliced.
I use a sharp chef’s knife (like my Mercer Culinary Genius) dipped in hot water between cuts—this prevents the fudge from sticking and gives you those professional-looking squares. The fridge also helps if you’re making this ahead for a party. ✨
Once cut, store individual squares in a single layer in the fridge for up to 2 weeks. For longer storage, wrap each piece in parchment paper and place in a ziplock bag—this prevents freezer burn and keeps them fresh.
The texture stays firm but still melts beautifully in your mouth. Pro tip: Let squares sit at room temperature for 5-10 minutes before serving to soften slightly.
Freezer Magic
This fudge freezes beautifully for up to 3 months—perfect for holiday gifting! I use quart-sized freezer bags (like the Ziploc brand) because they’re stackable and prevent freezer burn.
Leave 1 inch of headspace for expansion, and squeeze out all the air before sealing. Label with the date so you don’t forget this treasure! 🧊
To thaw, transfer the bag to the fridge overnight. The fudge will soften perfectly without losing its texture. If you’re in a hurry, let it sit at room temperature for 1-2 hours—just don’t microwave it, as this can make it grainy.
The freezer actually enhances the flavor, making it even more intense when you’re ready to enjoy it. I’ve given away fudge made this way as gifts, and it’s always a hit!
Reheating Tips
If you’ve stored your fudge in the fridge and want to serve it at room temperature, let it sit for 30-45 minutes. For a quick fix, I place the container in a bowl of warm water (like a double boiler) for 10-15 minutes—this gently warms it without melting.
Never microwave, as this can create a grainy texture and dull the rich chocolate flavor. 🔥
For a luxury touch, dust with unsweetened cocoa powder or drizzle with melted dark chocolate before serving. I also like adding a sprinkle of flaky sea salt (like Maldon) to enhance the sweetness.
The reheating process should bring it back to that perfect, velvety consistency—just like when you first made it. Trust me, your taste buds will thank you!
Nutrition facts
Frequently asked questions
Why does my fudge crack when it sets?
Cracking happens when the fudge cools too quickly or isn’t properly rested. Always let it set at room temperature for 4-6 hours before cutting—this slow cooling prevents stress fractures. Also, make sure your pan is lined with parchment paper (not wax paper) to allow even heat distribution. If your kitchen is warm, reduce setting time to 3 hours but no less!
Can I substitute corn syrup with something else?
Yes, but with caution! Honey or maple syrup work in a pinch (use 1:1 ratio), but they add moisture that can make the fudge softer. For best results, stick with light corn syrup—it prevents sugar crystallization and maintains that signature fudge snap. If using honey, reduce other liquids by 1 tablespoon to balance texture.
How do I make this fudge nut-free?
Simply omit the pecans entirely! The recipe works beautifully without them—just stir in the vanilla and espresso powder directly after removing from heat. For extra richness, consider adding 1/4 cup cocoa powder when combining ingredients. The texture will remain ultra-smooth and crack-free, just without the nutty crunch.
Is this fudge vegan-friendly?
Not traditionally, but with simple swaps! Replace the butter with vegan butter or coconut oil (use 1:1 ratio), and swap heavy cream for full-fat coconut milk. For chocolate, use dairy-free dark chocolate bars (like Enjoy Life brand). The texture will be slightly different but still delicious—just expect it to set a bit softer. The corn syrup remains vegan-friendly.
Why does my fudge taste bitter?
Bitterness usually comes from using low-quality chocolate or overheating. Always use 70% cocoa or higher dark chocolate (Valrhona or Guittard preferred) and never exceed 115°F during cooking. If it’s still bitter, you may have added too much espresso powder—reduce to 1/2 teaspoon next time. The corn syrup helps balance flavors, so ensure you’re using the full 1/2 cup.

- 12 Bean Chili Recipe: Hearty Slow-Cooked Depth With 12 Legumes - October 17, 2026
- 5 Seed Bread Recipe: Nutty Crunch and Artisan Flavor in One Loaf - October 17, 2026
- 1 Lb Macaroni Salad Recipe: Bold, Crunchy, and Crowd-Pleasing - October 17, 2026