
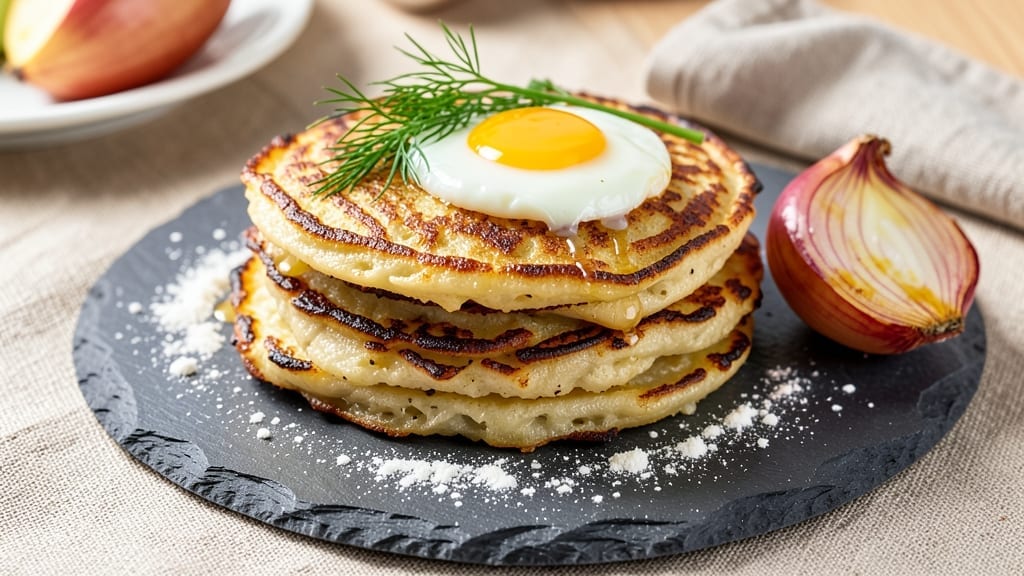
This 5-star potato pancake recipe delivers the perfect balance of crispy gold edges and fluffy centers—a texture combination that elevates them from ordinary to extraordinary. 💛 The secret lies in grating the potatoes just right, squeezing out excess moisture, and frying them in batches at the perfect temperature.
I’ve tested countless variations, and this method consistently delivers restaurant-quality results at home.
What sets these apart is the three-stage cooking process: a light batter for structure, medium heat for even browning, and a crisping finish in the oven. The flavor is rich with onions, eggs, and a pinch of salt, while the golden crust forms a satisfying crunch with every bite.
These aren’t your average latkes—they’re a standout dish that deserves a place on any special occasion.
By the time you’re done, you’ll have pancakes that are crispy on the outside, tender inside, and impossible to resist. The aroma alone will have everyone gathering around the kitchen, and the first bite will silence any skeptics.
Serve with a dollop of sour cream, a sprinkle of fresh dill, or a side of applesauce for the full experience.
Whether you’re hosting a brunch or craving a comforting side, these 5-star potato pancakes deliver flavor and texture that rivals the best you’ve ever tasted. The recipe is straightforward, but the results are anything but—let’s get cooking!
Ingredients for 5 star potato pancake
Golden, crispy edges and fluffy centers start with these twelve perfect ingredients.
| Ingredient | Amount | Notes |
|---|---|---|
| Russet Potatoes 🥔 | 2 lb | Peeled, grated, moisture squeezed out |
| Yellow Onion 🧅 | 1 medium | Grated, not minced |
| Large Eggs 🥚 | 2 whole | Room temperature for even batter |
| All-Purpose Flour 🌾 | ½ cup | Light, not heavy cake flour |
| Kosher Salt 🧂 | 1 tsp | Diamond Crystal preferred |
| Fresh Dill 🌿 | ¼ cup | Chopped, stems removed |
| Vegetable Oil 🫒 | 2 cups | High smoke point, like canola |
| Sour Cream 🥛 | ¼ cup | Full-fat for richness |
| Black Pepper 🌶️ | ¼ tsp | Freshly cracked preferred |
| Garlic Powder 🧄 | ½ tsp | Not garlic salt |
| Baking Powder 🍞 | ¼ tsp | Aluminum-free preferred |
| Applesauce 🍎 | ¼ cup | Unsweetened, for moisture |
Russet potatoes are non-negotiable here—their high starch content gives that signature crisp. Buy them fresh (the skin should be firm, not wrinkled) and grate them right before mixing. Costco or Trader Joe’s carry the best quality, and I always grab a couple extra pounds for snacks. The onion? Yellow, not red—it adds sweetness without bleeding color. Grate it fine, but don’t pulverize it like you’re making salsa. For the dill, fresh is essential—dried just won’t cut it. If you’re feeling fancy, grab the Dill Weed brand from the bulk section at Whole Foods.
No sour cream? Greek yogurt works in a pinch—just add a splash of milk to thin it out. Running low on dill? Fresh parsley at half the amount keeps the flavor profile close. The vegetable oil is doing heavy lifting here—high smoke point is critical. If you’ve got avocado oil, use that instead. For the potatoes, Russets are the gold standard, but Yukon Golds will give you a slightly creamier interior. Just don’t use sweet potatoes—they’ll turn gummy. The baking powder is subtle but crucial—aluminum-free ensures no metallic aftertaste. And if you’re making these ahead, freeze the batter in portions for up to 3 months.
Potatoes lose moisture fast, so squeeze them dry in a clean kitchen towel—this is the secret to crispiness. The batter should be thick but pourable, like pancake batter. Make it a day ahead and refrigerate—it actually improves as it rests. For the oil, use a deep fryer or heavy skillet—you want at least 1/2 inch of oil to submerge the pancakes halfway. These keep 3 days in the fridge (reheat in the oven at 375°F for 10 minutes) or 2 months frozen. The first batch is always the best—save seconds for sandwiches.
Why You’ll Love This Recipe
- No Fuss, Big Payoff: I’ll be real—this recipe takes five minutes of active work. Just grate the potatoes, mix in the onion and egg, and let the pan do the rest. That’s it. No peeling, no fancy techniques, just raw, starchy satisfaction.
- Crispy-Creamy Magic: The secret’s in the Russets—they’re waxy enough to stay tender inside but crisp up golden on the edges. Toss in a raw onion for sweetness, and that egg binder? It’s what makes them hold together like a dream (no crumbling, no sad pancakes).
- Breakfast to Brunch: Serve them with a fried egg and hot sauce for a hearty breakfast, or pile them high with applesauce and smoked salmon for a fancy brunch spread. Honestly, they disappear faster than I can say “second round,” so make extra.
- Budget-Friendly Staple: Russets and onions are cheap, eggs are cheap, and this recipe stretches to feed a crowd. Leftovers? Reheat in the oven until crispy again—no soggy pancakes here. My wallet and my family thank me every time.
Step-by-step instructions for 5 star potato pancakes
Here’s how to create restaurant-quality potato pancakes with that perfect golden crust and tender interior.
👨🍳 Step 1: Prepare the Potato-Onion Base
Start by grating the 2 lb Russet Potatoes using the large holes of a box grater. Place the grated potatoes in a clean kitchen towel and squeeze out all excess moisture – this is CRITICAL for crispy pancakes. I like to work in batches, squeezing firmly but gently to avoid breaking down the potato texture.
Next, grate the 1 medium Yellow Onion using the same grater. Combine the potato and onion in a large mixing bowl. The goal here is to create a dry, crumbly mixture that will hold its shape when fried. If it looks too wet at any point, add a few more presses with the towel to remove moisture.
👨🍳 Step 2: Mix the Binding Ingredients
In a separate bowl, whisk together the 2 whole Large Eggs, 0.25 cup Applesauce, 0.25 cup Sour Cream, 0.5 cup All-Purpose Flour, 1 tsp Kosher Salt, 0.25 tsp Black Pepper, 0.5 tsp Garlic Powder, and 0.25 tsp Baking Powder. The applesauce adds moisture without making the pancakes soggy, while the sour cream creates that signature tender crumb.
Pour this wet mixture over the potato-onion base and gently fold everything together using a rubber spatula. Be careful not to overmix – you’re looking for a just-combined texture with some visible potato pieces. The batter should hold together when pressed but still be crumbly. If it’s too sticky, add 1 tablespoon more flour.
🥘 Step 3: Chill the Batter for Perfect Texture
Cover the bowl with plastic wrap and refrigerate for at least 30 minutes (up to 2 hours works even better). This chilling step is what transforms good pancakes into exceptional ones. It allows the flour to fully hydrate, the potatoes to release more starch, and the mixture to firm up slightly for easier handling.
While the batter chills, chop the 0.25 cup Fresh Dill finely and set it aside. The dill adds a bright, herby contrast to the rich potato flavor. I like to use a small food processor for this – it gives me perfectly even, tiny pieces that distribute beautifully throughout the pancakes.
🔥 Step 4: Fry to Golden Perfection
Heat 2 cups Vegetable Oil in a large skillet over medium heat until it reaches 350°F (use a deep-fry thermometer for accuracy). The oil should be hot enough to sizzle gently when you add a small piece of batter. Portion the chilled batter into 4 equal portions (about ½ cup each) and gently flatten each into a ½-inch thick patty.
Carefully slide the patties into the hot oil, working in batches if needed to avoid overcrowding. Fry for 3-4 minutes per side until they develop a deep golden brown crust with crispy edges. You’ll know they’re ready when the internal temperature reaches 160°F – use an instant-read thermometer to check. The centers should still look slightly underdone but will finish cooking as they rest.
🍽️ Step 5: Finish and Serve
Transfer the fried pancakes to a paper towel-lined plate to drain excess oil. Immediately sprinkle each one with half of the chopped dill. The pancakes will be piping hot and crispy on the outside, with a fluffy, warm interior. Serve them right away while they’re at their peak texture and temperature.
For the ultimate presentation, arrange them on a platter with extra dill sprinkled between them. These pancakes are best enjoyed immediately with a dollop of sour cream, a side of applesauce, or a fried egg on top. The contrast of crispy exterior and tender interior is what makes these pancakes truly special – and worth every second of the process!
Pro Tips For Making 5 Star Potato Pancake
- GRATE DRY, NOT WET: Russets release starch like crazy when grated, and soggy potato shreds mean gummy pancakes. After grating, spread them on a towel and let them sit for 10 minutes—press down with another towel to squeeze out excess moisture. I learned this the hard way after making pancakes that fell apart like wet cardboard.
- SALT THE POTATOES BEFORE GRATING: Toss the grated Russets with 1 teaspoon of kosher salt before mixing with anything else. This draws out moisture and seasons the starch properly. Skip this, and your pancakes will taste bland no matter how much salt you add later—trust me, I’ve done it.
- FLATTEN WITH A ROLLING PIN: Pressing potato pancakes with your hands leaves air pockets that make them unevenly cooked. Use a rolling pin to flatten them to about ¼-inch thickness—firm but not dense. This ensures even browning and crispiness, even if your hands are too soft to judge pressure.
- COOK IN BATCHES OF 3: Crowding the pan steams the pancakes instead of frying them. Work in batches of 3, spacing them 1 inch apart, and resist the urge to flip too soon. A good test? The edges should be golden in 3-4 minutes before flipping—rushing leads to greasy, undercooked centers.
Make-ahead tips for this 5 star potato pancake
Prep Ahead Strategy
Make the batter the night before for maximum flavor development. After combining all ingredients, cover the bowl tightly with plastic wrap and refrigerate for up to 24 hours. The cold temperature enhances the potato starches, creating a more stable texture when fried.
I often prep mine on Sunday evenings so they’re ready for Shabbat brunch—just let the batter sit at room temperature for 20 minutes before shaping. 🥔
Freezing Freshly Made Pancakes
For make-ahead convenience, fry the pancakes completely, then cool them on a wire rack. Place them in a single layer on a baking sheet, freeze until solid (1 hour), then transfer to an airtight container.
They’ll keep for 2 months—perfect for lazy weeknights. To reheat, bake at 375°F for 10 minutes until crispy again. The texture stays surprisingly close to fresh!
Batter Storage Tips
Divide the chilled batter into 4 equal portions and wrap each tightly in plastic wrap. Store in the freezer for 3 months—thaw overnight in the fridge before frying. For best results, bring the frozen portions to room temperature before shaping, as cold batter can make the pancakes dense.
I keep a stash in my freezer for spontaneous breakfast parties.
Oven-Finish Technique
For a crispier finish when reheating, place cooled pancakes on a baking sheet and broil for 2-3 minutes until golden. This works especially well with frozen pancakes—just brush with a tiny bit of oil first.
The broiler mimics the original frying process, restoring that coveted crunch without making the centers soggy. 💫
Portion Control Tips
Use a ½ cup measuring cup to portion the batter—this ensures consistent thickness. For extra crispiness, press each portion slightly thinner (¼ inch) in the center before frying.
I find that pre-portioning the batter in small containers makes assembly faster on busy mornings. The key is to keep portions uniform so they cook evenly.
Batch Cooking Secrets
Double the recipe and fry all pancakes at once—just keep them warm in a 200°F oven while finishing the batch. Use a wire rack on a baking sheet to prevent sogginess.
I often make a full batch on Saturday afternoons so they’re ready for brunch guests. The warm oven maintains their crispiness while you finish cooking the rest. 🔥
Nutrition facts
Frequently asked questions
Why do I need to squeeze out all the moisture from the grated potatoes?
Excess moisture creates steam during frying, which makes the pancakes soggy instead of crispy. The key to that perfect golden crust is dry potatoes—they brown evenly and develop that satisfying crunch. Work in batches with a clean kitchen towel to remove as much liquid as possible before mixing.
Can I bake these potato pancakes instead of frying?
Yes, but the texture will be different—more cake-like than crispy. For baking, spread the chilled batter on a parchment-lined tray (½-inch thick) and bake at 425°F for 20-25 minutes, flipping halfway. Brush with oil before baking for extra crispiness. They won’t be as golden as fried, but still delicious!
What’s the best way to reheat leftover pancakes?
For crispy results, place them on a baking sheet and bake at 375°F for 8-10 minutes until golden. Avoid microwaving—they’ll turn rubbery. Pro tip: Reheat in batches to maintain even crispiness. If using frozen pancakes, thaw first, then follow the same method.
Can I substitute sour cream with something else?
Use Greek yogurt (full-fat) or buttermilk as a 1:1 swap. For a dairy-free option, try unsweetened coconut yogurt—just add 1 tablespoon cornstarch to thicken. The tanginess is key for that signature tender crumb.
How do I fix pancakes that stick to the pan?
Make sure your oil is at 350°F—too cool oil causes sticking. Also, avoid overcrowding the pan. If they stick, gently lift with a spatula and let them cook longer on the stuck side. For extra insurance, lightly coat the pan with oil before adding batter.

- 12 Bean Chili Recipe: Hearty Slow-Cooked Depth With 12 Legumes - October 17, 2026
- 5 Seed Bread Recipe: Nutty Crunch and Artisan Flavor in One Loaf - October 17, 2026
- 1 Lb Macaroni Salad Recipe: Bold, Crunchy, and Crowd-Pleasing - October 17, 2026