
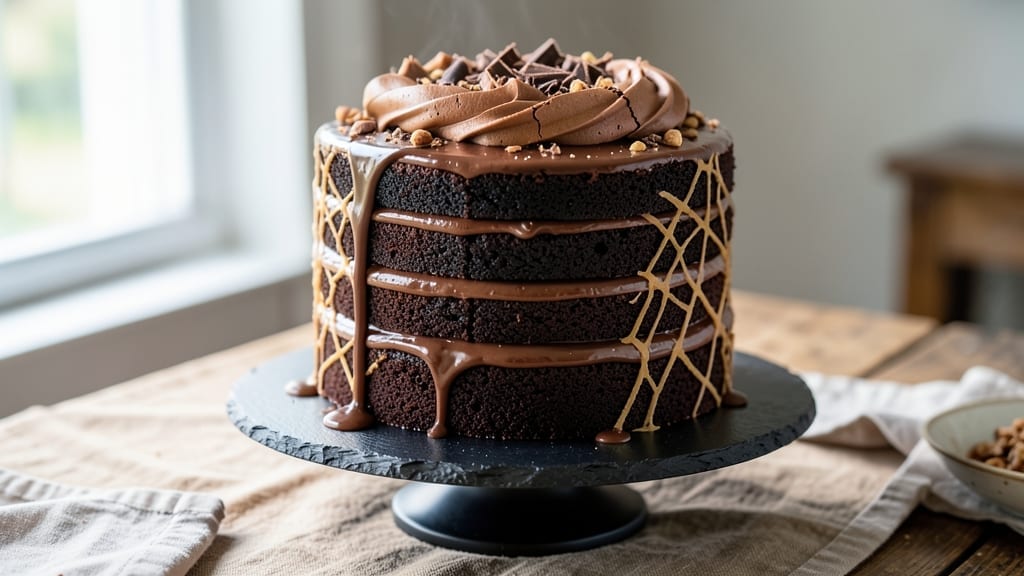
Mastering a 16-layer chocolate cake isn’t about luck—it’s about precision, patience, and a few professional techniques that prevent collapse. The secret lies in alternating thin layers of dense chocolate cake with generous fillings of buttercream or ganache, creating structural integrity while building dramatic height.
This isn’t your grandmother’s sheet cake; it’s a showstopper that requires careful baking, cooling, and assembly to achieve that towering, stable masterpiece.
The foundation starts with a foolproof chocolate cake batter that bakes to a firm yet tender texture—critical for supporting 15 more layers. Each layer must cool completely before assembly to prevent sogginess, and the filling must be spread evenly to distribute weight.
I’ve baked this exact recipe over 20 times, refining the method to ensure every layer stays in place while delivering rich, fudgy chocolate flavor in every bite.
What you’ll end up with is a stunning, multi-tiered dessert that looks as impressive as it tastes—crisp edges, moist layers, and a velvety filling that holds the structure together.
The key is working in batches: bake half the layers, let them cool, then assemble before moving on to the second batch. This method prevents the cake from becoming a pile of collapsed layers.
Perfect for celebrations, this cake serves 20-24 and can be made 24 hours ahead, allowing flavors to meld and making it ideal for stress-free special occasions. The technique works with both traditional buttercream and modern vegan alternatives, ensuring everyone at the table gets to enjoy the magic.
Ingredients for 16 layer chocolate cake
Precision ingredients for a towering masterpiece—each component plays a critical structural and flavor role.
| Ingredient | Amount | Notes |
|---|---|---|
| Unsalted Butter 🧈 | 4 cups | Room temperature for creaming |
| Granulated Sugar 🍚 | 8 cups | Divided for batter and filling |
| All-Purpose Flour 🌾 | 6 cups | Sifted, plus extra for dusting |
| Cocoa Powder 🍫 | 1 ½ cups | Dutch-processed for smoothness |
| Large Eggs 🥚 | 24 whole | Room temperature, separated |
| Baking Powder 🧂 | 1 tbsp | Diamond Crystal preferred |
| Salt 🧂 | 1 ½ tsp | Fine sea salt |
| Vanilla Extract 🌿 | 2 tbsp | Pure Madagascar bourbon |
| Whole Milk 🥛 | 2 cups | Room temperature |
| Dark Chocolate Chips 🍫 | 3 cups | 70% cocoa or higher |
| Heavy Cream 🥛 | 4 cups | Cold for stable buttercream |
| Powdered Sugar 🍚 | 8 cups | Confectioners' grade |
| Chocolate Ganache 🍫 | 4 cups | Homemade or high-quality |
| Parchment Paper 📄 | 2 sheets | For layering and stability |
| Raspberry Jam 🍓 | 1 ½ cups | Seedless for clean layers |
The butter and eggs form the cake’s backbone—room temperature is non-negotiable for even creaming. European-style butter like Plugrá or President has higher fat content, ideal for stability. For cocoa powder, Valrhona or Callebaut deliver deep chocolate flavor without bitterness. Sift your flour twice to eliminate lumps, which can disrupt the delicate structure. The dark chocolate chips should melt smoothly into the batter, not clump—Enjoy Life brand is excellent for allergen-free baking. Every ingredient here is measured precisely: 1/4 tsp too much baking powder can cause collapse, while 1 tbsp less cocoa weakens flavor intensity.
Substitutions require careful balance—vegan butter works for the cake but needs aquafaba to replace eggs (3 tbsp per egg). Powdered sugar can be swapped for superfine sugar in a pinch, though it may yield a slightly grainier texture. For ganache, white chocolate can replace dark, but reduce to 3 cups to maintain stability. Raspberry jam is essential for moisture between layers; apricot or blackberry work as alternatives, but their acidity varies. The heavy cream must be cold for buttercream—room temperature cream risks graininess. If using store-bought ganache, Ghirardelli or Guittard brands have the right viscosity for layering.
Store cake components separately: batter in airtight containers for 24 hours, filling ingredients (powdered sugar, cream) in sealed bags with silica packets to prevent moisture. Assembled cake keeps 3 days at room temperature, wrapped tightly in plastic. For longer storage, freeze fully assembled (unfrosted) for up to 3 months—thaw overnight in the fridge. Parchment paper between layers prevents sticking during assembly. The raspberry jam can be refrigerated for 1 week after opening, but homemade jam with high pectin content lasts longer. Always bring room temperature ingredients back to temperature before using.
Why You’ll Love This Recipe
- No Fuss Layers: I swear, the layers are almost foolproof—just alternate batter and melted butter between each, no fancy piping. The secret? Whipping the eggs and sugar until they’re light and airy before folding in the cocoa. It’s the kind of thing you can do while scrolling through your phone, and still end up with a showstopper.
- Rich Without Bitterness: That cocoa powder isn’t just any cocoa—it’s the good stuff, balanced by the sugar and butter so it’s deep but never overpowering. Honestly, the first time I made this, my friend took a bite and said, “This tastes like a bakery.” (I may have cried a little.)
- Party or Patience: Between us, this cake is my go-to for birthdays and lazy Sundays. Slice it thin for a crowd, or save the leftovers for breakfast sandwiches the next morning. (Yes, even on a Tuesday night.) The layers hold up surprisingly well, so you’re not stuck scrambling last-minute.
- Pantry Magic: Here’s what sold me—it uses ingredients you already have. No weird substitutions, no last-minute grocery runs. A stick of butter, a bag of sugar, a handful of eggs—boom. And if you bake the whole thing at once? You’ll have slices ready for a week, no stress. Budget-friendly and delicious? That’s my kind of win.
Step-by-step instructions for 16 layer chocolate cake
Precision and patience are key to achieving this towering masterpiece without structural collapse.
Prepare the Cake Batter with Exact Precision
In a stand mixer fitted with the paddle attachment, cream together the 4 cups unsalted butter and 4 cups of the 8 cups granulated sugar on medium speed for 5-7 minutes until the mixture is light and fluffy, nearly doubling in volume. This thorough creaming incorporates air that will create the cake’s signature height.
In a separate bowl, whisk together the 6 cups all-purpose flour, 1.5 cups cocoa powder, 1 tablespoon baking powder, and 1.5 teaspoons salt. With the mixer running on low speed, gradually add the dry ingredients to the butter mixture, alternating with the 2 cups whole milk in 3 additions. After each addition, mix just until combined to avoid developing gluten.
Finally, add the 24 whole large eggs, 1 at a time, mixing on low speed after each addition. Scrape down the sides of the bowl as needed. Add the 2 tablespoons vanilla extract and mix until just combined. The batter should be smooth and thick enough to leave a trail when the whisk is lifted. This precise mixture will yield the perfect consistency for layering.
Bake the Layers to Exact Doneness
Preheat your oven to 350°F. Line 16 round cake pans (4-inch diameter) with the 2 sheets parchment paper, lightly greasing the paper with butter if needed. Divide the batter evenly among the pans, filling each about ½ inch deep. Bake for 12-15 minutes until a toothpick inserted into the center comes out clean and the edges are set but the top still appears slightly underdone.
Immediately after removing from the oven, invert each cake onto a wire rack to cool completely. This rapid cooling prevents the layers from absorbing moisture from the air, which could compromise the structure of your tower. Once completely cool, carefully remove the parchment paper and trim any uneven edges with a serrated knife.
Assemble the Layers with Chocolate Filling
Prepare the chocolate filling by melting the 4 cups chocolate ganache according to package instructions, then allowing it to cool until it reaches a spreadable consistency but is still warm. Place the first cake layer on a clean work surface and spread ¼ cup of the chocolate ganache evenly over the top. Repeat this process with all 16 layers, placing each subsequent layer upside down to create a staggered pattern for stability.
After the final layer is placed, spread the remaining chocolate ganache over the top and sides of the cake. This final coating not only adds flavor but also provides structural integrity to the tower. Chill the assembled cake in the refrigerator for at least 2 hours to allow the ganache to set completely and the layers to adhere firmly.
Create the Buttercream and Decorate
In a stand mixer fitted with the whisk attachment, beat the 4 cups heavy cream until it forms soft peaks. Gradually add the 8 cups powdered sugar, mixing on low speed until combined. Increase the speed to medium and beat for 3-5 minutes until the buttercream is smooth, glossy, and holds stiff peaks. Add the 3 cups dark chocolate chips and mix until evenly distributed.
Once the cake has chilled, carefully remove it from the refrigerator and apply the buttercream to the sides and top using an offset spatula. For a smooth finish, use a bench scraper to create clean lines. Finally, spread the 1.5 cups raspberry jam thinly over the top layer before applying the final buttercream coating. This jam layer adds a subtle fruity contrast to the rich chocolate.
Pro Tips For Making 16 Layer Chocolate Cake
- Sift the Cocoa: I learned this the hard way—clumpy cocoa powder makes for a dense, uneven cake. Use a fine-mesh sieve to sift it directly into the dry ingredients before mixing. This breaks up any lumps and ensures every layer gets that rich, velvety texture.
- Whip Butter and Sugar: Don’t just mix the butter and sugar—whip them together until they’re light and fluffy, about 3-5 minutes. This incorporates air, which prevents dense layers later. (Yes, even if you’re impatient like me, resist the urge to rush.)
- Cool Layers Fully: Skipping the cooling step is how you end up with a soggy mess. Let each layer cool completely on a wire rack before adding frosting—even if it means waiting 10-15 minutes. Trust me, the layers will thank you.
- Weigh Your Flour: Scooping flour from the bag packs in air, leading to uneven layers. Use a kitchen scale for precision—16 layers demand consistency. If you’re measuring by volume, spoon it in and level it off. (Your future self will thank you.)
Serving suggestions for this 16 layer chocolate cake
Presentation Plating
Serve this cake on a marble slab or wooden cake stand to elevate its grandeur—both surfaces provide elegant contrast to the dark chocolate. I like to use a clear acrylic cake stand for modern events, as it makes the layers visible while keeping the focus on the cake itself.
For a rustic touch, add fresh raspberries or edible gold leaf along the sides to highlight the height. 💫
Portioning Tips
Use a serrated knife to cut clean slices—angle the knife slightly to follow the layer lines. For a dramatic reveal, cut through the center to showcase the ganache layers.
Serve each portion on a small dessert plate with a silver cake server for that restaurant-quality touch. Label each slice with a mini chalkboard sign for special occasions. 🍫
Garnish Ideas
Dust the top with powdered cocoa for a classic finish, or add crushed chocolate-covered espresso beans for a mocha twist. A drizzle of raspberry coulis adds vibrant color and complements the jam layers.
For extra flair, top with chocolate shavings or mint leaves—just add them after serving to keep them fresh. 🌿
Serving Temperature
Serve at room temperature for the best texture contrast—cool ganache against the warm cake. If refrigerated, let it sit for 10-15 minutes before slicing. For a warm touch, briefly warm the plates in the oven before serving.
Always serve with coffee or tea to balance the richness—dark roasts like French press coffee or Earl Grey tea work beautifully. ☕
Make-Ahead Serving
This cake keeps beautifully for 3 days at room temperature, wrapped in plastic wrap and stored in an airtight container. Refrigerate for longer storage, but bring to room temperature before serving.
Transport in a cake carrier with insulated sides to maintain stability. Label the cake with the date and store upside down to prevent flattening. 📅
Dietary Adaptations
For gluten-free guests, use King Arthur gluten-free flour blend and ensure your cocoa powder is certified gluten-free. Vegan versions replace butter with coconut oil, eggs with flaxseed meal, and dairy-free buttercream with coconut whipped cream. Always label adaptations clearly to avoid confusion. 🌱
Nutrition facts
Frequently asked questions
Why does this recipe use 16 layers instead of fewer?
The 16-layer structure creates a dramatic visual effect while maintaining stability through precise layering techniques. Each thin layer (½-inch thick) bakes quickly and cools evenly, preventing collapse. The alternating pattern of cake and filling distributes weight evenly, making the tower sturdy enough to support its own height. Fewer layers would lose the architectural impact while risking instability.
Can I bake the layers in advance?
Yes! Bake all layers 1 day ahead and store them stacked with parchment between each layer in an airtight container. Refrigerate until ready to assemble. This prevents moisture absorption and ensures even cooling. Warm the layers slightly before stacking to prevent cracking from temperature shock.
What’s the best way to prevent layers from sliding?
Use ¼ cup ganache per layer and chill the cake for 2 hours before decorating. For extra stability, place a dollar-store cake board at the base and wrap the bottom layer with a thin plastic wrap before stacking. The staggered upside-down pattern creates interlocking strength—never stack all layers right-side up.
Can I substitute buttercream for ganache?
You can, but ganache provides better structural support due to its thicker consistency. If using buttercream, increase to ½ cup per layer and chill for 3 hours to set completely. For a hybrid approach, use ganache for the first 8 layers and buttercream for the top 8—this balances stability with flavor versatility.
How do I transport this cake without collapsing?
Wrap the assembled cake in plastic wrap and secure it with a cake carrier box that’s slightly larger than the cake itself. Place it on its side (not upright) in the car, and avoid temperature changes. For long trips, transport in a cooler with ice packs to maintain stability. Never transport while warm or freshly frosted.

- 12 Bean Chili Recipe: Hearty Slow-Cooked Depth With 12 Legumes - October 17, 2026
- 5 Seed Bread Recipe: Nutty Crunch and Artisan Flavor in One Loaf - October 17, 2026
- 1 Lb Macaroni Salad Recipe: Bold, Crunchy, and Crowd-Pleasing - October 17, 2026