
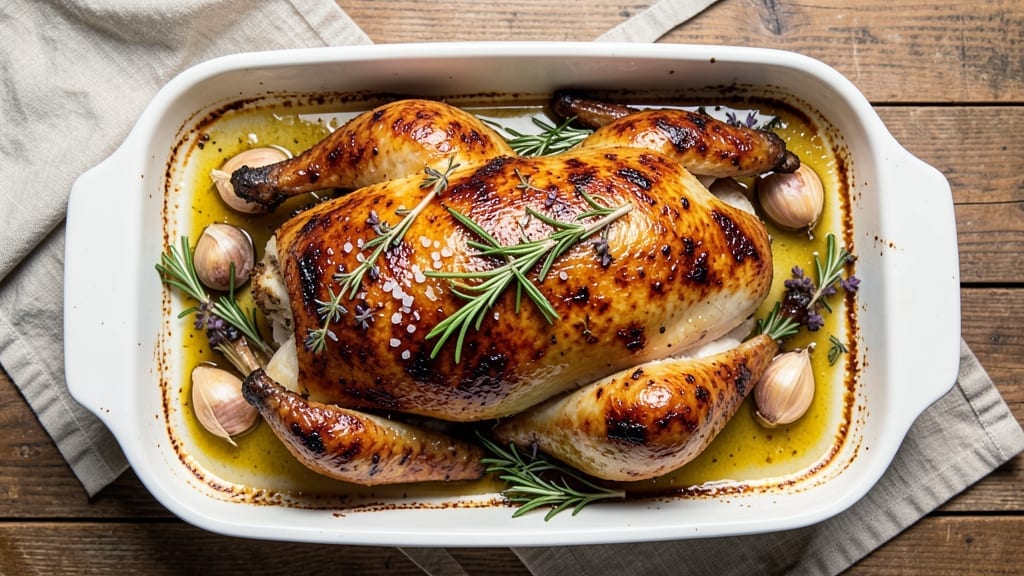
A 5-star roasted chicken isn’t just about flavor—it’s about juicy, perfectly golden skin that shatters with heat while keeping the meat tender and rich. This recipe delivers restaurant-quality results at home, using a high-heat technique and simple ingredients to transform a basic bird into something extraordinary.
The secret lies in the crispy skin, achieved through careful temperature control and a dry-brine method that ensures moisture stays locked inside.
What sets this recipe apart is the balance of texture and flavor—crispy, caramelized skin that gives way to succulent meat, all infused with aromatic herbs and garlic.
Unlike many recipes that rely on butter or marinades, this method focuses on dry heat and precision timing, resulting in a chicken that’s as impressive to serve as it is delicious to eat. The oven temperature stays steady at 425°F, ensuring even cooking without drying out the meat.
By the time you pull this chicken from the oven, you’ll have a golden, shatteringly crisp exterior and juicy, evenly cooked meat that falls apart at the bone.
The aroma alone will have everyone gathered at the table, and the presentation—with its glossy skin and tempting sheen—makes it feel like a special occasion dish. Serve with classic sides like roasted vegetables or a fresh herb salad to complete the meal.
This isn’t just another roasted chicken recipe—it’s a foolproof method that guarantees results worthy of a five-star review. Whether you’re hosting a dinner party or simply treating yourself to a showstopping meal, this technique ensures success every time. Let’s get started on creating your perfect roasted chicken.
Ingredients for 5 star roasted chicken
Eleven essential ingredients transform a simple chicken into a showstopping centerpiece with crispy, shatteringly golden skin.
| Ingredient | Amount | Notes |
|---|---|---|
| Whole Chicken (3-4 lbs) 🍗 | 3 ½ lb | Freshly thawed, giblets removed |
| Kosher Salt (Diamond Crystal) 🧂 | 2 tbsp | Coarse grain for dry-brine |
| Fresh Rosemary 🌿 | ½ cup | Chopped sprigs, stems removed |
| Fresh Thyme 🌿 | ¼ cup | Leaves only, finely chopped |
| Garlic Cloves 🧄 | 6 cloves | Peeled, smashed lightly |
| Extra-Virgin Olive Oil 🫒 | 2 tbsp | High-quality, fruity variety |
| Black Peppercorns 🌶️ | 1 tsp | Freshly cracked preferred |
| Lemon Zest 🍋 | 1 tbsp | Freshly grated, no pith |
| Unsalted Butter 🧈 | 2 tbsp | Cold, cubed for finishing |
| Fresh Parsley 🌿 | ¼ cup | Chopped, for garnish |
| Water (for dry-brine) 💧 | ½ cup | Room temperature |
The chicken is the star, so size matters. A 3-4 lb bird hits the sweet spot for juicy meat and crispy skin without overcooking. Look for a plump bird with firm, pale skin at Whole Foods or your local butcher—avoid those with yellowing or slimy patches. The herbs should be bright and fragrant: fresh rosemary and thyme from the grocery store’s produce section work, but farmers market bundles have more depth. For the olive oil, California brands like Corto or Lucini elevate the flavor—don’t skimp here. The butter? Plugrá or Land O’Lakes unsalted melts beautifully for finishing.
No fresh herbs? Dried rosemary and thyme at half the amount work in a pinch, but the flavor won’t be as vibrant. Substituting lemon zest? Orange zest works too, though it changes the profile slightly. For the olive oil, avocado oil is a neutral alternative if you’re avoiding olive oil. The butter can be swapped for vegetable shortening if you’re watching fat content, though the skin won’t be as crisp. If your chicken is pre-brined, reduce the kosher salt by half—but dry-brining is worth the extra hour for that perfect texture. The garlic can be roasted whole for mellow sweetness if you prefer.
Dry-brine the chicken overnight in the fridge—this step is non-negotiable for juicy meat. Pat dry thoroughly before roasting, even if it means using paper towels. The herbs and butter should be prepped right before finishing the chicken. Store any unused fresh herbs in damp paper towels in a sealed container for up to 5 days. Leftover roasted chicken reheats beautifully—4-5 days in the fridge or 3 months frozen. For presentation, transfer the chicken to a platter and garnish with parsley immediately after roasting—it wilts fast once cut.
Why You’ll Love This Recipe
- One-Pan Magic: I swear by this recipe because it’s literally one pan, one chicken, zero mess. The Diamond Crystal salt and garlic cloves infuse the skin so deeply, even the drippings taste like a flavor bomb—no extra bowls or pots to wash.
- Herb-Packed Perfection: Between us, the rosemary and thyme here aren’t just garnish—they’re the stars. The rosemary crisps into tiny, fragrant bits on the skin, while the thyme steeps into the meat like a warm hug. (Yes, even on a Tuesday night.)
- Leftovers That Shine: This chicken stays ridiculously good for days. Shred it for sandwiches, toss it into salads, or reheat slices straight from the fridge—the crispy edges soften just enough to taste like it was just roasted. No sad, dry leftovers here.
- Budget-Friendly Feast: A whole chicken for four people? That’s a steal. The kosher salt and fresh herbs might seem like small splurges, but they turn a basic bird into something special without breaking the bank. Honestly, I’ve spent more on takeout for two.
Step-by-step instructions for perfectly roasted chicken
Mastering this technique delivers restaurant-quality results with crisp skin and moist meat.
Prepare the Dry Brine
In a large bowl, combine the 3.5 lb whole chicken with all 2 tbsp kosher salt and the 0.5 cup water. This dry brine technique ensures even seasoning and prevents dryness by drawing moisture to the surface. Gently massage the salt into the skin, working it into crevices and the cavity. The salt will begin breaking down proteins immediately, creating a more tender texture.
Place the chicken breast-side up on a wire rack set inside a rimmed baking sheet. Cover loosely with plastic wrap and refrigerate for at least 12 hours, preferably 24. This extended dry-brine period allows the salt to penetrate deeply while keeping the skin dry for optimal browning. Real talk: Skipping this step results in bland, dry chicken—don’t rush it.
Season and Rest the Chicken
Remove the chicken from the refrigerator and let it sit at room temperature for 1 hour before roasting. This step is critical—cold chicken creates steam in the oven instead of crispy skin. While it rests, prepare the herb mixture by combining the 0.5 cup fresh rosemary, 0.25 cup fresh thyme, 6 smashed garlic cloves, 1 tbsp lemon zest, and 1 tsp cracked black peppercorns in a small bowl.
Rub this herb mixture all over the chicken, including inside the cavity. The lemon zest adds brightness that cuts through the richness, while the fresh herbs infuse flavor without overpowering. Don’t forget to tuck the wing tips under the body and tie the legs together with kitchen twine to ensure even cooking. This compact shape promotes better heat circulation.
Roast with Precision
Preheat your oven to 425°F with a rack positioned in the lower third. Place the chicken on the rack and roast for 1 hour 15 minutes, basting occasionally with the 2 tbsp extra-virgin olive oil. The high heat creates instant browning while the rack allows air to circulate underneath. You’ll know it’s developing properly when the skin turns golden brown and crispy.
After 1 hour 15 minutes, reduce the heat to 375°F and continue roasting for an additional 20-25 minutes until the internal temperature reaches 165°F in the thickest part of the thigh. The skin should be deep golden brown and crisp enough to shatter slightly when pressed. If the skin browns too quickly, tent loosely with foil to prevent burning while maintaining crispness.
Finish with Butter and Rest
Remove the chicken from the oven and transfer it to a cutting board. Immediately add the 2 tbsp cold unsalted butter to the roasting pan, tilting to coat the bottom evenly. Return the pan to the oven for 2-3 minutes to create a flavorful pan sauce. This butter basting adds richness and helps create a glossy finish.
Let the chicken rest for 15 minutes before carving. This resting period allows juices to redistribute throughout the meat, ensuring each slice remains moist. During this time, skim the butter from the pan (reserving it for drizzling) and whisk in 2 tbsp of the reserved pan juices. Garnish the chicken with the 0.25 cup chopped fresh parsley before serving.
Pro Tips For Making 5 Star Roasted Chicken
- CRANK THE HEAT FIRST: Start your chicken on the hottest rack in the oven—425°F or higher—for the first 20 minutes. I learned this the hard way after a pale, soggy bird ruined my dinner; high heat jumpstarts the crust while keeping the meat juicy inside. After that, drop to 375°F for even cooking.
- STUFF THE CAVITY RIGHT: Pack the chicken cavity with halved garlic cloves, 2 sprigs of rosemary, and 1 sprig of thyme—no loose herbs floating around. I used to just tuck them in loosely, and half the flavor ended up in the pan. Tight packing ensures every bite gets that herby punch.
- SALT THE CHICKEN 24 HOURS OUT: Season the whole chicken with 1 tablespoon of Diamond Crystal kosher salt (that’s about 2 teaspoons of table salt) and refrigerate uncovered overnight. Sounds weird, but it works: the salt breaks down the skin proteins for a crispier crust and deeper flavor penetration.
- DON’T PUNCTURE THE SKIN: Resist the urge to pierce the chicken skin with a knife—even for garlic or herbs. I was skeptical until I tried it: leaving the skin intact traps moisture and renders fat back into the meat, keeping it juicier. Just tuck everything under the skin near the legs instead.
Essential equipment for this recipe
Oven Essentials
Your oven is the heart of this recipe, so invest in a high-quality oven thermometer—I recommend the Thermoworks Oven Thermometer—to ensure accurate temperature control. Most home ovens run 25°F hotter or colder than set, and this chicken requires precise heat for perfect results.
Preheat for at least 30 minutes before roasting to eliminate hot spots. 🌡️
Wire Rack Must-Have
A wire rack is non-negotiable for crispy skin—it allows air circulation underneath the chicken, preventing soggy bottoms. I use a Vremi adjustable wire rack that fits most baking sheets.
Place it in the lower third of the oven to maximize browning from the broiler element. If you don’t have one, a perforated baking sheet works in a pinch.
Precision Thermometer
A meat thermometer is your best friend for foolproof results. I swear by the ThermoWorks Smoke for its instant-read accuracy. Insert the probe into the thickest part of the thigh—when it hits 165°F, your chicken is perfectly cooked.
Never guess: Overcooking ruins the texture, while undercooking risks foodborne issues. 💡
Butterflying for Speed
For larger chickens (5 lbs+), consider butterflying to reduce cooking time. Use a sharp boning knife and gently press along the backbone to flatten the bird.
This technique ensures even cooking and crispy skin on both sides. If you’re nervous about handling raw poultry, practice on a practice chicken from the grocery store first.
Kitchen Twine
Kitchen twine (like Butcher’s Twine) is a game-changer for even cooking. Tie the legs together to keep the chicken compact, preventing uneven browning. For extra security, tuck the wing tips under the body. This small step makes a huge difference in presentation and don’t forget to remove it before serving—guests will notice the professional finish. ✨
Basting Brush
A silicon baster brush (like the OXO Good Grips) is perfect for basting with olive oil and pan juices. Avoid metal brushes—they can scratch your baking sheet.
Baste every 15 minutes during the initial roast to build flavor and crispiness. Pro tip: Keep a small bowl of oil nearby for quick access while cooking. 🍋
Nutrition facts
Frequently asked questions
Why is dry-brining the chicken overnight so important?
The overnight dry-brine creates two magic things: juicy meat and crispy skin. The salt breaks down proteins on the surface, drawing moisture outward while keeping the interior tender. This method also ensures even seasoning throughout the bird. Skipping it often leads to bland, dry chicken—worth the extra time!
Can I use a frozen chicken for this recipe?
Fresh is best, but if you must use frozen, thaw it completely in the refrigerator (24 hours for a 3.5 lb bird). Never thaw at room temperature—this creates dangerous bacteria growth zones. Pat the skin completely dry before roasting, as any moisture will prevent crispiness.
What’s the secret to getting skin that shatters with heat?
The 425°F high-heat start creates instant browning while the wire rack allows air circulation underneath. Basting with olive oil every 15 minutes builds layers of crispiness. The key? Dry skin—pat it thoroughly after brining and avoid covering with foil until the last 10 minutes if needed.
How do I know when the chicken is fully cooked?
Use a meat thermometer—insert it into the thickest part of the thigh until it reaches 165°F. The skin should be deep golden brown and crisp enough to resist gentle pressure. If the juices run clear when pierced, it’s perfect. Never rely on color alone—dark meat can appear cooked while still being underdone.
What sides pair best with this 5-star roasted chicken?
Classic pairings include herb-roasted potatoes, garlic sautéed green beans, or a bright citrus salad. For a showstopper presentation, serve with crusty bread to soak up the pan juices. The lemon zest in the chicken also complements roasted carrots or asparagus beautifully.

- 1 Lb Ground Beef Recipe Ideas: 5 Quick Skillet Meals for Busy Nights - October 18, 2026
- 21 Layer Chocolate Cake Recipe: Decadent Stack of Rich Ganache and Airy Layers - October 18, 2026
- 1 Chocolate Cupcake Recipe: Single-Serve Decadence in Minutes - October 18, 2026