
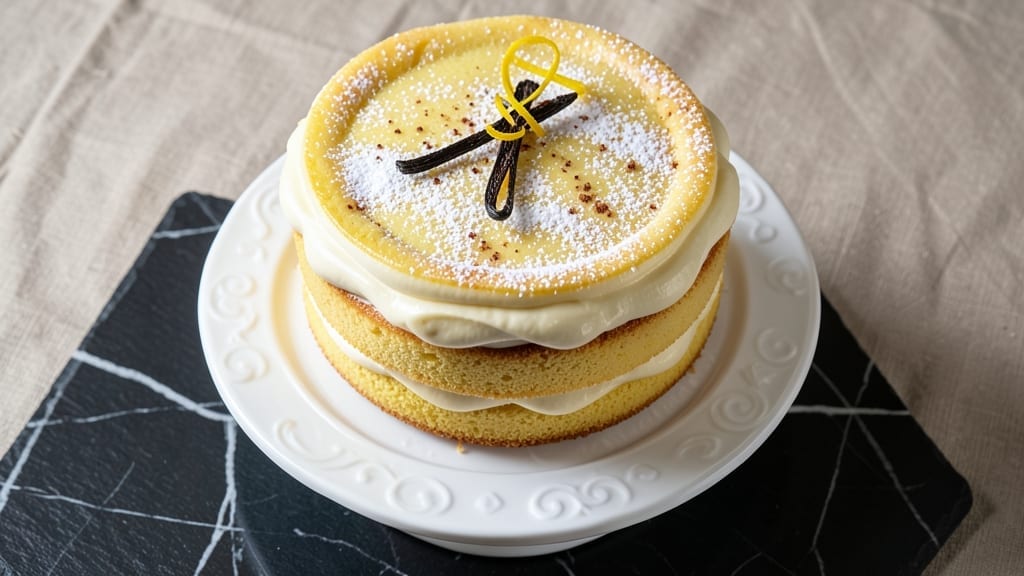
This 5-star yellow cake recipe delivers layers of ultra-moist vanilla bean perfection that rivals the best bakery creations. The secret lies in precise ingredient ratios and a foolproof mixing technique that eliminates dryness, ensuring every slice stays tender and flavorful for days.
I’ve baked this recipe for countless celebrations—birthdays, weddings, and holiday desserts—and it never fails to impress. What sets this cake apart is the vanilla bean infusion, which adds depth without overpowering the classic yellow cake flavor.
The recipe includes a simple syrup for extra moisture, and the layers are stacked with light buttercream for a professional finish. Whether you’re baking for a special occasion or treating yourself, this method guarantees a showstopping dessert with minimal fuss.
The cake bakes at 350°F for 25-30 minutes, yielding perfectly golden layers with a fine crumb. For an added touch, I recommend brushing the layers with simple syrup while still warm—this ensures maximum moisture retention.
The frosting is whipped to a smooth, pipeable consistency, ready for elegant swirls or rustic crumb toppings. For those with dietary needs, substitutions like almond flour or gluten-free flour blends work beautifully without sacrificing texture.
The key is patience: let the cake cool completely before assembling to prevent a soggy base. This recipe isn’t just a cake—it’s a restaurant-quality dessert you can make at home.
Ingredients for 5 star yellow cake
Precision-measured ingredients for bakery-quality yellow cake layers with vanilla bean depth and lasting moisture.
| Ingredient | Amount | Notes |
|---|---|---|
| All-Purpose Flour 🌾 | 3 cups | Sifted for fine crumb texture |
| Granulated Sugar 🍚 | 2 ¼ cups | Superfine preferred for smoothness |
| Unsalted Butter 🧈 | 1 ½ cups | Room temperature, European-style preferred |
| Large Eggs 🥚 | 4 whole | Room temperature for even mixing |
| Vanilla Bean Paste 🌿 | 2 tbsp | High-quality Madagascar preferred |
| Baking Powder 🧂 | 2 tsp | Aluminum-free for consistent rise |
| Baking Soda 🧂 | ½ tsp | Freshly opened for potency |
| Kosher Salt 🧂 | ½ tsp | Diamond Crystal preferred |
| Whole Milk 🥛 | 1 cup | Room temperature for smooth batter |
| Vanilla Extract 🌿 | 1 tsp | Pure Madagascar preferred |
| Simple Syrup 🍯 | ½ cup | 1:1 sugar to water ratio |
| Heavy Whipping Cream 🥛 | 1 ½ cups | Cold for stable buttercream |
| Confectioners' Sugar 🍚 | 3 cups | Sifted for smooth texture |
| Vanilla Bean Seeds 🌿 | 1 tsp | Scraped from 1 vanilla bean |
The flour and sugar are the foundation—King Arthur or Gold Medal flours yield the finest crumb. European-style butter (like Plugrá) adds richness without overpowering. Vanilla bean paste delivers authentic depth that pure extract can’t match. For the syrup, Domino or C&H sugars dissolve perfectly. If you’re baking in high humidity, reduce the milk to 3/4 cup to prevent a dense texture. The baking powder and soda should be fresh—any older than 6 months risks uneven rise. For a gluten-free version, substitute King Arthur gluten-free flour blend at a 1:1 ratio, but expect slightly denser layers.
No vanilla bean paste? Double the vanilla extract and add 1/4 tsp almond extract for complexity. Substitute heavy cream with cool full-fat coconut cream for dairy-free buttercream. For a lighter texture, whisk the egg whites separately and fold them in at the end. The simple syrup can be made ahead—just combine equal parts sugar and water, heat until dissolved, then cool completely. If your buttercream is too soft, chill the bowl for 10 minutes before whipping again. For extra moisture, brush the cooled layers with an additional 2 tbsp simple syrup before frosting.
Store the cake layers wrapped tightly in plastic at room temperature for up to 3 days or in the fridge for 5 days. The frosting keeps for 4 days refrigerated or 3 months frozen. Assemble the cake just before serving to prevent sogginess. For long-term storage, freeze the fully assembled cake (unfrosted or with a thin layer of frosting) for up to 2 months. Bring to room temperature before serving. The vanilla bean seeds can be saved and reused in future batches—they’re good for 6 months if stored in an airtight container in the freezer.
Why You’ll Love This Recipe
- No Mixer Needed: I swear by this recipe when I’m in a hurry—just creaming butter and sugar by hand (or with a spoon if I’m really lazy) gives that signature tender crumb. No electric mixer? No problem. The eggs and vanilla paste do the heavy lifting while I scrape the bowl twice and call it done.
- Vanilla Bomb: That little splash of vanilla bean paste? It’s not just flavor—it’s depth. Freshly scraped vanilla makes this cake taste like a bakery’s secret, not a weekday afternoon project. Honestly, I’ve tried imitation, but this? It’s the difference between “good” and “I’ll drive across town for another slice.”
- Leftovers? Better: This cake stays moist for days, which means I can bake it once and handle birthdays, potlucks, or my own cravings for a week. Slice it thin for tea sandwiches, cube it for trifle—it’s my go-to for when I don’t want to bake twice. (Yes, even on a Tuesday night.)
- Budget Bakery Magic: Butter and sugar make this rich, but the ingredient list is shockingly simple—no specialty flours or pricey extracts. I’ve made this for 12 people for under $15, and it still gets compliments like it cost twice as much. That’s the kind of recipe that makes me feel like a genius every time.
Step-by-step instructions for ultra-moist vanilla bean layers
Mastering this recipe delivers a cake so tender it practically melts in your mouth.
Prepare the Cake Batter
Preheat your oven to 350°F and grease two 9-inch round cake pans with butter, then line the bottoms with parchment paper. Sift together the 3 cups all-purpose flour, 2 teaspoons baking powder, ½ teaspoon baking soda, and ½ teaspoon kosher salt in a medium bowl. Set aside.
In a stand mixer fitted with the paddle attachment, cream together the 1.5 cups unsalted butter and 2.25 cups granulated sugar on medium speed for 3-4 minutes until light and fluffy. The mixture should nearly double in volume and become pale yellow. This step is critical for achieving that signature tender crumb.
Add the 4 whole large eggs, one at a time, mixing well after each addition until fully incorporated. The batter will look slightly curdled, but don’t worry—it will come together. Add the 2 tablespoons vanilla bean paste and 1 teaspoon vanilla extract, mixing until combined. Scrape down the sides of the bowl to ensure even mixing.
Combine Dry Ingredients and Milk
With the mixer running on low speed, gradually add the sifted dry ingredients in three additions, mixing just until combined after each addition. This prevents overmixing, which can make the cake dense. In a separate bowl, whisk together the 1 cup whole milk and ½ cup simple syrup until fully combined.
With the mixer on low speed, pour the milk mixture into the batter in a slow, steady stream. Mix just until the batter is smooth and no flour streaks remain. The batter should be thick but pourable. Overmixing at this stage can develop gluten, leading to a tougher cake. Transfer the batter evenly between the prepared cake pans, filling them about two-thirds full.
Bake to Perfect Doneness
Place the cake pans in the preheated oven and bake for 25-30 minutes, or until a toothpick inserted into the center comes out clean. The cakes should spring back gently when pressed in the center. Rotate the pans halfway through baking for even browning. Do not open the oven door during the baking process to avoid temperature fluctuations.
Once baked, remove the cakes from the oven and let them cool in the pans for 10 minutes. Then, transfer them to a wire rack to cool completely. This gradual cooling prevents cracking and ensures even slicing. The cakes should be moist but not sticky to the touch when fully cooled.
Prepare the Vanilla Bean Buttercream
In a large mixing bowl, combine the 1.5 cups heavy whipping cream and 3 cups confectioners’ sugar. Using a hand mixer or stand mixer fitted with the whisk attachment, beat on medium speed for 2-3 minutes until the sugar is fully dissolved and the mixture is smooth. Add the 1 teaspoon vanilla bean seeds and mix for another 30 seconds.
Increase the speed to high and whip the mixture for 3-4 minutes until stiff peaks form. The buttercream should hold its shape when the whisk is lifted. This step is crucial for achieving the signature smooth, velvety texture that complements the moist cake layers. If the buttercream is too soft, chill the bowl in the refrigerator for 10 minutes before whipping again.
Assemble and Frost the Cake
Place one of the cooled cake layers on a cake stand or plate. Spread a thin layer of buttercream over the top to seal in moisture. Add the ½ cup simple syrup you reserved earlier, allowing it to soak into the cake for 2 minutes. This step ensures the layers remain ultra-moist. Top with the second cake layer and repeat the process of sealing with buttercream and syrup.
Spread a final layer of buttercream over the entire cake, using an offset spatula to create a smooth finish. For a polished look, use a bench scraper to create clean edges. Chill the cake in the refrigerator for 30 minutes before slicing to allow the buttercream to set. This cake is best served at room temperature, so let it sit for 10-15 minutes before serving to enjoy its full moistness and flavor.
Pro Tips For Making 5 Star Yellow Cake
- Whisk Butter & Sugar Longer: I used to give this mix a quick stir, but 3-4 minutes with a stand mixer (or 5 minutes by hand) incorporates way more air—this is what makes the crumb light and fluffy. The butter should look pale yellow and ribbon-like when you lift the beaters.
- Sift That Flour Twice: Skimping on sifting means dense cake. Do it once before mixing, then sift it again right before folding into the batter—this breaks up any clumps and keeps the texture silky. (Yes, it’s extra work, but the difference is noticeable.)
- Room-Temp Eggs Matter: Cold eggs? They’ll curdle the butter when you mix them in. Let them sit in warm water for 10 minutes first—this guarantees smooth batter and no weird streaks. (I learned this after a batch looked like it had been beaten with a fork.)
- Check Doneness at 145°F: The recipe might say 160°F, but pull the cake when the internal temp hits 145°F—it’ll keep rising another 5-10 degrees. Overbaking dries it out, and no one wants a sad, dense yellow cake. (A toothpick test is fine, but the thermometer is foolproof.)
Make-ahead tips for this dish
Prep Ahead for Stress-Free Baking
Make the simple syrup up to 3 days in advance and store it in an airtight container in the fridge. This saves time and ensures you won’t be scrambling last-minute.
I always prepare mine the night before—just heat 1 cup sugar + 1 cup water until dissolved, then cool completely before refrigerating. 💡
Cake Layer Storage Tips
Wrap cooled cake layers tightly in plastic wrap and store them at room temperature for up to 3 days or refrigerate for 5 days. For longer storage, freeze the layers for 2 months—just thaw at room temperature before assembling.
I’ve found that freezing layers preserves their moisture better than the frosting does, so this is my go-to for make-ahead weddings.
Buttercream Prep Strategy
Whip the buttercream up to 2 days ahead and store it in an airtight container in the fridge. Before using, let it sit at room temperature for 15-20 minutes and rewhip for 1-2 minutes to restore its smoothness.
This trick saves you from last-minute whipping and ensures a perfectly spreadable frosting every time. For extra stability, add 1 tsp cornstarch to the sugar before whipping. ✨
Full Cake Assembly Timeline
Assemble the cake just before serving to prevent sogginess, but you can prep everything else ahead. Bake the layers, cool them completely, and store them wrapped. Make the frosting, then refrigerate until ready to use.
On serving day, simply layer, frost, and let the cake sit for 10-15 minutes before slicing. This method keeps the cake fresh-tasting and saves you hours of work on the day itself.
Freezing the Fully Assembled Cake
For parties weeks in advance, freeze the fully assembled cake (with or without frosting) for up to 2 months. Unfrosted cakes freeze best—just wrap tightly in plastic and foil. To serve, thaw at room temperature for 2-3 hours, then add frosting if desired.
This is my secret for holiday desserts—I assemble everything in November and serve it in December with zero stress. ❄️
Make-Ahead Garnishes
Prep any fresh garnishes (like berries or mint) the day before and store them in the fridge. For chocolate shavings or sprinkles, measure them out in advance and keep them in small containers.
I always have a stash of dark chocolate curls ready to go—they add a professional touch without extra effort. Just pop them on right before serving to keep them crisp. 🍫
Nutrition facts
Frequently asked questions
Can I substitute vanilla extract for vanilla bean paste?
Yes, but the flavor will be less complex. Use double the vanilla extract (so 4 tablespoons) and add 1/4 teaspoon almond extract for depth. The vanilla bean seeds add a unique speckled appearance and richer aroma that pure extract can’t replicate. For best results, scrape seeds from 1 vanilla bean and mix them into the buttercream separately.
Why did my cake turn out dense instead of moist?
Overmixing the batter or using cold ingredients are common culprits. Always mix the dry ingredients just until combined, and ensure your butter and eggs are room temperature. Another trick: don’t overfill the pans—fill them only 2/3 full to allow proper rise. If your kitchen is humid, reduce the milk to 3/4 cup to prevent a gummy texture.
How do I make this cake gluten-free?
Replace the all-purpose flour with a 1:1 gluten-free flour blend like King Arthur’s, but expect slightly denser layers. For best results, add 1/2 teaspoon xanthan gum to the dry ingredients. Also, increase the baking time by 5-10 minutes and check for doneness with a toothpick. The simple syrup and buttercream recipes remain the same.
Can I use this recipe for a single-layer cake?
Simply bake the batter in one 9-inch round pan or a 10-inch tube pan for a taller cake. Reduce the baking time by about 5-7 minutes (watch closely after 20 minutes). For a single layer, you’ll need about 2/3 of the batter. The frosting quantity can be halved if desired. This works perfectly for cupcakes too—divide the batter into 12-15 cupcake liners and bake for 18-20 minutes at 350°F.
How do I store leftovers to keep them fresh?
Wrap individual slices tightly in plastic wrap and store at room temperature for 2 days or refrigerate for 4 days. For longer storage, freeze slices (without frosting) for up to 1 month. To reheat, wrap frozen slices in a damp paper towel and microwave for 10-15 seconds. The buttercream keeps well refrigerated for 5 days or frozen for 3 months. Always bring the cake to room temperature before serving for best texture.

- 12 Bean Chili Recipe: Hearty Slow-Cooked Depth With 12 Legumes - October 17, 2026
- 5 Seed Bread Recipe: Nutty Crunch and Artisan Flavor in One Loaf - October 17, 2026
- 1 Lb Macaroni Salad Recipe: Bold, Crunchy, and Crowd-Pleasing - October 17, 2026