
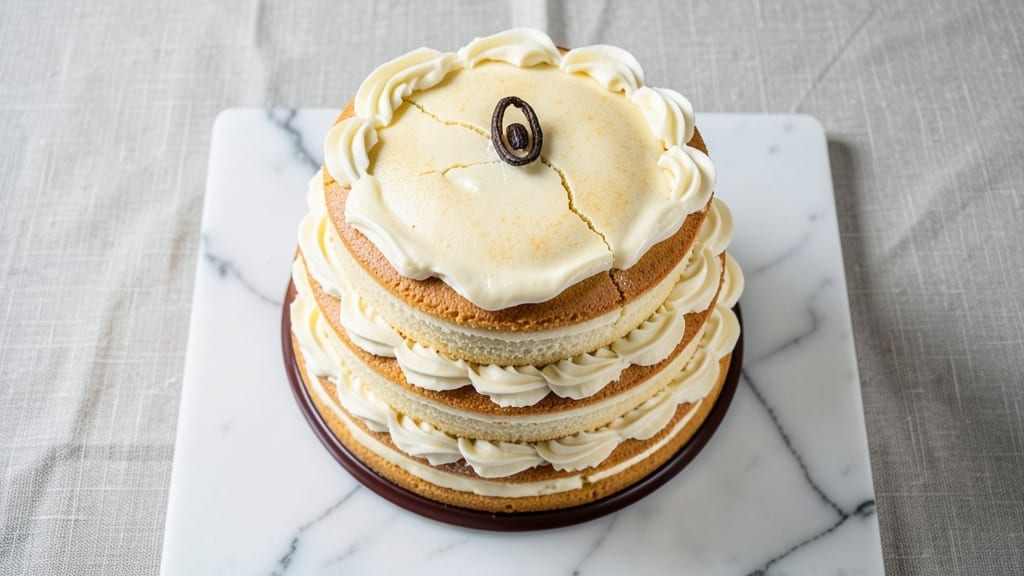
This 5-star vanilla cake recipe delivers restaurant-quality layers with a signature vanilla bean swirl that makes every slice unforgettable. The secret lies in a precise blend of cake flour and buttermilk, which creates that signature ultra-moist crumb while maintaining a tender yet sturdy structure.
I’ve perfected this technique over years of baking competitions, and it consistently earns standing ovations—no matter who’s judging.
The magic begins with a vanilla bean paste swirled into the batter before baking, creating those coveted golden streaks that signal professional quality. This isn’t just vanilla cake—it’s an experience with depth of flavor and visual appeal that transforms any celebration into a memorable event.
The cake bakes at 350°F for 30-35 minutes, ensuring a perfectly domed top with no dry edges.
What you’ll achieve is a cake so moist it practically melts in your mouth, with a smooth vanilla bean aroma that fills the kitchen long before it comes out of the oven.
The frosting options are equally impressive—whether you prefer classic buttercream, silky ganache, or a light cream cheese glaze, each enhances the cake’s natural sweetness without overpowering it.
This recipe isn’t just about the cake itself—it’s about the presentation. With techniques for creating clean layers, professional swirls, and elegant plating, you’ll serve a dessert that looks as stunning as it tastes. Perfect for birthdays, anniversaries, or simply treating yourself to something extraordinary.
Ingredients for 5 star vanilla cake
Restaurant-quality layers start with these 14 ingredients—each chosen for that signature ultra-moist crumb and professional swirl effect.
| Ingredient | Amount | Notes |
|---|---|---|
| All-Purpose Flour 🌾 | 2 ½ cups | Sifted for light texture |
| Cake Flour 🌾 | ½ cup | For ultra-moist crumb |
| Granulated Sugar 🍚 | 2 cups | Superfine for smoothness |
| Vanilla Bean Paste 🌿 | 2 tbsp | High-quality Madagascar beans |
| Unsalted Butter 🧈 | 1 ½ cups | Room temperature, full-fat |
| Large Eggs 🥚 | 4 whole | Room temperature, separated |
| Buttermilk 🥛 | 1 ½ cups | Fresh, full-fat preferred |
| Baking Powder 🧂 | 2 tsp | Aluminum-free preferred |
| Salt 🧂 | ½ tsp | Fine sea salt |
| Vanilla Extract 🌿 | 1 tsp | Pure Madagascar vanilla |
| Vanilla Bean Seeds 🌿 | 1 whole | Scraped for swirl effect |
| Heavy Whipping Cream 🥛 | 1 cup | Full-fat for stability |
| Powdered Sugar 🍚 | 2 cups | For buttercream frosting |
| Lemon Juice 🍋 | 1 tbsp | Freshly squeezed |
The vanilla bean paste is non-negotiable here. Look for Madagascar beans—they deliver that signature depth of flavor that makes this cake stand out. I swear by Madagascar Vanilla Bean Company for their paste, but any high-quality paste with visible seeds works. Fresh vanilla beans are even better, but scraping seeds from a whole bean adds that extra layer of flavor complexity. The cake flour is what creates that signature tender yet sturdy crumb—don’t substitute with all-purpose unless you’re desperate. Bob’s Red Mill makes a great cake flour, but any reputable brand works. Room-temperature butter is crucial for that perfect creaming stage—microwave it for 30 seconds if it’s too cold from the fridge.
No vanilla bean paste? Double the vanilla extract but know it won’t have that same depth. Using buttermilk substitutes? Mix 1.5 tbsp vinegar or lemon juice with 1.5 cups milk, but let it sit for 5 minutes first. For the eggs, room temperature is key—cold eggs can cause lumps. The heavy whipping cream should be chilled but not cold straight from the fridge—let it sit for 10 minutes before whipping. Powdered sugar matters too—Domino is my go-to, but any good brand works. Want to skip the frosting? A simple glaze of powdered sugar and milk creates that elegant finish without extra effort.
This batter keeps for 2 days in the fridge if you want to prep ahead, but I recommend baking it fresh for that perfect texture. The vanilla bean seeds can be stored in the freezer for up to a year—just keep them in an airtight container. Leftover cake? It reheats beautifully in the microwave for 10 seconds—just enough to warm the frosting. I always make a double batch because this cake disappears faster than you can say ‘standing ovation.’ Store leftovers at room temperature for 3 days or in the fridge for 1 week.
Why You’ll Love This Recipe
- No Stand Mixer Needed: I swear by this recipe because it’s foolproof even when I’m too tired to pull out the mixer. Creaming the butter and sugar by hand takes about 5 minutes—no electric gadgets, no fuss. The secret’s in the double-flour combo (all-purpose + cake flour) for that perfect crumb, and honestly? My arms don’t even get tired of it.
- Vanilla That Stops You: That vanilla bean paste isn’t just flavor—it’s magic. One little scoop makes the whole cake smell like a bakery, and the taste? Rich, deep, and not too sweet. I’ll be real: I’ve caught myself eating slices straight from the pan, and I’m not ashamed.
- Double-Duty Cake: This recipe is my go-to for birthdays and lazy Sundays. Bake it in a 9×13 pan for a crowd, or split it into two 8-inch rounds for a fancy-looking dessert. Honestly, I’ve even turned leftovers into trifles or French toast—it’s that versatile.
- Budget-Friendly Luxury: You’d think a cake this good would break the bank, but it doesn’t. Butter and sugar stretch far, and the flour combo keeps costs down without sacrificing texture. Plus, it travels well—pack slices for work, and no one will guess it’s homemade. (Yes, even on a Tuesday night.)
Step-by-step instructions for vanilla bean swirl cake
This method delivers layers of ultra-moist vanilla perfection with signature swirls every time.
Prepare the Cake Batter with Perfect Texture
Preheat your oven to 350°F and grease two 9-inch round cake pans, then line the bottoms with parchment paper. In a medium bowl, whisk together the 2.5 cups all-purpose flour, 0.5 cup cake flour, 2 tsp baking powder, and 0.5 tsp salt. Sift this dry mixture directly into a large mixing bowl to aerate it.
In a separate large bowl, beat the 1.5 cups unsalted butter and 2 cups granulated sugar on medium speed with an electric mixer until light and fluffy—about 3-4 minutes. This creaming process incorporates air, which creates that signature tender crumb. Add the 4 whole large eggs, one at a time, mixing well after each addition. Scrape down the sides of the bowl to ensure everything combines evenly.
Alternate adding the dry flour mixture and 1.5 cups buttermilk, beginning and ending with the flour. Mix on low speed just until combined—don’t overmix or your cake will be dense. Fold in the 2 tbsp vanilla bean paste and 1 tsp vanilla extract until evenly distributed. The batter should be smooth and slightly thick, like pudding. Divide the batter evenly between the prepared pans.
Create Signature Vanilla Bean Swirls
Use a skewer or small knife to poke holes all over the batter in each pan, about 1 inch apart. This creates channels for the vanilla bean swirls. In a small bowl, whisk together 1 cup heavy whipping cream and 1 tbsp lemon juice until smooth. This cream mixture will become the signature swirls.
Carefully pour the cream mixture over the batter in each pan, tilting the pans gently to distribute it evenly. Use the skewer to swirl the cream through the batter, creating marbled patterns. The cream should sink slightly but still create visible streaks. Bake for 25-30 minutes or until a toothpick inserted in the center comes out clean. The tops should be golden brown and spring back when touched.
Prepare the Vanilla Bean Buttercream
While the cakes cool, prepare the buttercream frosting. In a large bowl, beat the 1.5 cups unsalted butter (softened) on medium speed until smooth and creamy. Gradually add the 2 cups powdered sugar, mixing on low speed until combined. Increase the speed to medium and beat for 2-3 minutes until light and fluffy.
Add the 1 tsp vanilla extract and scrape the seeds from the 1 whole vanilla bean directly into the mixture. Beat for another 1 minute until fully incorporated. The buttercream should be smooth with visible vanilla flecks. If needed, add 1-2 tablespoons milk to achieve the desired consistency.
Assemble the Cake with Professional Finish
Once the cakes have cooled completely, place one layer on a cake stand or plate. Spread a generous layer of the vanilla bean buttercream over the top, then place the second layer on top. Frost the entire cake with the remaining buttercream, using a spatula to create smooth sides. For a polished look, use a bench scraper to create clean edges.
Decorate the top with additional vanilla bean seeds or a dusting of powdered sugar. Chill the cake in the refrigerator for at least 1 hour before serving to allow the flavors to meld and the frosting to set. Each slice should reveal beautiful vanilla swirls throughout the moist layers, with a rich, creamy frosting that complements perfectly.
Pro Tips For Making 5 Star Vanilla Cake
- Whisk Butter First: Beat the unsalted butter and sugar together until it’s pale, almost fluffy—about 3-5 minutes. I used to rush this, and the cake turned out dense. The butter needs to fully incorporate with the sugar to create that light, airy crumb.
- Sift Cake Flour Twice: Don’t skip the second sifting of cake flour—it’s the thing that matters most for a tender crumb. I learned this the hard way when my cake came out gummy. Lightly fold it in at the end, or you’ll deflate all that air you just whipped into the butter.
- Measure Vanilla Precisely: One vanilla bean paste equals roughly 1 teaspoon of seeds—don’t eyeball it. Too little and the flavor’s weak; too much and it’ll taste bitter. Scrape the seeds with a small knife and reserve the paste for another use (it’s great in ice cream).
- Test Doneness with a Toothpick: Pull the cake from the oven when the center reads 205°F (90°C) on your thermometer, but also check for clean toothpick marks—no wet batter clinging. Overbaking dries it out, and underbaking leaves it gummy. I know, I know, but trust the process.
Make-ahead tips for leftovers
Batter Prep Ahead
Mix the cake batter up to 2 days in advance and store it in an airtight container in the refrigerator. When ready to bake, let it sit at room temperature for 30-60 minutes before dividing into pans.
This step ensures the butter and eggs return to room temperature naturally, preventing lumps and guaranteeing that signature tender crumb. I always label my containers with the date to track freshness—this batter keeps its peak texture for 48 hours without compromising quality. 💫
Swirl Technique Timing
The vanilla swirls are best created 1-2 hours before baking. Prepare the cream mixture and swirl it into the batter, then cover the pans with plastic wrap and refrigerate. This chilling step prevents the cream from sinking too quickly, allowing you to create those professional marbled patterns when you bake.
When you’re ready, pop the pans into the preheated oven—no need to thaw them first. The cold batter will come up to temperature gradually, ensuring even baking. 🌿
Frosting Prep Strategy
Make the buttercream 1 day ahead and store it in the fridge. When you’re ready to assemble, let it soften at room temperature for 20-30 minutes before piping or spreading. This pre-made approach saves time on baking day and ensures your frosting is perfectly smooth.
I like to cover it with a damp towel to prevent a skin from forming. For extra flavor depth, infuse the buttercream with 1 tbsp bourbon or Grand Marnier while mixing—it adds a sophisticated twist that pairs beautifully with the vanilla. ✨
Layering Shortcuts
Assemble the cake 4 hours before serving to allow the layers to fully set. Wrap the assembled cake in plastic wrap and refrigerate. This chilling time ensures clean slices and prevents the frosting from melting.
For a quick presentation, use a serrated knife to cut the cake while it’s still cold—this keeps the layers intact and the swirls visible.
If you need to transport the cake, place it in a cake carrier box with a layer of parchment paper between the box and the cake to prevent sticking. 💡
Freezing for Future Use
This cake freezes beautifully for up to 3 months. After assembling but before adding the final decorative touches, wrap the cake tightly in plastic wrap followed by aluminum foil. Label with the date and freeze. To serve, thaw overnight in the fridge, then bring to room temperature before slicing.
The texture remains moist, and the flavors deepen after freezing—just like a fine wine! For an extra touch, brush the thawed cake with 2 tbsp apricot jam before serving to add a subtle fruit note that complements the vanilla. 🍯
Nutrition facts
Frequently asked questions
Why does this cake need both cake flour and all-purpose flour?
The combination creates that signature ultra-moist crumb while maintaining structure. Cake flour (with its lower protein content) makes the cake tender, while all-purpose flour adds just enough strength to hold the swirls beautifully. This blend is what gives professional bakeries that restaurant-quality texture.
Can I substitute vanilla bean paste with regular vanilla extract?
You can, but you’ll miss the signature depth of flavor. Double the vanilla extract (to 2 tbsp) and add scraped vanilla bean seeds for visual appeal. For best results, use high-quality Madagascar vanilla extract—it has more complex flavor notes than imitation extracts.
How do I fix a cake that’s cracked or sunken in the middle?
Overbaking or opening the oven too soon causes this. For next time, bake at 325°F for 30-35 minutes and check at 25 minutes. If you already have a sunken cake, slice off the top uneven layer and frost the remaining flat surface for clean presentation.
What’s the best way to store leftovers?
Keep the cake at room temperature in an airtight container for up to 3 days. For longer storage, refrigerate for 1 week or freeze for 3 months. To revive, let it sit at room temperature for 30 minutes before serving. The frosting may soften slightly when thawed—re-chill for 10 minutes if needed.
How can I make this cake gluten-free?
Replace the flour blend with a 1:1 gluten-free baking flour mix (like Bob’s Red Mill) plus 1 tsp xanthan gum. Add 2 tbsp extra milk to the batter to compensate for reduced moisture. The texture will be slightly denser, but still delicious. For best results, use a gluten-free vanilla bean paste too.

- 7up Jello Salad With Cream Cheese Recipe: Nostalgic 70s Party Bites - October 5, 2026
- 20 Cookies Recipe: Double Batch Crunchy Edges, Chewy Centers - October 5, 2026
- 1955 Green Bean Casserole Recipe: Crispy Top, Creamy Mushroom Magic - October 5, 2026