
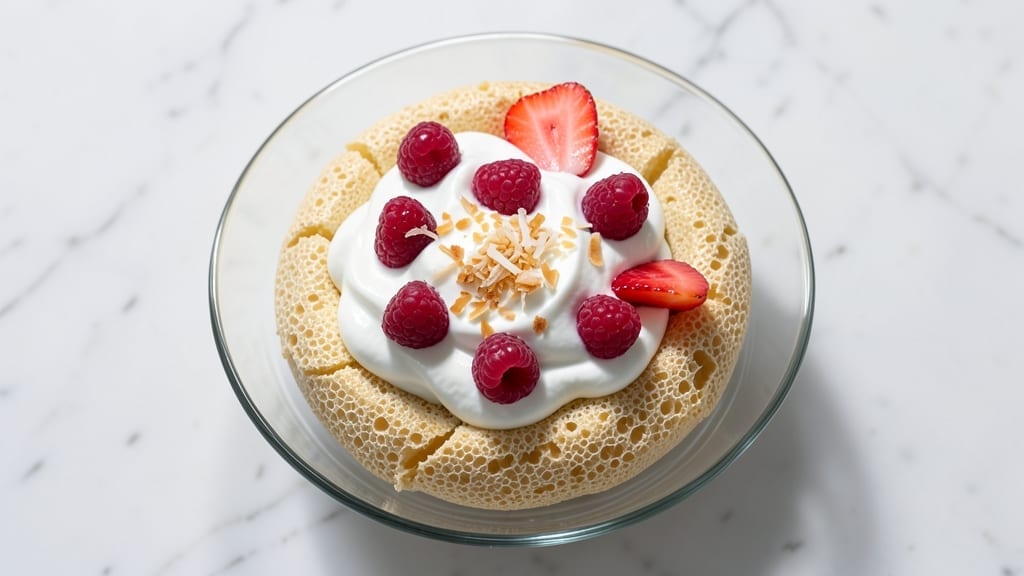
This 6-egg-white pavlova recipe delivers the perfect balance of a crisp outer shell and a light, marshmallow-like center that defies humidity—no soggy meringue here. The secret lies in precise whipping and a low-temperature bake that transforms delicate egg whites into a stunning, sturdy dessert.
I’ve perfected this technique after years of trial and error, ensuring every slice stays crisp at the edges while remaining tender inside.
The magic begins with whipping egg whites to stiff peaks at room temperature, then gently folding in sugar to create a stable meringue. Baking at 250°F for 1 hour (not too hot!) prevents cracking while developing that signature crispness.
A quick torch finish adds dramatic texture, and the key to success? Working in a dry environment—humidity is the enemy of perfect pavlovas.
Once baked, your pavlova will have a crisp shell that shatters slightly when cut, revealing a cloud-like interior. Top it with whipped cream and fresh fruit like kiwi or berries for a dessert that looks as impressive as it tastes.
The contrast of textures—crunchy shell, creamy filling, juicy fruit—makes every bite unforgettable.
This recipe is ideal for special occasions or when you want to impress without stress. The technique is straightforward, but the results are restaurant-worthy. Let’s create a pavlova that stands up to the classics—crispy, elegant, and full of magic.
Ingredients for 6 egg white pavlova
Six egg whites and precise technique transform into a dessert with restaurant-worthy texture contrast.
| Ingredient | Amount | Notes |
|---|---|---|
| Large Egg Whites 🥚 | 6 whole | Fresh, room temperature, no yolk trace |
| Granulated White Sugar 🍚 | 1 ½ cups | Superfine preferred for smooth texture |
| Cornstarch 🌾 | 1 tbsp | Lightly toasted for stability |
| White Vinegar 🍶 | ½ tsp | Pure, no additives |
| Unsalted Butter 🧈 | ½ cup | Cold, cubed for whipping |
| Heavy Whipping Cream 🥛 | 2 cups | Cold, full-fat for stability |
| Powdered Sugar 🍚 | 2 tbsp | For dusting only |
| Fresh Kiwi 🥝 | 1 whole | Sliced, for garnish |
| Raspberries 🍓 | 1 cup | Fresh, for garnish |
| Vanilla Extract 🌿 | ½ tsp | Pure, for cream flavor |
| Diamond Crystal Kosher Salt 🧂 | ¼ tsp | Fine grain for delicate seasoning |
The egg whites must be fresh and room temperature—older whites whip poorly, and cold ones won’t reach stiff peaks. Trader Joe’s often carries the freshest in sealed cartons, but check the sell-by date. For sugar, superfine or pulverized granulated dissolves faster than regular sugar, creating a smoother meringue. The cornstarch is non-negotiable—it stabilizes the structure, preventing cracking during baking. Toast it lightly in a dry pan for 30 seconds before mixing to enhance its thickening properties. Humidity is the silent enemy here, so bake on a dry day or use a dehumidifier if needed.
No superfine sugar? Pulse regular granulated sugar in a food processor for 30 seconds—it works in a pinch. Substituting cornstarch? Arrowroot powder at the same amount functions similarly. For the cream, whipped topping from a can saves time but lacks the lightness of fresh whipping. The vinegar and salt are critical—they strengthen the meringue’s structure, allowing it to hold its shape during baking. If you’re short on time, pre-whip the egg whites overnight in the fridge, then whip to stiff peaks before adding sugar.
Store the baked pavlova in an airtight container with parchment between layers for up to 3 days—it stays crisp longer than most meringues. For the cream, whip it just before serving to maintain texture. The fruit should be added within 30 minutes of assembly to prevent sogginess. Freeze unbaked meringue shells for 1 month—bake straight from frozen at 275°F for 1 hour 15 minutes. The torch finish adds drama but isn’t essential—just bake until golden brown if you’re skipping it.
Why You’ll Love This Recipe
- Six-Ingredient Magic: I swear by this recipe because it’s that simple—just egg whites, sugar, cornstarch, vinegar, and butter. No fancy tools, no stress, just a whisk and a hot oven. Honestly, the hardest part is waiting for it to set.
- Crispy-Creamy Balance: That perfect snap when you cut in? It’s all in the vinegar trick—acid stabilizes the meringue while the butter adds a buttery crunch. The inside stays light, almost cloud-like, and the edges? Chef’s kiss every time.
- Dessert for Any Day: Between us, I’ve served this at holiday dinners, potlucks, and even as a lazy Sunday breakfast (yes, with whipped cream and berries). It’s fancy enough for company but unfussy enough to make when you’re too tired to bake.
- Leftovers? No Problem: Meringue keeps for days in an airtight container, and if it softens, just pop it back in the oven for 5 minutes. I’ll be real: I’ve reheated slices twice—once for a midnight snack, once because I forgot to make dessert the next day.
Step-by-step instructions for 6 egg white pavlova
Master this delicate balance of crispy exterior and marshmallow center with precision timing and technique.
Prepare the Egg White Mixture for Maximum Stability
In a spotlessly clean, grease-free mixing bowl, combine the 6 whole large egg whites and the 0.25 tsp Diamond Crystal kosher salt. Use a stand mixer fitted with the whisk attachment and beat on medium speed for 2 minutes until soft peaks form. This initial whipping incorporates air and begins the protein structure formation.
Gradually add the 1.5 cups granulated white sugar while continuing to mix on medium speed. Increase to high speed and whip for an additional 5-7 minutes until the mixture is thick, glossy, and holds stiff peaks that stand straight up when the whisk is lifted. The sugar should dissolve completely—if you see any graininess, continue whipping until smooth. Here’s the thing—superfine sugar dissolves faster, but regular granulated sugar will work if whipped thoroughly.
Incorporate Stabilizers for Perfect Texture
Reduce the mixer speed to low and gently fold in the 1 tbsp cornstarch using a rubber spatula. The cornstarch acts as a stabilizer that prevents the pavlova from collapsing. Then add the 0.5 tsp white vinegar and mix on low speed for 30 seconds until fully incorporated. The vinegar helps create a more stable foam structure by slightly acidifying the egg whites.
Remove the bowl from the mixer and transfer the meringue to a piping bag fitted with a large star tip. Gently tap the piping bag on the counter to eliminate any air pockets. This step ensures even distribution when you pipe the meringue onto the baking sheet—uneven piping leads to uneven baking and potential cracking during cooling.
Shape and Bake the Pavlova Crust
Preheat your oven to 275°F—this lower temperature is crucial for baking the meringue gently. Line a baking sheet with parchment paper and lightly draw a 6-inch circle as a guide. Pipe the meringue into the circle, creating a 1-inch thick base with slightly higher edges. Use the back of a spoon to smooth the top and create a slight dome shape.
Bake for 1 hour and 15 minutes until the exterior is deep golden brown and crisp to the touch. The center should still feel slightly soft when you press gently—this ensures that marshmallow texture we’re after. I like to rotate the baking sheet halfway through for even baking. Here’s the critical part: don’t open the oven door during baking or the sudden temperature change will cause the meringue to collapse.
Create the Cream Filling While Baking
While the pavlova bakes, prepare the cream filling by beating the 0.5 cup unsalted butter and 2 cups heavy whipping cream together in a chilled bowl until soft peaks form. Add the 0.5 tsp vanilla extract and 2 tbsp powdered sugar, then continue whipping until stiff peaks form. The cream should hold its shape when the whisk is lifted—this ensures it will hold its position when spread on the pavlova.
Transfer the whipped cream to a piping bag fitted with a star tip. Keep this mixture cold until ready to use—warm cream won’t hold its shape properly. The cold temperature also helps maintain the stability of the whipped cream for a clean presentation. This step is where the magic happens—the contrast between the crispy shell and creamy center creates the perfect pavlova experience.
Assemble and Garnish for Presentation
Allow the baked pavlova to cool completely on the baking sheet for 1 hour before attempting to transfer it. This gradual cooling prevents cracking as the meringue sets. Once completely cool, carefully transfer the pavlova to a serving plate by sliding the parchment paper underneath.
Pipe the chilled whipped cream over the top of the pavlova, spreading it evenly to cover the entire surface. Then arrange the 1 whole fresh kiwi (sliced) and 1 cup raspberries decoratively on top. The fruit adds both visual appeal and a refreshing contrast to the sweet meringue. Serve immediately for the perfect balance of textures—crispy shell, marshmallow center, and velvety cream.
Pro Tips For Making 6 Egg White Pavlova
- Whip Egg Whites Cold: Grab a metal bowl and place it in the freezer for 5 minutes before starting—cold surfaces stabilize the whites faster. I used to skip this and end up with stubborn peaks that refused to hold, no matter how much I beat them. Trust me, the bowl’s chill makes all the difference when you’re working with just six whites.
- Sugar in Stages: Add the sugar gradually—start with half, then beat until the meringue is glossy before adding the rest. Dumping it all at once? You’ll end up with a gritty, uneven texture that won’t crisp up properly. Think of it like folding in flour: patience wins.
- Vinegar Last, Heat First: Mix the vinegar into the sugar after the meringue is stiff but before baking—this keeps the structure intact while adding that signature tang. And preheat your oven to 275°F (135°C), not 300°F. Too hot, and your pavlova collapses like a sad soufflé.
- Butter Brush Matters: Don’t just dot the butter on top—use a pastry brush to spread it in a thin, even layer. This prevents soggy spots and ensures every bite gets that buttery richness. (Yes, even if you’re lazy like me, the effort is worth it.)
Wine and beer pairings for 6 egg white pavlova
Crisp White Wine
For a pavlova’s delicate balance of textures, a dry Riesling from Germany or Austria is my go-to choice. The wine’s crisp acidity and subtle sweetness mirror the dessert’s crisp shell and creamy center, cleansing your palate between bites.
Look for a Kabinett-level Riesling—it’s light enough to complement the fruit toppings without overpowering them. Serve slightly chilled at 45-50°F to enhance its refreshing qualities. 🍷
Sparkling Pairing
A Prosecco or Cava adds effervescence that cuts through the richness of the whipped cream while enhancing the pavlova’s light, airy texture. Opt for a brut or extra brut style to avoid clashing with the dessert’s sweetness.
The bubbles create a playful contrast, making each bite feel like a celebration. Chill to 40-45°F for optimal flavor. ✨
Fruity Beer Options
If you prefer beer, a Belgian witbier like Stella Artois Wit or Hoegaarden pairs beautifully with the tartness of raspberries and kiwi. The coriander and citrus notes in these beers complement the fruit’s acidity while balancing the sweet meringue. Serve at 45-50°F to highlight the beer’s crisp, refreshing profile. 🍺
Dessert Wine Harmony
For a more indulgent pairing, a Moscato d’Asti—lightly sparkling and slightly sweet—echoes the dessert’s fruity toppings while adding a touch of luxury. Its low alcohol content and floral notes make it a sophisticated match for the pavlova’s elegant presentation. Serve well-chilled at 40-45°F to preserve its delicate bubbles. 🍇
Coffee Contrast
If you’re serving pavlova after dinner, a cold brew or espresso martini (with a splash of vanilla syrup) creates an unexpected but delightful contrast. The bitterness of coffee balances the sweetness, while the vanilla enhances the dessert’s creamy layers.
For a non-alcoholic option, try chilled chai tea with a hint of cinnamon. ☕
Nutrition facts
Frequently asked questions
Why does my meringue crack or collapse during baking?
Humidity is the #1 culprit! Even slight moisture causes meringue to weep or crack. Always bake on a dry day or use a dehumidifier near your oven. Also check for these mistakes: opening the oven door, uneven piping, or over-whipping. Let your meringue cool completely before transferring—rushing causes structural failure.
Can I make this pavlova without a stand mixer?
Use a hand mixer or even a whisk with strong arm muscles. Whip egg whites to stiff peaks takes longer (about 10-15 minutes vs 5-7 minutes in a mixer), but the technique remains identical. Work in short bursts to avoid overheating your arms, and keep your bowl completely grease-free.
How do I store leftover pavlova?
Store the baked shell in an airtight container with parchment between layers for 3 days—it stays crisp longer than most meringues. Keep the whipped cream separate until serving. For longer storage, freeze the unbaked meringue shell (up to 1 month)—bake straight from frozen at 275°F for 1 hour 15 minutes.
What’s the best fruit topping besides kiwi and raspberries?
Try passion fruit pulp for tangy contrast, mango slices for tropical sweetness, or blackberries for deep color. For a citrus twist, add candied orange peel or blood orange segments. Just slice fruit right before serving to prevent sogginess—acidic fruits like berries work best within 30 minutes of assembly.
Can I make this gluten-free?
Yes! This recipe is naturally gluten-free since it only contains egg whites, sugar, and cornstarch. Just ensure your cornstarch is certified gluten-free (some brands process in shared facilities). The whipped cream topping is also safe—stick to butter and heavy cream without additives. Always double-check ingredient labels for cross-contamination warnings.

- Baked Potatoes in Crock Pot Recipe: Buttery Interiors and Crispy Top Magic - November 1, 2026
- Braised Beef Short Ribs Recipe: Crock Pot Fall-Off-Bone Magic in 6 Hours - November 1, 2026
- Crock Pot Cocoa Recipe: Velvety Warmth With Hidden Spice Magic - November 1, 2026