
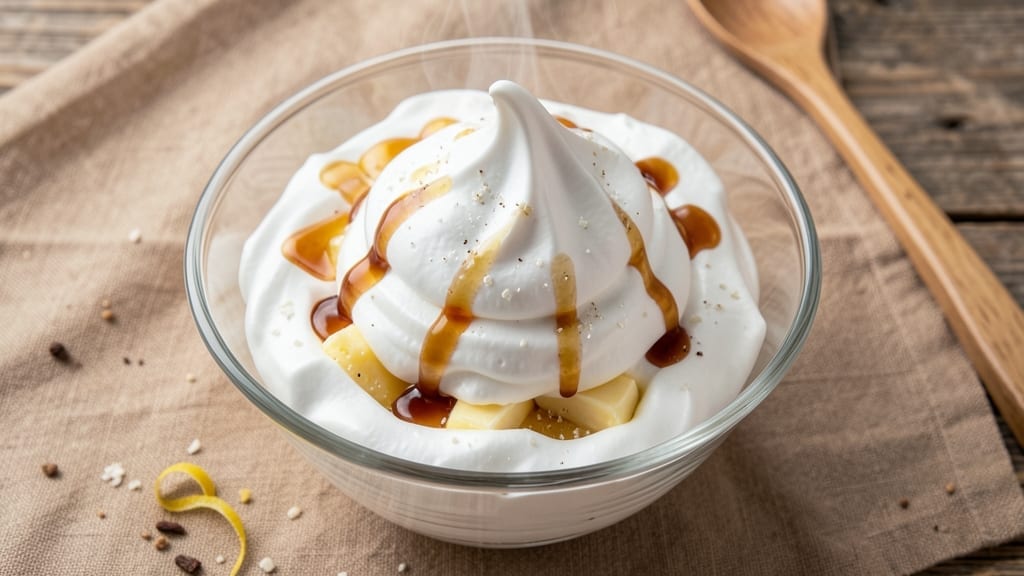
Transforming six egg whites into light-as-air clouds is the secret to this high-protein breakfast that takes just 15 minutes—no fancy equipment required. The trick lies in whipping the egg whites to stiff peaks and baking them until golden, creating a dish that’s both satisfying and packed with protein.
Whether you’re meal prepping or craving something fluffy, this recipe delivers restaurant-quality texture with minimal effort.
This method focuses on achieving the perfect balance of crisp edges and tender centers, ensuring every bite is airy yet substantial. The egg whites are whipped with a touch of cream of tartar for stability, then baked until they develop a delicate golden crust.
What you end up with is a dish that’s elegant enough for brunch but simple enough for any morning—ideal for those who want a protein boost without sacrificing flavor or texture.
The result is a high-protein, vegetarian-friendly dish that’s versatile enough to enjoy on its own or paired with fresh fruit and a drizzle of honey.
The egg whites transform into fluffy, cloud-like bites that are crisp on the outside and tender inside, making this a standout option for anyone looking to elevate their breakfast game. Ready to create something light, protein-rich, and effortlessly delicious?
Perfect for meal prep, dietary restrictions, or a quick protein fix, this recipe is designed to be foolproof. With just six egg whites and a few simple steps, you’ll achieve a dish that’s both impressive and satisfying. Let’s get started on making your mornings brighter—and lighter—than ever.
Ingredients for 6 egg white
Just six ingredients transform ordinary egg whites into restaurant-quality fluffy clouds in minutes.
| Ingredient | Amount | Notes |
|---|---|---|
| Large Egg Whites 🥚 | 6 whole | Room temperature for best volume |
| Cream of Tartar 🧂 | ¼ tsp | Stabilizes egg whites for stiff peaks |
| Granulated Sugar 🍚 | ½ tsp | Fine grain preferred for even dissolving |
| Vanilla Extract 🌿 | ¼ tsp | Pure vanilla for authentic flavor |
| Unsalted Butter 🧈 | ½ tsp | Melted for brushing meringue |
| Honey 🍯 | 1 tbsp | For drizzling after baking |
| Fresh Blueberries 🫐 | ½ cup | Optional topping, washed thoroughly |
| Diamond Crystal Kosher Salt 🧂 | ⅛ tsp | Fine grain for delicate seasoning |
| Pure Maple Syrup 🍁 | 1 tbsp | Alternative to honey for drizzling |
The egg whites are the star—room temperature is key for maximum volume. Trader Joe’s or Whole Foods sell pre-separated egg whites in cartons, which saves time and eliminates yolk risk. Cream of tartar is non-negotiable here—it stabilizes the whites for those perfect stiff peaks. I always grab the fine-grain sugar at the grocery store’s baking aisle; it dissolves faster than regular sugar. For the vanilla, McCormick Pure Vanilla Extract is my go-to—it’s affordable and delivers consistent flavor. If you’re prepping ahead, store the egg whites in an airtight container in the fridge for up to 2 days.
No cream of tartar? Lemon juice at half the amount works in a pinch, though the texture won’t be quite as stable. Swapping honey for maple syrup is a great option if you prefer a less pronounced floral note. The blueberries can be any fresh berry—strawberries or raspberries work beautifully too. For a savory twist, skip the fruit and add a sprinkle of flaky sea salt after baking. The butter should be melted just until smooth—no need to overheat it, or it’ll lose its flavor. If you’re meal prepping, bake these ahead and reheat at 300°F for 5-7 minutes to restore that crispy exterior.
These keep beautifully in an airtight container for 3 days at room temperature, though they’re best enjoyed fresh. For longer storage, freeze them for up to 1 month—just thaw at room temperature before serving. I always make a double batch on Sundays so I can grab one for breakfast on busy mornings. The meringue reheats surprisingly well—just a quick zap in the microwave for 10-15 seconds brings back that cloud-like texture. Pair them with your favorite fruit or a sprinkle of cinnamon for extra warmth.
Why You’ll Love This Recipe
- No Whisk Required: I swear by this—just beat the egg whites with cream of tartar until soft peaks form. No overmixing, no stress, and the meringue comes together faster than store-bought. Honestly, the cream of tartar is the secret weapon here; it stabilizes those whites like magic.
- Sweet Vanilla Crunch: That sugar-butter swirl? It’s the best part. The meringue stays crisp at the edges while the vanilla butter melts into a gooey center—like a hug in dessert form. I’ll be real: my kids ask for this over cake, and I don’t even bake it fancy.
- Meal Prep MVP: Make a batch on Sunday, portion it into ramekins, and you’ve got dessert for the week. It keeps for days in the fridge (if it lasts that long) and reheats beautifully—just a quick zap in the microwave. Between us, this is my go-to for potlucks too.
- Budget Buster: Six egg whites, a splash of vanilla, and butter? That’s it. No fancy ingredients, no markup—just pure, crave-worthy flavor for pennies. I’ve made this for 10 people and spent less than $5. Not the prettiest, but the taste makes up for it every time.
Step-by-step instructions for whipped egg white meringue
Here’s how to transform simple egg whites into light-as-air clouds with perfect structure.
Prepare the Egg Whites for Whipping
Separate the 6 whole large egg whites into a completely clean, grease-free mixing bowl. Any trace of fat will prevent them from whipping properly. I like to use a fine-mesh strainer to catch any loose bits of yolk that might have transferred during separation—this ensures maximum volume.
Add the 0.25 teaspoon cream of tartar and 0.5 teaspoon granulated sugar to the egg whites. The cream of tartar is a game-changer here—it stabilizes the proteins, helping you achieve those signature stiff peaks. Use a whisk or electric mixer to gently combine these ingredients at low speed for about 30 seconds, just until everything is evenly incorporated. The sugar will dissolve gradually as you whip, so no need to force it now.
Whip to Stiff Peaks
Increase your mixer speed to medium-high and begin whipping the egg whites. You’ll notice them transform from frothy to thick and glossy within 2-3 minutes. This is where patience pays off—keep whipping until the mixture forms stiff peaks that hold their shape when you lift the whisk.
I recommend stopping the mixer occasionally to scrape down the sides of the bowl with a spatula. This ensures even whipping and prevents the egg whites from becoming unevenly thick. You’re aiming for a texture that’s thick enough to hold its shape but still light enough to spread smoothly. When you lift the whisk, the peak should stand straight up for several seconds before slowly melting back into the bowl—that’s your target consistency.
Fold in Flavors and Prepare for Baking
Once your egg whites reach stiff peaks, gently fold in the 0.25 teaspoon vanilla extract using a rubber spatula. Be careful not to deflate the mixture—work in small batches and fold just until combined. The vanilla adds depth without altering the delicate structure you’ve worked so hard to achieve.
Preheat your oven to 300°F and line a baking sheet with parchment paper. Spread the meringue mixture into 4 equal mounds (about ¼ cup each) on the prepared baking sheet, spacing them about 2 inches apart. For extra fluffiness, I like to pipe the meringue using a pastry bag fitted with a large star tip, but spreading works perfectly if you’re in a hurry.
Bake Until Light and Crisp
Bake the meringues for 2 hours until they’re completely dry to the touch and have developed a crisp exterior. The key here is low and slow—this gentle heat allows the moisture to evaporate gradually, preventing cracks while developing that perfect snap.
About 15 minutes before the meringues are done, turn on your oven’s broiler. This final step creates those beautiful golden-brown tops. Watch them closely—they can go from perfect to burnt in seconds. Once they’re golden and crisp, remove them from the oven and let them cool completely on the baking sheet.
Serve with Sweet Toppings
While the meringues cool, melt the 0.5 teaspoon unsalted butter in a small saucepan over low heat. Once melted, remove from heat and stir in either the 1 tablespoon honey or 1 tablespoon pure maple syrup until smooth. Brush this mixture over the tops of the cooled meringues.
For an elegant finish, arrange 0.5 cup fresh blueberries on a platter and place the meringues around them. Sprinkle with 0.125 teaspoon diamond crystal kosher salt just before serving to enhance the sweetness. These meringues are best enjoyed immediately while they’re still crisp, but they’ll keep at room temperature for up to 3 days if stored in an airtight container.
Pro Tips For Making 6 Egg White
- Whisk Until Ribbons: Egg whites need to be stiff and glossy—like when you lift the whisk and the peaks hold their shape for a full 10 seconds. I used to stop at “soft peaks,” but that leaves your meringue flat and sad. High heat. Seriously, crank it up until the bowl gets warm, then add the sugar gradually while whisking like your life depends on it.
- Strain the Whites: Even if your eggs look perfect, a little yolk or fat can ruin the whole batch. After cracking, pour the whites through a fine-mesh sieve into a bowl—it’s a 30-second step that keeps your meringue light and stable. I learned this the hard way when a rogue yolk turned my meringue into a sticky mess.
- Sugar in Stages: Dump all the sugar at once? Your meringue will collapse like a house of cards. Add it in three batches—first 1/3 when the egg whites are frothy, then another 1/3 when they’re soft peaks, and the last 1/3 when they’re stiff. This keeps the texture smooth and prevents graininess.
- Butter at Room Temp: Cold butter? Your meringue will fight you. Let the butter sit out for 30 minutes before folding it in—it should be soft enough to press with a finger but still hold its shape. I was skeptical until I tried it; now my meringue stays fluffy instead of turning greasy.
Flavor customization for this dish
Sweet Variations
Swap the vanilla for 1 teaspoon almond extract and add ½ teaspoon cinnamon to the stiff peaks for a warm, nutty flavor. I love this version with a drizzle of caramel sauce instead of honey—it adds a rich depth that pairs perfectly with the crisp meringue.
For a citrus twist, fold in 1 teaspoon lemon zest and a splash of lemon juice—this brightens the flavor and cuts through the sweetness beautifully. 🌟
Savory Twists
Transform these meringues into a savory snack by omitting the sugar and vanilla. Instead, fold in 1 tablespoon finely chopped fresh herbs like dill or chives, then sprinkle with ½ teaspoon smoked paprika and ¼ teaspoon garlic powder before baking.
Serve with a side of whipped feta dip or a sprinkle of grated Parmesan for a protein-packed alternative. 🧀
Flavor Boosters
Add ½ teaspoon espresso powder to the stiff peaks for a subtle coffee note that enhances the sweetness. I’ve also found that ½ teaspoon orange zest adds a zesty brightness that’s perfect for breakfast.
For a tropical vibe, fold in 1 teaspoon coconut extract and top with toasted coconut flakes—this creates a dessert-like texture that’s still light and airy. 🥥
Spiced Options
Infuse the meringues with warmth by adding ¼ teaspoon ground cardamom or ½ teaspoon pumpkin pie spice to the stiff peaks. These spices work surprisingly well and add a cozy, aromatic quality.
For a festive touch, fold in ½ teaspoon rum extract (or a splash of real rum) and bake until golden—these taste like little holiday treats. 🎄
Protein-Packed Add-Ins
Boost the protein content by folding in 2 tablespoons powdered peanut butter (like PB2) or 1 tablespoon collagen peptides into the stiff peaks before baking. These additions keep the meringues light while adding a nutty or savory depth.
For a chocolate twist, mix in 1 tablespoon cocoa powder and drizzle with melted dark chocolate after baking. 🍫
Nutrition facts
Frequently asked questions
Can I use regular sugar instead of granulated sugar?
Yes, but fine-grain sugar works best for even dissolving and smooth texture. If you only have regular sugar, crush it lightly with a rolling pin before adding to prevent graininess. The amount stays the same—just 0.5 teaspoon—but expect slightly less sweetness since larger crystals dissolve slower.
What if my egg whites won’t whip to stiff peaks?
This usually happens if your bowl has traces of fat or your egg whites aren’t at room temperature. First, wash your bowl thoroughly with soapy water and rinse well. For extra insurance, use a clean, grease-free whisk. If your whites are cold, let them sit at room temperature for 30 minutes before whipping. The cream of tartar is also crucial—it stabilizes the proteins.
How do I store these meringues for meal prep?
Store them in an airtight container at room temperature for up to 3 days—they’ll stay crisp! For longer storage, freeze them for 1 month. To reheat, place on a baking sheet and warm at 300°F for 5-7 minutes until crisp again. Never microwave frozen meringues directly, as they’ll lose their texture.
Can I make these without cream of tartar?
Yes, but your meringues might not be as stable. Use 0.125 teaspoon lemon juice or white vinegar as a substitute—these acids help stabilize the egg whites. However, you’ll need to whip them slightly longer (about 5-7 minutes extra) to reach stiff peaks, and they may not hold their shape as well.
Are these egg white clouds suitable for vegans?
No, this recipe isn’t vegan since it uses egg whites. For a vegan alternative, try aquafaba (chickpea brine) whipped with ½ teaspoon apple cider vinegar and 1 teaspoon sugar. The texture will be similar but slightly denser. These vegan “meringues” work well with fruit toppings too!

- Baked Potatoes in Crock Pot Recipe: Buttery Interiors and Crispy Top Magic - November 1, 2026
- Braised Beef Short Ribs Recipe: Crock Pot Fall-Off-Bone Magic in 6 Hours - November 1, 2026
- Crock Pot Cocoa Recipe: Velvety Warmth With Hidden Spice Magic - November 1, 2026