
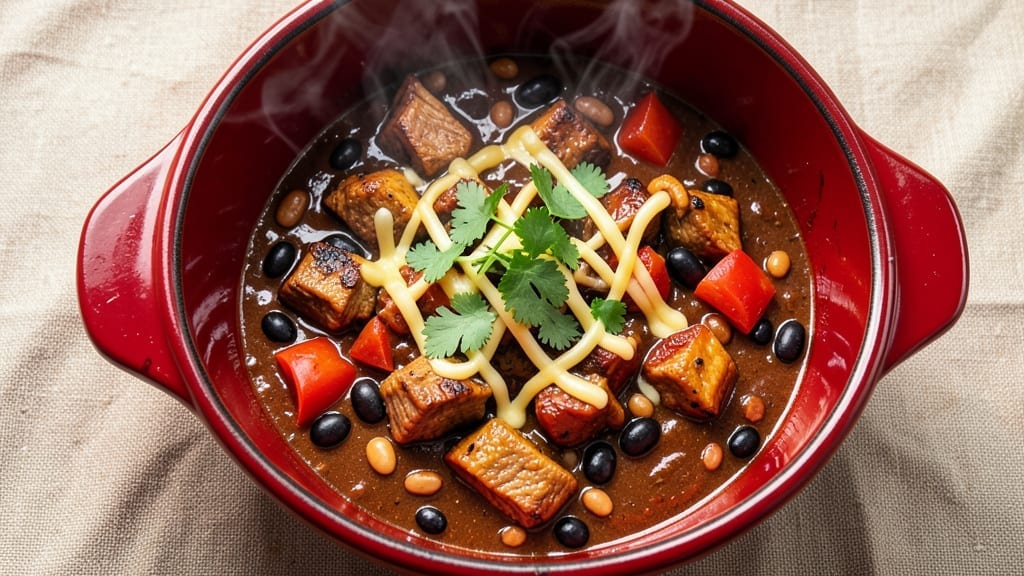
A 6-hour crockpot chili transforms tough beef into melt-in-your-mouth perfection with deep, smoky flavors that develop naturally over time. This isn’t your average chili—it’s a hearty, restaurant-quality dish where slow cooking unlocks layers of flavor that quick methods can’t match.
The secret lies in balancing spices, letting them meld while the beef tenderizes, resulting in a rich, velvety broth that clings to every bean and bite of meat.
The beauty of this recipe is its simplicity: dump everything in the crockpot, set it to low, and let it work its magic. No need for constant stirring or monitoring—just six hours of hands-off cooking that yields a chili so flavorful, it’ll become your go-to weeknight dinner.
The slow process also allows the beans to soften just enough to absorb the smoky, savory broth without turning mushy, creating the ideal texture for every spoonful.
By the time you’re ready to serve, you’ll have a steaming pot of chili with tender beef chunks, perfectly seasoned beans, and a thick, aromatic sauce that’s rich enough to stand alone or pair beautifully with cornbread or crusty rolls.
The aroma alone will have everyone gathering around the table, and the first bite delivers that deep, complex flavor that only slow cooking can achieve.
This chili scales effortlessly for a crowd, reheats perfectly for leftovers, and tastes even better the next day as flavors continue to develop. Whether you’re feeding a family or meal prepping for the week, this recipe delivers consistent, foolproof results with minimal effort.
Let’s get started on creating your new favorite chili recipe.
Ingredients for 6 hour crockpot chili
Six simple ingredients transform into restaurant-quality chili with smoky depth and tender beef.
| Ingredient | Amount | Notes |
|---|---|---|
| Chuck Roast 🥩 | 2 lb | Pre-cut into 1-inch cubes |
| Kidney Beans 🌱 | 1 can | Drained and rinsed (15 oz can) |
| Black Beans 🌱 | 1 can | Drained and rinsed (15 oz can) |
| Pinto Beans 🌱 | 1 can | Drained and rinsed (15 oz can) |
| Tomato Paste 🍅 | ½ cup | Squeeze tube or canned |
| Diced Tomatoes 🍅 | 2 cans | Fire-roasted, 15 oz each |
| Beef Broth 💧 | 4 cups | Low-sodium preferred |
| Chili Powder 🌶️ | 2 tbsp | Smoked or mild variety |
| Ground Cumin 🌿 | 1 tbsp | Toasted for deeper flavor |
| Garlic Powder 🧄 | 1 tbsp | Freshly ground preferred |
| Onion Powder 🧅 | 1 tbsp | Freshly ground preferred |
| Salt 🧂 | 1 tsp | Kosher or sea salt |
| Black Pepper 🌶️ | ½ tsp | Freshly ground preferred |
| Bay Leaves 🌿 | 2 whole | Removed before serving |
| Dark Brown Sugar 🍬 | 1 tbsp | Enhances depth of flavor |
The chuck roast is where the magic happens—it’s the secret to that melt-in-your-mouth texture. Grab it from the butcher counter if you can, or pre-cut cubes from the grocery store meat section work fine. Look for good marbling, which means more flavor. I always buy Costco’s chuck roast when I’m doing a big batch, but the regular supermarket stuff is totally fine for a weeknight dinner. The beans? Trader Joe’s sells those pre-rinsed cans that are perfect—no mess, no fuss. If you’re using dried beans, soak them overnight, but canned is way easier for this recipe.
No chili powder? Mix smoked paprika with a pinch of cayenne for a close substitute. Fresh garlic and onion? Use double the powdered versions—it’s a good shortcut. The tomato paste is non-negotiable though—it’s what gives that rich, thick base. If you’re worried about canned tomatoes being too watery, drain them well and pat dry with a paper towel. The brown sugar might sound weird, but it balances the acidity and adds that deep, caramelized note that makes this chili taste like it simmered all day. Trust me on that one.
This chili tastes even better the next day, so make a double batch if you can. It keeps for 5 days in the fridge and freezes beautifully for 3 months. I like to portion it into containers with a little extra broth on top—just microwave for 2-3 minutes when you’re ready to eat. The beef gets even more tender as it sits, so don’t skip the overnight chilling if you can help it. Serve with cornbread or crusty rolls to soak up all that smoky goodness.
Why You’ll Love This Recipe
- Rich Without Fuss: Between the chuck roast breaking down into shreds and that tomato paste deepening the sauce, every bite has this perfect balance of hearty and smooth. Honestly, I’ve tried fancy chilis, but this one’s the most satisfying—no tricks, just pure flavor.
- Leftovers I Actually Want: This recipe makes way more than I need for one meal, but between us? I love it. The next day, the beans soak up the juices even better, and the meat stays moist. I’ll eat it for lunch three days in a row—no complaints.
- Budget-Friendly Crowd-Pleaser: A whole chuck roast and three kinds of beans? That’s a steal, and it feeds six people for less than takeout. My college roommates and I used to split a pot and argue over who got the last bowl—best kind of problem to have.
Step-by-step instructions for 6 hour crockpot chili
This slow-cooked chili delivers rich, smoky depth that only comes from hours of gentle simmering.
Sear the Chuck Roast for Maximum Flavor
Before adding anything to your crockpot, heat a large skillet over medium-high heat. Add the 2 lb chuck roast cut into 1-inch cubes and sear for 3-4 minutes per side until deeply browned. This step builds a flavor foundation that transforms simple ingredients into something extraordinary.
Work in batches if needed to avoid overcrowding the pan. You’re looking for a rich, caramelized crust on each piece—this will carry through to your chili. Once browned, transfer the beef to a plate and set aside. The sizzling aroma alone will make your kitchen smell amazing.
Layer the Base Ingredients
In the same skillet (no need to clean it—the browned bits are flavor gold), add the 0.5 cup tomato paste and cook for 1-2 minutes until it darkens slightly. This creates a deeper, more complex base flavor. Transfer this to your crockpot.
Next, add the 2 cans diced tomatoes, 4 cups beef broth, 1 tbsp dark brown sugar, 1 tbsp garlic powder, 1 tbsp onion powder, 2 tbsp chili powder, and 1 tbsp ground cumin. Stir everything together gently to combine. The sugar helps balance the acidity from the tomatoes while building depth.
Combine All Ingredients and Cook
Add the seared chuck roast cubes to the crockpot along with the 1 can kidney beans, 1 can black beans, and 1 can pinto beans. Stir everything together just until the beans are evenly distributed. Place the 2 whole bay leaves on top—they’ll infuse subtle earthy notes that elevate the whole dish.
Cover and cook on low heat for 6 hours. The slow cooking breaks down the tough beef into tender, melt-in-your-mouth pieces while allowing all the flavors to meld perfectly. I know it seems like forever, but this is where the magic happens—patience pays off with rich, complex flavors.
Season and Finish
After 6 hours, remove the 2 bay leaves and stir in the 1 tsp salt and 0.5 tsp black pepper. Taste and adjust seasoning if needed—this is your chance to perfect the balance. The chili should be rich with beefy depth, slightly sweet from the brown sugar, and properly spiced.
Let the chili sit for 10-15 minutes before serving. This resting time allows the flavors to settle and the textures to meld perfectly. The beans will soak up all that delicious beef juice, and the chili will develop even more depth. Serve with cornbread or crusty bread to soak up every last bit of that smoky goodness.
Pro Tips For Making 6 Hour Crockpot Chili
- Brown the Chuck First: That raw chuck roast straight into the crockpot? Nope. Sear it first in a hot skillet—4 minutes per side—until it’s deep brown. I learned this the hard way: skipping this step leaves your chili tasting like it’s missing something. The crust adds flavor that no slow cooker can replicate.
- Rinse Those Beans: Drain and rinse the kidney, black, and pinto beans twice before adding them. The canned liquid is salty, and if you skip this, your chili will taste like a brine bath. (Yes, even if the recipe doesn’t say it—trust me.)
- Stir the Paste In: Don’t just dump the tomato paste in a lump. Mix it with a splash of broth or water first, then whisk it into the crockpot. That way, it dissolves smoothly instead of clumping like a sad, thick blob. Your chili will be silky, not grainy.
- Check the Heat: If your crockpot runs hotter than 200°F (or if it’s one of those cheap ones that gets sketchy), reduce the cook time to 5 hours instead of 6. Overcooking turns the beans mushy and the meat stringy—neither of which you want in a chili that’s supposed to be hearty.
Common mistakes when making perfect results
Skipping the Sear
This is the most common mistake I see—skipping the sear step entirely. That caramelized crust on your beef is what creates the deep, rich flavor that makes crockpot chili taste like it came from a smoky pit.
Without it, your chili will taste more like stew than the complex, smoky masterpiece we’re going for. Take 5 minutes to brown your beef in a skillet—it makes all the difference. 🔥
Overcrowding the Crockpot
Don’t be tempted to double the recipe without adjusting your crockpot size. When your ingredients are packed too tightly, they won’t cook evenly, and the heat won’t circulate properly. This leads to uneven cooking and potentially mushy beans.
For a standard 6-quart crockpot, stick to this recipe’s measurements—you can always make extra batches separately if you need more servings.
Using High Heat
Setting your crockpot to high heat might seem faster, but it’s a recipe for disaster. High heat causes the chili to cook too quickly, leaving the beef tough and the beans undercooked.
The magic happens at low heat for 6 hours—this breaks down the connective tissue in the beef while allowing all the flavors to meld together perfectly. Trust the process and keep it on low.
Skipping the Resting Time
I can’t stress this enough—never skip the 10-15 minute rest before serving. This resting period lets the juices redistribute throughout the chili, making every bite more flavorful.
Skipping it means you’ll end up with a pot of chili where the first spoonful is amazing, but the last is dry and bland. It’s worth the wait!
Ignoring the Bay Leaves
Those little bay leaves might seem insignificant, but they add subtle earthy notes that elevate your chili from good to extraordinary. Don’t forget to add them during cooking, and remember to remove them before serving.
I’ve seen people skip them entirely, and while the chili still tastes great, it’s missing that little something special that makes it truly memorable.
Over-Salting Early
It’s tempting to add all the salt at the beginning, but this can make your chili taste flat and bland. Instead, wait until the very end to add the 1 teaspoon salt.
This way, you can taste and adjust the seasoning perfectly. Remember, you can always add more salt, but you can’t take it out once it’s in there. 💡
Nutrition facts
Frequently asked questions
Can I use ground beef instead of chuck roast?
You can absolutely substitute! Use 1.5 lbs of ground beef (80/20 blend works best) and brown it thoroughly in the skillet first. The texture will be slightly different—more uniform and less chunky—but the flavor will still be rich and satisfying. Just make sure to drain any excess fat after browning to keep your chili from becoming greasy.
How do I make this vegetarian?
Swap the beef for 1.5 lbs of extra-firm tofu (pressed and cubed) or 1 can lentils (drained). Use 1 tbsp soy sauce or tamari with the tofu to enhance flavor. For a meatier texture, try 1.5 lbs of mushrooms (like portobello or cremini) sautéed with garlic and onion powder before adding to the crockpot. The cooking time remains the same—just 6 hours on low.
Can I make this in a slow cooker with less time?
Yes, but the flavor won’t be as deep. Cook on high for 4 hours or low for 3 hours, but expect the beef to be slightly tougher. The 6-hour low setting is ideal for maximum tenderness and flavor development. If you’re short on time, try adding 1 cup of beef broth after the initial 3 hours to help break down the meat further.
What’s the best way to reheat leftovers?
Reheat in the microwave for 2-3 minutes, stirring halfway, or on the stovetop over medium-low heat for 5-7 minutes. Add a splash of beef broth or water if it’s too thick. The chili actually tastes better the next day as flavors continue to meld! Store leftovers in an airtight container for up to 5 days in the fridge or freeze for 3 months.
How can I make this spicier?
Add 1/2 tsp cayenne pepper or 1 tbsp hot sauce at the end for immediate heat. For deeper spice, include 1-2 chipotle peppers in adobo sauce (minced) or 1 tsp smoked paprika with the chili powder. Remember to taste as you go—you can always add more heat, but you can’t remove it! For a smoky kick, top with diced jalapeños** or a dash of hot sauce when serving.

- Pea Soup Instant Pot Recipe: Velvety Green Smoothness in 20 Minutes - November 1, 2026
- Pork Loin Pulled Pork Crock Pot Recipe: Slow-Smoked Tenderness With Zero Dryness - November 1, 2026
- Baked Potatoes in Crock Pot Recipe: Buttery Interiors and Crispy Top Magic - November 1, 2026