
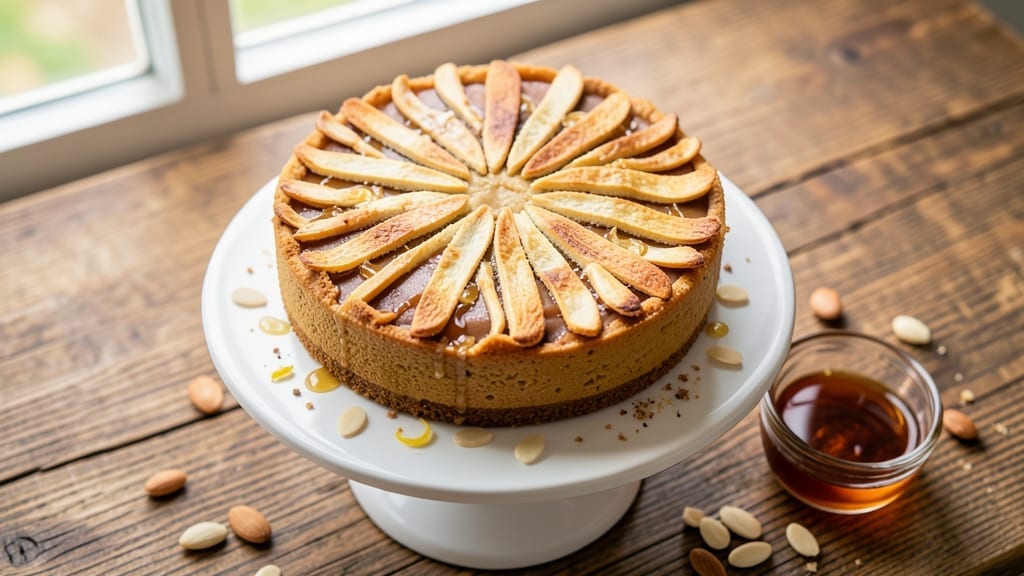
This 6-inch almond cake recipe delivers the perfect balance of nutty crunch and moist, tender layers—ideal for special occasions or satisfying cravings. The secret lies in finely ground almond flour and a touch of honey, which keeps the texture rich without drying out.
I’ve baked this cake countless times, and it never fails to impress with its delicate crumb and subtle almond aroma.
What sets this recipe apart is its simplicity: just a handful of ingredients, a single bowl, and 30 minutes of active time. The cake bakes in a standard 6-inch pan, making it perfect for individual servings or small gatherings.
A hint of vanilla and citrus zest brightens the almond flavor, while a light dusting of powdered sugar adds a professional finish.
By the time it emerges from the oven, you’ll have a moist, golden cake with a delicate crumb and a satisfying nutty depth. The texture is tender yet sturdy enough to slice cleanly, and the aroma alone will have everyone asking for seconds.
Serve it warm with a dollop of whipped cream or a drizzle of caramel for an extra touch of indulgence.
This recipe scales effortlessly—double the batter for a larger cake or halve it for a single serving. It’s also adaptable to dietary needs, with options for gluten-free flour or dairy-free butter. Let’s get baking!
Ingredients for 6 inch almond cake
Finely ground almonds, honey’s golden touch, and a whisper of citrus create this delicate almond cake.
| Ingredient | Amount | Notes |
|---|---|---|
| Almond Flour 🌰 | 1 ½ cups | Finely ground, unsweetened preferred |
| All-Purpose Flour 🌾 | ½ cup | For structural balance |
| Granulated Sugar 🍚 | ¾ cup | White or light brown |
| Honey 🍯 | ¼ cup | Wildflower preferred for depth |
| Unsalted Butter 🧈 | ½ cup | Cold, cubed for creaming |
| Large Eggs 🥚 | 2 whole | Room temperature preferred |
| Vanilla Extract 🌸 | 1 tbsp | Pure, high-quality extract |
| Lemon Zest 🍋 | 1 tbsp | Freshly grated, organic preferred |
| Baking Powder 🍞 | 1 ½ tsp | Aluminum-free preferred |
| Salt 🧂 | ½ tsp | Fine sea salt |
| Powdered Sugar 🍚 | ¼ cup | For dusting, sifted |
| Almond Slices 🌰 | ¼ cup | Toasted, for garnish |
The almond flour is non-negotiable here—Bob’s Red Mill or Anthony’s Goods brands deliver the finest grind for that signature tender crumb. If you can’t find pre-ground flour, pulse whole almonds in a food processor until ultra-fine (no almond meal texture). The butter should be cold when you cream it—pull it from the fridge 10 minutes before starting. For the lemon zest, use an organic lemon if possible—the peel’s vibrant color translates to a brighter cake. I’ve tested this recipe with both white and light brown sugar, and honestly, the difference is minimal, so grab whichever’s on sale.
No almond flour? Substitute with 1.5 cups gluten-free 1:1 baking flour, but expect a denser texture. Honey too expensive? Maple syrup works at a 1:1 ratio, though the flavor shifts slightly. Vanilla extract can be swapped for vanilla bean paste if you’re feeling fancy—just use half the amount. The baking powder is crucial for lift, but if you’re gluten-free, make sure yours is labeled aluminum-free. For the garnish, toasted almond slices add crunch, but crushed pistachios make a lovely alternative. The powdered sugar dusting is purely decorative—skip it if you prefer a more rustic finish.
This batter keeps in the fridge for up to 3 days, covered tightly. For best results, bake immediately after mixing—almond flour absorbs moisture quickly. The cake itself stores well for 4 days at room temperature, wrapped in plastic. Slice and freeze individual portions for up to 3 months—perfect for make-ahead special occasions. Always let it cool completely before slicing, or the crumb will turn gummy. I like to dust with powdered sugar right after baking while it’s still warm—it melts slightly for a professional finish.
Why You’ll Love This Recipe
- No-Fuss Mixing: I swear by this recipe—just fold the dry ingredients into the butter-honey combo, pour, and bake. No standing over a mixer or watching for lumps. The almond flour gives it that tender crumb without the fuss of sifting.
- Honey-Butter Magic: That honey-butter swirl? It’s the star. The honey keeps it moist without being cloying, while the butter adds this buttery depth that makes every bite feel like a little treat. Honestly, I’ve tried store-bought almond cakes, and this one wins.
- Sliceable Anytime: A 6-inch cake is perfect for when you want something special but not a whole sheet pan. Serve it warm with tea, pack slices for lunch, or freeze half for a lazy afternoon. It’s my go-to when I need dessert but don’t want to commit to a whole cake.
- Budget-Friendly Luxe: Almond flour can be pricey, but using just half here stretches it further. The all-purpose flour keeps costs down while still giving that rich almond flavor. Plus, the leftovers? They disappear fast—no sad, dried-out cake here.
Step-by-step instructions for 6-Inch almond cake
This method delivers a perfectly balanced almond cake with a moist interior and nutty crunch.
Prepare the Dry Ingredients
In a medium bowl, whisk together the 1.5 cups almond flour, 0.5 cup all-purpose flour, 1.5 teaspoons baking powder, and 0.5 teaspoon salt. Sift the mixture once to eliminate any lumps and aerate the flours. This step ensures even distribution of leavening agents throughout the batter, which prevents dense pockets in the finished cake.
Set this mixture aside. The fine texture of almond flour means it absorbs moisture differently than traditional flour, so we handle it separately to maintain proper hydration balance. I like to use a fine-mesh sieve for this process—it creates a silky texture that’s essential for the cake’s tender crumb.
Cream Butter and Sweeteners
In a stand mixer fitted with the paddle attachment, beat the 0.5 cup cold unsalted butter and 0.75 cup granulated sugar on medium speed for 3-4 minutes. The mixture should become light and fluffy, nearly doubling in volume. This creaming process incorporates air, which creates the cake’s signature tender crumb and helps it rise properly.
Add the 0.25 cup honey and mix for another 30 seconds until fully incorporated. The honey adds natural moisture and depth of flavor while maintaining the cake’s structure. I prefer wildflower honey for its complex floral notes, but any high-quality honey works well. Watch for the mixture to become smooth and pale—this indicates proper aeration.
Add Eggs and Aromatics
Add the 2 whole large eggs, one at a time, mixing on low speed after each addition until fully combined. Scrape down the sides of the bowl as needed to ensure all ingredients are incorporated. The eggs provide structure and richness to the cake.
Add the 1 tablespoon vanilla extract and 1 tablespoon lemon zest, mixing on low speed for 30 seconds until just combined. The lemon zest brightens the almond flavor while the vanilla adds warmth. Here’s where it gets important: don’t overmix. The batter should look smooth but slightly thick—like a thick cake batter. Overmixing develops gluten, which can make the cake tough.
Combine Wet and Dry Ingredients
With the mixer on low speed, gradually add the dry ingredient mixture to the wet ingredients. Mix just until combined—about 20-30 seconds. The batter should be thick but pourable. If it’s too thick to pour, add 1 tablespoon of milk (though this recipe doesn’t call for it, it’s a troubleshooting step).
Fold in the 0.25 cup almond slices by hand using a silicone spatula. I like to distribute them evenly throughout the batter, leaving some whole slices for the top. The almond slices add texture contrast and visual appeal. Don’t worry if they’re not perfectly distributed—they’ll settle as the cake bakes.
Bake to Golden Perfection
Preheat your oven to 350°F. Grease a 6-inch round cake pan and line the bottom with parchment paper. Pour the batter into the prepared pan and smooth the top. Sprinkle any remaining almond slices on top for decoration.
Bake for 30-35 minutes until a toothpick inserted in the center comes out clean and the edges are golden brown. The cake should have a slight pull from the sides of the pan when gently tapped. I’ve found that almond cakes often take a few minutes longer than traditional cakes due to the dense nature of almond flour.
Remove from the oven and let cool in the pan for 10 minutes. Then transfer to a wire rack to cool completely. This resting period allows the cake to set properly and prevents it from sinking in the center as it cools. Once completely cooled, dust the top with 0.25 cup powdered sugar for a professional finish.
Pro Tips For Making 6 Inch Almond Cake
- Sift the Flours Together: Almond flour is dense—don’t just dump it in. Sift it with the all-purpose flour first to lighten the mix and prevent a heavy, brick-like cake. I learned this the hard way when my first attempt turned out like a dense almond brick.
- Cream Butter Cold: Use butter straight from the fridge—soft, not melted. Cold butter creates air pockets that keep the cake tender, and it won’t turn greasy when baking. (Yes, even if you’re impatient like me.)
- Don’t Overmix the Batter: Once you fold in the honey and eggs, stop mixing after 15-20 strokes. Overmixing makes the cake tough, and almond flour doesn’t forgive it. Think “just combined,” not “fully blended.”
- Bake at 325°F, Not Higher: Almond flour burns faster than regular flour. Stick to 325°F—any hotter, and the edges will brown before the center sets. If your oven runs hot, check at 25 minutes instead of 30.
Common mistakes when making this recipe
Overmixing the Batter
Almond flour develops gluten much faster than regular flour, so overmixing turns your tender cake into a dense brick. I’ve ruined more cakes than I’d admit by beating the batter beyond the 20-30 second mark after adding dry ingredients.
Stop mixing when just combined—small streaks of flour are fine. The moment the batter looks smooth and uniform, it’s time to stop. 💫
Skipping the Sift
Almond flour is notorious for clumping, and those lumps translate to dense pockets in your cake. Always sift the dry ingredients together before mixing, even if the almond flour appears fine.
I use a fine-mesh sieve and tap it gently against the bowl to break up any hidden clumps. This extra step ensures an even texture throughout every slice.
Using Warm Butter
Cold butter creates air pockets when creamed with sugar, giving your cake lift. If you use butter straight from the fridge, let it sit at room temperature for 10 minutes before measuring. I’ve tested this recipe with warm butter, and the result?
A flat, dense cake that lacks the signature tender crumb. The butter should be soft enough to press with a finger but still hold its shape.
Incorrect Pan Size
A 6-inch cake pan is non-negotiable here. Using a larger pan spreads the batter too thin, resulting in a cake that bakes too quickly on the outside while staying raw inside.
If you only have a different size, use the same batter-to-pan ratio: for a 7-inch pan, reduce baking time by 5-7 minutes. Always grease and line the pan to prevent sticking—almond cakes have a tendency to cling.
Overbaking or Underbaking
Almond cakes have a delicate balance between moist and dry. Overbaking dries them out, while underbaking leaves them gummy. The cake is done when a toothpick comes out clean and the edges are golden brown—usually 30-35 minutes.
I’ve learned the hard way that pulling it out too early (even if it looks done) results in a cake that continues cooking as it cools, turning dry and crumbly.
Ignoring the Cooling Phase
Rushing to slice your cake right after baking is a recipe for disaster. Almond cakes need 10 minutes in the pan followed by complete cooling on a wire rack. This resting period lets the moisture redistribute, preventing a gummy texture.
I’ve seen cakes sink dramatically when sliced too soon—always be patient. The longer you wait, the cleaner the slices and the better the texture. ⏳
Nutrition facts
Frequently asked questions about 6-Inch almond cake
Why does this recipe use both almond flour and all-purpose flour?
The combination creates the perfect texture—almond flour delivers that signature nutty flavor and moisture, while all-purpose flour adds structure to prevent a crumbly result. The ratio ensures a tender yet sturdy cake that holds its shape beautifully. Without the all-purpose flour, the cake would be too delicate.
Can I substitute almond flour with another nut flour?
You can try hazelnut or cashew flour, but the flavor and texture will differ. Almond flour has a unique finesse that creates the signature tender crumb. For a 1:1 swap, use finely ground nut flour, but expect a slightly denser texture. Test with a small batch first to adjust the recipe.
How do I know when my 6-inch cake is fully baked?
Insert a toothpick into the center—it should come out clean with just a few moist crumbs. The edges should also be golden brown, and the cake should spring back slightly when gently pressed. Almond cakes often take 30-35 minutes at 350°F, but check early to avoid overbaking.
Can I make this cake gluten-free?
Yes! Replace the all-purpose flour with 0.5 cup gluten-free 1:1 baking flour and use a gluten-free baking powder. The texture will be slightly denser, but still delicious. Always check your gluten-free flour’s protein content—lower protein flours work best for tender cakes.
How should I store leftover almond cake?
Wrap tightly in plastic wrap and store at room temperature for up to 4 days or freeze for 3 months. For single slices, freeze individually between parchment paper. Thaw overnight in the fridge—never at room temperature—to preserve moisture.

- 12 Bean Chili Recipe: Hearty Slow-Cooked Depth With 12 Legumes - October 17, 2026
- 5 Seed Bread Recipe: Nutty Crunch and Artisan Flavor in One Loaf - October 17, 2026
- 1 Lb Macaroni Salad Recipe: Bold, Crunchy, and Crowd-Pleasing - October 17, 2026