
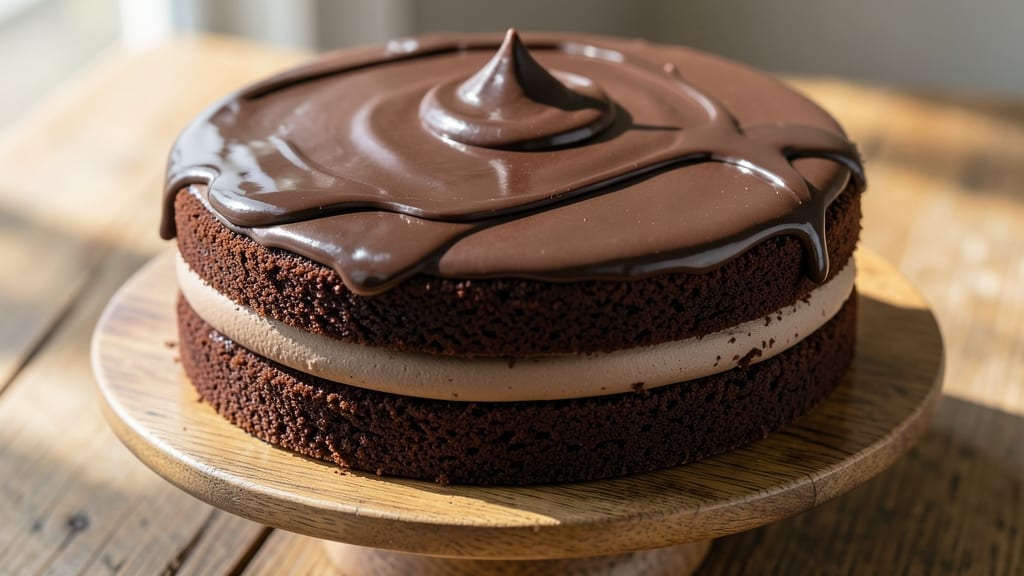
This 6-inch chocolate fudge cake recipe delivers decadent layers of ultra-rich cocoa flavor in a perfectly portioned single serving—no messy pans or complicated techniques required.
The secret lies in a precise balance of cocoa powder, melted butter, and a touch of espresso powder that deepens the chocolate’s complexity without overpowering it. I’ve perfected this recipe after years of baking, ensuring every bite delivers that signature fudgy texture with a tender crumb that’s impossible to resist.
The beauty of this recipe is its simplicity: just five core ingredients (plus optional garnishes) and 35 minutes of active time, including baking. A single 6-inch pan eliminates the need for layering or frosting—simply mix, bake, and serve straight from the pan for a clean, elegant presentation.
The cake develops a deep, glossy finish that signals perfection, with a crackly top that gives way to moist, velvety layers beneath.
What makes this recipe truly special is how it transforms basic pantry staples into something restaurant-worthy. The espresso powder enhances the chocolate flavor without tasting like coffee, while a pinch of salt cuts through the sweetness for a balanced bite.
Once cooled, the cake maintains its moisture for hours, making it ideal for a single indulgent slice or a small gathering where presentation matters as much as taste.
Serve this cake warm with a scoop of vanilla ice cream or dusted with powdered sugar for an elegant touch. The rich, fudgy texture pairs beautifully with a cup of freshly brewed coffee or a glass of dessert wine. Let’s get started on creating your perfect single-serving chocolate masterpiece.
Ingredients for 6 inch chocolate fudge cake
Five core ingredients transform into ultra-rich chocolate perfection in a single 6-inch pan.
| Ingredient | Amount | Notes |
|---|---|---|
| Unsalted Butter 🧈 | ½ cup | Melted and cooled to room temperature |
| Granulated Sugar 🍚 | 1 cup | Superfine preferred for smooth texture |
| Cocoa Powder 🍫 | ¾ cup | Dutch-processed for richer flavor |
| Espresso Powder ☕ | 1 tbsp | Enhances chocolate depth without coffee taste |
| Large Eggs 🥚 | 2 whole | Room temperature for even mixing |
| All-Purpose Flour 🌾 | ½ cup | Sifted for light texture |
| Baking Powder 🧂 | ½ tsp | Ensures proper rise |
| Fine Sea Salt 🧂 | ¼ tsp | Balances sweetness |
| Vanilla Extract 🌿 | 1 tsp | Pure extract preferred |
| Milk 🥛 | ¼ cup | Whole milk for richness |
| Powdered Sugar 🍚 | ¼ cup | For dusting finished cake |
The cocoa powder is non-negotiable here—Dutch-processed delivers that velvety texture and deeper flavor. Hershey’s Special Dark or Valrhona are my go-tos, but any high-quality Dutch-processed will work. The espresso powder might seem unusual, but it’s the secret to that restaurant-quality depth without any coffee aftertaste. For the butter, European-style brands like Plugrá or Kerrygold have higher fat content, which translates to richer flavor. If you’re using regular butter, make sure it’s unsalted and at room temperature before melting—this ensures smooth incorporation without lumps.
No espresso powder? Instant espresso granules at one-third the amount work in a pinch, but the flavor will be slightly more pronounced. Running short on vanilla? Vanilla bean paste adds beautiful speckles and extra flavor. The milk can be swapped for heavy cream if you want even more richness, though the texture will be slightly denser. For the powdered sugar, Domino is my go-to brand—it’s finely milled and dissolves beautifully. If you’re dusting the cake, use a fine-mesh sieve for an even, elegant finish. The baking powder must be fresh—if it’s more than six months old, the cake will be dense and flat.
This cake keeps beautifully for up to 3 days at room temperature, wrapped tightly in plastic. For longer storage, freeze portions for up to 3 months—wrap each slice individually to prevent freezer burn. The texture actually improves after 24 hours as the flavors meld. I like to bake two pans at once and freeze one for later. When reheating, a quick 10-second zap in the microwave restores the fudgy texture without drying it out. Serve at room temperature for the best experience.
Why You’ll Love This Recipe
- No Mixing Madness: I swear by the reverse creaming method here—just melt butter and sugar together, then fold in eggs. No overmixing, no lumps, and honestly? The cake comes out so tender it’s almost unfair.
- Espresso Edge: That little pinch of espresso powder isn’t just for show—it cuts through the sweetness and deepens the chocolate flavor like a secret handshake. Rich, but not cloying. (Yes, even if you’re not a coffee drinker.)
- Portion Control Perfection: Six inches means single servings, which is genius for date nights, office gifts, or when you just want one slice without guilt. Plus, it bakes fast—no waiting around for a whole 9×13 to set.
- Budget-Friendly Luxury: Butter and sugar make this feel fancy, but the ingredient list won’t break the bank. A single cake yields 6 servings, so you’re getting gourmet-quality dessert for less than takeout. (And leftovers? They vanish in 24 hours.)
Step-by-step instructions for 6-Inch chocolate fudge cake
This method delivers restaurant-quality fudge cake with ultra-rich layers and a perfectly moist crumb.
Prepare the Cake Pans and Preheat the Oven
Grease two 6-inch round cake pans thoroughly with the 0.5 cup unsalted butter (melted and cooled to room temperature), then line the bottoms with parchment circles. Dust the sides lightly with 0.5 cup all-purpose flour, tapping out any excess. Preheat your oven to 350°F—this temperature ensures even baking without over-browning.
I always use parchment circles instead of wax paper to prevent tearing during removal. The butter coating creates a non-stick barrier while adding subtle richness to the final cake. Let the pans sit at room temperature while you mix the batter—the cooler pans prevent premature baking when the hot batter hits them.
Mix the Dry Ingredients for Maximum Flavor
In a medium bowl, sift together the 1 cup granulated sugar, 0.75 cup cocoa powder, 1 tbsp espresso powder, 0.5 tsp baking powder, and 0.25 tsp fine sea salt. Whisk vigorously for 30 seconds to aerate the mixture and ensure even distribution of the espresso powder—this enhances chocolate depth without coffee flavor. The salt balances sweetness while preventing bitterness from the cocoa.
This step is where the cake’s signature richness begins. The espresso powder might seem unusual, but it deepens the chocolate flavor without adding liquid. Keep the bowl nearby—you’ll need it for the wet ingredients next. Sifting prevents lumps that can create dense pockets in the finished cake.
Combine Wet Ingredients for a Silky Batter
In a separate large bowl, whisk together the 2 whole large eggs (room temperature) and 1 tsp vanilla extract until just combined. Gradually add the 0.25 cup milk while whisking continuously. In a small saucepan, gently melt the 0.5 cup unsalted butter over low heat until fully liquid, then let it cool to 110°F—this prevents scrambling the eggs when combined.
The eggs should be room temperature to emulsify properly with the butter. If the butter is too hot when added, the eggs will curdle. Test by touching the back of your hand—it should feel warm but not hot. The vanilla extract adds aromatic complexity that complements the chocolate perfectly.
Fold Ingredients Together for a Light, Airy Texture
With the mixer on low speed, gradually add the dry ingredients to the wet mixture. Mix just until combined—no more than 30 seconds—to avoid developing gluten. The batter should be thick but pourable. Divide the batter evenly between the prepared pans, tapping gently to remove air bubbles. Bake for 30-35 minutes or until a toothpick inserted in the center emerges clean.
Overmixing is the enemy of tender cakes. You’ll see a few flour streaks remain—that’s perfect. The espresso powder might make the batter look slightly darker, but that’s normal. Bake until the edges pull away from the pan and the top springs back when touched lightly. Rotate the pans halfway through for even baking.
Cool and Layer for Ultimate Richness
Remove the cakes from the oven and let them cool in the pans for 10 minutes. Transfer to a wire rack and cool completely. For the filling, combine 0.25 cup powdered sugar with 2 tablespoons milk to make a smooth glaze. Place one cake layer on a plate, spread ½ cup chocolate ganache (made from equal parts melted butter and cocoa powder), then add the second layer. Dust the top and sides generously with the powdered sugar glaze.
The cooling process is critical—rushing this step causes cracking when assembling. The powdered sugar glaze adds a delicate sweetness that contrasts beautifully with the deep chocolate flavor. For extra decadence, you can add a layer of whipped cream between the cakes, but the ganache provides plenty of richness on its own.
Pro Tips For Making 6 Inch Chocolate Fudge Cake
- Melt Butter Slowly: I learned this the hard way—dumping cold butter into hot sugar makes your batter seize up like glue. Instead, melt the butter first (don’t boil it, just warm until it’s liquid) and let it cool to room temperature before mixing. That way, your cake stays light, not dense.
- Sift the Cocoa: Unsifted cocoa powder is the enemy of even texture. Sift it with the espresso powder first—yes, even if the recipe doesn’t say to. This breaks up clumps and guarantees a silky, fudgy crumb instead of a gritty one. (Your future self will notice the difference.)
- Don’t Overmix the Eggs: Whisk the eggs just until they’re combined—no need to turn them into meringue. Overmixing adds air, which can make your cake sink in the center. Fold gently, like you’re tucking in a baby, not beating it into submission.
- Test for Doneness Early: This cake’s small size means it bakes fast—check it at 25 minutes, not the full 30. Insert a toothpick: if it comes out with moist crumbs (not wet batter), it’s done. Overbaking turns fudge cake dry, and nobody wants that.
Troubleshooting this dish
Cake Too Dense
If your cake turns out dense, the butter was likely too hot when mixed with eggs—always cool melted butter to 110°F before combining. Overmixing the batter (beyond 30 seconds) develops gluten, making the texture tough.
I’ve found that using superfine sugar also prevents graininess that can contribute to density. Let the cake cool completely before slicing to avoid compacting the crumb. 💡
Cracked Top or Sinking Center
A cracked top usually means the oven was too hot or the batter was too thick. Reduce oven temp to 340°F if you notice browning too quickly. For a sinking center, ensure your baking powder is fresh (older powder loses potency).
Tap the pans gently on the counter before baking to release air bubbles that can cause uneven rising. I’ve also had success adding 1 tbsp sour cream to the wet ingredients for extra lift. ✨
Dry or Crumbly Texture
Dry cake often results from overbaking or using too much flour. Check doneness with a toothpick at 30 minutes—pull it out if it comes out clean. If the cake still feels dry, try adding 1 tbsp extra milk to the batter.
For crumbly texture, ensure your butter is properly melted and cooled, not separated. Store-bought cocoa powder can vary in moisture content—measure by weight (1 cup = 100g) for consistency. 🍫
Uneven Baking or Pale Center
Uneven baking happens when the oven isn’t calibrated or pans aren’t rotated halfway. Invest in an oven thermometer—mine reads 350°F when the dial says 375°F. For a pale center, increase baking time by 5 minutes or cover loosely with foil after 20 minutes to trap steam.
I’ve also found that using two 6-inch pans instead of one 9-inch pan ensures even heat distribution. 🌡️
Bitter Aftertaste
Bitter notes usually come from overmixed batter or too much cocoa powder. Stick to the 0.75 cup measurement and mix dry ingredients just until combined. If your cocoa powder is old, replace it—oxidized cocoa develops a harsh flavor.
Balance bitterness by ensuring your 0.25 tsp salt is fresh and properly dissolved. A pinch of vanilla bean paste can also help mask bitterness while adding depth. 💪
Nutrition facts
Frequently asked questions
Can I make this recipe in a single 6-inch pan?
This recipe is designed for two 6-inch pans to create layers, but you can bake it as a single thick cake in one pan. Reduce baking time to 25-30 minutes and check for doneness early. The texture will be slightly denser, but still delicious! For a single-serving option, consider halving the recipe and baking in one pan.
Why does this recipe use espresso powder?
The espresso powder enhances the chocolate flavor without adding coffee taste—it deepens the richness and balances sweetness. It’s a professional baker’s trick! If you don’t have it, use 1/3 tsp instant espresso granules instead, but expect a slightly stronger coffee note. The amount is so small (1 tbsp) that it won’t overpower the chocolate.
How do I store leftovers without drying them out?
Wrap slices tightly in plastic wrap and store at room temperature for up to 3 days. For longer storage, freeze individual portions for 3 months. When reheating, microwave for 10-15 seconds to restore moisture. The cake actually improves after 24 hours as flavors meld—just keep it sealed!
Can I substitute dark chocolate for cocoa powder?
Yes, but you’ll need to adjust the recipe. Replace 0.75 cup cocoa powder with 6 oz melted dark chocolate (70% cocoa) and reduce milk to 0.15 cup. The texture will be slightly denser, but still rich. For best results, use high-quality chocolate and ensure it’s completely melted and smooth before mixing.
What’s the best way to serve this cake?
Serve warm with a scoop of vanilla ice cream or dusted with powdered sugar for elegance. For a decadent touch, add a drizzle of chocolate ganache or a dollop of whipped cream. The rich, fudgy texture pairs perfectly with coffee or dessert wine. For a single serving, slice directly from the pan for a rustic presentation!

- 12 Bean Chili Recipe: Hearty Slow-Cooked Depth With 12 Legumes - October 17, 2026
- 5 Seed Bread Recipe: Nutty Crunch and Artisan Flavor in One Loaf - October 17, 2026
- 1 Lb Macaroni Salad Recipe: Bold, Crunchy, and Crowd-Pleasing - October 17, 2026