
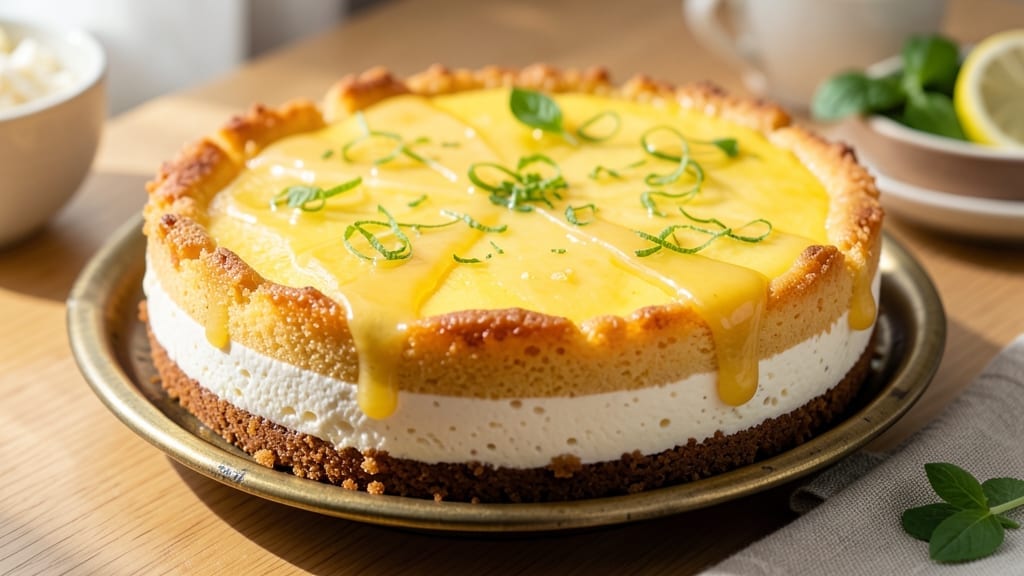
A 6-inch lemon cheesecake delivers bright citrus notes and creamy perfection in every bite—ideal for sharing or satisfying a single craving. ✨ The secret lies in a buttery, zesty crust that stands up to the tangy filling, all baked in a single 350°F oven for 50-60 minutes.
This recipe balances simplicity with restaurant-quality results, using just 9 ingredients and one bowl for minimal cleanup.
The crust combines graham crackers, melted butter, and a touch of lemon zest for an aromatic base that complements the filling. Meanwhile, the cream cheese mixture gets whipped to light and airy before baking, ensuring a smooth texture without cracks.
Chilling for at least 4 hours (or overnight) is key—it lets flavors meld and the center set properly.
What you’ll end up with is a golden, glossy cheesecake with a crisp crust and a tangy, velvety filling that’s brightened by lemon juice and zest. Serve it at room temperature with a dollop of whipped cream or a drizzle of honey for extra indulgence.
Perfect for summer gatherings, holidays, or whenever you crave a dessert that’s equal parts elegant and effortless.
This recipe scales easily—double the batch for an 8-inch pan or use the same proportions for individual 4-inch ramekins. Garnish with fresh berries or a sprinkle of powdered sugar for a polished touch. Let’s get baking!
Ingredients for 6 inch lemon cheesecake
Nine essential ingredients transform into a golden, tangy lemon cheesecake with minimal effort.
| Ingredient | Amount | Notes |
|---|---|---|
| Graham Crackers 🍪 | 1 ½ cups | Crushed finely for crust texture |
| Unsalted Butter 🧈 | ½ cup | Melted, full-fat preferred |
| Lemon Zest 🍋 | 1 tbsp | From 1 large organic lemon |
| Cream Cheese 🧀 | 8 oz | Full-fat, room temperature |
| Granulated Sugar 🍚 | ¾ cup | White sugar for sweetness |
| Sour Cream 🥛 | ¼ cup | Full-fat for creaminess |
| Fresh Lemon Juice 🍋 | ½ cup | From 2-3 lemons, strained |
| Large Eggs 🥚 | 2 whole | Room temperature for blending |
| Vanilla Extract 🌿 | 1 tsp | Pure vanilla for aroma |
The graham crackers should be Honey Maid or similar—avoid any with artificial flavors. Melt the butter slowly over low heat to prevent burning, then let it cool slightly before mixing. For the lemon zest, organic lemons yield the brightest flavor; scrub the peel thoroughly to remove any wax. The cream cheese must be full-fat (like Philadelphia brand) and completely room temperature—this prevents lumps in the filling. If your kitchen runs warm, let it sit out for 30 minutes before starting. For the lemon juice, freshly squeezed makes all the difference—bottled juice lacks the same brightness.
No full-fat cream cheese? Neufchatel works in a pinch, but expect slightly less richness. Substituting sour cream? Use Greek yogurt at the same amount for tanginess. Running short on lemons? Lemon extract (½ tsp) can supplement, but nothing beats fresh. For the graham crackers, digestive biscuits or shortbread add a different texture if needed. The eggs must be room temperature—cold eggs create air pockets in the batter. If you’re concerned about salmonella, use pasteurized eggs or make a water bath (bake in a pan of hot water). The vanilla extract should be pure, not imitation—McCormick or Nielsen-Massey are reliable brands.
Assemble the crust immediately after mixing—press it firmly into the pan for an even base. The filling should be smooth and glossy before baking; if it looks curdled, strain it through a fine-mesh sieve. Bake at 350°F without opening the oven until the edges are set (about 50 minutes). Let it cool completely before chilling, then refrigerate for at least 4 hours—this is non-negotiable for proper texture. Store leftovers covered in the fridge for up to 5 days, though it’s best enjoyed within 2 days. The cheesecake freezes beautifully for up to 3 months—wrap tightly in plastic wrap and foil for best results.
Why You’ll Love This Recipe
- No Crust Fuss: I crush the graham crackers right in the pan—no food processor, no extra bowls. Toast them with butter until they’re golden, and suddenly, you’ve got a buttery, crunchy base that takes two minutes flat.
- Zesty Magic: That lemon zest? It’s the secret weapon. The crust gets a bright, citrusy kick, while the cream cheese filling stays silky with just enough tang to make every bite feel like a little sunshine. Honestly, the first time I tasted it, I wondered why I’d ever made plain cheesecake.
- Single-Serve Perfection: Six inches is the ideal size—big enough to feel special, small enough to eat in one sitting. Take it to a picnic, a potluck, or just enjoy it while binge-watching your favorite show. (Yes, even on a Tuesday night.)
Step-by-step instructions for 6-Inch lemon cheesecake
Here’s the precise method for a perfectly balanced lemon cheesecake with a buttery crust and silky filling.
👨🍳 Step 1: Prepare the Crust with Perfect Texture
Preheat your oven to 325°F and grease a 6-inch springform pan lightly with butter. Pulse the 1.5 cups graham crackers in a food processor until you achieve a fine, sand-like consistency—this ensures a crumbly, not cakey, crust texture. I like to process in 2 batches for even fineness.
In a medium bowl, combine the graham cracker crumbs with the 0.5 cup melted unsalted butter and 1 tbsp lemon zest. Mix with a rubber spatula until the crumbs are uniformly moistened but not soggy. Press the mixture firmly and evenly into the bottom of your prepared pan, creating an even layer. Here’s the thing—press down with the bottom of a measuring cup for perfect, even distribution.
Bake the crust for 10 minutes to set it slightly. Remove from oven and let cool for 5 minutes while you prepare the filling. This pre-baking prevents a soggy bottom when you add the wet filling later. Keep the oven on at 325°F for the next step.
🍳 Step 2: Whip Cream Cheese and Sugar to Smooth Perfection
While the crust cools, beat the 8 oz cream cheese and 0.75 cup granulated sugar in a stand mixer fitted with the paddle attachment on medium speed for 3-4 minutes until completely smooth and creamy. This step is critical—any lumps will remain in your finished cheesecake. I like to scrape down the sides of the bowl with a spatula every 30 seconds to ensure even mixing.
Add the 0.25 cup sour cream, 0.5 cup fresh lemon juice, and 1 tsp vanilla extract to the cream cheese mixture. Mix on low speed just until combined—overmixing incorporates too much air, which can cause cracks in the final product. The batter should be thick but pourable. Here’s where it gets fun—taste the mixture. It should be tangy but not overly acidic; adjust with more sugar or lemon if needed.
🥘 Step 3: Incorporate Eggs for Silky Smoothness
Add the 2 whole large eggs, one at a time, mixing on low speed after each addition until just incorporated. This gentle approach prevents breaking the egg yolks and maintains the smooth texture. After adding both eggs, mix for another 30 seconds to ensure complete integration. The batter should be thick and glossy—if it looks too thin, let it sit for 5 minutes at room temperature to thicken slightly.
Pour the filling over the pre-baked crust, spreading it evenly with a spatula. Tap the pan gently on the counter 3-4 times to release any air bubbles that may have formed. This prevents surface cracks during baking. Real talk: I’ve learned the hard way that skipping this step often leads to unsightly bubbles in the finished cheesecake.
⏰ Step 4: Bake with Precision for Perfect Texture
Place the cheesecake in the preheated oven and bake for 45-50 minutes. The edges should be set, but the center should still appear slightly jiggly—this indicates it’s fully cooked but not overbaked. Your oven might run hot, so start checking at the 40-minute mark. Here’s the critical visual cue: the cheesecake should pull away slightly from the edges of the pan.
After removing from the oven, turn off the heat and crack the oven door open 2 inches. Let the cheesecake cool in the oven for 1 hour—this gradual cooling prevents cracking. The contrast in temperature helps set the cheesecake evenly. Once cooled, remove from the oven and let it cool to room temperature on a wire rack for another 1 hour before refrigerating.
🍽️ Step 5: Chill and Serve for Optimal Texture
Transfer the cheesecake to the refrigerator and chill for at least 4 hours or preferably overnight. This extended chilling period allows the flavors to meld and the texture to firm up perfectly. When ready to serve, run a thin knife around the edge of the springform pan to loosen it from the sides. Release the springform clamp and gently slide the cheesecake onto a serving plate.
Slice with a warm knife (dip in hot water and wipe dry) for clean cuts. The finished cheesecake should have a vibrant lemon color, a smooth, creamy texture, and a perfect balance of sweet and tangy flavors. Each slice should be firm enough to hold its shape but still creamy when served. Enjoy within 3 days for the best texture and flavor.
Pro Tips For Making 6 Inch Lemon Cheesecake
- CHILL THE CRUST: Pop the graham cracker crust into the freezer for 15 minutes before adding the filling—this prevents it from turning soggy when the warm cheesecake hits it. I learned this the hard way after a batch where the crust dissolved into a crumbly mess.
- ZEST FIRST, THEN JUICE: Extract the lemon zest before juicing, and sift it to remove any bitter pith—this keeps the flavor bright without the harsh aftertaste. I was skeptical until I tried it, and now I double-check this step every time.
- ROOM-TEMP CREAM CHEESE: Let the cream cheese sit out for 30-60 minutes before mixing—this ensures it blends smoothly with the sugar and eggs, avoiding lumps that ruin the texture. Sounds weird, but it works: no more grainy cheesecake.
- BAKE LOW AND SLOW: Set your oven to 325°F (not 350°F) and bake the cheesecake for 50-55 minutes—this prevents cracking while still getting a set center. After burning three batches at higher temps, I finally figured out patience pays off.
Flavor customization for 6 inch lemon cheesecake
Citrus Variations
Swap the lemon for orange or grapefruit by adjusting the juice and zest ratios. For orange, use ¼ cup juice and 1 tbsp zest from a Navel orange—the natural sweetness balances the cream cheese beautifully.
For grapefruit, reduce the sugar to ½ cup and add 1 tsp orange liqueur (like Cointreau) for depth. Both work best with full-fat cream cheese to prevent bitterness. 🍊
Spiced Twists
Infuse warmth by adding ½ tsp ground cardamom or ½ tsp cinnamon to the filling. For a ginger kick, mix 1 tbsp grated fresh ginger into the crust butter.
These spices complement the lemon’s acidity without overpowering it. I’ve found that cardamom adds an unexpected sophistication, while ginger pairs perfectly with a honey drizzle on top.
Protein Swaps
For a lighter option, replace half the cream cheese with Greek yogurt (use 4 oz cream cheese + 4 oz yogurt). For extra richness, try mascarpone cheese (substitute 4 oz cream cheese for 4 oz mascarpone).
Both alternatives keep the texture creamy but adjust the tanginess—taste the filling before baking to balance flavors. 🧀
Fruit Toppings
Fresh berries like raspberries or blackberries add a vibrant contrast to the pale lemon filling. For a tropical twist, top with mango slices or passion fruit pulp. I recommend adding toppings just before serving to prevent sogginess.
A drizzle of honey or white chocolate ganache elevates the presentation while keeping the focus on the zesty lemon flavor.
Crust Alternatives
Swap graham crackers for digestive biscuits (crush finely for a nuttier taste) or shortbread cookies (add 1 tsp vanilla extract to the crust butter). For a gluten-free option, use almond flour mixed with 2 tbsp melted butter** and pressed into the pan.
Each alternative alters the texture—shortbread gives a buttery crunch, while almond flour adds a delicate sweetness. ✨
Nutrition facts
Frequently asked questions
Why does my lemon cheesecake have cracks?
Cracks usually appear from overmixing the filling or rapid temperature changes. Mix the batter just until combined (no streaks) and avoid opening the oven door during baking. Let it cool gradually in the turned-off oven for 1 hour before refrigerating. For extra insurance, tap the pan gently on the counter after pouring to release air bubbles.
Can I make this recipe without a springform pan?
Yes! Use a 6-inch oven-safe ceramic dish or line a regular pan with parchment paper for easy removal. Press the crust firmly into the pan and bake as directed. If using a non-springform pan, release the cheesecake from the sides with a thin knife before serving—it won’t release cleanly like a springform.
How do I adjust the recipe for a 9-inch pan?
Double all ingredients (except baking time) for a 9-inch pan. Bake at 325°F for 60-70 minutes—check at 55 minutes for doneness. The center should jiggle slightly. The chilling time remains the same (4+ hours), but the larger size means you’ll need 8-10 hours for even cooling before slicing.
What’s the best way to store leftovers?
Cover tightly with plastic wrap and refrigerate for up to 5 days. For longer storage, slice and freeze individual portions in airtight containers for 3 months. Thaw overnight in the fridge—never at room temperature. Reheat slices in the microwave for 10-15 seconds to restore creaminess, though texture may be slightly softer than fresh.
Can I make this cheesecake ahead of time?
This recipe actually tastes better after 24 hours of chilling. Assemble the cheesecake up to 2 days in advance—just refrigerate uncovered to prevent condensation. Bring to room temperature for 1 hour before serving to enjoy the perfect balance of chilled creaminess and vibrant lemon flavor.

- Pork Loin Pulled Pork Crock Pot Recipe: Slow-Smoked Tenderness With Zero Dryness - November 1, 2026
- Baked Potatoes in Crock Pot Recipe: Buttery Interiors and Crispy Top Magic - November 1, 2026
- Braised Beef Short Ribs Recipe: Crock Pot Fall-Off-Bone Magic in 6 Hours - November 1, 2026