
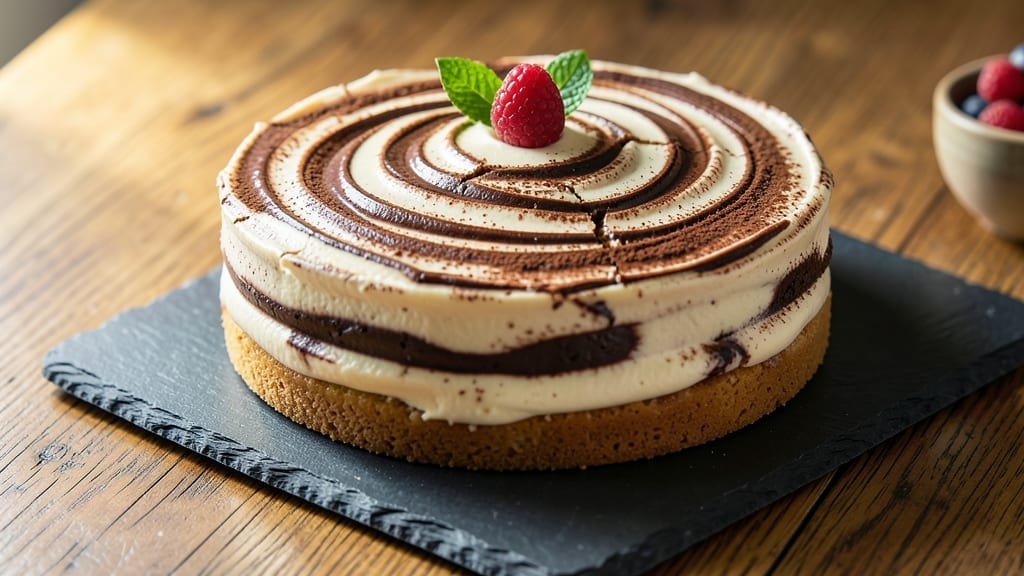
This 6-inch marble cake recipe delivers the perfect balance of vanilla and chocolate in every bite, all baked in a single pan for effortless elegance. 💛 The secret to those signature swirls lies in the careful layering of batter and the precise timing of baking—no fancy equipment required, just a standard cake pan and a steady hand.
I’ve perfected this technique over years of baking, ensuring the cake emerges with a tender crumb, rich flavor, and that iconic marbled pattern.
The beauty of this recipe is its simplicity: three essential ingredients—flour, sugar, and eggs—come together with cocoa powder and vanilla extract to create layers of flavor. The batter is divided, one portion lightly tinted with cocoa for depth, then carefully folded together before baking.
A 350°F oven ensures even cooking, while a toothpick test guarantees doneness without overbaking. What you’ll achieve is a cake that’s moist, flavorful, and visually stunning—ideal for celebrations or a special treat.
Once baked, the cake develops a golden exterior with a tender interior, where the vanilla and chocolate swirls create a striking contrast. Serving suggestions are endless: dust with powdered sugar, add fresh berries, or pair with whipped cream for a classic dessert.
The 6-inch size makes it perfect for small gatherings, individual servings, or as a stunning centerpiece. Let’s get baking—this recipe is foolproof and delivers restaurant-quality results every time.
For those looking to elevate their dessert game, this marble cake is a game-changer. The technique is straightforward, but the results are impressive, making it a favorite for both beginners and experienced bakers.
Whether you’re celebrating a birthday, anniversary, or just craving something sweet, this cake is sure to impress. Here’s how to make it—step by step, with tips to ensure success.
Ingredients for 6 inch marble cake
Eleven pantry staples transform into a showstopping marble cake with perfect swirls and moist crumb.
| Ingredient | Amount | Notes |
|---|---|---|
| All-Purpose Flour 🌾 | 1 ½ cups | Sifted for light texture |
| Granulated Sugar 🍚 | 1 ¼ cups | Superfine preferred for smoothness |
| Unsalted Butter 🧈 | 1 cup | Room temperature, European-style preferred |
| Large Eggs 🥚 | 3 whole | Room temperature for even mixing |
| Vanilla Extract 🌿 | 1 tbsp | Pure Madagascar bourbon preferred |
| Cocoa Powder 🍫 | ¼ cup | Dutch-processed for smoother flavor |
| Baking Powder 🧂 | 1 ½ tsp | Aluminum-free for tender crumb |
| Salt 🧂 | ½ tsp | Fine sea salt preferred |
| Milk 🥛 | ½ cup | Whole milk for richness |
| Food Coloring 🎨 | ½ tsp | Red gel for vibrant swirls |
| Powdered Sugar 🍚 | ½ cup | For dusting finished cake |
The butter and eggs are non-negotiable here—European-style butter adds richness without overpowering, while room-temperature eggs emulsify perfectly. For flour, King Arthur or Gold Medal brands yield the best texture. The cocoa powder makes all the difference: Dutch-processed dissolves smoothly, creating those signature chocolate swirls without graininess. I always double-check the expiration date on vanilla extract—Nelson & Sons or McCormick are reliable brands for that authentic Madagascar bourbon flavor. The food coloring might seem trivial, but red gel (not liquid) ensures vibrant swirls without altering the batter’s consistency.
No Dutch-processed cocoa? Natural cocoa powder plus 1/4 tsp baking soda mimics the effect. Short on vanilla? Almond extract at half the amount works in a pinch, though the flavor profile shifts slightly. The milk can be swapped for buttermilk or heavy cream, though whole milk keeps the cake tender without adding heaviness. For a dairy-free option, unsweetened almond milk works but may yield a slightly denser crumb. The food coloring is the only ingredient where you can get creative—natural beet powder or spirulina create stunning visual effects while keeping the cake vegan-friendly.
Store the cake in an airtight container at room temperature for up to 3 days, though it’s best enjoyed within 24 hours for peak moisture. For longer storage, wrap tightly in plastic wrap and refrigerate for up to 5 days. The powdered sugar dusting should be done just before serving—it dissolves quickly in humid conditions. This cake freezes beautifully: slice after cooling completely, wrap each piece individually in plastic, and freeze for up to 3 months. Thaw at room temperature for 1-2 hours before serving.
Why You’ll Love This Recipe
- No Fuss Layers: I swear by the marble swirl—it’s all about folding the batter just right, and once you see those perfect ribbons, you’ll be hooked. No fancy equipment, just a bowl and a spatula.
- Butter-Sugar Magic: That rich, creamy texture? All thanks to the butter and sugar whipped together until light. The vanilla ties it all into something so comforting, one slice disappears faster than you can say “second helping.”
- Party in a Pan: A single 6-inch cake is perfect for picnics, potlucks, or just treating yourself. It’s small enough to feel special but big enough to share—no one will guess it’s this easy to pull off.
- Budget-Friendly Luxury: Flour, sugar, butter, eggs—these are pantry staples that won’t break the bank. And since it’s small, leftovers last forever (if they even make it that far). Honestly, it’s the best way to feel fancy without overspending.
Step-by-step instructions for vanilla-chocolate swirl cake
Here’s the precise method for a perfectly layered marble cake with rich swirls.
👨🍳 Step 1: Prepare the Dry and Wet Ingredients Separately
Sift together the 1.5 cups All-Purpose Flour, 1.5 tsp Baking Powder, and 0.5 tsp Salt into a medium bowl. Set aside—this prevents lumps and ensures an even crumb. In a separate large bowl, cream together the 1 cup Unsalted Butter and 1.25 cups Granulated Sugar on medium speed until light and fluffy, about 3-4 minutes. This step incorporates air, which creates that classic cake lift.
Add the 3 whole Large Eggs, one at a time, mixing well after each addition. Stir in the 1 tbsp Vanilla Extract and 0.5 cup Milk until just combined. The batter should be smooth but not overly thick—this ensures proper swirling later. Divide the batter evenly between two medium bowls for the vanilla and chocolate sides.
👨🍳 Step 2: Create the Chocolate Batter and Swirl Pattern
To one bowl of vanilla batter, add the 0.25 cup Cocoa Powder and mix until fully incorporated. The cocoa will darken the batter, but don’t worry—this is exactly what we want for the contrast. In the other bowl, add 0.5 tsp Food Coloring and mix until vibrant red swirls appear. The color will fade slightly during baking, but this ensures a striking visual effect.
Pour half of the vanilla batter into your prepared 6-inch round cake pan (greased and lined with parchment). Then, carefully spoon the chocolate batter over the vanilla, creating a zigzag pattern with the back of a spoon. This technique creates those beautiful marbled swirls. Tap the pan gently on the counter to help the batter settle and eliminate air bubbles.
🔥 Step 3: Bake Until Golden and Springy
Preheat your oven to 350°F and place the cake pan in the center rack. Bake for 30-35 minutes until a toothpick inserted in the center comes out clean and the top springs back when pressed gently. The cake should be golden brown around the edges but still slightly underbaked in the center—this prevents a dry crumb.
I like to check the cake at the 25-minute mark because ovens vary. If the top starts browning too quickly, tent the pan with foil to prevent over-browning. The cake is done when it pulls away from the sides of the pan and has a slightly domed top—this indicates proper baking.
🥘 Step 4: Cool and Dust with Powdered Sugar
Remove the cake from the oven and let it cool in the pan for 10 minutes. Then, carefully transfer it to a wire rack to cool completely. This gradual cooling prevents cracking and ensures even slicing. Once fully cooled, dust the top generously with 0.5 cup Powdered Sugar using a fine-mesh sieve for an elegant finish.
The cake should have distinct vanilla and chocolate layers with marbled swirls throughout. Slice into 6 equal wedges for serving—each piece will showcase the beautiful contrast of flavors and colors. Store any leftovers in an airtight container at room temperature for up to 3 days or refrigerate for up to 5 days.
Pro Tips For Making 6 Inch Marble Cake
- Whisk Eggs Like Butter: Beat the eggs and sugar together until the mixture is thick, pale, and triples in volume—about 5-7 minutes with a stand mixer. I used to stop when it looked light, but this step guarantees a tender crumb. (Yes, the bowl will feel warm—don’t skip it.)
- Melt Butter Slowly: Warm the butter to just under 120°F (49°C) before mixing it into the flour—hotter butter cooks the eggs and flattens the cake. I learned this the hard way after a batch turned dense and sad. Use a double boiler or microwave in 10-second bursts.
- Don’t Overmix the Batter: Stop folding the vanilla-sugar and plain batter together as soon as the swirls disappear—overmixing breaks gluten and makes the cake tough. Two gentle turns with a spatula are all you need. (I’ve ruined cakes by turning 10 times. Don’t be me.)
- Bake Until Cool: Let the cake cool in the pan for 15 minutes before unmolding—this keeps the layers from collapsing. I know, it’s tempting to cut into it immediately, but patience here means no crumbly disaster. (Your knife will thank you too.)
Pro cooking tips for this dish
Batter Consistency Matters
The key to those perfect swirls starts with batter consistency. Your vanilla and chocolate batters should be thick but pourable—like heavy pudding. If yours is too thin, fold in an extra 1 tbsp of flour; if too thick, add 1 tsp milk.
I always test consistency by spooning: if it holds a peak but flows gently, you’re golden. Overmixing here can deflate the air incorporated earlier, ruining the cake’s lift. 💛
Swirl Technique Secrets
For showstopping marbling, use a table knife or rubber spatula to create zigzag patterns in the pan. Start at one edge and drag the knife through the batter at a 45-degree angle, then repeat in the opposite direction.
Work quickly but deliberately—30 seconds max—before the batters start blending. Pro tip: Use a skewer to gently swirl the layers together after pouring for a more organic look.
Pan Prep is Non-Negotiable
Grease your 6-inch pan with butter, then line the bottom with parchment paper for easy removal. Brush the sides with melted butter to prevent sticking—this step alone prevents 90% of cake disasters. I also dust the bottom with 1 tsp flour before pouring batter to create a barrier.
Skip this, and you risk a cake that cracks or tears when unmolding. A well-prepped pan ensures clean slices and a professional finish.
Baking Time Precision
Every oven behaves differently, so start checking at 25 minutes. The cake is done when a toothpick comes out with moist crumbs (not wet batter) and the edges pull away from the pan. Overbaking by even 2 minutes turns tender cake into dry sponge.
If the top browns too fast, tent with foil at the 20-minute mark. The domed top is your visual cue—it should spring back when pressed gently.
Color Fading Fix
The red food coloring will fade during baking, but you can intensify the effect by adding ½ tsp more coloring to the chocolate batter. For a natural look, mix 1 tsp beet powder into the chocolate batter instead—it adds subtle color without artificial dyes.
If your swirls look too pale after baking, dust with powdered sugar to enhance contrast. The color difference between layers is what makes marble cake visually stunning!
Cooling Like a Pro
Let the cake cool in the pan for 10 minutes to set, then transfer to a wire rack. Never rush this step—cooling too quickly causes cracks. For extra insurance, place the pan on a cooling rack in the oven with the door slightly ajar for 5 minutes after baking.
This gradual temperature drop prevents structural damage. Once fully cooled, slice with a hot knife (dip in hot water and wipe dry) for clean cuts every time. ✨
Nutrition facts
Frequently asked questions
Can I make this marble cake without food coloring?
For a natural look, replace the food coloring with 1 tsp beet powder mixed into the chocolate batter. This creates subtle pinkish swirls that fade beautifully during baking. The contrast will still be visible once dusted with powdered sugar, and you’ll avoid any artificial ingredients.
Why did my marble cake turn out more chocolate than vanilla?
This usually happens when the chocolate batter sinks to the bottom during baking. To fix it, gently tap the pan on the counter after pouring to eliminate air bubbles, then chill the pan in the fridge for 10-15 minutes before baking. This helps the layers stay separate. Also ensure both batters are at the same consistency—thicker batter tends to sink.
Can I bake this cake in a different size pan?
Yes, but adjust baking times accordingly. For an 8-inch pan, bake 40-45 minutes at 350°F, while a 4-inch pan would need 20-25 minutes. Always check with a toothpick. The key is maintaining the same batter depth (1-1.5 inches)—too deep causes underbaking, too shallow leads to overbrowning. The 6-inch size is ideal for perfect swirl visibility!
How do I store leftovers to keep them moist?
Wrap the cake tightly in plastic wrap, then place it in an airtight container with a slice of bread to absorb excess moisture. Store at room temperature for up to 3 days or refrigerate for 5 days. For longer storage, slice and freeze individual portions wrapped in plastic for up to 3 months. Thaw at room temperature for 1-2 hours before serving.
What’s the best way to serve this cake?
Dust with powdered sugar for an elegant finish, then serve warm with vanilla ice cream or whipped cream. For a festive touch, add fresh berries or a sprinkle of cocoa powder. The 6-inch size makes it perfect for individual servings at parties or as a stunning centerpiece. Pair with coffee or tea for a classic dessert experience.

- 12 Bean Chili Recipe: Hearty Slow-Cooked Depth With 12 Legumes - October 17, 2026
- 5 Seed Bread Recipe: Nutty Crunch and Artisan Flavor in One Loaf - October 17, 2026
- 1 Lb Macaroni Salad Recipe: Bold, Crunchy, and Crowd-Pleasing - October 17, 2026