
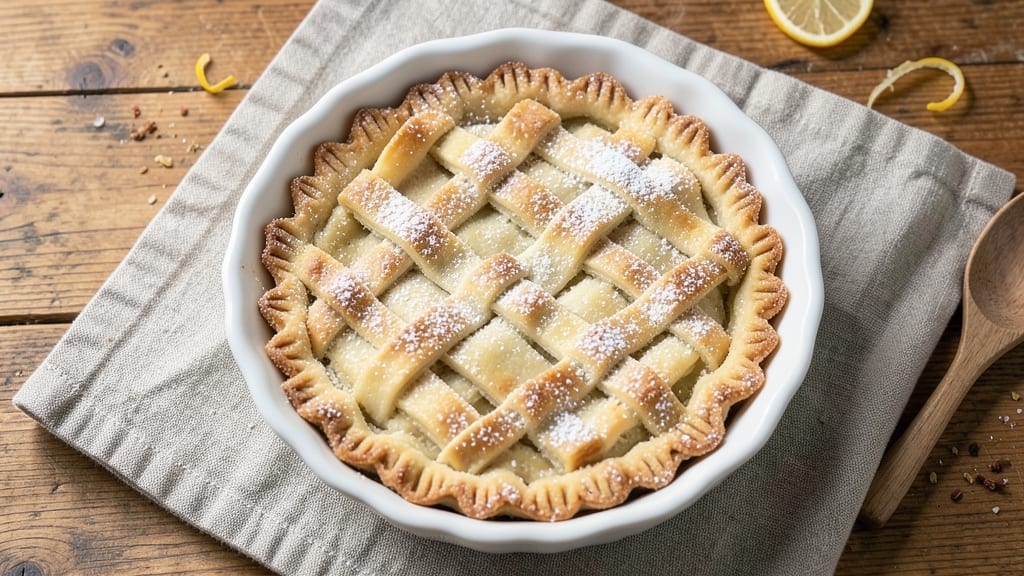
Mastering a flaky 6-inch pie crust transforms homemade desserts from ordinary to extraordinary—without requiring pastry chef skills. This recipe delivers perfectly crisp layers with minimal effort, using a foolproof technique that works every time.
The secret lies in cold butter and gentle handling, ensuring that delicate texture that makes all the difference in pies, tarts, and quiches.
What sets this crust apart is its simplicity: just five ingredients and 20 minutes of active time, yet it yields a result that rivals bakery-quality crusts. Whether you’re a beginner or an experienced baker, this method ensures consistent results with minimal stress.
The crust bakes up golden and tender, providing the ideal foundation for sweet or savory fillings.
By following these steps, you’ll achieve a crust with flaky layers that melt in your mouth while maintaining structure to hold fillings perfectly. The beauty of this recipe is its versatility—use it for classic apple pies, rich quiches, or elegant tarts.
The key is patience during the chilling and rolling stages, which pays off in a crisp, buttery crust that impresses every time.
Ready to elevate your baking? This crust requires no special equipment beyond a rolling pin and pie dish, making it accessible for any home kitchen. Once you master this technique, you’ll never buy pre-made crusts again. Here’s how to create it from scratch.
Ingredients for 6 inch pie crust
Five simple ingredients transform into a restaurant-quality crust with perfect flaky layers.
| Ingredient | Amount | Notes |
|---|---|---|
| All-Purpose Flour 🌾 | 2 ½ cups | Sifted for even texture |
| Unsalted Butter 🧈 | 1 cup | Cold, cubed into 1/2-inch pieces |
| Ice Water 💧 | ½ cup | Chilled for proper hydration |
| Diamond Crystal Kosher Salt 🧂 | ½ tsp | Fine grain preferred |
| Granulated Sugar 🍚 | 1 tbsp | For subtle sweetness |
The butter makes or breaks flakiness—use European-style butter if you can, like Plugrá or Land O’Lakes European. Most grocery stores carry it near the regular butter. Cold butter is critical: pull it from the fridge 10 minutes before mixing, but keep it in the freezer until ready to cube. The flour should be all-purpose, not self-rising. I always sift mine into a bowl first—it prevents lumps and ensures even distribution. For the salt, Diamond Crystal dissolves more easily than Morton’s, but either works. The sugar? Just a touch—it tenderizes the crust slightly.
No ice water? Freeze water in an ice cube tray for 30 minutes before using. Short on butter? Vegetable shortening works, but it won’t be as flaky. The sugar can be omitted entirely if you prefer a savory crust. For a richer flavor, add 1 tsp of lemon zest to the flour mixture. The crust can handle a pinch of nutmeg or cinnamon too, if you’re making a spiced filling. Always measure flour by scooping and leveling—not packing it down. And remember: never overwork the dough—just handle it gently.
Wrap the dough in plastic and refrigerate for at least 1 hour before rolling. It can stay in the fridge for up to 2 days or be frozen for 3 months. For best results, bring it to room temperature 10 minutes before rolling. The crust bakes best at 375°F for 15-20 minutes. If pre-baking for a quiche, blind-bake with pie weights or dried beans. Leftovers? Crumble and freeze for future hand pies or pot pies.
Why You’ll Love This Recipe
- No-Fuss Prep: I swear by this crust because it’s just three ingredients (plus ice water) mixed with a fork—no food processor, no overworking. The butter stays cold, the dough comes together fast, and I’m not left with a sticky mess on my counter.
- Buttery Crisp Perfection: That first bite? Chef’s kiss. Cold butter cut into the flour creates flaky layers like magic—no fancy pastry skills needed. The sugar in the dough gives it just enough sweetness to balance savory fillings (looking at you, apple pie).
- Mini Portions, Big Impact: Six-inch crusts are my secret weapon for potlucks, lunches, or when I’m craving dessert but only want one slice. They’re easy to handle, bake faster than big pies, and freeze beautifully for last-minute cravings.
- Budget-Friendly Staples: Flour, butter, salt—these are pantry basics that don’t break the bank. I make this crust all year round, and the leftovers? Perfect for hand pies or frozen dough for when I’m too tired to bake.
Step-by-step instructions for 6-Inch pie crust recipe
Master this classic technique for a perfect, flaky crust every time.
Combine Dry Ingredients
In a large bowl, whisk together the 2.5 cups all-purpose flour, 0.5 teaspoon Diamond Crystal kosher salt, and 1 tablespoon granulated sugar. Sifting the flour first ensures no lumps remain and creates a lighter texture. I like to use a whisk for this step—it distributes the salt and sugar evenly throughout the flour, preventing any pockets of concentrated seasoning that could affect flavor.
This dry mixture forms the foundation of your crust. The sugar adds just a hint of sweetness that balances savory fillings, while the salt enhances the overall flavor profile. Keep the bowl nearby as we’ll need it for the next step. The key here is thorough mixing—don’t skip this, or your crust might develop uneven texture.
Cut in the Cold Butter
Add the 1 cup unsalted butter, cut into ½-inch cubes, to the flour mixture. Using a pastry cutter or two forks, work the butter into the flour until you achieve pea-sized crumbs with some flour still clinging to them. This process is called “cutting in,” and it’s crucial for creating those signature flaky layers.
I recommend working quickly and keeping the butter cold—if it starts to soften, return the bowl to the refrigerator for 5 minutes to firm it up again. The butter should remain firm but not rock-hard. You’re aiming for a texture where the butter pieces are evenly distributed but still distinct. If you overwork the dough at this stage, you’ll develop gluten and lose that beautiful flakiness we’re after.
Add Ice Water Gradually
Drizzle in the ½ cup ice water, 1 tablespoon at a time, using a small measuring cup or spoon. Mix gently with a fork or your fingers until the dough just comes together. Be careful not to overmix—you’re looking for a shaggy mass that holds when pressed, but still has some crumbly texture remaining.
Using ice water is essential here. The cold temperature helps maintain the butter’s firmness while the dough forms. If your dough feels too dry, add another tablespoon of water. Too wet? Sprinkle in a little more flour. The dough should be pliable but not sticky—you should be able to press it together without it sticking to your hands. This is where experience helps, but don’t worry if it’s not perfect on the first try.
Chill the Dough
Shape the dough into a disk, wrap it tightly in plastic wrap, and refrigerate for at least 1 hour—I prefer 2 hours for best results. This chilling period is non-negotiable. It allows the gluten to relax, prevents shrinking during baking, and ensures those beautiful flaky layers develop properly as the butter melts during baking.
While the dough chills, I like to set up my workspace. Preheat your oven to 375°F and roll out a piece of parchment paper. This gives you everything ready to go when your dough is properly chilled. The dough should be cold and firm when you remove it from the refrigerator—if it’s too soft, return it for another 15-20 minutes. Cold dough is easier to handle and gives you better control during rolling.
Roll and Fit the Crust
On a lightly floured surface, roll the chilled dough into a 6-inch circle, about ⅛-inch thick. I use a 6-inch plate as a guide to ensure the right size. Rotate the dough as you roll to maintain even thickness. If it starts to stick, dust with more flour, but don’t overdo it or your crust will become tough.
Carefully transfer the rolled dough to your prepared pie dish, using the parchment paper to help lift it if needed. Gently press the dough into the bottom and up the sides, creating a ¼-inch overhang. Trim the excess dough with kitchen shears, leaving about ½-inch extra to help seal the crust during baking. The goal is to create an even thickness throughout—this ensures even baking and prevents a soggy bottom.
Pro Tips For Making 6 Inch Pie Crust
- CHILL THE BUTTER FIRST: Take your unsalted butter straight from the fridge and cut it into ½-inch cubes—no need to soften it at room temp. Cold butter creates flaky layers, and skipping this step means your crust will turn out greasy instead of tender. (I learned this the hard way when my first attempt melted into a sad, dense mess.)
- USE ICE WATER—REALLY: Fill a bowl with actual ice water, not tap water from the faucet. The cold slows gluten development and keeps the butter from melting prematurely. Pour it in slowly, tablespoon by tablespoon, until the dough just holds together when pressed—no more, no less. (Your future self will thank you when the crust doesn’t crack during rolling.)
- DON’T OVERWORK THE DOUGH: Mix the flour, butter, salt, and sugar until the mixture resembles coarse crumbs with pea-sized butter pieces. Resist the urge to pulse it into a fine powder—you want texture, not a paste. Overmixing develops gluten, which makes the crust tough. (I was skeptical until I tried it, and now I never go back.)
- REST THE DOUGH TWICE: After mixing, flatten the dough into a disk, wrap it tightly in plastic, and refrigerate for at least 1 hour—overnight is better. Then, let it sit at room temp for 10-15 minutes before rolling. This relaxes the gluten and prevents shrinking when it hits the pie dish. (Sounds weird, but it works—no more lopsided crusts.)
Regional styles of this 6 inch pie crust
Southern Classic
In the South, a 6-inch pie crust often forms the base for pecan pie or sweet potato pie, where butter-rich crusts shine. I add 1 teaspoon of cinnamon to the flour mixture for warmth, then use brown sugar instead of white to deepen the caramel notes.
The crust gets a light egg wash before baking, creating that golden, crackly top Southern bakers love. 🥧
New England Style
Up north, apple pies and blueberry pies dominate, so the crust leans toward tart and sturdy—perfect for holding thick fruit fillings. I swap ½ tablespoon of the sugar for lemon zest in the dough, then brush the baked crust with apricot jam before adding filling.
This creates a beautiful lattice pattern while keeping the crust tender. The key is a thicker roll-out (~⅛-inch) to handle juicy fillings.
Midwest Homestyle
The Midwest loves quiches and hand pies, where a 6-inch crust becomes a versatile canvas. I often add 1 tablespoon of cornmeal to the flour for a slightly grainy texture that pairs well with savory fillings.
For hand pies, I roll out two 5-inch circles instead of one 6-inch, then fold them together after filling. The crust gets a light sprinkle of coarse salt before baking to enhance savory flavors.
Pacific Northwest Twist
On the West Coast, rhubarb pies and cherry tarts take center stage, so the crust needs to balance tart fillings. I replace ¼ cup of butter with vegetable shortening for extra flakiness, then add 1 teaspoon of vanilla extract to the dough.
The crust bakes until deep golden, then gets a drizzle of honey after baking to soften the edges. This works beautifully with local berry compotes or spiced fruit fillings.
French-Inspired Tart
For a French-style tart, I adjust the crust to be thinner and more delicate (~⅛-inch thick) with 1 extra tablespoon of ice water to prevent cracking. The dough gets a light dusting of powdered sugar before rolling, then a pinch of nutmeg in the flour.
After baking, I brush the crust with melted dark chocolate for an elegant finish. This style pairs perfectly with fruit curds or creamy custards. 🍫
Nutrition facts
Frequently asked questions
Can I use this crust for savory dishes like quiche?
This crust works perfectly for savory dishes. For quiches, blind-bake it at 375°F for 15 minutes with pie weights or dried beans. The sugar in the recipe adds just a touch of sweetness, but it won’t overpower savory fillings like cheese, spinach, or ham. If you prefer a neutral flavor, omit the sugar entirely.
Why does my crust turn out tough instead of flaky?
Overworking the dough or using warm butter are the most common culprits. Keep everything cold, work quickly, and avoid excessive handling. The butter should remain pea-sized when cutting it into the flour. If the dough feels sticky, add just a touch more flour—but don’t overdo it, or the crust will become dense.
Can I make this crust ahead of time?
Yes! The dough can be refrigerated for up to 2 days or frozen for 3 months. For best results, thaw frozen dough in the fridge overnight. If you’re short on time, just let it sit at room temperature for 10-15 minutes before rolling. The key is to keep it cold until ready to use—this preserves the flakiness.
What’s the best way to prevent a soggy bottom?
Pre-baking the crust is your best defense. For fruit pies, blind-bake at 375°F for 10 minutes with pie weights or dried beans. For custard pies, pre-bake for 12-15 minutes. Always ensure the crust is fully cooled before adding fillings. A well-chilled crust also helps—never use warm dough straight from the fridge.
Can I substitute butter with something else?
You can use vegetable shortening for a slightly less flavorful but equally flaky crust. Replace the butter 1:1 by volume. For a healthier option, try cold coconut oil, but expect a slightly different texture. Avoid olive oil—it has too low a melting point and won’t create proper layers.

- Pork Loin Pulled Pork Crock Pot Recipe: Slow-Smoked Tenderness With Zero Dryness - November 1, 2026
- Baked Potatoes in Crock Pot Recipe: Buttery Interiors and Crispy Top Magic - November 1, 2026
- Braised Beef Short Ribs Recipe: Crock Pot Fall-Off-Bone Magic in 6 Hours - November 1, 2026