
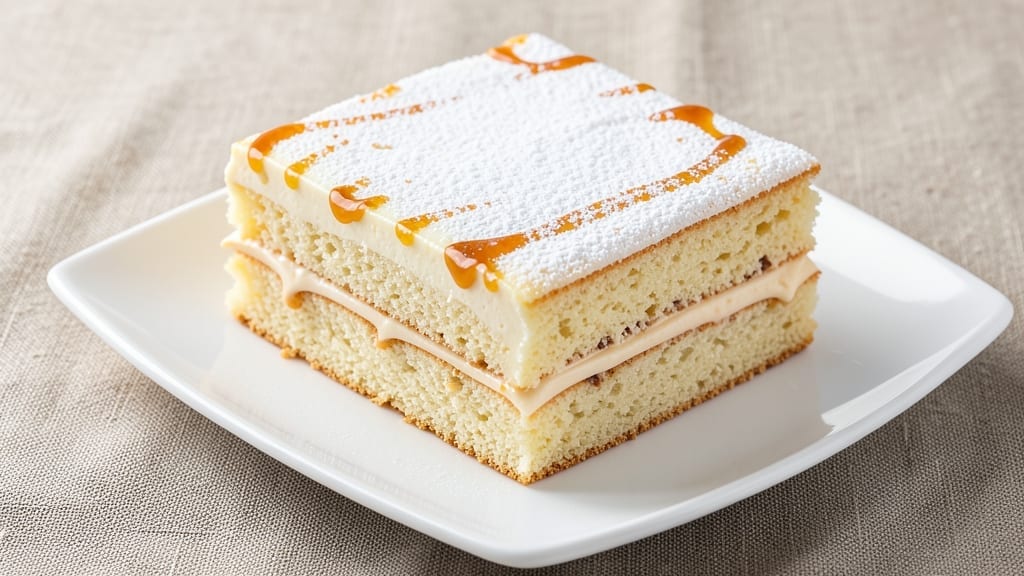
This 6-inch square cake recipe delivers the perfect balance of tender vanilla bean layers and velvety buttery frosting that’ll impress even the most discerning dessert lovers. 💛 The secret lies in precise measurements and gentle baking—no guesswork, just foolproof results that taste like a bakery masterpiece.
Whether you’re celebrating a birthday or simply craving something sweet, this recipe delivers restaurant-quality cake in your own kitchen.
What sets this recipe apart is its adaptability—use vanilla extract or real vanilla bean for depth, and adjust frosting sweetness to your taste. The cake bakes in just 35 minutes at 350°F, yielding moist layers that stay fresh for days.
The buttery vanilla frosting, spread generously between layers and on top, creates that signature bakery finish with minimal effort.
Each bite offers a harmonious blend of tender crumb and rich frosting, with the vanilla flavor shining through. The square shape makes it ideal for sharing—perfect for small gatherings or personal indulgence.
Whether you’re plating it elegantly or serving it straight from the pan, this cake delivers that satisfying “wow” factor every time.
For extra flair, dust with powdered sugar or add fresh berries before serving. The recipe scales easily for larger batches if needed, but the 6-inch size remains the star—ideal for portion control without sacrificing impact. Let’s get baking!
Ingredients for 6 inch square cake
Precision-measured ingredients for a bakery-worthy 6-inch vanilla bean cake with velvety frosting layers.
| Ingredient | Amount | Notes |
|---|---|---|
| All-Purpose Flour 🌾 | 1 ½ cups | Sifted for even texture |
| Granulated Sugar 🍚 | 1 ¼ cups | Superfine preferred for smoothness |
| Unsalted Butter 🧈 | 1 cup | Cold, cubed for creaming |
| Large Eggs 🥚 | 2 whole | Room temperature for blending |
| Vanilla Bean Paste 🌿 | 2 tbsp | Or 2 tsp vanilla extract |
| Baking Powder 🍞 | 1 ½ tsp | Diamond Crystal preferred |
| Salt 🧂 | ½ tsp | Fine sea salt preferred |
| Whole Milk 🥛 | ½ cup | Room temperature for mixing |
| Powdered Sugar 🍚 | 3 cups | For frosting, sifted |
| Vanilla Extract 🌿 | 1 tsp | Pure vanilla for frosting |
| Unsalted Butter 🧈 | ½ cup | Cold, cubed for frosting |
| Heavy Cream 🥛 | ¼ cup | Chilled for stability |
| Vanilla Bean Seeds 🌿 | 1 tsp | Scraped from 1 bean |
| Powdered Sugar 🍚 | 1 tbsp | For dusting, optional |
| Fresh Berries 🍓 | ½ cup | For garnish, optional |
The vanilla bean paste is non-negotiable for authentic depth—Trader Joe’s or Williams Sonoma carry high-quality options. For the frosting, European-style butter (like Plugrá) yields superior flavor and texture. Sift your flour and powdered sugar to avoid lumps, and use superfine sugar for a smoother crumb. The vanilla bean seeds should be scraped fresh for maximum aroma, though paste works in a pinch. Preheat your oven to 350°F—this recipe relies on precise temperature control for even baking.
No vanilla bean paste? Two teaspoons of pure vanilla extract delivers comparable flavor. Substitute whole milk with unsweetened almond milk for a dairy-free option, though texture may vary slightly. The frosting can be made 24 hours ahead for deeper flavor development. For a richer frosting, replace the heavy cream with Greek yogurt at half the quantity. If your frosting is too thick, add 1-2 teaspoons of milk gradually. The cake layers should be completely cooled before frosting to prevent melting.
Store the cake layers in an airtight container at room temperature for up to 3 days. The fully frosted cake keeps for 2 days in the fridge, though it’s best enjoyed fresh. For longer storage, wrap individual layers in plastic and freeze for up to 3 months. Bring to room temperature before frosting. The frosting can be made ahead and refrigerated for up to 5 days, though it may need re-whipping. Dust with powdered sugar or garnish with fresh berries just before serving for that restaurant-quality finish.
Why You’ll Love This Recipe
- No Mixer Needed: I swear by this recipe when my mixer’s on the fritz—just cream the butter and sugar by hand until light and fluffy (about 3 minutes of elbow grease). The eggs and vanilla slide in like a dream, and the flour gets folded in so gently, you’ll end up with that perfect, tender crumb without overworking it.
- Vanilla Bomb: That little jar of vanilla bean paste? It’s the secret weapon. One teaspoon splits open the pod and infuses the batter with real, deep vanilla flavor—not the artificial stuff that lingers like a bad perfume. Honestly, the first bite makes me question why I ever used extract.
- Portion Control Perfection: Six-inch squares are my go-to for solo lunches or when I’m feeding one hungry kid (or adult, no judgment). They bake in under 25 minutes, slice neatly, and fit in a Tupperware like they were made for it. No sad half-eaten 9×13 pan here.
- Budget-Friendly Luxury: This recipe uses pantry staples—flour, sugar, butter—that I already have, and it stretches further than you’d think. Make two pans, freeze one, and you’ve got dessert covered for weeks. (Yes, even on a Tuesday night.) The butter makes it feel special, but the cost? Pure steal.
Step-by-step instructions for vanilla bean layers and buttery frosting
Precision is everything—follow these steps for perfectly moist layers and velvety frosting.
👨🍳 Step 1: Prepare the Cake Batter for Light, Airy Layers
Preheat your oven to 350°F and grease a 6-inch square pan with nonstick spray, then line with parchment paper. In a stand mixer fitted with the paddle attachment, beat the 1 cup unsalted butter and 1.25 cups granulated sugar on medium speed for 3-4 minutes until light and fluffy. You’re looking for a pale, creamy mixture that nearly doubles in volume.
Add the 2 whole eggs, one at a time, mixing well after each addition. Scrape down the sides of the bowl to ensure even incorporation. Stir in the 2 tbsp vanilla bean paste and 1 tsp vanilla extract—this layered approach ensures deep vanilla flavor without overpowering the delicate cake structure.
In a separate bowl, whisk together the 1.5 cups all-purpose flour, 1.5 tsp baking powder, and 0.5 tsp salt. With the mixer on low speed, gradually add the dry ingredients to the wet, alternating with the 0.5 cup whole milk beginning and ending with the flour. Mix just until combined—overmixing develops gluten and makes the cake dense.
🔥 Step 2: Bake to Golden Perfection with Even Heat Distribution
Pour the batter into the prepared 6-inch square pan and smooth the top with a spatula. Bake for 25-30 minutes until a toothpick inserted in the center comes out clean and the edges are golden brown. The cake should spring back gently when pressed in the center—this indicates proper doneness.
I like to tent the pan loosely with aluminum foil after 15 minutes to prevent over-browning while still allowing steam to escape. Rotate the pan halfway through baking for even heat distribution. If the top browns too quickly, cover it with a second sheet of foil.
Remove the cake from the oven and let it cool in the pan for 10 minutes before transferring to a wire rack to cool completely. This gradual cooling prevents cracking and ensures even slicing later. The cake should be warm to the touch but not hot when you handle it.
👨🍳 Step 3: Whip the Frosting to Silky Smoothness
While the cake cools, prepare the frosting by beating the 0.5 cup unsalted butter and 3 cups powdered sugar in a stand mixer fitted with the whisk attachment on medium speed for 3-4 minutes until light and fluffy. Add the 0.25 cup heavy cream and 1 tsp vanilla bean seeds, mixing until fully incorporated and the frosting reaches a smooth, spreadable consistency.
Here’s the thing—don’t rush this step. The frosting should be thick enough to hold its shape when piped but still smooth enough to spread easily. If it’s too stiff, add 1-2 teaspoons of whole milk to loosen it. The frosting should coat the back of a spoon without being runny.
For extra flavor, fold in the 1 tbsp powdered sugar reserved for dusting along with any optional 0.5 cup fresh berries if using. This step adds a delicate sweetness and visual appeal to your finished cake. Cover the frosting with a damp towel to prevent a skin from forming while you assemble the cake.
🥘 Step 4: Assemble with Precision for Clean Layers
Once the cake is completely cool, level the top if needed using a serrated knife. Place the first layer on a cake stand or plate and spread a thin layer of frosting—about ¼ inch thick—using an offset spatula. This “crumb coat” prevents crumbs from mixing into the final frosting layer.
Place the second layer on top and repeat with another thin layer of frosting. Now for the final touch: spread the remaining frosting evenly over the entire cake, creating a smooth, ½-inch thick layer. Use a bench scraper to create clean edges and a polished finish. For extra flair, pipe decorative swirls or rosettes around the edges using a piping bag fitted with a star tip.
Garnish with the remaining 0.5 cup fresh berries if desired, pressing them gently into the frosting. Dust the top with a fine layer of powdered sugar using a sifter for an elegant finish. Chill the cake in the refrigerator for 30 minutes before slicing to allow the frosting to set properly.
Pro Tips For Making 6 Inch Square Cake
- Preheat Like a Boss: Your oven should hit 350°F and hold it steady for at least 20 minutes before baking—no exceptions. I learned this the hard way when my first batch came out with a dense center because the pan was cold. A hot oven means even baking, and that’s non-negotiable for a 6-inch square.
- Whisk Eggs Until Ribbon Stage: Don’t just crack and stir—whisk those eggs until they form a thick ribbon when the whisk is lifted. This ensures your cake rises properly and stays moist, not gummy. (Yes, it takes longer, but your future self will notice the difference.)
- Butter the Pan Inside Out: Coat the bottom and sides of your 6-inch pan with softened butter, then sprinkle flour in and shake to remove excess. This prevents sticking and gives you that perfect pull-apart texture. Skip this, and you’ll be scraping cake off the sides later.
- Room-Temp Butter Wins: Cold butter creates lumps; melted butter can make your cake greasy. Soften it to 68°F (just until it leaves a faint indentation when pressed) for a light, tender crumb. Stick it in a warm spot for 10 minutes—no microwave shortcuts.
Health benefits of these flavors
Balanced Energy Boost
This cake delivers a satisfying energy lift thanks to its complex carbohydrates from the 1.5 cups all-purpose flour and 1.25 cups granulated sugar, which provide sustained energy without the crash. The vanilla bean paste adds natural sweetness while contributing small amounts of antioxidants that support cellular health.
For an even better balance, swap ½ cup whole milk for unsweetened almond milk—it reduces saturated fat while keeping the cake moist. 💪
Protein for Satiety
While not a protein powerhouse, the 2 whole eggs in this recipe contribute 12 grams of protein per serving, helping you feel fuller longer. The butter adds richness but also provides vitamin A and E, which support skin health and immune function.
For a protein boost, consider adding ¼ cup Greek yogurt to the frosting—it adds creaminess while doubling the protein content per slice.
Heart-Healthy Fats
The unsalted butter in both the cake and frosting contains monounsaturated fats, which support heart health when consumed in moderation. Using European-style butter like Plugrá provides a higher fat content per tablespoon, meaning you can use slightly less while maintaining richness.
For a lighter option, replace ½ cup butter in the frosting with ¼ cup mashed avocado—it adds creaminess without dairy.
Portion Control Perfection
The 6-inch square pan creates 6 perfect individual portions, making this cake ideal for mindful indulgence. Each slice contains about 250-300 calories, with 15-20 grams of sugar—perfect for a dessert treat without overdoing it.
The vanilla bean frosting adds depth without excessive sweetness, allowing you to control portion sizes while still enjoying a decadent dessert. 🍰
Antioxidant-Rich Garnishes
Fresh berries like strawberries or raspberries add vitamin C and fiber while providing natural color and texture contrast. A ½ cup serving of mixed berries boosts the cake’s nutritional profile with antioxidants that combat inflammation.
For an extra boost, sprinkle 1 tbsp chia seeds on top—they add omega-3 fatty acids and fiber without altering the cake’s texture.
Mindful Sweetness
This recipe uses superfine sugar for a smoother texture while keeping the total sugar content at 3.25 cups (including frosting). The vanilla bean enhances sweetness perception, allowing you to reduce sugar slightly if desired—try 3 cups total for a lighter option.
For a diabetic-friendly version, replace ½ cup granulated sugar in the cake with ¼ cup monk fruit sweetener and reduce the frosting sugar to 2.5 cups.
Nutrition facts
Frequently asked questions
Can I bake this cake in a different pan size?
Yes, but you’ll need to adjust the baking time and temperature. For an 8-inch square pan, bake at 325°F for 40-45 minutes—the larger surface area requires lower heat to prevent over-browning. For a 9-inch round pan, use the same temperature but reduce time to 30-35 minutes. Always check doneness with a toothpick, and let the cake cool completely before frosting.
Why does my cake sink in the middle?
This usually happens from overmixing the batter or opening the oven door too soon. Mix just until combined (about 1 minute after dry ingredients are incorporated), and avoid peeking at the cake during the first 20 minutes of baking. If your oven runs hot, tent the pan with foil after 15 minutes to prevent over-browning while ensuring the center cooks through.
How do I make this cake gluten-free?
Replace the 1.5 cups all-purpose flour with a 1:1 gluten-free baking flour blend (like Bob’s Red Mill) plus 1.5 tsp xanthan gum. Add 2 tbsp extra milk to compensate for reduced moisture in GF flours. Chill the batter for 30 minutes before baking to improve texture. Expect a slightly denser crumb, but the vanilla flavor remains intact.
Can I use this recipe for a layered trifle?
Bake the cake as directed, then cool completely and slice into ½-inch thick layers. For a trifle, layer the cake with whipped cream or custard, and top with fresh berries. The 6-inch square pan yields perfect individual portions—just multiply the recipe for larger gatherings. Store assembled trifles in the fridge for up to 4 hours before serving.
What’s the best way to store leftovers?
Wrap individual slices in plastic wrap and store at room temperature for 2 days, or refrigerate for up to 5 days. For longer storage, freeze slices between parchment paper for 3 months. Thaw at room temperature for 1-2 hours before serving. The frosting may soften slightly when reheated, so re-chill briefly before eating.

- Baked Potatoes in Crock Pot Recipe: Buttery Interiors and Crispy Top Magic - November 1, 2026
- Braised Beef Short Ribs Recipe: Crock Pot Fall-Off-Bone Magic in 6 Hours - November 1, 2026
- Crock Pot Cocoa Recipe: Velvety Warmth With Hidden Spice Magic - November 1, 2026