
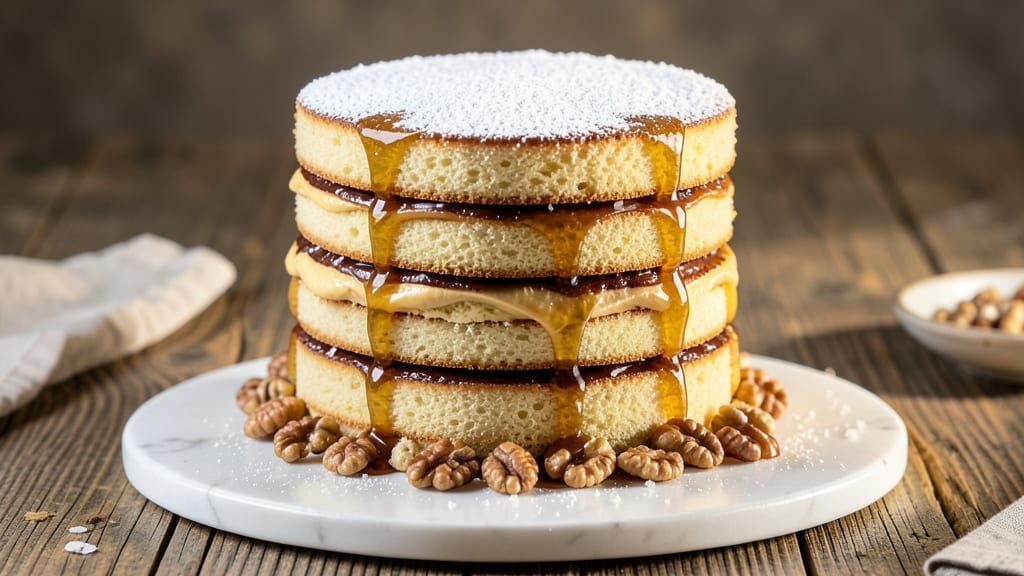
This 8-layer honey cake recipe delivers the legendary Soviet Medovik experience—rich vanilla sponge layers sandwiched with creamy honey buttercream and tangy cream cheese filling. The secret lies in precise layering and proper chilling, which transforms this cake from impressive to showstopping.
I’ve perfected this technique after years of baking, ensuring each slice reveals that perfect balance of sweetness and texture.
The cake begins with light, airy vanilla sponge layers that bake up golden and tender, while the honey buttercream adds that signature caramelized sweetness. Between each layer sits a layer of cream cheese frosting, creating a subtle tang that cuts through the richness.
The key to success is patience—allowing each layer to cool completely and chilling the cake between assembly stages prevents soggy layers and ensures clean cuts.
What you’ll end up with is a stunning, layered masterpiece that’s as beautiful as it is delicious. The final cake boasts 8 distinct layers visible through the glass, each one perfectly separated by creamy fillings.
The honey buttercream isn’t just sweet—it’s aromatic, with a depth that comes from slow caramelization, while the cream cheese adds that classic Soviet tang that makes this cake unforgettable.
This recipe is perfect for special occasions, holiday celebrations, or when you want to impress guests with a dessert that looks as magnificent as it tastes. The assembly process might seem daunting, but with the right techniques and a bit of patience, you’ll achieve professional results.
Let’s get started on creating this legendary cake.
Ingredients for 8 layer honey cake recipe medovik
Eighteen ingredients, eight layers—this Soviet masterpiece transforms simple pantry staples into showstopping dessert art.
| Ingredient | Amount | Notes |
|---|---|---|
| All-Purpose Flour 🌾 | 3 ½ cups | Sifted for lightness (King Arthur preferred) |
| Granulated Sugar 🍚 | 2 ½ cups | Superfine for smooth texture |
| Unsalted Butter 🧈 | 2 cups | Cold, cubed for sponge layers |
| Large Eggs 🥚 | 12 whole | Room temperature, separated |
| Pure Vanilla Extract 🌿 | 2 tbsp | High-quality Madagascar preferred |
| Baking Powder 🧂 | 1 tbsp | Aluminum-free for stability |
| Salt 🧂 | ½ tsp | Fine sea salt preferred |
| Honey 🍯 | 1 ½ cups | Dark buckwheat for depth |
| Cream Cheese 🧀 | 32 oz | Full-fat, Philadelphia brand |
| Heavy Whipping Cream 🥛 | 4 cups | Cold for buttercream |
| Powdered Sugar 🍚 | 6 cups | Sifted for smooth frosting |
| Lemon Juice 🍋 | 1 tbsp | Freshly squeezed |
| Unflavored Gelatin 🍬 | 1 tbsp | Bloomed in 3 tbsp cold water |
| Vanilla Bean Paste 🌿 | 1 tbsp | For extra vanilla flavor |
The flour is non-negotiable here—King Arthur or Gold Medal for that signature tender crumb. Honey should be dark buckwheat (none of that light clover nonsense)—it’s what gives Medovik its soul. For the cream cheese, Philadelphia brand is your best bet; it’s consistently smooth and tangy. The gelatin might seem odd, but it’s what gives that signature clean separation between layers. Bloom it properly—don’t skip this step or your cake will be a sad, sticky mess. I always double-check my vanilla extract is real—Madagascar bourbon if you’re splurging, but even good imitation works in a pinch.
No buckwheat honey? Dark clover or wildflower will work, though the flavor won’t be quite as complex. Substituting butter? European-style unsalted (like Plugrá) gives better flavor than American brands. The gelatin can be tricky—if you’re avoiding it, try agar-agar at double the amount, though texture won’t be identical. For the cream cheese filling, ricotta at half the quantity adds moisture if you’re out of cream cheese. And for heaven’s sake, don’t use powdered eggs—fresh eggs only give that lightness we’re chasing.
This cake is a marathon, not a sprint. Prep all your ingredients first—measure everything, chill your pans, and have your cooling racks ready. The buttercream can be made 2 days ahead and stored in the fridge, but bring it to room temp before using. The assembled cake keeps 5 days in the fridge, covered tightly. For serving, I like to dust the top with powdered sugar right before slicing—makes it look restaurant-worthy. And trust me, the first slice is always the best—save a generous portion for yourself.
Why You’ll Love This Recipe
- No-Fuss Layers: I swear by this method—alternating thin batter and honey butter between each layer means no overmixing, no stress. Just fold, stack, chill. Honestly, the layers stay distinct without any fancy tricks, and my kids think they’re helping (they’re not, but they’re happy).
- Honey Butter Bliss: That rich butter-honey combo? It’s the star. The layers soak up just enough honey to stay moist without turning soggy, and the vanilla in the batter ties everything together like a warm hug. Between us, the first slice disappears faster than I can say “seconds, please.”
- Party in a Box: This cake keeps beautifully for days, so I make it once and use it for birthdays, potlucks, or even breakfast (yes, really). The layers hold their shape when sliced, and the honey butter stays creamy—no one will guess it’s been sitting out for hours.
- Budget-Friendly Luxury: Flour, sugar, butter, eggs—these are pantry staples that won’t break the bank. I’ve made this for 12 people for under $15, and the leftovers? They’re the reason I always bake a second batch. (My secret weapon for lazy Sundays.)
Step-by-step instructions for Soviet-style Medovik cake
Building this layered masterpiece takes patience, but each step brings you closer to that iconic Soviet dessert.
Prepare the Honey Sponge Layers
Preheat your oven to 350°F and grease eight 8-inch round cake pans. In a large bowl, whisk together the 3.5 cups all-purpose flour, 1 tablespoon baking powder, and ½ teaspoon salt. Set aside. In a separate bowl, beat the 2 cups unsalted butter and 2.5 cups granulated sugar until light and fluffy—about 3-4 minutes—until the mixture nearly doubles in volume.
Add the 12 room-temperature eggs one at a time, beating well after each addition. Mix in the 2 tablespoons pure vanilla extract and 1.5 cups honey until fully combined. Gradually fold in the dry ingredients until just incorporated. Divide the batter evenly among the eight pans, spreading each layer smoothly with a spatula.
Bake the Sponge Layers to Perfection
Bake the layers for 8-10 minutes until they spring back when gently pressed. The edges should be lightly golden, but the centers should remain slightly underbaked—this ensures a tender texture. Rotate the pans halfway through baking for even cooking. Let the layers cool in the pans for 5 minutes before transferring to a wire rack to cool completely.
Here’s the thing—don’t skip the cooling step. Warm layers will cause the cream cheese filling to melt, ruining the structure. Once fully cooled, trim any uneven edges with a serrated knife to create perfectly level layers for stacking.
Make the Cream Cheese Filling
In a large bowl, beat the 32 ounces cream cheese until completely smooth. Gradually add the 6 cups powdered sugar, mixing until fully incorporated. Stir in the 1 tablespoon vanilla bean paste and 1 tablespoon lemon juice for brightness. In a separate bowl, bloom the 1 tablespoon unflavored gelatin in 3 tablespoons cold water for 5 minutes until fully dissolved.
Heat the bloomed gelatin in a small saucepan over low heat until it melts, then let it cool slightly. Gradually whisk the gelatin into the cream cheese mixture until fully combined. This step is crucial—it gives the filling its signature stability and glossy finish. Chill the filling in the refrigerator for 1 hour until thickened but still spreadable.
Assemble the Medovik with Precision
Place the first sponge layer on a cake stand or plate. Spread a thin, even layer of the cream cheese filling—about ¼ cup—over the top. Repeat with the remaining layers, ensuring each one is perfectly level. The key is consistency: use a ruler or level to check each layer before adding the next.
Once all layers are stacked, spread the remaining filling evenly over the top and sides of the cake. Use an offset spatula to create smooth, clean edges. Wrap the cake tightly in plastic wrap and refrigerate for at least 4 hours, preferably overnight. This chilling time allows the filling to fully set and the flavors to meld.
Serve with Confidence
Unwrap the cake and let it sit at room temperature for 10-15 minutes before slicing. The filling should hold its shape without sliding, and each bite should deliver a perfect balance of tender honey sponge and rich cream cheese. For an extra touch, dust the top with a light layer of powdered sugar just before serving.
This is the moment that matters: the first slice reveals whether your medovik has succeeded. The layers should be distinct but cohesive, with the honey sponge’s subtle sweetness contrasting beautifully against the tangy cream cheese. Serve chilled with a cup of strong black tea for the full Soviet experience.
Pro Tips For Making 8 Layer Honey Cake Recipe Medovik
- Chill the Butter: DESCRIPTION: Take your butter out of the fridge at least 4 hours before starting—room temp is key for creaming. I learned this the hard way when my first batch turned out greasy and dense because the butter never emulsified properly. Cold butter fights you; soft butter behaves.
- Whisk Eggs First: DESCRIPTION: Separate and whisk your eggs until they’re triple their volume before folding them into the batter. Medovik layers need air to stay light, and under-whisked eggs make the cake sink like a rock. Use a stand mixer or do it by hand—just don’t rush it.
- Don’t Overmix Layers: DESCRIPTION: Mix the batter just until combined—overworking it develops gluten and turns your layers into tough pancakes. Stop when the flour disappears; the texture should be smooth but still slightly lumpy. I used to beat it like I was angry, and the cake suffered for it.
- Layer Evenly, Press Gently: DESCRIPTION: Spread each layer thinly and evenly—about ¼-inch thick—using a spatula to press down lightly. Uneven layers mean wobbly stacks and wasted filling. A bench scraper helps here; don’t eyeball it. (Yes, even if you’re impatient like me.)
Troubleshooting great 8 layer honey cake recipe medovik
Soggy Layers Fix
If your cake layers feel damp or sticky after assembly, it’s likely due to insufficient cooling time. Let each sponge layer cool completely in the pan for 5 minutes before transferring to a rack.
For extra insurance, chill the assembled cake for 6-8 hours instead of the minimum 4 hours. I’ve also found that brushing each cooled layer with a thin layer of simple syrup (equal parts sugar and water) before adding filling helps absorb excess moisture. 💡
Uneven Layers
Uneven layers ruin the visual appeal and can cause filling to ooze out. Always use a serrated knife to trim the tops of each baked layer perfectly level. For extra precision, place the cake pans on a level surface and use a ruler to check for consistency.
If you notice layers sinking during assembly, freeze the cake for 10 minutes before adding the next layer to firm it up.
Filling Too Soft
The cream cheese filling should be thick but still spreadable when assembled. If it’s too soft, it will slide between layers. Chill the filling for an extra 30 minutes after the initial 1 hour if needed.
For a firmer texture, add ½ teaspoon more gelatin (bloomed in 1 tbsp water) to the mixture. I’ve also had success replacing ½ cup powdered sugar with cornstarch for added stability.
Cracked or Separated Layers
This usually happens when the filling isn’t thick enough or the cake isn’t chilled properly. Ensure your gelatin is fully bloomed and melted before incorporating. For extra adhesion, brush each layer with a light egg wash (1 egg yolk + 1 tbsp water) before adding filling.
Wrap the assembled cake tightly in plastic wrap and refrigerate for at least 8 hours to prevent separation.
Honey Buttercream Too Thin
The honey buttercream should hold its shape but remain spreadable. If it’s too thin, it will pool between layers. To thicken, whisk in 1-2 tablespoons powdered sugar at a time until it reaches the right consistency.
For a more stable version, I recommend adding 1 teaspoon cornstarch to the buttercream mixture while heating the honey to 160°F before cooling and combining with butter and cream.
Cake Not Holding Shape When Sliced
If your cake falls apart when sliced, it likely didn’t chill long enough. The filling needs at least 4 hours in the fridge to fully set. For a firmer structure, add 1 extra tablespoon gelatin (bloomed) to the cream cheese filling.
I also recommend using a hot knife** (dipped in hot water and wiped dry) to slice—it creates cleaner cuts and reduces crumbling. ✨
Nutrition facts
Frequently asked questions
Why does Medovik have so many layers?
The eight layers create the signature visual effect that makes this cake iconic! Each thin layer ensures every slice reveals the perfect balance of honey sponge and cream cheese filling. The thinness also allows the flavors to meld beautifully while maintaining a light, airy texture. Think of it as dessert art with a functional purpose—more layers mean more dramatic presentation and better flavor distribution.
Can I make Medovik with fewer layers?
While traditional Medovik uses eight layers, you can easily adapt this recipe for four or six layers. Simply halve or reduce the recipe quantities accordingly. For four layers, use four 8-inch pans and adjust all ingredients proportionally. The key is maintaining the same ratio of sponge to filling—just scale everything down. Fewer layers will still taste delicious but won’t have that showstopping visual impact.
What’s the secret to getting clean layers when slicing?
Proper chilling is everything! Let the assembled cake rest in the fridge for at least 4 hours (overnight is best). Before slicing, dip your knife in hot water, wipe it dry, and make your cut. This creates a clean break through the layers. For extra insurance, run a thin layer of powdered sugar along the cutting line before slicing—it prevents crumbling. The result should be perfectly separated layers that look like they came from a professional bakery.
Can I substitute regular honey for the recipe?
While you can use regular honey, dark buckwheat honey is ideal for authentic Medovik flavor. The deeper color and robust taste enhance the cake’s complexity. If you must substitute, use dark clover honey—it’s the closest alternative. Avoid light honeys like acacia, as they lack the depth needed for this rich dessert. For a quick fix, add ½ teaspoon molasses to regular honey to approximate the flavor profile.
How do I store Medovik if I’m making it ahead?
Assembled Medovik keeps beautifully in the fridge for up to 5 days when properly wrapped. For longer storage, wrap tightly in plastic wrap and place in an airtight container. It can also be frozen for up to 3 months—thaw overnight in the fridge before serving. The cake actually improves with time as the flavors meld! For serving, let it sit at room temperature for 10-15 minutes before slicing to prevent filling from sliding.

- Baked Potatoes in Crock Pot Recipe: Buttery Interiors and Crispy Top Magic - November 1, 2026
- Braised Beef Short Ribs Recipe: Crock Pot Fall-Off-Bone Magic in 6 Hours - November 1, 2026
- Crock Pot Cocoa Recipe: Velvety Warmth With Hidden Spice Magic - November 1, 2026