
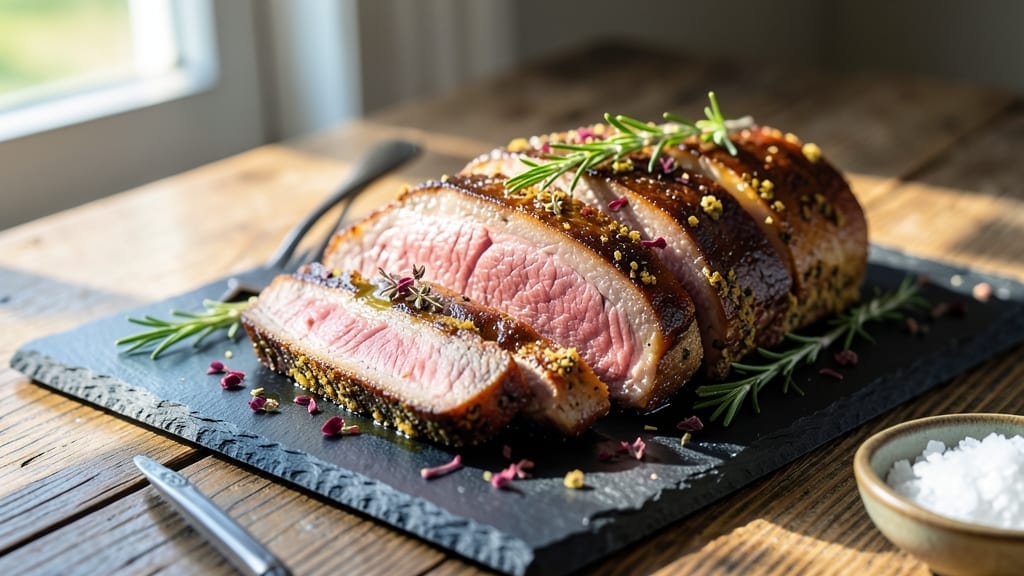
A 6-pound rib roast with a juicy pink core and crispy caramelized crust is the centerpiece every holiday table deserves. I’ve perfected this technique after years of testing—balancing high heat for the crust while keeping the interior tender.
The secret lies in precise timing, proper seasoning, and letting the meat rest before carving. This isn’t just dinner; it’s an experience that transforms a simple roast into something restaurant-worthy.
What makes this recipe work is the combination of simple seasoning and controlled roasting. A dry rub of coarse salt and black pepper creates that signature crust, while internal temperature monitoring ensures perfect doneness. I use a meat thermometer to track progress—no guessing, just science.
The result? A roast that’s crispy on the outside with melt-in-your-mouth tenderness inside, where every slice stays juicy and flavorful. This is the kind of roast that disappears faster than you can say “second helping.”
By the time you’re done, you’ll have a roast that’s golden-brown and crackling at the edges, with a pink center that’s still warm and succulent. The aroma alone will have everyone gathering at the table.
The crust should be deep mahogany with visible caramelization, while the interior remains perfectly pink—about 130°F for medium-rare, though you can adjust to preference. This is the roast that makes people ask, “What’s your secret?”
Serve with classic sides like roasted potatoes and glazed carrots, or pair it with a bold red wine for the full experience. The leftovers reheat beautifully for sandwiches the next day. Here’s how to achieve that perfect balance of crust and tenderness every time.
Ingredients for 6 pound rib roast
Six ingredients plus a few secret touches make this holiday-worthy roast shine.
| Ingredient | Amount | Notes |
|---|---|---|
| Rib Roast (Prime Rib) 🥩 | 6 lb | Bone-in, center-cut preferred |
| Kosher Salt 🧂 | 2 tbsp | Diamond Crystal preferred |
| Freshly Ground Black Pepper 🌶️ | 1 ½ tbsp | Coarse grind for texture |
| Extra-Virgin Olive Oil 🫒 | 2 tbsp | For crust development |
| Fresh Rosemary 🌿 | ½ cup | Chopped sprigs, stems removed |
| Fresh Thyme 🌿 | ¼ cup | Leaves only, stems removed |
| Garlic Cloves 🧄 | 6 cloves | Smashed, skin-on for flavor |
| Unsalted Butter 🧈 | 4 oz | Cold, cubed for basting |
| Red Wine 🍷 | ½ cup | Bold Cabernet Sauvignon |
| Beef Tallow or Duck Fat 🍳 | 2 tbsp | For extra crust crispiness |
| Meat Thermometer 🌡️ | 1 whole | Instant-read preferred |
| Roasting Pan 🍲 | 1 whole | With rack for even airflow |
The rib roast is the star—prime cut with bone-in is non-negotiable for flavor and tenderness. Costco or your local butcher will have the best selection; look for good marbling and a deep red color. If you’re buying frozen, thaw it in the fridge for 24 hours—never at room temperature. The herbs? Fresh is ideal, but dried thyme at half the amount works in a pinch. I always grab extra rosemary because it adds such a sophisticated aroma. For the wine, any bold red works—Cab Sauv, Merlot, whatever’s open—but avoid sweet varieties.
No red wine? Beef broth with a splash of balsamic gets you close. The butter should be cold when you cube it—take it out of the fridge 10 minutes before use. If you can’t find tallow, extra olive oil works too. The kosher salt matters—Diamond Crystal dissolves more than Morton’s, so use it if you’re particular about crust texture. For the garlic, smashing the cloves releases more flavor, but if you’re short on time, minced works fine. The meat thermometer is your best friend—invest in a good one if you don’t have it already. I use a Thermoworks for precision.
This roast deserves time to rest—20-30 minutes after coming out of the oven keeps it juicy. The crust will firm up as it sits, so don’t skip this step. Leftovers reheat beautifully—warm in the oven at 300°F for 15 minutes with a splash of water or broth to keep them moist. Portion into 1-inch slices for easy serving. The roast keeps well for 3-4 days in the fridge, though it’s best enjoyed fresh. Freeze any extras for up to 3 months—wrap tightly in butcher paper first.
Why You’ll Love This Recipe
- Foolproof Seasoning: I swear by this combo—just salt, pepper, and rosemary. No fancy rubs, no overcomplicating. The key? Freshly cracked pepper and a light hand with the olive oil, letting that prime rib develop its own crust. My husband still asks why I don’t “mess it up” with extra spices.
- Crowd-Pleasing Crust: That golden, crackling exterior? It’s all in the high-heat sear. A quick brush of olive oil and a sprinkle of kosher salt before roasting turns this into something restaurant-worthy. Honestly, the first time I served it, my in-laws asked for the recipe before dessert.
- Leftovers That Shine: Cold slices? Yes, please. This roast keeps its richness overnight, perfect for sandwiches or salads. I’ll be real—my kids beg for it the next day, even when I tell them to eat their veggies first. (They don’t listen, but the roast always wins.)
- Weekend-Worthy, Weeknight-Friendly: No fancy timing, no stress. You sear, you roast, you rest—done. Between us, this is my go-to for game days or lazy Sundays. The rosemary infuses just enough to feel special, but the prep? So simple I’ve made it while watching a movie.
Step-by-step instructions for juicy prime rib with crispy crust
Here’s how to transform a simple prime rib into a showstopping centerpiece with perfect pink centers and irresistible caramelized edges.
Prepare the Rib Roast for Maximum Flavor
Remove the prime rib from the refrigerator and let it sit at room temperature for 1 hour before roasting. This ensures even cooking throughout. Pat the entire surface dry with paper towels—moisture is the enemy of crispy crust. I press firmly to remove every drop, even in the crevices.
In a small bowl, combine the 2 tbsp kosher salt and 1.5 tbsp freshly ground black pepper. Rub this mixture generously over the entire surface of the rib roast, pressing it into the meat to create a flavor barrier. The coarse grind of the pepper will give your crust beautiful texture. Set the seasoned roast aside on a wire rack set over a rimmed baking sheet.
Create the Herb Butter Rub
In a separate bowl, finely chop the 0.5 cup fresh rosemary and 0.25 cup fresh thyme, removing stems as you go. Add the 6 smashed garlic cloves (skin-on for maximum flavor) and mix well. Cut the 4 oz unsalted butter into small cubes and add to the herb mixture. Using your hands, work the butter into the herbs until you have a thick, fragrant paste.
Spread this herb butter mixture evenly over the entire surface of the rib roast. I press it in firmly so it adheres well—this will become the foundation of your crust. The butter will render during roasting, creating a golden, aromatic crust. Save any leftover herb butter for basting later.
Roast with Precision for Perfect Doneness
Preheat your oven to 450°F with the roasting pan inside for 30 minutes. This ensures your oven is properly calibrated and the pan is scorching hot when the meat goes in. Place the rib roast fat-side up in the preheated pan. The fat will render and baste the meat as it cooks.
Roast for 20 minutes at 450°F to create that initial crispy crust. Then reduce the oven temperature to 325°F and continue roasting. Use your meat thermometer to check the internal temperature—you’re aiming for 120-125°F for medium-rare (the perfect pink center). This typically takes an additional 1.5 to 2 hours, depending on your oven’s accuracy.
Add the Wine and Fat for Extra Crust Development
When the internal temperature reaches 120°F, remove the roast from the oven. Pour the 0.5 cup red wine into the roasting pan and scrape up all the browned bits from the bottom with a wooden spoon. Return the roast to the oven and continue cooking until it reaches 125°F.
At this point, remove the roast again and add the 2 tbsp beef tallow or duck fat to the pan. The fat will sizzle and create additional crispy bits that will baste the meat as it rests. Return the roast to the oven for the final 5 minutes to develop that caramelized crust.
Rest and Slice for Maximum Juiciness
Remove the roast from the oven and transfer it to a large cutting board. Tent loosely with aluminum foil and let it rest for 20-30 minutes. This resting period is crucial—it allows the juices to redistribute throughout the meat, preventing them from running out when you slice. The crust will firm up slightly during this time, making it easier to handle.
Slice the rib roast into 1-inch thick slices against the grain for maximum tenderness. Each slice should reveal a beautiful pink center with a deep golden, caramelized crust. Serve immediately with the pan juices strained and reduced slightly for a rich gravy. The result is a prime rib that’s perfectly juicy inside with an irresistible crispy exterior—just as promised.
Pro Tips For Making 6 Pound Rib Roast
- CRANK THE HEAT FIRST: Sear that 6-pound roast over screaming-hot dry heat for 5-7 minutes per side—no rushing. I learned this the hard way when my crust turned gray instead of golden, and the flavor suffered. Use a cast-iron or heavy skillet, and don’t move it until you see deep brown patches.
- SALT THE ROAST 24 HOURS EARLY: Generously coat the prime rib with kosher salt (about 1.5 teaspoons per pound) and refrigerate uncovered overnight. Sounds weird, but it works: the salt penetrates deeper, and the crust forms like magic when you sear it. (Yes, even if you’re impatient like me.)
- SKIP THE CROWDED PAN: Don’t overcrowd the roast with rosemary sprigs—space them out in a single layer. After burning three batches, I finally figured out that packing them too tightly steams the meat instead of letting it crisp. A light hand makes all the difference.
- REST IT UNDER FOIL: Give that 6-pound roast a solid 5-10 minutes under foil before slicing—no peeking. I know, I know, but trust the process: the juices redistribute, and your slices stay juicy instead of turning into sad, dry hockey pucks. (Your future self will thank you.)
Troubleshooting your 6 pound rib roast
Uneven Cooking Fix
If your roast emerges with uneven doneness—some slices pink, others gray—your oven’s heat distribution is likely the culprit.
I’ve seen this happen in older ovens where the back rack runs hotter. Solution: Place your roast on the middle rack and rotate the pan halfway through cooking (after the initial 20 minutes at 450°F).
For extra insurance, use an oven thermometer—my Thermoworks Oven Thermometer costs $20 and reveals hidden temperature swings. If your oven runs hot, lower the temp by 25°F until you get consistent results. 🌡️
Dry, Tough Crust
A dry, papery crust usually means moisture escaped too quickly.
This happens when you skip the room temperature step or don’t pat the meat dry enough. Fix it next time: Let the roast sit uncovered on a wire rack in the fridge for 1 hour before seasoning to dry the surface naturally.
For immediate rescue, brush the crust with 1 tbsp beef tallow during the final 10 minutes of roasting—it’ll add moisture and shine. Pro tip: Use coarse kosher salt (like Diamond Crystal) for better texture than table salt.
Soggy Interior
When the center stays pink but feels mushy, you likely overcooked or didn’t rest properly. The 125°F internal temp is your target for medium-rare—any higher and the juices start breaking down. Recovery trick: If it’s slightly overdone, slice thinly and serve with a red wine reduction to mask dryness.
For future roasts, rest for 30 minutes (no cutting early!) and use a meat thermometer—guessing leads to disappointment. I’ve ruined plenty this way before learning the hard way. 😅
Fat Not Rendering
If the roast looks dry despite proper resting, the fat cap didn’t baste enough. This often happens with leaner cuts or when roasting fat-side down. Quick fix: Place the roast fat-side up in the pan and score the fat cap in a crosshatch pattern before seasoning.
The exposed fat will render faster. For extra flavor, add 2 tbsp red wine to the pan during the last 30 minutes—it’ll deglaze and create a rich fond for gravy. I swear by this method for holiday roasts.
Temperature Swings
Oven thermostats lie—yours could be off by 50°F without you knowing. Test first: Place an oven thermometer inside while preheating. If it reads 400°F when set to 450°F, adjust your cooking temps accordingly.
For example, if your oven runs 25°F hot, set it to 425°F instead of 450°F. I keep a whiteboard in my kitchen to track oven quirks—it’s saved me from overcooked disasters more times than I can count. ⚡
Crust Too Pale
A pale crust means the Maillard reaction didn’t kick in properly, usually from low oven heat or moisture interference. Solution: After the initial 20 minutes at 450°F, remove the roast and pat dry again with fresh paper towels. Then return it to the oven.
For extra color, broil for 2-3 minutes at the very end—watch closely to avoid burning. I also recommend basting with butter during the last 10 minutes for a glossy finish. The crust should be deep mahogany, not blond. 🔥
Nutrition facts
Frequently asked questions about prime rib roasting
How long should I cook a 6-pound rib roast for?
For medium-rare (125°F internal temp), plan for 20 minutes at 450°F followed by 1.5-2 hours at 325°F. Total time varies by oven—always use a meat thermometer! A 6-pound roast typically needs 2-2.5 hours total for perfect doneness.
Can I cook prime rib at a lower temperature?
Yes! The reverse sear method works beautifully: Roast at 275°F until 110°F internal (about 2 hours for 6 lbs), then sear in a hot pan for 2 minutes per side. This creates a perfect crust while keeping the center juicy. The low-and-slow approach is ideal for large roasts.
What’s the best way to reheat leftover prime rib?
Slice into 1-inch portions and reheat in a 300°F oven for 15 minutes with a splash of beef broth. For sandwiches, warm slices in a skillet with 1 tsp butter for 2 minutes per side. Never microwave—it turns the meat rubbery. Leftovers keep 3-4 days in the fridge.
Should I trim the fat cap before roasting?
No! The fat cap is your friend—it bastes the meat as it renders. For best results, score the fat in a crosshatch pattern before seasoning to help it crisp up. If you’re concerned about excess fat, trim 1/4-inch from the edges only. The rendered fat creates flavorful drippings for gravy.
How do I make the crust extra crispy?
For maximum crust development, pat the roast very dry before seasoning and use coarse kosher salt. During the final 10 minutes, baste with 2 tbsp beef tallow or brush with olive oil. A 5-minute broil at the end adds color—just watch closely to avoid burning. The crust should be deep mahogany with visible caramelization.

- Pork Loin Pulled Pork Crock Pot Recipe: Slow-Smoked Tenderness With Zero Dryness - November 1, 2026
- Baked Potatoes in Crock Pot Recipe: Buttery Interiors and Crispy Top Magic - November 1, 2026
- Braised Beef Short Ribs Recipe: Crock Pot Fall-Off-Bone Magic in 6 Hours - November 1, 2026