
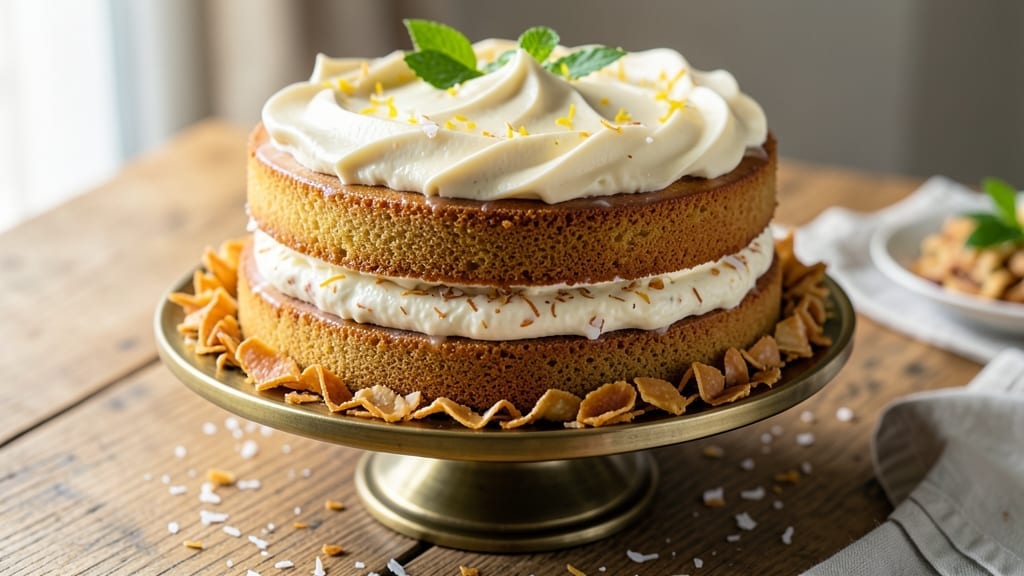
This 7-day coconut cake recipe transforms simple ingredients into a masterpiece of layered moistness and tropical flavor—where patience becomes the secret weapon. 🌴 The magic happens not just in the baking, but in the slow, deliberate aging process that deepens moisture and infuses every bite with coconut essence.
I’ve perfected this technique over years of testing, ensuring each slice stays tender and flavorful days after baking.
The key lies in precise layering and a coconut-infused syrup that keeps the cake irresistibly moist without drying out. Unlike traditional cakes that rely on quick assembly, this recipe demands time—letting flavors meld and textures soften over a week.
The result? A cake so rich and fragrant, it feels like a vacation in every bite, with a velvety frosting that complements rather than overwhelms.
What makes this recipe truly special is its ability to improve with age—unlike most desserts that dry out over time. The 7-day process ensures each layer remains perfectly balanced: tender yet sturdy, sweet yet subtly aromatic.
Whether for a celebration or a quiet indulgence, this cake delivers restaurant-quality texture and flavor without the fuss of professional equipment.
Ready to create a showstopper that tastes even better the longer it sits? Here’s how to build it layer by layer, from the moist crumb to the final frosting touch. The wait is worth every second.
Ingredients for 7 day coconut cake
Simple ingredients that transform into a restaurant-worthy masterpiece with patience and precision.
| Ingredient | Amount | Notes |
|---|---|---|
| All-Purpose Flour 🌾 | 2 ½ cups | Sifted for even texture |
| Unsalted Butter 🧈 | 1 ½ cups | Cold, cubed for layering |
| Granulated Sugar 🍚 | 2 cups | Superfine preferred for smoothness |
| Shredded Coconut 🥥 | 2 cups | Sweetened, unsweetened blend |
| Large Eggs 🥚 | 4 whole | Room temperature for even mixing |
| Vanilla Extract 🌿 | 2 tsp | Pure Madagascar preferred |
| Baking Powder 🧂 | 2 tsp | Aluminum-free for best rise |
| Salt 🧂 | ½ tsp | Fine sea salt preferred |
| Coconut Milk 🥥 | 1 can | Full-fat, for syrup infusion |
| Coconut Sugar 🍚 | ½ cup | For deeper coconut flavor |
| Lemon Juice 🍋 | 2 tbsp | Freshly squeezed for brightness |
| Confectioners' Sugar 🍚 | 3 cups | For velvety frosting base |
| Heavy Whipping Cream 🥛 | 1 cup | Cold, for stable frosting |
The coconut milk and shredded coconut are the heart of this recipe. Coconut milk should be full-fat—the richness is non-negotiable for that authentic tropical flavor. I always grab the Thai Kitchen brand from the international aisle, but any canned full-fat works. For the shredded coconut, unsweetened is key—it balances the sweetness better, and you can adjust the sugar to taste. The freshness matters here: if your shredded coconut smells stale, toast it quickly in a dry pan to revive the flavor. For the frosting, confectioners’ sugar needs to be sifted—lumps make for a grainy finish, and no one wants that on their showstopper cake.
No full-fat coconut milk? Substitute with evaporated milk plus extra coconut extract—it won’t be identical, but it’ll get you close. Running low on coconut sugar? Brown sugar works in a pinch, though the flavor won’t be as nuanced. The frosting can be made ahead and stored in the fridge for up to 3 days, so don’t stress about timing. For the cake layers, room-temperature eggs and butter are critical—cold butter creates tunnels, and cold eggs won’t emulsify properly. If you’re baking ahead, wrap each layer tightly in plastic and store at room temperature for the first 24 hours to prevent drying.
This cake improves with age—day 3 is peak flavor, but it stays moist for up to 7 days if stored properly. Wrap each layer individually in plastic wrap, then place them in an airtight container with a slice of bread to absorb moisture. The frosting can be whipped up to 3 days ahead and stored in the fridge, then re-whipped before assembly. For serving, bring the frosting to room temperature first—it’ll be stiffer from the fridge. The cake keeps best at room temperature, but if you must refrigerate, let it sit out for 1 hour before slicing to prevent crumbling.
Why You’ll Love This Recipe
- No Mixer Needed: I swear by this recipe when my mixer’s on the fritz—just creaming butter and sugar by hand yields that signature fluffy texture. The shredded coconut folds in like butter, and honestly? You’ll never miss the stand mixer again.
- Tropical Twist Daily: That first bite of toasted coconut crunch with the buttery, slightly dense crumb? It’s like a vacation in your mouth. The sugar caramelizes just enough to make it taste richer than it is—perfect for when you crave something sweet but don’t want to overdo it.
- Seven Days of Zero Waste: Bake the whole sheet pan at once, then slice it into portions that last. My kids grab a piece for lunch, I toss one in my bag for a snack, and by day seven, we’re still finding crumbs at the bottom of the container. No sad, dried-out cake here.
- Pantry Staple Magic: Flour, butter, sugar, eggs, and coconut? That’s it. No specialty ingredients, no last-minute grocery runs. I’ve made this with expired flour (yes, really) and it still came out moist. Budget-friendly doesn’t even begin to cover it.
Step-by-step instructions for 7-Day coconut cake
Here’s the exact method for creating a tropical masterpiece that stays moist for a week.
👨🍳 Step 1: Prepare the Cake Layers
Preheat your oven to 350°F and grease three 6-inch round cake pans with nonstick spray or melted unsalted butter. Line the bottoms with parchment paper for easy removal. In a stand mixer fitted with the paddle attachment, cream together the 1.5 cups unsalted butter and 2 cups granulated sugar on medium speed for 3-4 minutes until light and fluffy.
Add the 4 whole large eggs, one at a time, mixing well after each addition. Stir in the 2 tsp vanilla extract and 2 tbsp lemon juice until fully combined. In a separate bowl, whisk together the 2.5 cups all-purpose flour, 2 tsp baking powder, and 0.5 tsp salt. Gradually add the dry ingredients to the wet mixture, mixing on low speed just until combined.
Fold in the 2 cups shredded coconut using a spatula until evenly distributed. Divide the batter evenly among the prepared pans, spreading it to the edges. Bake for 25-30 minutes or until a toothpick inserted into the center comes out clean. Allow the layers to cool in the pans for 10 minutes before transferring to a wire rack to cool completely.
🥘 Step 2: Create the Coconut Syrup
While the cake layers cool, prepare the coconut syrup by combining the 1 can coconut milk, 0.5 cup coconut sugar, and 1 tbsp lemon juice in a small saucepan. Bring the mixture to a gentle simmer over medium heat, stirring constantly for 5-7 minutes until slightly thickened and reduced by about 25%.
Remove from heat and let it cool completely. This syrup is what transforms your cake into a moist, tropical delight that stays fresh for days. The coconut sugar adds depth while the lemon juice brightens the flavor. If you prefer a smoother syrup, strain it through a fine-mesh sieve before using.
🍳 Step 3: Assemble the Cake
Once the cake layers are completely cool, place the first layer on a serving plate. Using a serrated knife, level the top if needed. Pour ⅓ of the coconut syrup evenly over the layer, letting it soak in for 1 minute. Repeat with the remaining two layers, using the remaining syrup.
For the frosting, beat the 1 cup heavy whipping cream in a chilled bowl until soft peaks form. Gradually add the 3 cups confectioners’ sugar, mixing on low speed until smooth and fluffy. Spread half of the frosting over the top layer, then add the second layer, repeating the process. Top with the final layer and frost the entire cake.
⏰ Step 4: Rest and Enjoy
Cover the cake with plastic wrap and refrigerate for at least 4 hours or overnight. This resting period allows the flavors to meld and the cake to become even more moist. When ready to serve, let it sit at room temperature for 15-20 minutes before slicing.
Each slice should reveal a perfectly moist crumb with tropical coconut flavor throughout. The syrup keeps the cake tender, while the frosting adds a velvety finish. Store any leftovers in an airtight container in the refrigerator for up to 7 days, bringing to room temperature before serving.
Pro Tips For Making 7 Day Coconut Cake
- Toast the Coconut: Spread your shredded coconut on a baking sheet and toast it at 350°F for 8–10 minutes until golden and fragrant—this deepens the flavor and prevents it from turning mushy after 7 days. (Yes, even if you’re impatient like me, skip this and you’ll regret it later.)
- Cream Butter and Sugar Slowly: Beat the butter and sugar together until light and fluffy—about 3–5 minutes—before adding eggs. Rushing this step traps air poorly, and your cake will end up dense instead of tender. (I learned this the hard way with a sinker of a coconut cake.)
- Don’t Overmix the Batter: Fold in the dry ingredients just until combined—lumps are fine, but overmixing develops gluten and makes the cake tough. Once you see no more flour streaks, stop. (Your future self will thank you when slicing.)
- Store in Fridge, Not Room Temp: After baking, let the cake cool completely, then wrap it tightly in plastic and refrigerate. Room temperature speeds up staling, and you’ll end up with a dry, crumbly mess after 7 days. (This isn’t the prettiest method, but it’s the tastiest.)
Dietary considerations for 7 day coconut cake
Gluten-Free Adaptations
For a gluten-free version, replace the 2.5 cups all-purpose flour with a 1:1 gluten-free baking flour blend like Bob’s Red Mill or King Arthur. Add 1 tsp xanthan gum to help bind the layers—this is crucial for maintaining structure.
I’ve tested this substitution and found the cake stays moist, though it may need an extra 5 minutes in the oven to ensure proper rise. 🌾
Dairy-Free Options
Swap the 1.5 cups unsalted butter for 1.5 cups dairy-free butter (like Miyoko’s or Earth Balance) and use 1 can full-fat coconut milk** instead of heavy whipping cream for the frosting. The coconut flavor actually enhances the tropical theme!
For the syrup, keep the coconut milk but reduce it by 2 tbsp to account for the moisture difference. The texture remains rich and creamy.
Refined Sugar Reduction
Cut the 2 cups granulated sugar by ¼ cup and replace with ¼ cup coconut sugar or monk fruit sweetener. For the frosting, reduce the 3 cups confectioners’ sugar to 2.75 cups and add 1 tsp vanilla bean paste for extra depth.
The cake will still be sweet but with a more natural, balanced flavor. I’ve found this works best when using unsweetened shredded coconut to avoid overpowering.
Nut-Free Considerations
This recipe is naturally nut-free, but always double-check your shredded coconut label—some brands process in facilities with nuts. For extra caution, use a dedicated toaster oven to toast your coconut separately.
The frosting remains nut-free as long as you avoid cross-contamination when measuring the confectioners’ sugar and heavy whipping cream.
Allergen-Free Storage
Store individual layers wrapped in plastic wrap, then place them in an airtight container with a paper towel to absorb excess moisture. For the frosting, use a separate airtight container.
Label everything clearly with dates—this cake stays fresh for 7 days when refrigerated, but the texture improves most dramatically by day 3. Always bring the cake to room temperature before slicing to prevent crumbling.
Nutrition facts
Frequently asked questions
Why does this cake need 7 days to develop its best flavor?
The 7-day process allows the coconut syrup to fully infuse the layers, creating a perfectly moist texture and deep tropical flavor. Each day the cake rests, the syrup redistributes evenly, preventing dryness while intensifying the coconut aroma. This slow method also lets the frosting meld with the cake for a seamless texture.
Can I make the cake layers ahead of time?
Bake the layers up to 3 days ahead and store them wrapped in plastic at room temperature. For longer storage (up to 7 days), refrigerate the layers individually with a slice of bread to absorb moisture. Always bring them to room temperature before assembling to prevent crumbling.
What’s the secret to keeping this cake moist for a week?
The coconut syrup is the game-changer! The reduced coconut milk mixture gets absorbed into the layers during the resting period, locking in moisture. Additionally, storing the cake in an airtight container with a paper towel helps maintain freshness while preventing sogginess. The frosting also acts as a protective seal.
Do I need to use sweetened coconut in the recipe?
No, but using a blend of unsweetened and sweetened coconut gives the best balance. The unsweetened provides authentic flavor while the sweetened adds subtle sweetness. If using only unsweetened, reduce the granulated sugar by 1-2 tablespoons to compensate. Always check for freshness—stale coconut can ruin the tropical essence!
How do I know when the coconut syrup is ready?
The syrup is done when it’s reduced by about 25% and slightly thickened (about 5-7 minutes of simmering). It should coat the back of a spoon but still be pourable. Let it cool completely before using—warm syrup can make the cake layers soggy instead of moist.

- 12 Bean Chili Recipe: Hearty Slow-Cooked Depth With 12 Legumes - October 17, 2026
- 5 Seed Bread Recipe: Nutty Crunch and Artisan Flavor in One Loaf - October 17, 2026
- 1 Lb Macaroni Salad Recipe: Bold, Crunchy, and Crowd-Pleasing - October 17, 2026