
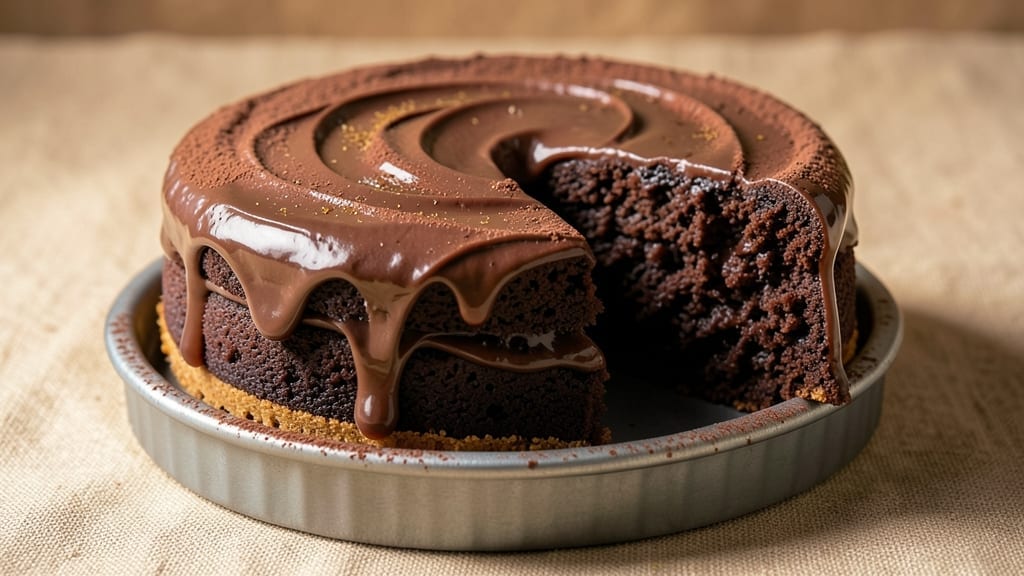
A 7-inch chocolate cake baked in a single bowl delivers restaurant-quality richness without the fuss of layers or multiple pans. This recipe transforms simple ingredients into a moist, fudgy center with a perfectly crisp crust—all in one bowl, no special tools required.
The secret lies in precise mixing and a gentle bake that ensures every bite is decadent yet balanced.
What sets this recipe apart is its foolproof technique for achieving that signature chocolate cake texture without cracking or drying out. You’ll use just 5 ingredients (plus a few pantry staples) and 30 minutes of active time, making it ideal for last-minute cravings or single-serving indulgence.
The cake’s rich cocoa flavor comes through without overpowering, thanks to a carefully measured balance of sugar and fat.
By the time it emerges from the oven, your cake will be golden brown on top with a crackly crust that gives way to tender, moist crumbs inside. The edges stay slightly crisp for contrast, while the center remains soft enough to cut cleanly.
This is the kind of dessert that feels like a treat—without requiring a full baking session.
Serve it warm with a scoop of vanilla ice cream or dusted with powdered sugar for an elegant touch. The single-serving size makes it perfect for satisfying cravings without leftovers, though you might find yourself tempted to bake another. Here’s how to make it perfectly every time.
Ingredients for 7 inch chocolate cake
Five essential ingredients plus pantry staples create this luxurious single-serve chocolate cake.
| Ingredient | Amount | Notes |
|---|---|---|
| Unsalted Butter 🧈 | ½ cup | Cold, cubed for even melting |
| Granulated Sugar 🍚 | ¾ cup | Superfine preferred for smooth texture |
| Unbleached All-Purpose Flour 🌾 | ½ cup | Sifted for lightness |
| Dutch-Processed Cocoa Powder 🍫 | ¼ cup | High-quality for rich flavor |
| Large Egg 🥚 | 1 whole | Room temperature for even mixing |
| Vanilla Extract 🌿 | 1 tbsp | Pure extract preferred |
| Baking Powder 🍞 | ½ tsp | Freshly measured |
| Salt 🧂 | ¼ tsp | Fine sea salt preferred |
| Milk 🥛 | ¼ cup | Whole milk for richness |
| Vegetable Oil 🫒 | ¼ cup | Light, neutral flavor |
| Powdered Sugar 🍚 | ¼ cup | For dusting, optional |
The cocoa powder makes all the difference here—Valrhona or Ghirardelli are ideal, but Hershey’s Special Dark works in a pinch. Buy it in bulk if you bake often, as it loses potency quickly once opened. The butter should be cold and cubed when you measure it; this ensures proper creaming later. For the flour, King Arthur or Bob’s Red Mill brands are reliable for consistent results. The milk and oil combination creates that signature moist texture, so don’t substitute with water or dry ingredients alone.
No vegetable oil? Melted butter at the same quantity works, though the flavor will be richer. Running short on vanilla? Almond extract at half the amount adds depth, but reduce to 0.5 tbsp. The powdered sugar is optional but recommended for that elegant final touch—Domino brand dissolves smoothly. For a lighter cake, you can replace 0.125 cup of the all-purpose flour with cake flour. The baking powder must be fresh; if your container is over a year old, test it by mixing with water—it should fizz vigorously. No baking powder? Whisk 0.5 tsp baking soda with 0.5 tsp cream of tartar as a substitute.
Store the cake in an airtight container at room temperature for up to 3 days—though it’s best enjoyed fresh. For longer storage, wrap tightly in plastic and refrigerate for 1 week. The texture holds up beautifully when reheated briefly in the microwave (10-15 seconds). This recipe makes exactly two servings, but you can easily double it for a 9-inch cake by adjusting baking time. The powdered sugar keeps indefinitely in a cool, dry place—perfect for future dusting needs.
Why You’ll Love This Recipe
- One-Bowl Wonder: I swear by this recipe—just mix, bake, repeat. No fancy tools, no extra bowls, and that rich cocoa powder makes it taste like a bakery secret, not a shortcut.
- Fudgy Yet Light: The butter-to-sugar ratio here is chef’s kiss—moist enough to melt in your mouth but with that satisfying density. Honestly, it’s the kind of cake that disappears before dessert even hits the table.
- Birthday or Boredom: Slice it for a kid’s party or a solo night in—same cake, different vibes. Between us, I’ve served it at 3 AM with ice cream and no one batted an eye.
- Budget-Friendly Luxury: Five ingredients, zero waste. That Dutch-processed cocoa? Deep flavor without the gimmick. Leftovers? They’ll be gone faster than you can reheat them. (Yes, even on a Tuesday night.)
Step-by-step instructions for 7-Inch chocolate cake
This one-bowl method delivers a perfectly moist, rich chocolate cake every time—no fancy equipment required.
Cream Butter and Sugars Together
In a 7-inch springform pan, melt the 0.5 cup unsalted butter in the microwave for 30 seconds (or melt in a saucepan over low heat). Let it cool slightly until just warm to the touch. This prevents scrambling the eggs later.
Add the 0.75 cup granulated sugar and whisk vigorously for 2-3 minutes until the mixture becomes pale and thick. You’re looking for a ribbon-like consistency when the whisk is lifted—the mixture should leave a trail that holds its shape briefly. This step incorporates air, ensuring a light texture.
Incorporate Wet and Dry Ingredients
Add the 1 whole large egg and whisk until fully combined, scraping down the sides to ensure no dry spots remain. Stir in the 1 tbsp vanilla extract and mix until evenly distributed. This creates a smooth batter foundation.
In a separate bowl, sift together the 0.5 cup unbleached all-purpose flour, 0.25 cup Dutch-processed cocoa powder, 0.5 tsp baking powder, and 0.25 tsp salt. Gradually whisk this dry mixture into the wet ingredients in three additions, mixing just until combined after each addition. Overmixing develops gluten, which can make the cake dense.
Add Milk and Oil for Moisture
Pour in the 0.25 cup milk and 0.25 cup vegetable oil, whisking until the batter is completely smooth and glossy. The batter should be thick but pourable—if it’s too thick, add 1 tablespoon milk at a time until it reaches the right consistency. This ensures even distribution of moisture throughout the cake.
Pour the batter into the prepared 7-inch springform pan lined with parchment paper (or lightly greased). Tap the pan gently on the counter to release any air bubbles. Bake at 350°F for 35-40 minutes, or until a toothpick inserted in the center comes out clean. The edges should be set, but the center should still have a slight bounce.
Cool and Dust with Powdered Sugar
Remove the cake from the oven and let it cool in the pan for 10 minutes. Then transfer it to a wire rack to cool completely. This gradual cooling prevents cracking. Once fully cooled, dust the top generously with 0.25 cup powdered sugar for a professional finish.
The cake should have a rich, fudgy texture with a moist crumb. For best results, serve at room temperature—this allows the flavors to fully develop. Store leftovers in an airtight container for up to 3 days, though it’s unlikely to last that long!
Pro Tips For Making 7 Inch Chocolate Cake
- Melt Butter Slowly: The butter’s temperature matters more than you’d think. Melt it in the microwave in 15-second bursts, stirring between each, until it’s just shimmering—not steaming. Cold butter creates lumps in the batter, and you’ll end up with a cake that’s dense instead of light. (Yes, even if you’re impatient like me.)
- Sift the Cocoa Twice: Dutch-processed cocoa is finicky—it clumps like a jealous ex. Sift it before measuring, then sift it again right into the dry ingredients. This keeps your cake from turning out streaky or bitter. I learned this the hard way after a cake looked perfect but tasted like it had sand in it.
- Don’t Overmix the Batter: Stop mixing the moment the flour disappears. Overworking the batter introduces too much air, which collapses in the oven and leaves you with a sad, flat cake. Use a spatula to gently fold in the dry ingredients—just until combined. Your arms will thank you later.
- Chill the Batter 30 Minutes: This isn’t just about rising—it’s about texture. Let the batter sit at room temp for 30 minutes before baking. The eggs and butter will emulsify better, and your cake will have that fudgy, moist crumb instead of cracking or sinking in the middle. (I know, I know—waiting is the hardest part.)
Common mistakes when making your 7 inch chocolate cake
Overmixing the Batter
I’ve seen this happen more times than I can count—especially when people get nervous about whether the flour is fully incorporated. Once you’ve combined the dry ingredients with the wet, stop mixing immediately after they’re just blended.
Overmixing develops gluten in the flour, which creates a tough, dense cake instead of the tender crumb you want. The goal is to distribute the flour evenly, not to create a smooth batter like pancakes. 💫
Skipping the Cooling Step
Rushing to cut into your cake as soon as it comes out of the oven is a classic mistake. Let it cool in the pan for 10 minutes first, then transfer to a wire rack to cool completely.
This gradual cooling prevents cracking and ensures the cake holds its shape. I once cut into a cake right after baking and ended up with a sad, domed mess that fell apart when sliced.
Using Room-Temperature Butter
The butter in this recipe needs to be cold and cubed when you measure it. If it’s too soft, the creaming process won’t incorporate enough air, leading to a dense cake. If your kitchen is warm, chill the butter for 15-20 minutes before measuring.
I learned this the hard way—my first attempt with room-temperature butter resulted in a cake that was more like a dense brownie.
Incorrect Oven Temperature
Baking at the wrong temperature is a surefire way to ruin your cake. The oven should be preheated to 350°F—any hotter, and the outside will burn before the center is done; any cooler, and the cake won’t rise properly.
I recommend using an oven thermometer to double-check, as many home ovens run hot or cold. A properly baked cake should have a golden-brown top with a slight crack, not a pale or overly dark crust.
Not Greasing the Pan Properly
Even with parchment paper, a lightly greased pan ensures the cake doesn’t stick. Use a small amount of butter or oil to coat the bottom and sides of the pan before adding the parchment.
If the cake sticks, it’s a sign you didn’t grease enough. I’ve had cakes tear apart when removing them from the pan because of this—always take the extra 30 seconds to grease properly.
Using Old or Low-Quality Cocoa Powder
The cocoa powder is the soul of this chocolate cake, so don’t skimp. Old or low-quality cocoa can make the cake taste bitter or flat. If your cocoa powder has been sitting in your pantry for over 6 months, it’s time to replace it.
I recommend brands like Valrhona or Ghirardelli for the best flavor, but even Hershey’s Special Dark works in a pinch if stored properly.
Nutrition facts
Frequently asked questions
Can I make this recipe gluten-free?
Yes! Replace the 0.5 cup all-purpose flour with 0.5 cup gluten-free 1:1 baking flour (like Bob’s Red Mill or King Arthur). Add 0.5 tsp xanthan gum to help bind the cake—this ensures the same tender crumb. For best results, whisk the dry ingredients thoroughly to prevent lumps. The texture will be slightly denser but still delicious.
How do I adjust this for a 9-inch cake?
Double all ingredients and bake in a 9-inch round pan for 45-50 minutes at 350°F. The cake may require an additional 10-15 minutes to fully set. For even baking, rotate the pan halfway through. This makes a perfect two-layer cake—just split the batter evenly between two pans or bake one at a time.
Why did my cake crack on top?
Cracking usually happens from rapid cooling or overbaking. Let the cake cool in the pan for 10 minutes before transferring to a rack, and never open the oven door during the last 20 minutes of baking. If the top is cracked but the center is still soft, it’s fine—just let it cool completely. For extra insurance, brush the top with simple syrup after baking.
Can I add mix-ins like nuts or chocolate chips?
Yes, but keep it minimal! Fold in 0.25 cup chopped walnuts or dark chocolate chunks after mixing the wet ingredients. Too many mix-ins can make the cake dense. For a marbled effect, swirl in 1 tbsp white chocolate batter before baking. Just don’t exceed 0.5 cup total of add-ins to maintain the cake’s light texture.
How do I store leftovers?
Wrap the cake tightly in plastic wrap or store in an airtight container at room temperature for up to 3 days. For longer storage, refrigerate for 1 week or freeze for 2 months. To reheat, microwave for 10-15 seconds or warm at 300°F for 5 minutes. The texture holds up well, though it’s best enjoyed fresh!

- 12 Bean Chili Recipe: Hearty Slow-Cooked Depth With 12 Legumes - October 17, 2026
- 5 Seed Bread Recipe: Nutty Crunch and Artisan Flavor in One Loaf - October 17, 2026
- 1 Lb Macaroni Salad Recipe: Bold, Crunchy, and Crowd-Pleasing - October 17, 2026