
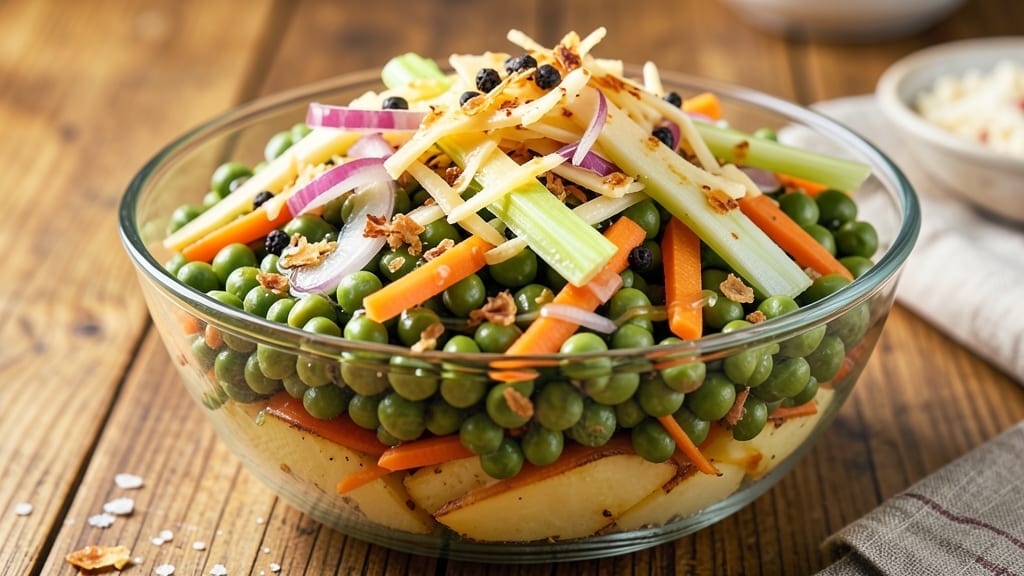
This 7-layer green pea salad recipe transforms simple ingredients into a vibrant, creamy masterpiece that’s perfect for picnics, potlucks, or elegant gatherings. The secret lies in precision layering—each component contributes texture and flavor, from tender peas to crisp vegetables and creamy dressing.
I’ve perfected this technique over years of hosting, ensuring every bite delivers that satisfying mix of crunch and creaminess.
The salad’s beauty comes from its balance: creamy potato salad, crisp carrots and celery, hard-boiled eggs, and sharp cheddar cheese create visual and textural layers. Traditional Eastern European roots inspire this dish, where peas take center stage in spring and summer meals.
The key is assembling carefully—starting with the sturdiest ingredients at the bottom and finishing with delicate garnishes to maintain that restaurant-worthy presentation.
What you’ll achieve is a salad that’s as impressive to look at as it is delicious to eat. The peas stay vibrant, the dressing clings perfectly to each layer, and the flavors meld beautifully when chilled.
This recipe serves 8-10 generously, making it ideal for sharing. The best part? It keeps well in the fridge for up to 3 days, allowing flavors to develop even more.
For presentation, use a deep glass or ceramic dish to showcase the layers. Garnish with fresh dill or parsley just before serving to add a pop of color.
This salad proves that with careful layering and quality ingredients, even the simplest vegetables can become a showstopper. Let’s build this colorful masterpiece together.
Ingredients for 7 layer green pea salad
Precision ingredients create this layered masterpiece—each contributes texture and flavor to the vibrant stack.
| Ingredient | Amount | Notes |
|---|---|---|
| Fresh Green Peas 🌿 | 2 cups | Frozen works if fresh unavailable |
| Large Potatoes 🥔 | 3 medium | Yukon gold preferred, boiled |
| Carrots 🥕 | 2 cups | Julienned or thinly sliced |
| Celery Sticks 🧅 | 3 cups | Thinly sliced, crisp |
| Red Onion 🧅 | 1 medium | Thinly sliced, sharp flavor |
| Sharp Cheddar Cheese 🧀 | 1 ½ cups | Shredded, aged preferred |
| Mayonnaise 🥛 | 1 ½ cups | High-quality preferred |
| Sour Cream 🥛 | ½ cup | Full-fat for creaminess |
| Fresh Dill 🌿 | ¼ cup | Chopped, for garnish |
| Fresh Parsley 🌿 | ¼ cup | Chopped, for garnish |
| Dijon Mustard 🍯 | 1 tbsp | For dressing tang |
| Apple Cider Vinegar 🍎 | 1 tbsp | Balances creaminess |
| Salt 🧂 | 1 ½ tsp | Diamond Crystal preferred |
| Black Pepper 🌶️ | ½ tsp | Freshly ground |
The potatoes are the foundation—Yukon gold holds its shape beautifully when boiled and chilled. Whole Foods or Trader Joe’s carry them year-round, but local farmers markets offer fresher options in summer. For the peas, frozen works perfectly if fresh isn’t available—just thaw and drain thoroughly. The carrots and celery should be crisp; organic varieties from Costco or Walmart’s Great Value line provide excellent quality without breaking the bank. Thinly slicing the vegetables ensures even texture throughout each layer.
No sharp cheddar? Pepper jack or Gruyère add different but equally delicious profiles. The dressing ratio is key—mayonnaise to sour cream 3:1 creates that signature creaminess. For extra tang, lemon juice instead of vinegar works beautifully. Fresh herbs are ideal, but dried dill at one-third the amount suffices in a pinch. The onions should be sharp—red or yellow both work, but avoid sweet varieties like Vidalia. For presentation, glass bowls with ridges from Bed Bath & Beyond make layering effortless.
Assemble the salad in a glass serving dish to showcase the layers. Keeps 3-4 days in the fridge when properly layered, with flavors deepening overnight. For transport, use individual mason jars—pack dressing first, then layer ingredients. Garnish with fresh herbs just before serving to maintain vibrant color. The dressing can be made 2 days ahead for maximum flavor development.
Why You’ll Love This Recipe
- One-Pot Wonder: I swear by this trick—just boil everything together. Potatoes, carrots, celery, and onions all cook in the same water as the peas, so no chopping, no fuss, and zero extra pots to wash. The only real prep is peeling and slicing, and honestly? That’s half the battle won.
- Crunchy-Creamy Magic: Between us, this salad has layers—literally. The crisp-tender potatoes and carrots hold their shape while the peas stay bright, and that red onion? It adds this sharp, fresh bite that cuts through everything. It’s the kind of dish where every bite feels like a little surprise.
- Potluck Hero: I’ve brought this to picnics, BBQs, and even my mom’s holiday table, and it’s never gone untouched. It’s hearty enough to stand alone but light enough to pair with anything—grilled meats, sandwiches, or just straight from the bowl. No one will ask, “What is this?” because it’s that good.
- Budget Meal That Lasts: Fresh peas might seem pricey, but this recipe stretches them far. A single batch feeds four for lunch and dinner, and the leftovers? Even better the next day. Plus, potatoes and carrots are cheap staples—this is my go-to when I need to feed the family without breaking the bank.
Step-by-step instructions for 7 layer green pea salad
Here’s how to assemble this vibrant, layered salad with perfect texture and flavor balance.
Prepare and Cook the Potatoes
Peel the 3 medium large potatoes and cut them into even-sized chunks, about 1-inch pieces. Place them in a pot of cold, salted water and bring to a boil over high heat. Once boiling, reduce to medium-high heat and cook for 10-12 minutes until the potatoes are fork-tender but still hold their shape.
Drain immediately and transfer to a bowl of ice water to stop the cooking process. This shock treatment preserves their texture. Once cooled completely, drain again and pat dry with a clean kitchen towel. The potatoes should be cool to the touch before layering – this prevents sogginess in your salad.
Blanch the Green Peas and Prepare Vegetables
Fill a medium pot with water and bring to a rolling boil. Add the 2 cups fresh green peas and cook for exactly 2 minutes. Immediately drain in a colander and plunge into ice water to halt cooking. This brief blanch preserves their vibrant color and crisp texture. Drain well and set aside.
While the peas cook, prepare the remaining vegetables. Thinly slice the 2 cups carrots and 3 cups celery sticks. Peel and thinly slice the 1 medium red onion. Chop the 0.25 cup fresh dill and 0.25 cup fresh parsley finely. All vegetables should be cut uniformly to ensure even distribution in each layer.
Create the Creamy Dressing Base
In a large mixing bowl, combine the 1.5 cups mayonnaise, 0.5 cup sour cream, 1 tbsp Dijon mustard, 1 tbsp apple cider vinegar, 1.5 tsp salt, and 0.5 tsp black pepper. Whisk until completely smooth and creamy. This dressing forms the foundation of your salad’s rich, velvety texture.
The acidity from the vinegar and mustard balances the richness of the mayonnaise and sour cream, creating a harmonious flavor profile. Taste and adjust seasoning if needed – you want it to be perfectly balanced before adding the other components.
Layer the Salad in the Serving Dish
In a large glass or clear serving dish (at least 8-inch diameter), begin by spreading half of the prepared dressing evenly across the bottom. This creates a stable base for your layers. Add the blanched green peas in an even layer, gently pressing down to create a compact foundation.
Alternate layers of vegetables and dressing, starting with the potatoes, then carrots, celery, and finally red onion. Each layer should be about ½-inch thick. After each vegetable layer, spread a thin layer of dressing to help bind the components. Finish with the shredded sharp cheddar cheese.
Chill and Garnish for Perfect Presentation
Cover the dish and refrigerate for at least 4 hours, preferably overnight. This chilling time allows all the flavors to meld together and the textures to develop properly. The salad should be completely chilled before serving to achieve that signature creamy, layered effect.
Before serving, garnish with the chopped fresh dill and parsley. These herbs add a pop of color and freshness that contrasts beautifully with the rich, creamy layers. Serve chilled in individual portions or as a centerpiece salad for your gathering.
Pro Tips For Making 7 Layer Green Pea Salad
- COOL THE POTATOES FAST: Drain those potatoes straight into an ice bath—no waiting for them to sit in hot water. I learned this the hard way after peeling soggy, mealy potatoes that turned to mush when sliced. Five minutes in ice water keeps them firm and easy to handle.
- SLICE ONIONS THIN AND SOAK: Cut the red onion paper-thin and toss it in cold water for 10 minutes before draining. This softens the bite without making the salad watery, and it stops the sharpness from overpowering the peas. (Yes, even if you’re impatient like me.)
- DON’T OVERMIX THE LAYERS: Build the salad in the bowl like a proper lasagna—no stirring between layers. I used to blend everything together, and the flavors got muddy. Keep the celery sticks whole and the peas in chunks; the texture’s the star.
- USE WARM PEAS, NOT BOILED: Shock the peas in ice water after they’re bright green but still slightly warm—about 2 minutes less than package instructions. Cold peas from the pot will turn the whole salad into a sad, watery mess. (Your future self will thank you.)
Storing and reheating this dish
Refrigerator Storage
Store your 7-layer green pea salad in an airtight container with a tight-fitting lid to maintain freshness and prevent drying. I recommend using glass containers from Pyrex or Cambro—they keep the layers intact and allow you to see the vibrant colors.
Place the container in the fridge at 40°F or below and consume within 3-4 days for optimal texture and flavor. The salad tastes even better the next day as the flavors meld together! 🌿
Freezer-Friendly Tips
This salad isn’t ideal for freezing because the texture of the vegetables and peas can become mushy. However, you can freeze the dressing separately in an ice cube tray for up to 3 months.
Thaw overnight in the fridge, then mix with fresh ingredients when ready to assemble. For the best results, always assemble and serve fresh from the fridge. ❄️
Reheating for Meal Prep
If you’ve prepped individual portions in mason jars, simply remove the lid and let the salad sit at room temperature for 10-15 minutes before serving. For larger servings, transfer to a microwave-safe dish and heat on low power (50%) for 1-2 minutes, stirring halfway.
Avoid high heat—it can make the dressing separate or the vegetables soggy. A quick stovetop warm over low heat with a splash of water works best for even heating. 🔥
Transporting for Picnics
Use insulated lunch bags with ice packs to keep your salad chilled during transport. Pack individual servings in small glass jars (like Le Parfait jars) with the dressing at the bottom—this keeps everything intact and prevents sogginess.
For longer trips, add a cooling element like a frozen water bottle wrapped in a towel. The layers stay crisp and vibrant, just like when you first assembled them! 🧊
Reviving Day-Old Salad
If your salad loses some crispness after a day or two, don’t toss it! Sprinkle a little extra mayonnaise or sour cream on top and mix gently to restore creaminess. For extra crunch, add thinly sliced fresh celery or carrots on top before serving.
A squeeze of lemon juice brightens flavors if the salad tastes flat. Most importantly, always garnish with fresh herbs right before serving to revive that restaurant-fresh look. ✨
Nutrition facts
Frequently asked questions
Can I substitute frozen peas for fresh in this recipe?
Yes, you can use frozen peas—but there’s a trick! Thaw them completely first, then drain thoroughly to remove excess moisture. For extra crispness, blanch the frozen peas for 1 minute in boiling water before adding to your salad. This mimics the texture of fresh peas perfectly.
What’s the best way to keep the layers from getting soggy?
Chill the salad for at least 4 hours before serving—this helps the dressing set properly. Use an airtight container with a tight lid when storing, and avoid cutting portions until ready to serve. For transport, pack individual servings in glass jars with dressing at the bottom to maintain crisp layers.
Can I make this salad ahead of time for a party?
Assemble the salad 1-2 days ahead for maximum flavor development. Store in the fridge in an airtight container and garnish with fresh herbs just before serving. The flavors actually improve overnight as the dressing penetrates each layer. For parties, use a large glass dish to showcase the vibrant layers.
What if I don’t have sharp cheddar cheese?
Try Pepper Jack for a milder, slightly spicy alternative, or Gruyère for a nutty flavor. If you prefer a vegetarian option, vegetarian cheddar works perfectly. Just shred it finely to mimic the texture of sharp cheddar in the layers.
How do I adjust the recipe for a smaller gathering?
Scale down all ingredients proportionally. For 4 servings, use 1 cup peas, 1.5 potatoes, and 1 cup dressing. Keep the same layering technique—just use a smaller 6-inch dish. The key is maintaining the same thickness for each layer to preserve texture.

- Baked Potatoes in Crock Pot Recipe: Buttery Interiors and Crispy Top Magic - November 1, 2026
- Braised Beef Short Ribs Recipe: Crock Pot Fall-Off-Bone Magic in 6 Hours - November 1, 2026
- Crock Pot Cocoa Recipe: Velvety Warmth With Hidden Spice Magic - November 1, 2026